Page 125 of 180

8-29
8
5. Install the oil filler bolt and its gasket, and then
tighten the bolt to the specified torque.
To change the differential gear oil 1. Place the ATV on a level surface.
2. Place an oil pan under the differential gear case to collect the used oil.
3. Remove the differential gear oil filler bolt, the differential gear oil drain bolt and their gasket
to drain the oil from the differential gear case. 4. Install the drain bolt and its new gasket, and
then tighten the bolt to the specified torque.
5. Refill with the recommended differential gear oil to the brim of the filler hole as shown.
NOTICE: Be sure no foreign material en-
ters the differential gear case.
[ECB00412]
Tightening torque: Differential gear oil filler bolt:23 Nm (2.3 m·kgf, 17 ft·lbf)1. Differential gear oil drain bolt
2. Gasket
12
Tightening torque: Differential gear oil drain bolt:9.8 Nm (0.98 m·kgf, 7.1 ft·lbf)1. Differential gear oil filler bolt
2. Gasket
3. Differential gear oil
4. Correct oil level
1
2
3
4
UB1660E0.book Page 29 Thursday, February 26, 2015 4:01 PM
Page 126 of 180
8-30
86. Check the oil filler bolt gasket for damage,
and replace it if necessary.
7. Install the oil filler bolt and its gasket, and then tighten the bolt to the specified torque.
8. Check the differential gear case for oil leak- age. If oil is leaking, check for the cause.
EBU23471CoolantThe coolant level should be checked before each
ride. In addition, the coolant must be changed at
the intervals specified in the periodic maintenance
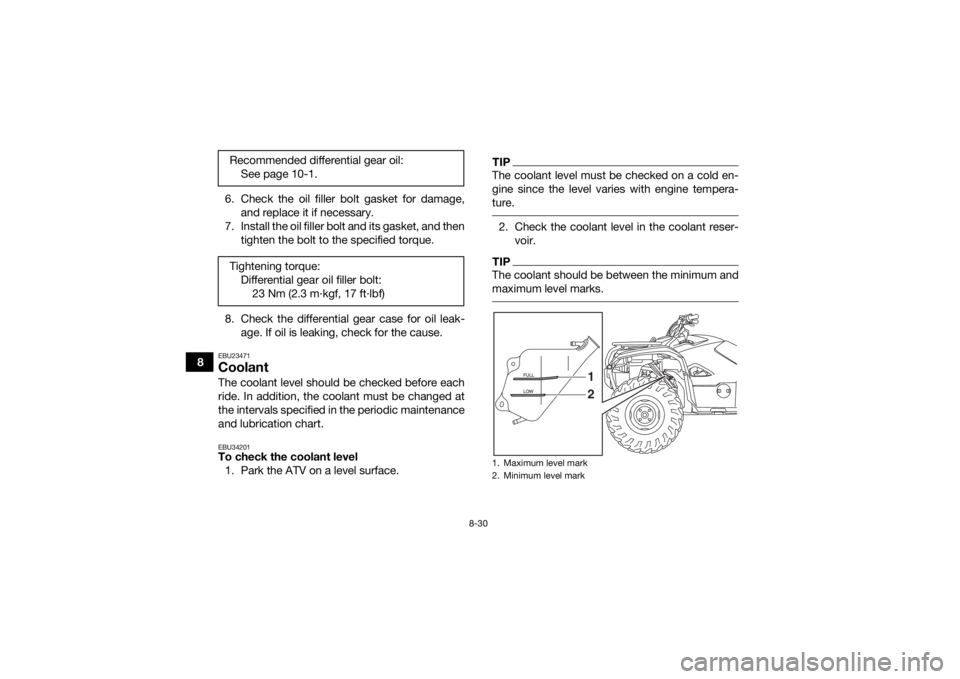
and lubrication chart.EBU34201To check the coolant level1. Park the ATV on a level surface.
TIPThe coolant level must be checked on a cold en-
gine since the level varies with engine tempera-
ture. 2. Check the coolant level in the coolant reser- voir.TIPThe coolant should be between the minimum and
maximum level marks.
Recommended differential gear oil:See page 10-1.
Tightening torque: Differential gear oil filler bolt:23 Nm (2.3 m·kgf, 17 ft·lbf)
1. Maximum level mark
2. Minimum level mark
12
UB1660E0.book Page 30 Thursday, February 26, 2015 4:01 PM
Page 141 of 180

8-45
8
Insufficient brake fluid may allow air to enter
the brake system, reducing braking perfor-
mance.
Clean the filler cap before removing. Use
only DOT 4 brake fluid from a sealed contain-
er.
Use only the specified brake fluid; otherwise,
the rubber seals may deteriorate, causing
leakage.
Refill with the same type of brake fluid. Add-
ing a brake fluid other than DOT 4 may result
in a harmful chemical reaction.
Be careful that water does not enter the
brake fluid reservoir when refilling. Water will
significantly lower the boiling point of the flu-
id and may result in vapor lock.
NOTICEECB01161Brake fluid may damage painted surfaces or
plastic parts. Always clean up spilled fluid im-
mediately. As the brake pads wear, it is normal for the brake
fluid level to gradually go down. A low brake fluid
level may indicate worn brake pads and/or brake
system leakage; therefore, be sure to check the brake pads for wear and the brake system for
leakage. If the brake fluid level goes down sud-
denly, have a Yamaha dealer check the cause be-
fore further riding.
EBU24283Changing the brake fluidHave a Yamaha dealer change the brake fluid at
the intervals specified in the periodic maintenance
and lubrication chart. In addition, have the oil seals
of the brake master cylinder and calipers as well
as the brake hoses replaced at the intervals listed
below or whenever they are damaged or leaking.
Oil seals: Replace every two years.
Brake hoses: Replace every four years.EBU24395Checking the front brake lever free
playThe brake lever free play must be checked at the
intervals specified in the periodic maintenance
and lubrication chart. The brake lever should have
no free play as shown. If there is free play, have a
Yamaha dealer check the brake system.
UB1660E0.book Page 45 Thursday, February 26, 2015 4:01 PM