2016 YAMAHA KODIAK 700 brake light
[x] Cancel search: brake lightPage 69 of 180

6-4
6
TIPWhen in reverse, the reverse indicator light
should come on. If the indicator light does not
come on, have a Yamaha dealer check the elec-
trical circuit.
Due to the synchronizing mechanism in the en-
gine, the indicator light may not come on until
the ATV starts moving.
4. Check behind for people or obstacles, and
then release the brake pedal.
5. Open the throttle lever gradually and continue to watch to the rear while backing.EBU20683Engine break-inTIPFor ATVs equipped with an odometer or an hour
meter, follow the figures given in km (mi) or the
figures given in hours.
For ATVs not equipped with an odometer or
hour meter, follow the figures given in hours. There is never a more important period in the life
of your engine than the first 320 km (200 mi) or 20
hours of riding. For this reason, you should read
the following material carefully.
Since the engine is brand new, do not put an ex-
cessive load on it for the first 320 km (200 mi) or
20 hours. The various parts in the engine wear and
polish themselves to the correct operating clear-
ances. During this period, prolonged full-throttle
operation or any condition that might result in en-
gine overheating must be avoided.
1. Drive select lever
2. L (Low-range)
3. H (High-range)
4. N (Neutral)
5. R (Reverse)
6. P (Park)
1
23456
LHNRP
UB1660E0.book Page 4 Thursday, February 26, 2015 4:01 PM
Page 104 of 180

8-8
8
EBU28392TIPSome maintenance items need more frequent service if you are riding in unusually wet, dusty, sandy or
muddy areas, or at full-throttle.
Hydraulic brake service
• Regularly check and, if necessary, correct the brake fluid level.23 *Moving parts and
cables • Lubricate.
√√√√
24 *Drive select lever
safety system cable • Check operation and adjust or replace if neces-
sary. √√√
25 *Throttle lever • Check operation.
• Check throttle lever free play, and adjust if neces-
sary.
• Lubricate cable and lever housing. √√√√√
26 *Front and rear
brake switches • Check operation and correct if necessary.
√√√√√
27 *Lights and switches • Check operation and correct if necessary.
• Adjust headlight beams.
√√√√√
NO. ITEM
CHECK OR MAINTENANCE
JOB INITIAL EVERY
Whichev-
er comes first month136612
km (mi) 320
(200) 1300
(800) 2500
(1600) 2500
(1600) 5000
(3200)
hours 20 80 160 160 320UB1660E0.book Page 8 Thursday, February 26, 2015 4:01 PM
Page 145 of 180

8-49
8
EBU34270Brake light switchesThe brake light, which is activated by the brake
pedal and brake levers, should come on just be-
fore braking takes effect.
The rear brake light switch can be adjusted as fol-
lows, but the front brake light switch should be ad-
justed by a Yamaha dealer.
Turn the rear brake light switch adjusting nut while
holding the brake light switch in place. To make
the brake light come on earlier, turn the adjusting
nut in direction (a). To make the brake light come
on later, turn the adjusting nut in direction (b).
EBU24905Checking and lubricating the cablesThe operation and the condition of all control ca-
bles should be checked before each ride, and the
cables and cable ends should be lubricated if nec-
essary. If a cable is damaged or does not move
smoothly, have a Yamaha dealer check or replace
it.
1. Rear axle boot (each side)
1
1
1. Rear brake light switch adjusting nut
2. Rear brake light switchRecommended lubricant:
Yamaha cable lubricant or other suitable cable lubricant
1
2 (b)
(a)
UB1660E0.book Page 49 Thursday, February 26, 2015 4:01 PM
Page 159 of 180

8-63
8
To raise a headlight beam, turn the headlight
beam adjusting screw in direction (a).
To lower a headlight beam, turn the adjusting
screw in direction (b).
YFM70KPXG / YFM70KPHG / YFM70KPSG
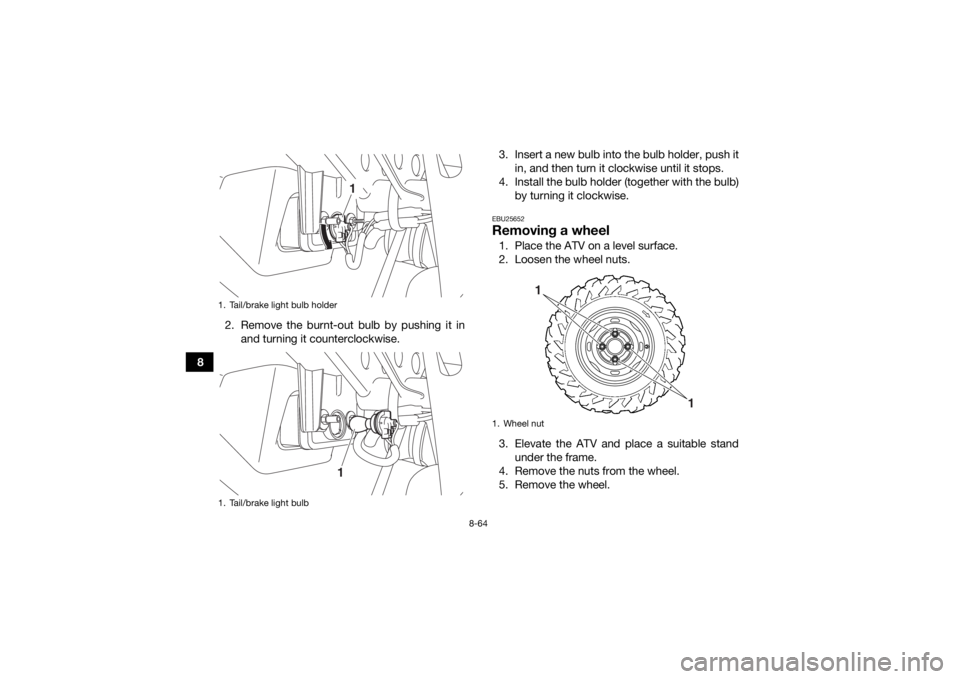
EBU25614Replacing the tail/brake light bulbIf the tail/brake light bulb burns out, replace it as
follows.
1. Remove the tail/brake light bulb holder (to- gether with the bulb) by turning it counter-
clockwise.
1. Headlight beam adjusting screw
(b)
(a)
1
1. Headlight beam adjusting screw
(b)
(a)
1
UB1660E0.book Page 63 Thursday, February 26, 2015 4:01 PM
Page 160 of 180
8-64
82. Remove the burnt-out bulb by pushing it in
and turning it counterclockwise. 3. Insert a new bulb into the bulb holder, push it
in, and then turn it clockwise until it stops.
4. Install the bulb holder (together with the bulb) by turning it clockwise.
EBU25652Removing a wheel1. Place the ATV on a level surface.
2. Loosen the wheel nuts.
3. Elevate the ATV and place a suitable standunder the frame.
4. Remove the nuts from the wheel.
5. Remove the wheel.
1. Tail/brake light bulb holder
1. Tail/brake light bulb
1
1
1. Wheel nut
1
1
UB1660E0.book Page 64 Thursday, February 26, 2015 4:01 PM
Page 171 of 180

10-4
10
Rear wheel:Wheel type:Cast wheel (YFM70KPSG)
Panel wheel (YFM70KDHG, YFM70KDXG,
YFM70KPHG, YFM70KPXG)
Rim size: 12 x 7.5ATFront brake:Type:
Disc brake
Operation: Right hand operation
Specified brake fluid: DOT 4Rear brake:Type:Wet multiple disc brake
Operation: Left hand and right foot operationFront suspension:Type:Double wishbone
Spring/shock absorber type: Coil spring/oil damper
Wheel travel:
193 mm (7.6 in)Rear suspension:Type:Double wishbone
Spring/shock absorber type:
Coil spring/oil damper Wheel travel:
232 mm (9.1 in)
Electrical system:Ignition system:
TCI
Charging system: AC magnetoBattery:Model:
YTX20L-BS
Voltage, capacity: 12 V, 18.0 AhHeadlight:Bulb type:
Krypton bulb
High-mounted headlight bulb type: Halogen bulb (YFM70KPHG, YFM70KPSG,
YFM70KPXG)Bulb voltage, wattage × quantity:Headlight:
12 V, 30.0/30.0 W × 2
High-mounted headlight:
12 V, 35.0/36.5 W × 1 (YFM70KPHG, YFM70KPSG,
YFM70KPXG)
Tail/brake light:
12 V, 5.0/21.0 W × 1
Meter lighting: EL (Electroluminescent) (YFM70KPHG, YFM70KPSG,
YFM70KPXG)
Neutral indicator light: LED
UB1660E0.book Page 4 Thursday, February 26, 2015 4:01 PM
Page 176 of 180

12-1
12
INDEX
AAccessories and loading ................................................ 6-6
Accessories, auxiliary jack ........................................... 4-25
Air filter element, cleaning ............................................ 8-37
Axle boots .................................................................... 8-48BBattery .......................................................................... 8-54
Brake fluid, changing ...................................................8-45
Brake fluid level, checking ........................................... 8-44
Brake lever free play, checking the front ..................... 8-45
Brake lever, front .......................................................... 4-17
Brake levers, checking and lubricating ........................ 8-50
Brake light switches ..................................................... 8-49
Brake pads and friction plates, checking ..................... 8-43
Brake pedal and rear brake lever ................................. 4-17
Brake pedal, checking and lubricating ........................ 8-51
Brakes .......................................................................... 8-43
Brakes, front and rear .................................................... 5-3CCables, checking and lubricating ................................. 8-49
Carrier, front ................................................................. 4-23
Carrier, rear .................................................................. 4-23
Chassis fasteners ........................................................... 5-7
Cleaning ......................................................................... 9-1
Coolant ................................................................. 5-3, 8-30
Coolant temperature warning light ................................. 4-3DDifferential gear lock indicator (YFM70KPSG) ............... 4-5
Differential gear oil ............................................... 5-3, 8-28Drive lever (YFM70KDXG / YFM70KDHG /
YFM70KPXG / YFM70KPHG) .................................... 4-15
Drive select lever .......................................................... 4-18
Drive select lever and driving in reverse ........................ 6-2
Drive select lever safety system cable, adjusting ........ 8-43
EEngine break-in .............................................................. 6-4
Engine oil ....................................................................... 5-3
Engine oil and oil filter cartridge .................................. 8-21
Engine stop switch ......................................................... 4-9
Engine trouble warning light .......................................... 4-4
EPS warning light (for EPS model) ................................. 4-4FFinal gear oil ......................................................... 5-3, 8-25
Four-wheel-drive indicator light (YFM70KDXG / YFM70KDHG) .............................................................. 4-5
Four-wheel-drive indicator (YFM70KPXG / YFM70KPHG / YFM70KPSG) ...................................... 4-5
Fuel ...................................................................... 4-19, 5-3
Fuel level warning light (YFM70KDXG / YFM70KDHG) .............................................................. 4-4
Fuel tank cap ............................................................... 4-18
Fuses, replacing ........................................................... 8-57HHandlebar switches ....................................................... 4-9
Headlight beam, adjusting ........................................... 8-62
Headlight bulb, replacing ............................................. 8-59
High-range indicator light (YFM70KPXG / YFM70KPHG / YFM70KPSG) ...................................... 4-3
UB1660E0.book Page 1 Thursday, February 26, 2015 4:01 PM
Page 177 of 180

12-2
12
Horn switch .................................................................. 4-10IIdentification numbers ................................................. 11-1
Indicator lights and warning lights ................................. 4-2
Instruments, lights and switches ................................... 5-7LLabel locations ............................................................... 1-1
Light switch .................................................................. 4-10
Low-range indicator light (YFM70KPXG / YFM70KPHG / YFM70KPSG) ...................................... 4-3MMain switch .................................................................... 4-1
Maintenance and lubrication chart ................................ 8-5
Maintenance chart, emission control system ................ 8-3
Model label .................................................................. 11-1
Multi-function display (YFM70KPXG / YFM70KPHG / YFM70KPSG) .............................................................. 4-6NNeutral indicator light ..................................................... 4-3OOn-Command differential gear lock switch
(YFM70KPSG) ........................................................... 4-12
On-Command four-wheel-drive switch (YFM70KPSG) ........................................................... 4-11
Override switch (YFM70KPSG) .................................... 4-10
Owner’s manual and tool kit .......................................... 8-2PPanels, removing and installing ................................... 8-10
Park indicator light ......................................................... 4-3
Parking ........................................................................... 6-5
Parking on a slope ......................................................... 6-5 Part locations ................................................................. 3-1
RRear brake, adjusting the lever, pedal free play .......... 8-46
Rear knuckle pivots, lubricating .................................. 8-52
Reverse indicator light ................................................... 4-3
Riding your ATV ............................................................. 7-1SSafety information .......................................................... 2-1
Seat .............................................................................. 4-20
Shock absorber assemblies, adjusting the front and
rear (YFM70KPXG / YFM70KPHG / YFM70KPSG) ... 4-23
Spark arrester, cleaning ............................................... 8-40
Spark plug, checking ................................................... 8-18
Specifications .............................................................. 10-1
Speed limiter ................................................................ 4-16
Stabilizer bushes, checking .......... ............................... 8-52
Starting the engine ........................................................ 6-1
Start switch .................................................................. 4-10
Steering shaft, lubricating ............................................ 8-53
Storage .......................................................................... 9-2
Storage compartment .................................................. 4-21TTail/brake light bulb, replacing .................................... 8-63
Throttle lever ......................................................... 4-16, 5-4
Throttle lever free play, adjusting ................................ 8-42
Tires ............................................................................... 5-4
Trailer hitch (YFM70KPXG / YFM70KPHG / YFM70KPSG) ............................................................ 4-24
Troubleshooting ........................................................... 8-66
Troubleshooting charts ................................................ 8-67
UB1660E0.book Page 2 Thursday, February 26, 2015 4:01 PM