Page 32 of 146

4-5
4
EBU18065Handlebar switchesEBU18081Engine stop switch “ / ”
Set this switch to “ ” before starting the engine.
The engine stop switch controls the ignition and
stops the engine when it is running. Use this
switch to stop the engine in an emergency situa-
tion. The engine will not start or run when this
switch is set to “ ”.
EBU18102Start switch “ ”
Push this switch to crank the engine with the start-
er. See the starting instructions on page 6-1 prior
to starting the engine.EBU18164Light switch “ / /OFF”
Set this switch to “ ” to turn on the low beams,
the taillight and the meter lighting. Set the switch
to “ ” to turn on the high beams, the taillight
and the meter lighting. Set the switch to “OFF” to
turn off all the lights.NOTICEECB00044Do not use the headlights with the engine
turned off for an extended period of time, oth-
erwise the battery may discharge to the point
that the starter motor will not operate properly.
If this should happen, remove the battery and
recharge it. (See page 8-39.) EBU18171Horn switch “ ”
Press the switch to sound the horn.
1. Light switch “ / /OFF”
2. Engine stop switch “ / ”
3. Start switch “ ”
4. Horn switch “ ”U1NS64E0.book Page 5 Thursday, June 25, 2015 8:36 AM
Page 38 of 146
4-11
4
EBU18757FuelMake sure there is sufficient gasoline in the tank.
WARNING
EWB02522Gasoline and gasoline vapors are extremely
flammable. To avoid fires and explosions and
to reduce the risk of injury when refueling, fol-
low these instructions. 1. Before refueling, turn off the engine and besure that no one is sitting on the vehicle. Nev-
er refuel while smoking, or while in the vicinity of sparks, open flames, or other sources of
ignition such as the pilot lights of water heat-
ers and clothes dryers.
2. Do not overfill the fuel tank. When refueling, be sure to insert the pump nozzle into the fuel
tank filler hole. Stop filling when the fuel
reaches the bottom of the filler tube. Because
fuel expands when it heats up, heat from the
engine or the sun can cause fuel to spill out of
the fuel tank.1. Fuel tank cap
1. Maximum fuel level
2. Fuel tank filler tube
U1NS64E0.book Page 11 Thursday, June 25, 2015 8:36 AM
Page 122 of 146

8-39
8
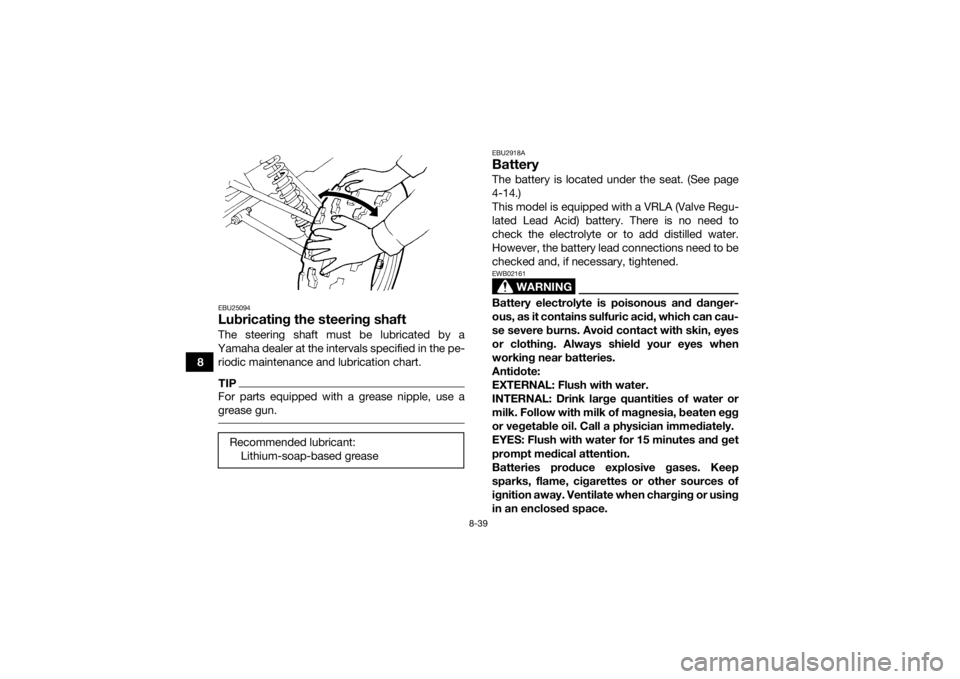
EBU25094Lubricating the steering shaftThe steering shaft must be lubricated by a
Yamaha dealer at the intervals specified in the pe- riodic maintenance and lubrication chart.TIPFor parts equipped with a grease nipple, use a
grease gun.
EBU2918ABatteryThe battery is located under the seat. (See page
4-14.)
This model is equipped with a VRLA (Valve Regu-
lated Lead Acid) battery. There is no need to
check the electrolyte or to add distilled water.
However, the battery lead connections need to be
checked and, if necessary, tightened.
WARNING
EWB02161Battery electrolyte is poisonous and danger-
ous, as it contains sulfuric acid, which can cau-
se severe burns. Avoid contact with skin, eyes
or clothing. Always shield your eyes when
working near batteries.
Antidote:
EXTERNAL: Flush with water.
INTERNAL: Drink large quantities of water or
milk. Follow with milk of magnesia, beaten egg
or vegetable oil. Call a physician immediately.
EYES: Flush with water for 15 minutes and get
prompt medical attention.
Batteries produce explosive gases. Keep
sparks, flame, cigarettes or other sources of
ignition away. Ventilate when charging or using
in an enclosed space.
Recommended lubricant:
Lithium-soap-based grease
U1NS64E0.book Page 39 Thursday, June 25, 2015 8:36 AM
Page 125 of 146
8-42
8
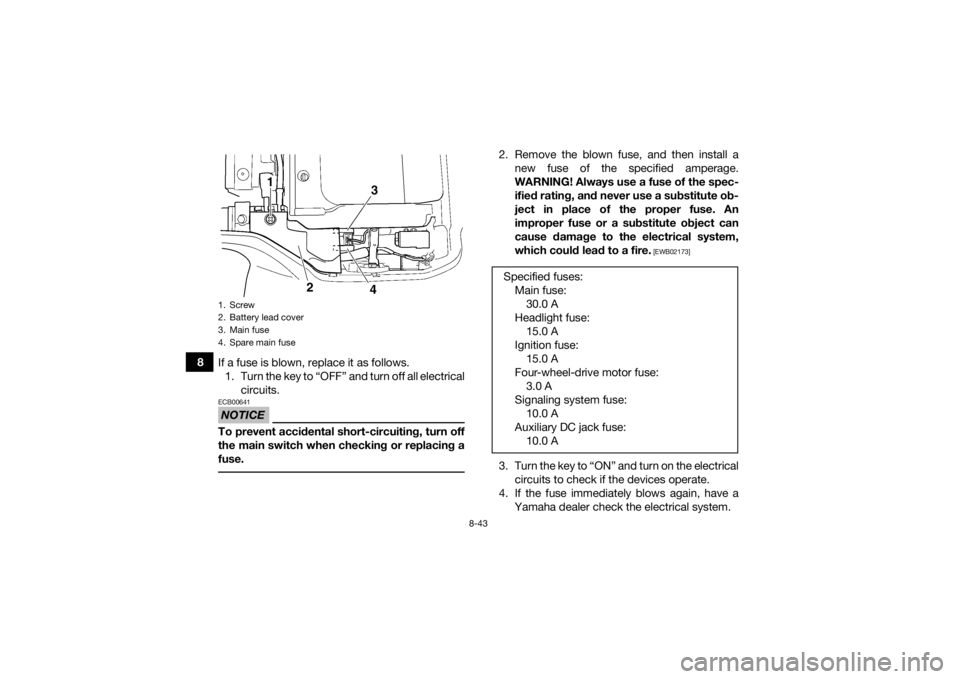
EBU30671Replacing a fuseThe main fuse and the fuse box are located under
the seat. (See page 4-14.)
TIPTo access the main fuse, remove the battery lead
cover by removing the screw.
1. Main fuse
2. Spare main fuse
3. Fuse box
1. Headlight fuse
2. Ignition fuse
3. Auxiliary DC jack fuse (for optional auxiliary DC jack)
4. Four-wheel-drive motor fuse
5. Signaling system fuse
6. Spare fuse
U1NS64E0.book Page 42 Thursday, June 25, 2015 8:36 AM
Page 126 of 146

8-43
8If a fuse is blown, replace it as follows.
1. Turn the key to “OFF” and turn off all electrical circuits.
NOTICEECB00641To prevent accidental short-circuiting, turn off
the main switch when checking or replacing a
fuse.
2. Remove the blown fuse, and then install anew fuse of the specified amperage.
WARNING! Always use a fuse of the spec-
ified rating, and never use a substitute ob-
ject in place of the proper fuse. An
improper fuse or a substitute object can
cause damage to the electrical system,
which could lead to a fire.
[EWB02173]
3. Turn the key to “ON” and turn on the electricalcircuits to check if the devices operate.
4. If the fuse immediately blows again, have a Yamaha dealer check the electrical system.
1. Screw
2. Battery lead cover
3. Main fuse
4. Spare main fuse
43
2
1
Specified fuses:Main fuse:30.0 A
Headlight fuse: 15.0 A
Ignition fuse: 15.0 A
Four-wheel-drive motor fuse: 3.0 A
Signaling system fuse: 10.0 A
Auxiliary DC jack fuse: 10.0 A
U1NS64E0.book Page 43 Thursday, June 25, 2015 8:36 AM
Page 131 of 146

8-48
8
EBU25721TroubleshootingAlthough Yamaha ATVs receive a thorough in-
spection before shipment from the factory, trouble
may occur during operation. Any problem in the
fuel, compression, or ignition systems, for exam-
ple, can cause poor starting and loss of power.
The following troubleshooting chart represents a
quick and easy procedure for checking these vital
systems yourself. However, should your ATV re-
quire any repair, take it to a Yamaha dealer, whose
skilled technicians have the necessary tools, ex-
perience, and know-how to service the ATV prop-
erly.
Use only genuine Yamaha replacement parts. Im-
itation parts may look like Yamaha parts, but they
are often inferior, have a shorter service life and
can lead to expensive repair bills.
WARNING
EWB02281Do not smoke when checking the fuel system.
Fuel can ignite or explode, causing severe inju-
ry or property damage. Make sure there are no
open flames or sparks in the area, including pi-
lot lights from water heaters or furnaces. U1NS64E0.book Page 48 Thursday, June 25, 2015 8:36 AM
Page 132 of 146

8-49
8
EBU25754Troubleshooting chart
Check the fuel level in
the fuel tank.1. Fuel
There is enough fuel.There is no fuel.
Check the battery.
Supply fuel.
The engine does not start.
Check the battery.
The engine does not start.
Check the ignition.
Operate the electric starter.4. Compression
There is compression.
There is no compression.
The engine does not start. Have a Yamaha dealer check the ATV.Have a Yamaha dealer check the ATV.
Remove the spark plug
and check the electrodes.3. Ignition
Wipe off with a dry cloth and correct the
spark plug gap, or replace the spark plug. Have a Yamaha dealer check the ATV.
The engine does not start.
Check the compression.
Operate the electric starter.2. Battery
The engine turns over
quickly.
The engine turns over
slowly.
The battery is good.Check the battery lead connections,
and have a Yamaha dealer charge
the battery if necessary.
DryWet
Open the throttle halfway and operate
the electric starter.
U1NS64E0.book Page 49 Thursday, June 25, 2015 8:36 AM
Page 139 of 146

10-4
10
Specified brake fluid:DOT 4Rear brake:Type:
Drum brake
Operation: Left hand and right foot operationFront suspension:Type:
Double wishbone
Spring/shock absorber type: Coil spring/oil damper
Wheel travel: 160 mm (6.3 in)Rear suspension:Type:Swingarm
Spring/shock absorber type: Coil spring/oil damper
Wheel travel:
180 mm (7.1 in)Electrical system:Ignition system:DC CDI
Charging system:
AC magnetoBattery:Model:YTX14AH
Voltage, capacity:
12 V, 12.0 Ah
Headlight:Bulb type:Krypton bulbBulb voltage, wattage × quantity:Headlight:
12 V, 30.0/30.0 W × 2
Tail/brake light: 12 V, 5.0/21.0 W × 1
Meter lighting:
14 V, 3.0 W × 1
Neutral indicator light: 12 V, 1.7 W × 1
Reverse indicator light: 12 V, 1.7 W × 1
Oil temperature warning light:
12 V, 1.7 W × 1
On-command four-wheel-drive indicator light: 12 V, 1.7 W × 1Fuses:Main fuse:
30.0 A
Headlight fuse: 15.0 A
Signaling system fuse: 10.0 A
Ignition fuse:
15.0 A
Auxiliary DC jack fuse: 10.0 A
Four-wheel-drive motor fuse: 3.0 A
U1NS64E0.book Page 4 Thursday, June 25, 2015 8:36 AM