2016 YAMAHA FJR1300A engine
[x] Cancel search: enginePage 81 of 120

Periodic maintenance an d a djustment
6-13
6
8. Install the engine oil drain bolt and
its new gasket, and then tighten
the bolt to the specified torque.
9. Refill with the specified amount of the recommended engine oil, and
then install and tighten the oil filler
cap.
TIP
Be sure to wipe off spilled oil on any
parts after the engine and exhaust sys-
tem have cooled down.
NOTICE
ECA11621
In or der to prevent clutch slip-
pa ge (since the en gine oil also
lu bricates the clutch), do not
mix any chemical additives. Do
not use oils with a diesel speci-
fication of “CD” or oils of a hi gh-
er quality than specified . In
a dd ition, do not use oils la bele d
“ENERGY CONSERVING II” or
hi gher.
Make sure that no forei gn mate-
rial enters the crankcase.
10. Start the engine, and then let it idle for several minutes while checking
it for oil leakage. If oil is leaking,
immediately turn the engine off
and check for the cause.
TIP
After the engine is started, the engine
oil level warning light should go off if
the oil level is sufficient.
NOTICE
ECA10402
If the oil level warnin g li ght flickers
or remains on even if the oil level is
correct, imme diately turn the en gine
off an d have a Yamaha d ealer check
the vehicle.
11. Turn the engine off, and then check the oil level and correct it if
necessary.
1. Torque wrench
Tightening torque:
Oil filter cartridge: 17 Nm (1.7 m·kgf, 12 ft·lbf)
Ti ghtening torque:
Engine oil drain bolt:
43 Nm (4.3 m·kgf, 31 ft·lbf)
Recommen ded en gine oil:
See page 8-1.
Oil quantity: Oil change:
3.80 L (4.02 US qt, 3.34 Imp.qt)
With oil filter removal: 4.00 L (4.23 US qt, 3.52 Imp.qt)
1
UB88E0E0.book Page 13 Friday, October 16, 2015 11:59 AM
Page 83 of 120

Periodic maintenance an d a djustment
6-15
6
4. Install the final gear oil drain bolt
and its new gasket, and then tight-
en the bolt to the specified torque.
5. Refill with the recommended final gear oil to the brim of the filler
hole.
6. Check the oil filler bolt gasket for damage, and replace it if neces-
sary.
7. Install the oil filler bolt and its gas- ket, and then tighten the bolt to
the specified torque.
8. Check the final gear case for oil leakage. If oil is leaking, check for
the cause.
EAU20071
Coolant
The coolant level should be checked
before each ride. In addition, the cool-
ant must be changed at the intervals
specified in the periodic maintenance
and lubrication chart.
EAU54163To check the coolant level1. Place the vehicle on the center- stand.
TIP
The coolant level must be
checked on a cold engine since
the level varies with engine tem-
perature.
Make sure that the vehicle is posi-
tioned straight up when checking
the coolant level. A slight tilt to the
side can result in a false reading.
2. Remove the left cowling vent pan-
el. (See page 3-38.)
3. Check the coolant level in the coolant reservoir.
TIP
The coolant should be between the
minimum and maximum level marks.
1. Final gear oil filler bolt
2. Gasket
3. Final gear oil drain bolt
Tightening torque:
Final gear oil drain bolt:
23 Nm (2.3 m·kgf, 17 ft·lbf)
Recommen ded final gear oil:
Yamaha genuine shaft drive gear oil
SAE 80W-90 API GL-5
Oil quantity:
0.20 L (0.21 US qt, 0.18 Imp.qt)
Ti ghtening torque:
Final gear oil filler bolt: 23 Nm (2.3 m·kgf, 17 ft·lbf)
1
2
32
1. Coolant reservoir
2. Maximum level mark
3. Minimum level mark
2
1 3
UB88E0E0.book Page 15 Friday, October 16, 2015 11:59 AM
Page 86 of 120

Periodic maintenance an d a djustment
6-18
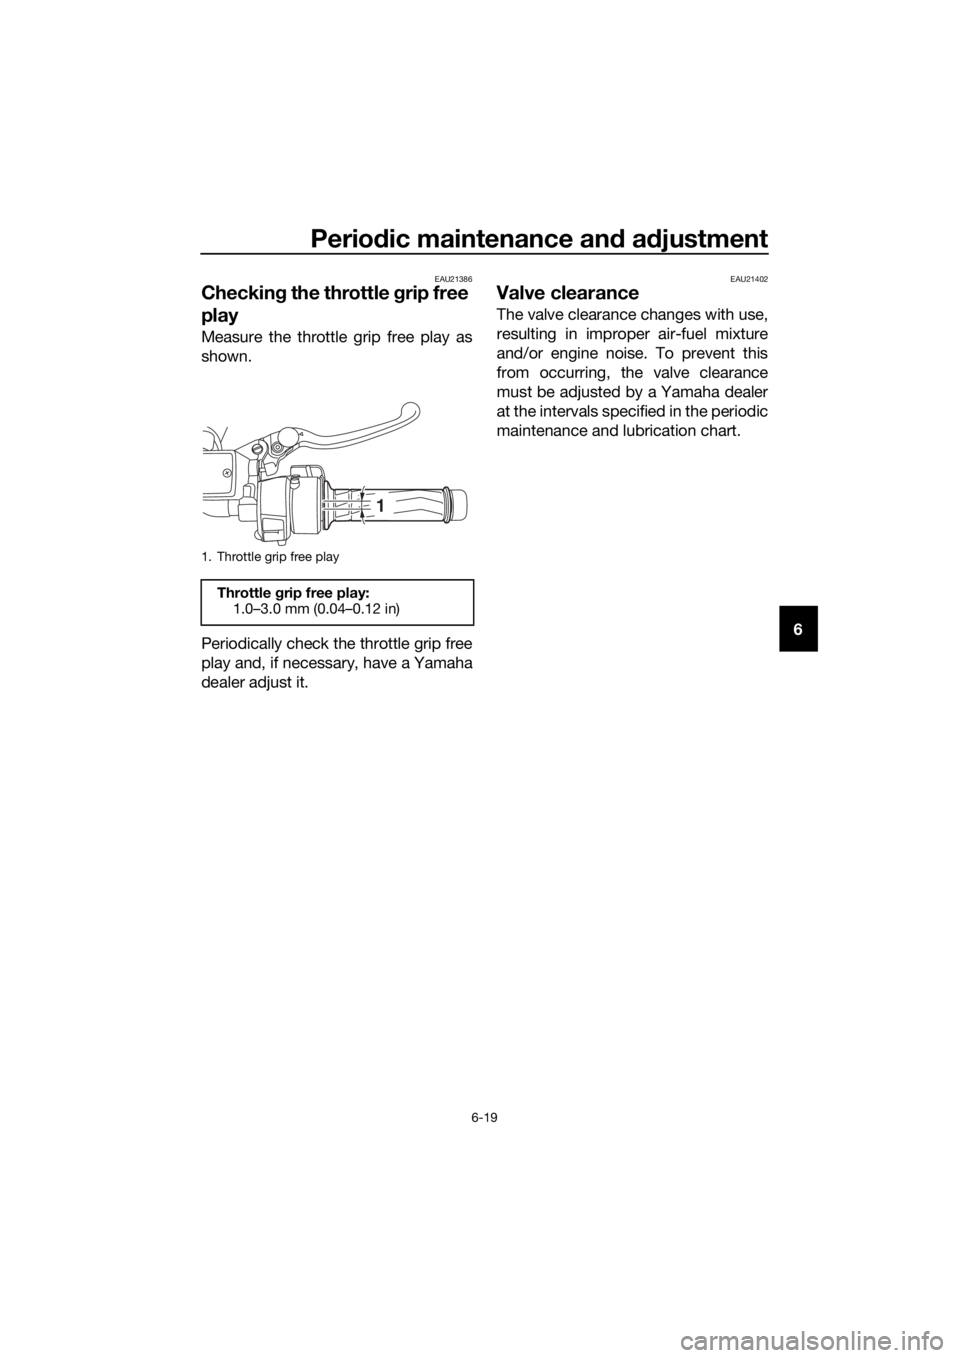
6 8. Install the intake air shroud by in-
stalling the screw and the quick
fastener screws.
9. Install the panel.
EAU44735
Checkin g the eng ine idlin g
spee d
Check the engine idling speed and, if
necessary, have it corrected by a
Yamaha dealer.
1. Fuel tank overflow hose
1
En gine i dlin g spee d:
1000–1100 r/min
UB88E0E0.book Page 18 Friday, October 16, 2015 11:59 AM
Page 87 of 120

Periodic maintenance an d a djustment
6-19
6
EAU21386
Checkin g the throttle grip free
play
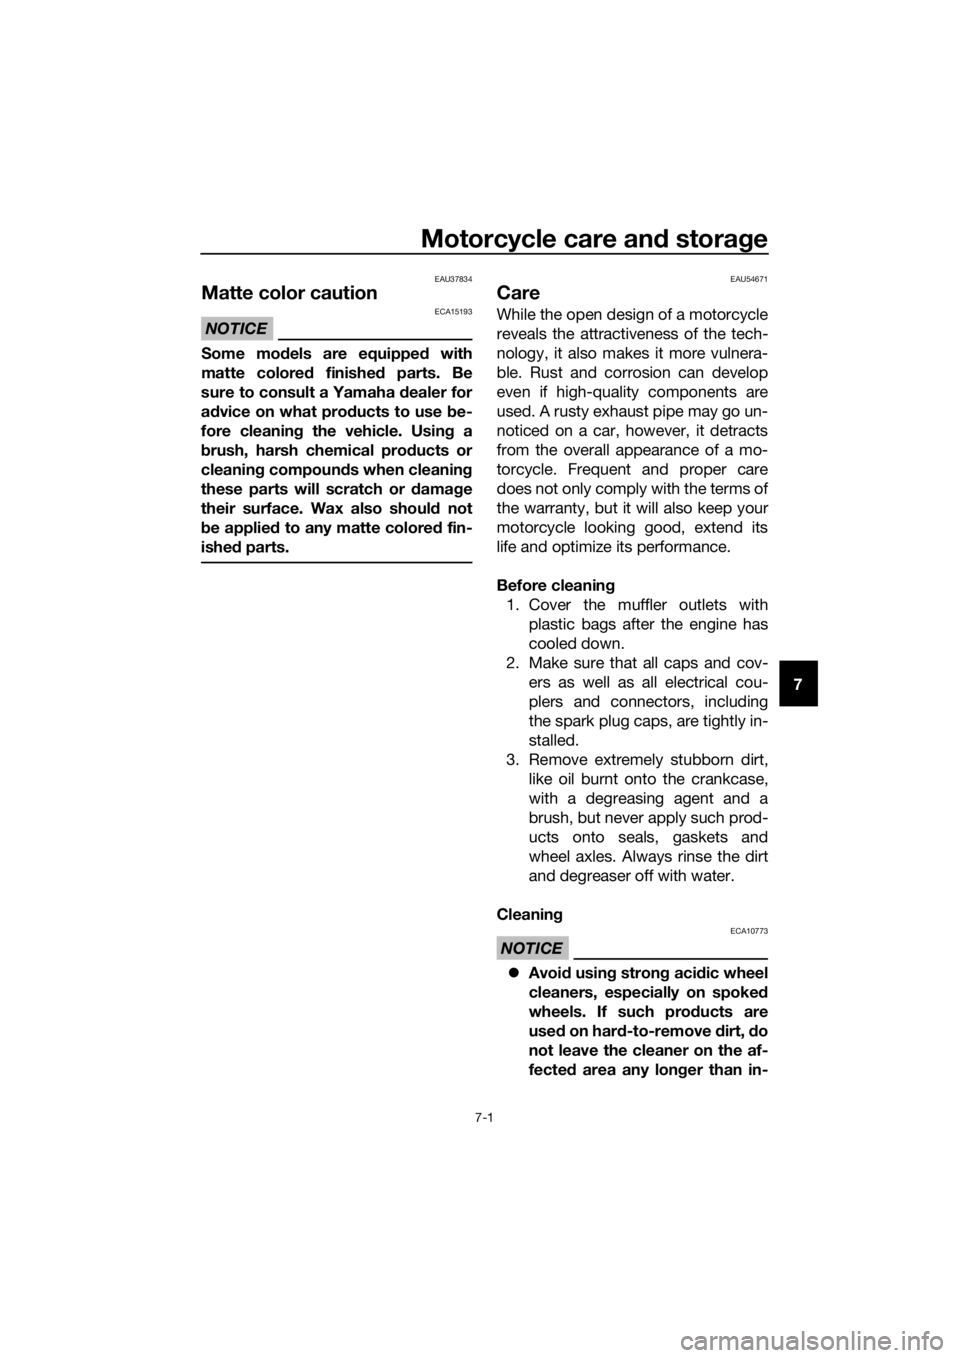
Measure the throttle grip free play as
shown.
Periodically check the throttle grip free
play and, if necessary, have a Yamaha
dealer adjust it.
EAU21402
Valve clearance
The valve clearance changes with use,
resulting in improper air-fuel mixture
and/or engine noise. To prevent this
from occurring, the valve clearance
must be adjusted by a Yamaha dealer
at the intervals specified in the periodic
maintenance and lubrication chart.
1. Throttle grip free play
Throttle g rip free play:
1.0–3.0 mm (0.04–0.12 in)
1
UB88E0E0.book Page 19 Friday, October 16, 2015 11:59 AM
Page 105 of 120

Periodic maintenance an d a djustment
6-37
6
EAU63470
Trou bleshootin g charts
Startin g pro blems or poor en gine performance
1. FuelThere is enough fuel.
There is no fuel.
Check the battery.
Supply fuel.
The engine turns over
quickly.
The engine turns over
slowly.
The engine does not
start.
Check the battery.
Wipe off with a dry
cloth and correct the
spark plug gaps, or
replace the spark
plugs.
Check the battery
lead connections, and
have a Yamaha dealer
charge the battery if
necessary.
2. BatteryThe battery is good.
The engine does not
start.
Check the ignition.
3. IgnitionWetOperate the electric
starter.
Dry
There is compression.
There is no
compression.
The engine does not start.
Have a Yamaha dealer check the vehicle.
Have a Yamaha dealer check the vehicle.
The engine does not
start.
Check the
compression.Have a Yamaha
dealer check the
vehicle.
Remove the spark
plugs and check
the electrodes.
Operate the electric
starter.
Operate the electric
starter.
Check the fuel level
in the fuel tank.
4. Compression
UB88E0E0.book Page 37 Friday, October 16, 2015 11:59 AM
Page 106 of 120

Periodic maintenance an d a djustment
6-38
6 En
gine overheatin g
WARNING
EWAT1041
Do not remove the ra diator cap when the en gine an d ra diator are hot.
Scal din g hot flui d an d steam may b e blown out un der pressure, which
coul d cause serious injury. Be sure to wait until the eng ine has cooled.
Place a thick ra g, like a towel, over the ra diator cap, an d then slowly ro-
tate the cap counterclockwise to the detent to allow any resi dual pres-
sure to escape. When the hissin g soun d has stopped , press down on the
cap while turnin g it counterclockwise, an d then remove the cap.
TIP
If coolant is not available, tap water can be temporarily used instead, provided
that it is changed to the recommended coolant as soon as possible.
Wait until the engine
has cooled.
Check the coolant
level in the reservoir
and radiator.Add coolant.
(See TIP.)
The coolant level is
OK.
There is no leakage.
There is leakage.
The coolant level is
low.
Check the cooling
system for leakage.
Have a Yamaha
dealer check and
repair the cooling
system.
Start the engine. If the engine overheats again,
have a Yamaha dealer check and repair the cooling
system.
UB88E0E0.book Page 38 Friday, October 16, 2015 11:59 AM
Page 107 of 120

Motorcycle care and stora ge
7-1
7
EAU37834
Matte color caution
NOTICE
ECA15193
Some mo dels are equipped with
matte colored finished parts. Be
sure to consult a Yamaha dealer for
a d vice on what pro ducts to use be-
fore cleanin g the vehicle. Usin g a
b rush, harsh chemical prod ucts or
cleanin g compoun ds when cleanin g
these parts will scratch or damag e
their surface. Wax also shoul d not
b e applie d to any matte colored fin-
ishe d parts.
EAU54671
Care
While the open design of a motorcycle
reveals the attractiveness of the tech-
nology, it also makes it more vulnera-
ble. Rust and corrosion can develop
even if high-quality components are
used. A rusty exhaust pipe may go un-
noticed on a car, however, it detracts
from the overall appearance of a mo-
torcycle. Frequent and proper care
does not only comply with the terms of
the warranty, but it will also keep your
motorcycle looking good, extend its
life and optimize its performance.
Before cleanin g
1. Cover the muffler outlets with plastic bags after the engine has
cooled down.
2. Make sure that all caps and cov- ers as well as all electrical cou-
plers and connectors, including
the spark plug caps, are tightly in-
stalled.
3. Remove extremely stubborn dirt, like oil burnt onto the crankcase,
with a degreasing agent and a
brush, but never apply such prod-
ucts onto seals, gaskets and
wheel axles. Always rinse the dirt
and degreaser off with water.
Cleanin g
NOTICE
ECA10773
Avoi d using strong aci dic wheel
cleaners, especially on spoked
wheels. If such pro ducts are
use d on har d-to-remove dirt, do
not leave the cleaner on the af-
fected area any lon ger than in-
UB88E0E0.book Page 1 Friday, October 16, 2015 11:59 AM
Page 108 of 120

Motorcycle care and stora ge
7-2
7 structe
d. Also, thorou ghly rinse
the area off with water, imme di-
ately dry it, an d then apply a cor-
rosion protection spray.
Improper cleanin g can d amage
plastic parts (such as cowlin gs,
panels, win dshield s, head light
lenses, meter lenses, etc.) an d
the mufflers. Use only a soft,
clean cloth or spon ge with wa-
ter to clean plastic. However, if
the plastic parts cannot be thor-
ou ghly cleaned with water, di-
lute d mil d d eter gent with water
may be used . Be sure to rinse
off any d etergent resi due usin g
plenty of water, as it is harmful
to plastic parts.
Do not use any harsh chemical
prod ucts on plastic parts. Be
sure to avoi d using cloths or
spon ges which have been in
contact with stron g or a brasive
cleanin g prod ucts, solvent or
thinner, fuel (g asoline), rust re-
movers or inhi bito
rs, brake flui d,
antifreeze or electrolyte.
Do not use hi gh-pressure wash-
ers or steam-jet cleaners since
they cause water seepa ge an d
d eterioration in the followin g ar-
eas: seals (of wheel an d swin g-
arm bearin gs, fork an d b rakes),
electric components (couplers,
connectors, instruments,
switches an d lig hts), breather
hoses an d vents.
For motorcycles equippe d with
a win dshield : Do not use stron g
cleaners or har d spon ges as
they will cause dullin g or
scratchin g. Some cleanin gcompoun
ds for plastic may
leave scratches on the win d-
shield . Test the pro duct on a
small hi dden part of the win d-
shield to make sure that it d oes
not leave any marks. If the win d-
shield is scratche d, use a quality
plastic polishin g compoun d af-
te r
washin g.
After normal use
Remove dirt with warm water, a mild
detergent, and a soft, clean sponge,
and then rinse thoroughly with clean
water. Use a toothbrush or bottlebrush
for hard-to-reach areas. Stubborn dirt
and insects will come off more easily if
the area is covered with a wet cloth for
a few minutes before cleaning.
After riding in the rain, near the sea or
on salt-sprayed roads
Since sea salt or salt sprayed on roads
during winter are extremely corrosive
in combination with water, carry out
the following steps after each ride in
the rain, near the sea or on salt-
sprayed roads.
TIP
Salt sprayed on roads in the winter
may remain well into spring.
1. Clean the motorcycle with cold
water and a mild detergent, after
the engine has cooled down.
NOTICE: Do not use warm wa-
ter since it increases the corro-
sive action of the salt.
[ECA10792]
UB88E0E0.book Page 2 Friday, October 16, 2015 11:59 AM