Page 114 of 396
||
03 Instruments and controls
03
112* Option/accessory, for more information, see Introduction.
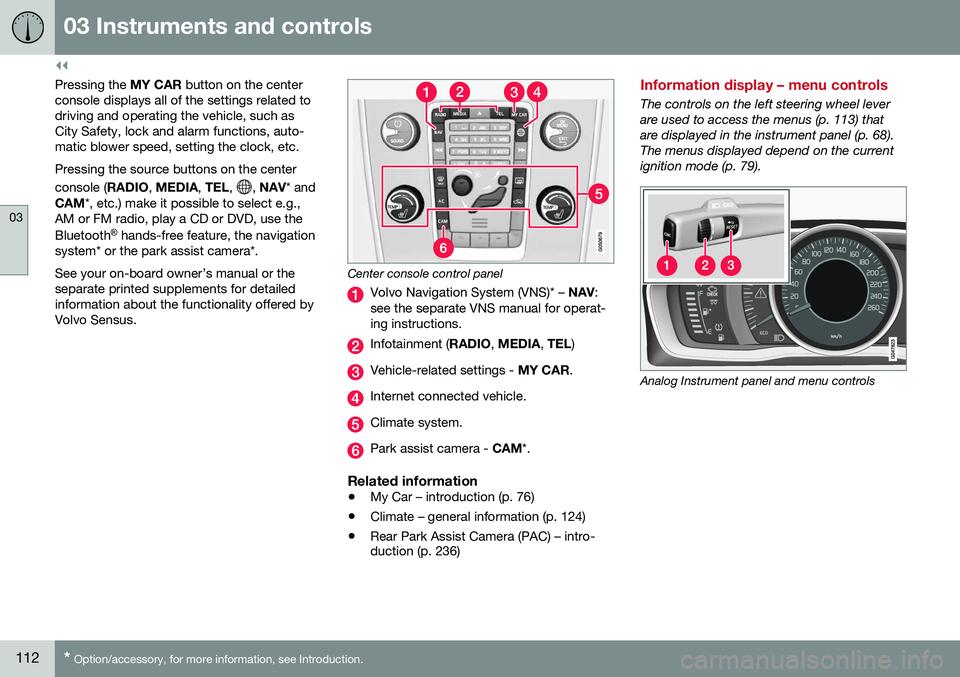
Pressing the MY CAR button on the center
console displays all of the settings related to driving and operating the vehicle, such asCity Safety, lock and alarm functions, auto-matic blower speed, setting the clock, etc. Pressing the source buttons on the center console ( RADIO, MEDIA , TEL ,
, NAV * and
CAM *, etc.) make it possible to select e.g.,
AM or FM radio, play a CD or DVD, use the Bluetooth ®
hands-free feature, the navigation
system* or the park assist camera*. See your on-board owner’s manual or the separate printed supplements for detailedinformation about the functionality offered byVolvo Sensus.
Center console control panel
Volvo Navigation System (VNS)* – NAV:
see the separate VNS manual for operat- ing instructions.
Infotainment ( RADIO, MEDIA , TEL )
Vehicle-related settings - MY CAR.
Internet connected vehicle.
Climate system.
Park assist camera - CAM*.
Related information
•My Car – introduction (p. 76)
• Climate – general information (p. 124)
• Rear Park Assist Camera (PAC) – intro- duction (p. 236)
Information display – menu controls
The controls on the left steering wheel lever are used to access the menus (p. 113) thatare displayed in the instrument panel (p. 68).The menus displayed depend on the currentignition mode (p. 79).
Analog Instrument panel and menu controls
Page 115 of 396
03 Instruments and controls
03
}}
* Option/accessory, for more information, see Introduction.113
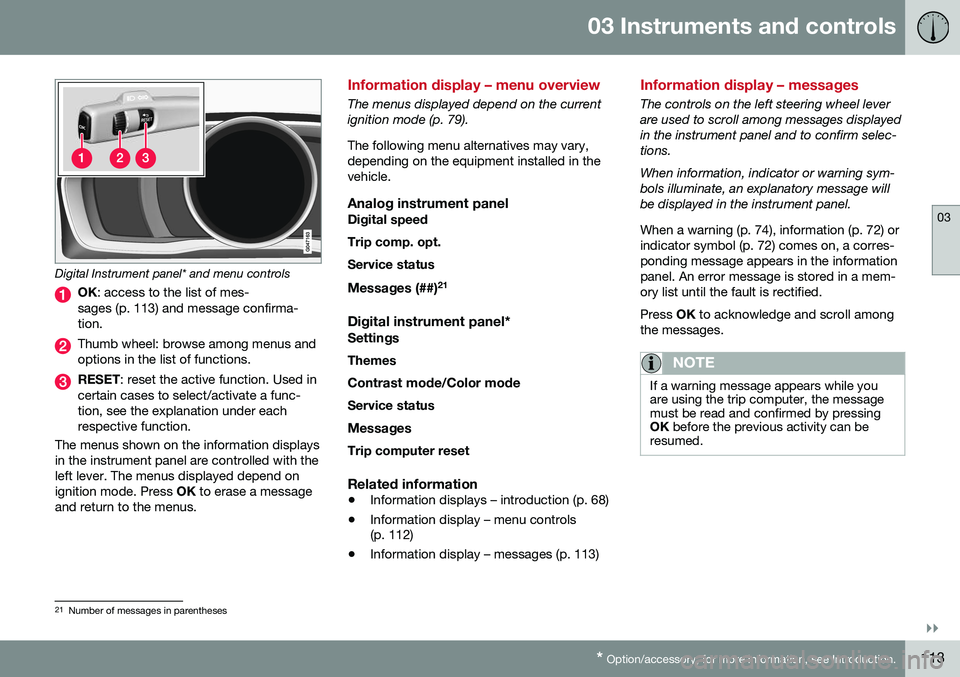
Digital Instrument panel* and menu controls
OK : access to the list of mes-
sages (p. 113) and message confirma- tion.
Thumb wheel: browse among menus and options in the list of functions.
RESET : reset the active function. Used in
certain cases to select/activate a func- tion, see the explanation under eachrespective function.
The menus shown on the information displaysin the instrument panel are controlled with theleft lever. The menus displayed depend onignition mode. Press OK to erase a message
and return to the menus.
Information display – menu overview
The menus displayed depend on the current ignition mode (p. 79). The following menu alternatives may vary, depending on the equipment installed in thevehicle.
Analog instrument panelDigital speed Trip comp. opt.Service status
Messages (##) 21
Digital instrument panel*
Settings
Themes
Contrast mode /Color mode
Service status
Messages Trip computer reset
Related information
• Information displays – introduction (p. 68)
• Information display – menu controls (p. 112)
• Information display – messages (p. 113)
Information display – messages
The controls on the left steering wheel lever are used to scroll among messages displayedin the instrument panel and to confirm selec-tions. When information, indicator or warning sym- bols illuminate, an explanatory message willbe displayed in the instrument panel. When a warning (p. 74), information (p. 72) or indicator symbol (p. 72) comes on, a corres-ponding message appears in the informationpanel. An error message is stored in a mem-ory list until the fault is rectified. Press
OK to acknowledge and scroll among
the messages.
NOTE
If a warning message appears while you are using the trip computer, the messagemust be read and confirmed by pressingOK before the previous activity can be
resumed.
21 Number of messages in parentheses
Page 116 of 396
||
03 Instruments and controls
03
114
MessageDescription
Stop engineAStop and switch off the engine as soon as possi-ble. Serious risk of dam-age. Contact an author-ized Volvo workshop.
Stop safelyAStop and switch off the engine. Serious risk ofdamage. Contact anauthorized Volvo work-shop.
Service urgentAHave the vehicle checked by an authorized Volvoworkshop immediately.
Service requiredAHave the vehicle checked by an authorized Volvoworkshop as soon as pos-sible.
See man- ualARead the owner's manual.
Book time for mainte-nanceTime to book service at an authorized Volvo retailer.
MessageDescription
Time for regularmainte-nanceTime for regular service at an authorized Volvo work-shop. The timing is deter-mined by the number ofmiles driven, number ofmonths since the lastservice, engine runningtime.
Mainte- nance over-dueIf the service intervals are not followed, the warrantydoes not cover any dam-aged parts. Contact anauthorized Volvo work-shop for service.
Temporarily OFFAA function has been tem- porarily switched off andis reset automatically whiledriving or after startingagain.
Low battery Power savemodeThe audio system is switched off to save cur-rent. Charge the battery.
AThere will also be a system-specific part of this message
Related information
• Information displays – introduction (p. 68)
• Information display – menu overview (p. 113) •
Information display – menu controls(p. 112)
Page 117 of 396
03 Instruments and controls
03
115
Trip computer – introduction
The content and appearance of the trip com- puter varies depending on whether the vehi-cle is equipped with an Analog or Digital
instrument panel.
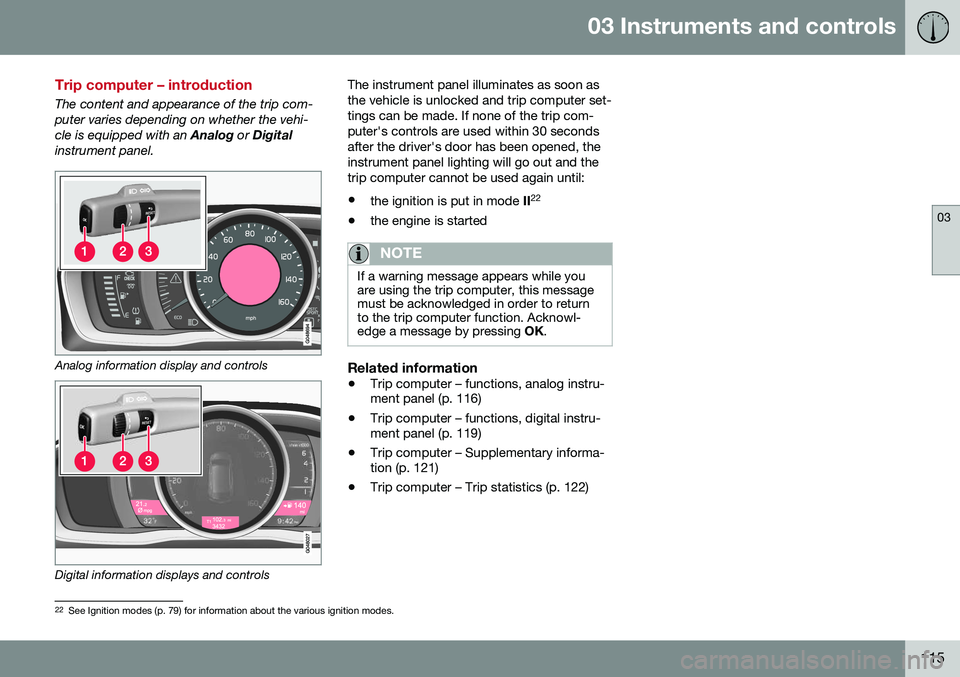
Analog information display and controls
Digital information displays and controls The instrument panel illuminates as soon as the vehicle is unlocked and trip computer set-tings can be made. If none of the trip com-puter's controls are used within 30 secondsafter the driver's door has been opened, theinstrument panel lighting will go out and thetrip computer cannot be used again until: •
the ignition is put in mode II22
• the engine is started
NOTE
If a warning message appears while you are using the trip computer, this messagemust be acknowledged in order to returnto the trip computer function. Acknowl-edge a message by pressing
OK.
Related information
• Trip computer – functions, analog instru- ment panel (p. 116)
• Trip computer – functions, digital instru-ment panel (p. 119)
• Trip computer – Supplementary informa-tion (p. 121)
• Trip computer – Trip statistics (p. 122)
22
See Ignition modes (p. 79) for information about the various ignition modes.
Page 118 of 396
03 Instruments and controls
03
116
Trip computer – functions, analog instrument panel
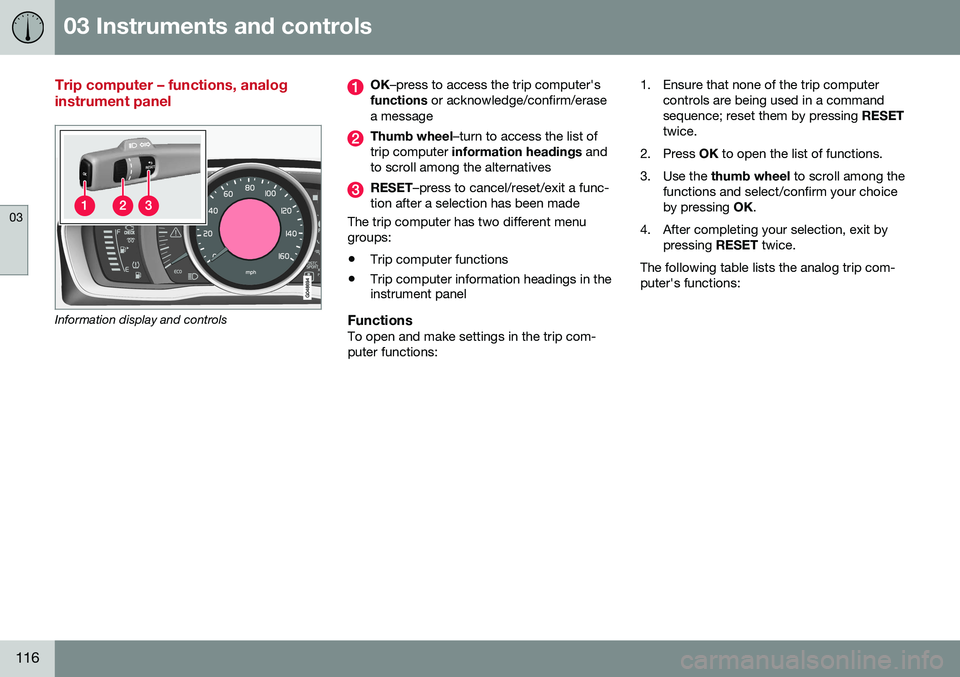
Information display and controls
OK–press to access the trip computer's
functions or acknowledge/confirm/erase
a message
Thumb wheel –turn to access the list of
trip computer information headings and
to scroll among the alternatives
RESET –press to cancel/reset/exit a func-
tion after a selection has been made
The trip computer has two different menu groups:
• Trip computer functions
• Trip computer information headings in the instrument panel
FunctionsTo open and make settings in the trip com- puter functions: 1. Ensure that none of the trip computer
controls are being used in a commandsequence; reset them by pressing RESET
twice.
2. Press OK to open the list of functions.
3. Use the thumb wheel to scroll among the
functions and select/confirm your choiceby pressing OK.
4. After completing your selection, exit by pressing RESET twice.
The following table lists the analog trip com-puter's functions:
Page 119 of 396
03 Instruments and controls
03
}}
117
FunctionDescription
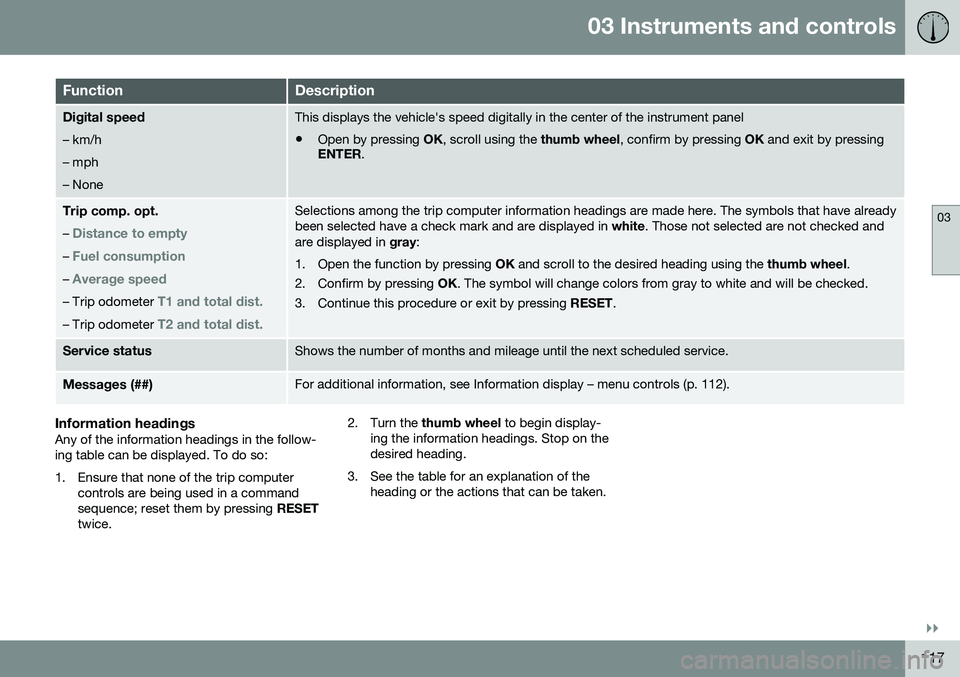
Digital speed – km/h – mph– NoneThis displays the vehicle's speed digitally in the center of the instrument panel
• Open by pressing
OK, scroll using the thumb wheel, confirm by pressing OK and exit by pressing
ENTER .
Trip comp. opt.
–
Distance to empty
– Fuel consumption
– Average speed
– Trip odometer T1 and total dist.
– Trip odometer T2 and total dist.
Selections among the trip computer information headings are made here. The symbols that have already been selected have a check mark and are displayed in white. Those not selected are not checked and
are displayed in gray:
1. Open the function by pressing OK and scroll to the desired heading using the thumb wheel.
2. Confirm by pressing OK. The symbol will change colors from gray to white and will be checked.
3. Continue this procedure or exit by pressing RESET.
Service statusShows the number of months and mileage until the next scheduled service.
Messages (##)For additional information, see Information display – menu controls (p. 112).
Information headingsAny of the information headings in the follow- ing table can be displayed. To do so:
1. Ensure that none of the trip computer
controls are being used in a command sequence; reset them by pressing RESET
twice. 2. Turn the
thumb wheel to begin display-
ing the information headings. Stop on thedesired heading.
3. See the table for an explanation of the heading or the actions that can be taken.
Page 120 of 396
||
03 Instruments and controls
03
118
Information headings in the instrument panelDescription
Trip odometer T1 and total dist.•Press and hold
RESET to reset trip odometer T1.
Trip odometer T2 and total dist.•Press and hold
RESET to reset trip odometer T2.
Distance to emptySee Distance to empty in Trip computer – Supplementary information (p. 121).
Fuel consumptionCurrent fuel consumption.
Average speedPress and hold RESET to reset Average speed.
-No information will be displayed. This also indicates the beginning/end of the list of information headings.
Scroll among the trip computer information headings at any time by turning the thumb
wheel until the desired heading is displayed.
Related information
•Trip computer – introduction (p. 115)
• Trip computer – functions, digital instru- ment panel (p. 119)
• Trip computer – Supplementary informa-tion (p. 121)
• Trip computer – Trip statistics (p. 122)
Page 121 of 396
03 Instruments and controls
03
}}
* Option/accessory, for more information, see Introduction.119
Trip computer – functions, digital instrument panel
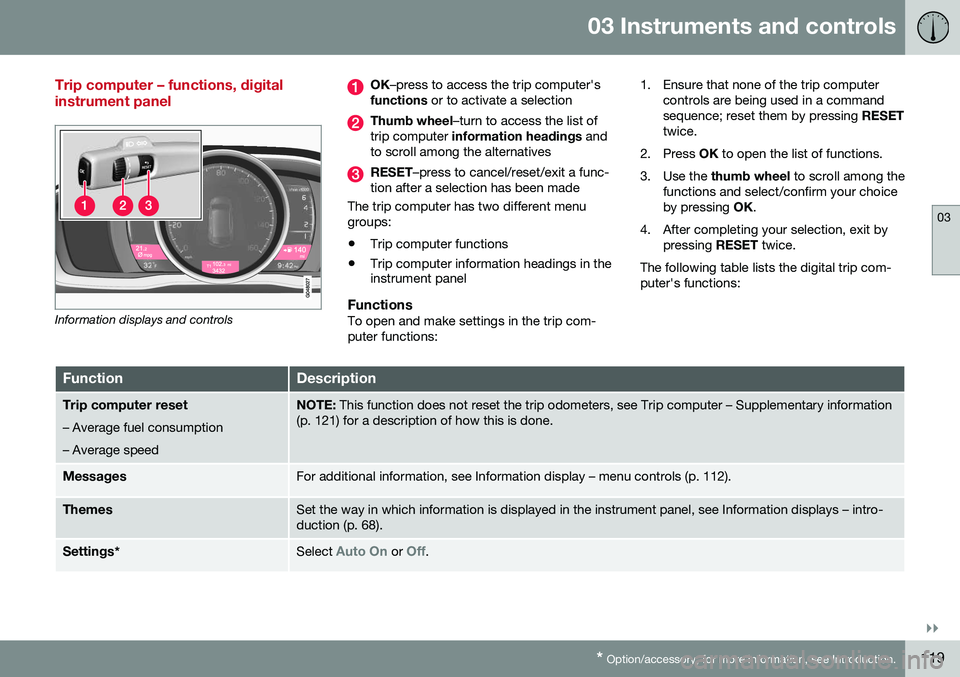
Information displays and controls
OK –press to access the trip computer's
functions or to activate a selection
Thumb wheel –turn to access the list of
trip computer information headings and
to scroll among the alternatives
RESET –press to cancel/reset/exit a func-
tion after a selection has been made
The trip computer has two different menu groups:
• Trip computer functions
• Trip computer information headings in the instrument panel
FunctionsTo open and make settings in the trip com- puter functions: 1. Ensure that none of the trip computer
controls are being used in a commandsequence; reset them by pressing RESET
twice.
2. Press OK to open the list of functions.
3. Use the thumb wheel to scroll among the
functions and select/confirm your choiceby pressing OK.
4. After completing your selection, exit by pressing RESET twice.
The following table lists the digital trip com-puter's functions:
FunctionDescription
Trip computer reset
– Average fuel consumption – Average speedNOTE: This function does not reset the trip odometers, see Trip computer – Supplementary information
(p. 121) for a description of how this is done.
MessagesFor additional information, see Information display – menu controls (p. 112).
ThemesSet the way in which information is displayed in the instrument panel, see Information displays – intro- duction (p. 68).
Settings *Select Auto On or Off.