2016 VOLVO V60 CROSS COUNTRY brakes
[x] Cancel search: brakesPage 277 of 402

08 Starting and driving
08
275
Connect an auxiliary battery if the battery voltage is too low, see Jump starting (p. 256).
Parking on a hill
•
If the vehicle is pointing uphill, turn the front wheels so that they point away fromthe curb.
• If the vehicle is pointing downhill, turn thefront wheels so that they point toward thecurb.
The parking brake should also be applied.
Related information
• Parking brake – applying (p. 275)
• Parking brake – releasing (p. 276)
• Parking brake – symbols and messages(p. 277)
• Brakes – general (p. 271)
Parking brake – applying
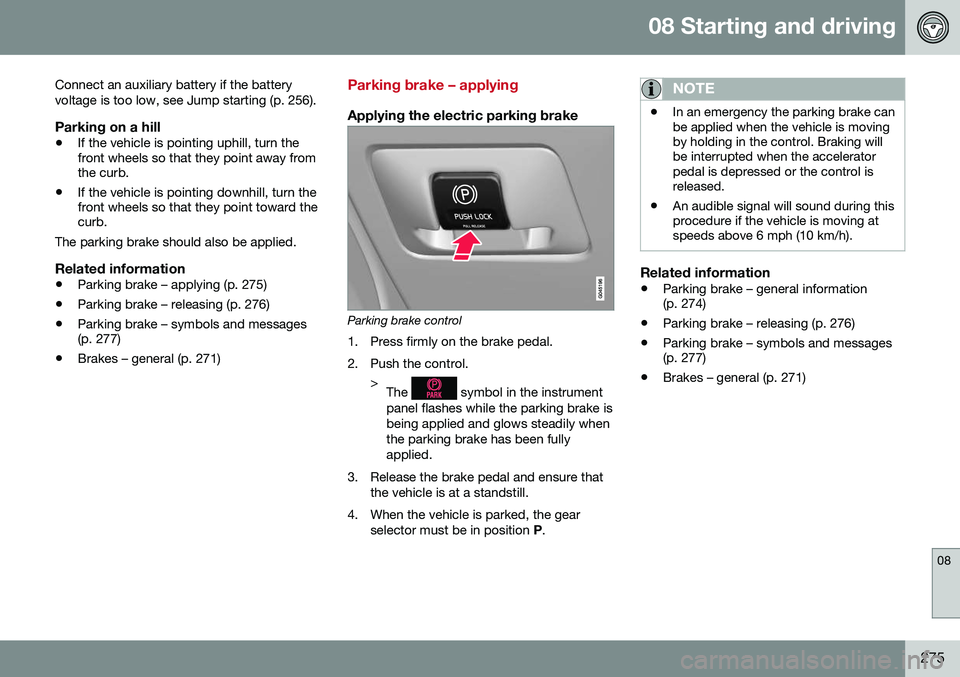
Applying the electric parking brake
Parking brake control
1. Press firmly on the brake pedal.
2. Push the control. >The
symbol in the instrument
panel flashes while the parking brake is being applied and glows steadily whenthe parking brake has been fullyapplied.
3. Release the brake pedal and ensure that the vehicle is at a standstill.
4. When the vehicle is parked, the gear selector must be in position P.
NOTE
• In an emergency the parking brake can be applied when the vehicle is movingby holding in the control. Braking willbe interrupted when the acceleratorpedal is depressed or the control isreleased.
• An audible signal will sound during thisprocedure if the vehicle is moving atspeeds above 6 mph (10 km/h).
Related information
•
Parking brake – general information (p. 274)
• Parking brake – releasing (p. 276)
• Parking brake – symbols and messages(p. 277)
• Brakes – general (p. 271)
Page 278 of 402

08 Starting and driving
08
276
Parking brake – releasing
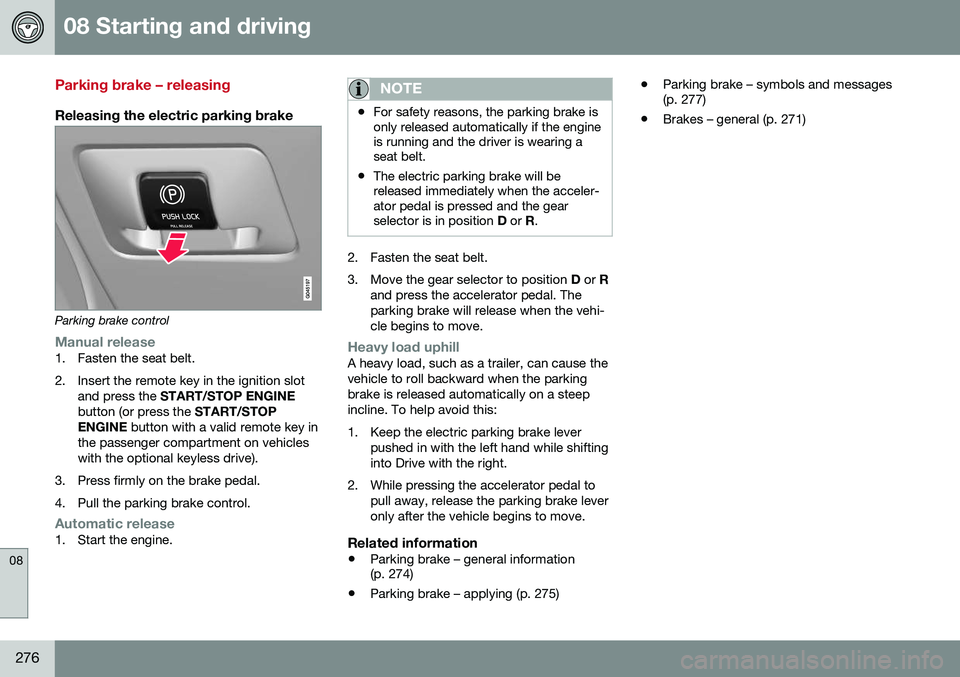
Releasing the electric parking brake
Parking brake control
Manual release1. Fasten the seat belt.
2. Insert the remote key in the ignition slotand press the START/STOP ENGINE
button (or press the START/STOP
ENGINE button with a valid remote key in
the passenger compartment on vehicles with the optional keyless drive).
3. Press firmly on the brake pedal.
4. Pull the parking brake control.
Automatic release1. Start the engine.
NOTE
• For safety reasons, the parking brake is only released automatically if the engineis running and the driver is wearing aseat belt.
• The electric parking brake will bereleased immediately when the acceler-ator pedal is pressed and the gearselector is in position
D or R.
2. Fasten the seat belt.
3. Move the gear selector to position D or R
and press the accelerator pedal. The parking brake will release when the vehi-cle begins to move.
Heavy load uphillA heavy load, such as a trailer, can cause the vehicle to roll backward when the parkingbrake is released automatically on a steepincline. To help avoid this:
1. Keep the electric parking brake lever pushed in with the left hand while shifting into Drive with the right.
2. While pressing the accelerator pedal to pull away, release the parking brake leveronly after the vehicle begins to move.
Related information
• Parking brake – general information (p. 274)
• Parking brake – applying (p. 275) •
Parking brake – symbols and messages(p. 277)
• Brakes – general (p. 271)
Page 279 of 402

08 Starting and driving
08
277
Parking brake – symbols and messages
A text message can be erased by pressing briefly on the OK button on the turn signal
lever.
Symbol and messages in the instrument panel
SymbolMessageDescription/action
"Message"Read the message in the information display
A flashing symbol indicates that the parking brake is being applied. If the symbol flashes in any other situation then this means that a fault has arisen. Read the message on the information display.
-Park brake not fully releasedA fault is preventing the parking brake from being released. Try to apply the parking brake and release it sev- eral times. If the problem persists, contact an authorized Volvo workshop. If you drive off with this error mes-sage showing, a warning signal sounds.
-Parking brake not appliedA fault is preventing the parking brake from being applied. Try to apply the parking brake and release it several times. If the problem persists, contact an authorized Volvo workshop. If you drive off with this error messageshowing, a warning signal sounds.
-Parking brake Service requiredA fault has occurred. Try to apply and release. Contact a Volvo workshop if the fault remains
WARNING
If the vehicle must be parked before the fault has been corrected, always put thegear selector in P and turn the wheels so
that they point away from the curb if thevehicle is pointing uphill or toward the curbif it is pointing downhill.
Related information
• Parking brake – general information (p. 274)
• Parking brake – applying (p. 275)
• Parking brake – releasing (p. 276)
• Brakes – general (p. 271)
Page 280 of 402

08 Starting and driving
08
278
Driving through water
The vehicle should be driven with extreme caution if it is necessary to drive throughstanding water. The vehicle can be driven through water up to a depth of approximately 10 in. (25 cm), (V60Cross Country: approximately 12 in. (30 cm))at walking speed to help prevent water fromentering the differential and the transmission.Water reduces the oil's lubricating capacityand may shorten the service life of thesecomponents.
• Take particular care when driving through flowing water.
• Clean the electrical connections for trailerwiring after driving in mud or water.
• When driving through water, maintain lowspeed and do not stop in the water.WARNING
•Avoid driving through standing or rushing water. Doing so can be dan-gerous and it may also be difficult todetermine the actual depth of thewater.
• If water cannot be avoided, after driv-ing through the water, press lightly onthe brake pedal to ensure that thebrakes are functioning normally. Wateror mud can make the brake liningsslippery, resulting in delayed brakingeffect.
CAUTION
•
Engine damage will occur if water is drawn into the air cleaner.
• If the vehicle is driven through waterdeeper than approximately 10 in.(25 cm), (V60 Cross Country: approxi-mately 12 in. (30 cm)), water may enterthe differential and the transmission.This reduces the oil's lubricatingcapacity and may shorten the servicelife of these components.
• Damage to any components, theengine, transmission, turbo-charger,differential or its internal componentscaused by flooding, vapor lock orinsufficient oil is not covered underwarranty.
• Do not allow the vehicle to stand inwater up to the door sills longer thanabsolutely necessary. This could resultin electrical malfunctions.
• If the engine has been stopped whilethe vehicle is in water, do not attemptto restart it. Have the vehicle towedout of the water.
Related information
•
Towing the vehicle (p. 289)
• Towing by tow truck (p. 291)
Page 281 of 402

08 Starting and driving
08
}}
279
Engine and cooling system
Under special conditions, for example when driving in hilly terrain, extreme heat or withheavy loads, there is a risk that the engine andcooling system will overheat. Proceed as follows to avoid overheating the engine. •Maintain a low speed when driving with a trailer up long, steep hills. For informa-tion, see Towing a trailer (p. 287)
• Do not turn the engine off immediatelywhen stopping after a hard drive.
WARNING
The cooling fan may start or continue to operate (for up to 6 minutes) after theengine has been switched off.
•
Remove any auxiliary lights from in front of the grille when driving in hot weatherconditions.
• Do not exceed engine speeds of4500 rpm if driving with a trailer in hillyterrain. The oil temperature could becometoo high.
Conserving electrical current
Keep the following in mind to help minimize battery drain:
• When the engine is not running, avoid using ignition mode
II. Many electrical
systems (the audio system, the optionalnavigation system, power windows, etc)will function in ignition modes 0 and I.
These modes reduce drain on the battery.
• Please keep in mind that using systems,accessories, etc., that consume a greatdeal of current when the engine is notrunning could result in the battery beingcompletely drained. Driving or having theengine running for approximately15 minutes will help keep the batterycharged.
• The optional 12-volt socket in the cargoarea (p. 138) area provides electrical cur-rent even with the ignition switched off,which drains the battery.
Before a long distance trip
It is always worthwhile to have your vehicle checked by a trained and qualified Volvo serv-ice technician before driving long distances.Your retailer will also be able to supply youwith bulbs, fuses, spark plugs and wiperblades for your use in the event that problemsoccur. As a minimum, the following items should be checked before any long trip:
• Check that engine runs smoothly and that fuel consumption is normal.
• Check for fuel, oil, and fluid leakage.
• Have the transmission oil level (p. 383)checked.
• Check condition of drive belts.
• Check state of the battery's charge.
• Examine tires carefully (the spare tire aswell), and replace those that areworn (p. 295). Check tire pres-sure (p. 302).
• The brakes, front wheel alignment, andsteering gear should be checked by atrained and qualified Volvo service techni-cian only.
• Check all lights, including high beams.
• Reflective warning triangles are legallyrequired in some states/provinces.
• Have a word with a trained and qualifiedVolvo service technician if you intend to
Page 288 of 402

||
08 Starting and driving
08
286* Option/accessory, for more information, see Introduction.
• Using the engine's optional Eco func- tion18
can help improve fuel economy. For
additional information, see ECO* (p. 267).
• Using the transmission's Sport mode 19
may increase fuel consumption some- what. Use the transmission's Drive ( D)
position as often as possible. For addi-tional information about Sport mode, seeTransmission – Geartronic (p. 259).
• Do not exceed posted speed limits.
• Avoid carrying unnecessary items (extraload) in the vehicle.
• Maintain correct tire pressure. Check tirepressure regularly (when tires are cold).
• Remove snow tires when threat of snowor ice has ended.
• Note that roof racks, ski racks, etc,increase air resistance and also fuel con-sumption.
• At highway driving speeds, fuel consump-tion will be lower with the air conditioningon and the windows closed than with theair conditioning off and the windowsopen.
• Using the onboard trip computer's fuelconsumption modes can help you learnhow to drive more economically.
Other factors that decrease gas mileage are: •
Dirty air cleaner
• Dirty engine oil and clogged oil filter
• Dragging brakes
• Incorrect front end alignment
Some of the above mentioned items and oth-ers are checked at the standard maintenanceintervals.
WARNING
Driving with the tailgate open: Driving
with the tailgate open could lead to poi- sonous exhaust gases entering the pas-senger compartment. If the tailgate mustbe kept open for any reason, proceed asfollows: • Close the windows
• Set the ventilation system control to air flow to floor, windshield and side win-dows and the blower control to itshighest setting.
Handling and roadholdingAt the specified curb weight your vehicle has a tendency to understeer, which means thatthe steering wheel has to be turned morethan might seem appropriate for the curva-ture of a bend. This ensures good stabilityand reduces the risk of rear wheel skid.Remember that these properties can alter with the vehicle load. The heavier the load inthe cargo area, the less the tendency toundersteer. •
Vehicle load, tire design and inflation pressure all affect vehicle handling.Therefore, check that the tires are inflatedto the recommended pressure accordingto the vehicle load. Loads should be dis-tributed so that capacity weight or maxi-mum permissible axle loads are notexceeded.
• At the specified curb weight your vehiclehas a tendency to understeer, whichmeans that the steering wheel has to beturned more than might seem appropriatefor the curvature of a bend. This ensuresgood stability and reduces the risk of rearwheel skid. Remember that these proper-ties can alter with the vehicle load. Theheavier the load in the cargo compart-ment, the less the tendency to under-steer.
Related information
• Climate – general information (p. 122)
18
Available on certain 4-cyl. engines
19 Models with the T6 turbo engine only.
Page 289 of 402

08 Starting and driving
08
}}
287
Towing a trailer
When towing a trailer, always observe the legal requirements of the state/province.
NOTE
For the maximum trailer and tongue weights recommended by Volvo, seeWeights (p. 378).
•All Volvo models are equipped with energy-absorbing shock-mounted bump-ers. Trailer hitch installation should notinterfere with the proper operation of thisbumper system.
Trailer towing does not normally present any particular problems, but take into considera-tion: • Increase tire pressure to recommended full pressure, see Tire inflation – pressuretable (p. 305).
• When your vehicle is new, avoid towingheavy trailers during the first 620 miles(1,000 km).
• Maximum speed when towing a trailer:50 mph (80 km/h).
• Engine and transmission are subject toincreased loads. Therefore, engine cool-ant temperature should be closelywatched when driving in hot climates orhilly terrain. Use a lower gear and turn offthe air conditioner if the temperaturegauge needle enters the red range. •
If the automatic transmission begins tooverheat, a message will be displayed inthe text window.
• Avoid overload and other abusive opera-tion.
• Hauling a trailer affects handling, durabil-ity, and economy.
• It is necessary to balance trailer brakeswith the towing vehicle brakes to providea safe stop (check and observe state/local regulations).
• Do not connect the trailer's brake systemdirectly to the vehicle's brake system.
• More frequent vehicle maintenance isrequired.
• Remove the ball holder when the hitch isnot being used.
NOTE
• When parking the vehicle with a trailer on a hill, apply the parking brakebefore putting the gear selector in
P.
Always follow the trailer manufactur-er's recommendations for wheelchocking.
• When starting on a hill, put the gearselector in
D before releasing the park-
ing brake.
• If you use the manual (Geartronic) shiftpositions while towing a trailer, makesure the gear you select does not puttoo much strain on the engine (usingtoo high a gear).
• The drawbar assembly/trailer hitchmay be rated for trailers heavier thanthe vehicle is designed to tow. Pleaseadhere to Volvo's recommended trailerweights.
• Avoid driving with a trailer on inclinesof more than 15%.
Page 291 of 402

08 Starting and driving
08
}}
289
be switched off (but will be on again the next time the engine is started)
• TSA may not intervene when the vehicleand trailer begin to sway if the driver triesto compensate for the swaying motion bymoving the steering wheel rapidly
How TSA worksOnce swaying has begun, it can be very diffi- cult to stop, which makes it difficult to controlthe vehicle and trailer. The TSA system continuously monitors the vehicle's movements, particularly lateralmovement. If the system detects a tendencyto sway, the brakes are applied individuallyon the front wheels, which has a stabilizingeffect on the vehicle and trailer. This is oftenenough to enable the driver to regain controlof the vehicle. If this is not adequate to stop the swaying motion, the brakes are applied to all of thewheels on the vehicle and on the trailer if it isequipped with brakes, and engine power istemporarily reduced. As the swaying motionbegins to decrease and the vehicle-trailerhave once again become stable, TSA will nowstop regulating the brakes/engine power andthe driver regains control of the vehicle.
Related information
• Towing a trailer (p. 287)
• Loading – general (p. 139)
Towing the vehicle
Always check with state and local authorities before attempting to tow another vehiclebecause this type of towing is subject to reg-ulations regarding maximum towing speed,length and type of towing device, lighting, etc.
1. With the remote key fully pressed into the
ignition slot 20
, press START/STOP
ENGINE for approximately 2 seconds to
activate ignition mode II. 2. The remote key must remain in the igni-
tion slot 21
for the entire time that the vehi-
cle is being towed.
3. Keep the tow rope taut when the towing vehicle slows down by applying light pressure on the brake pedal. This willhelp prevent jarring movements of thevehicle being towed.
4. Be prepared to apply the brakes to stop the vehicle being towed.
20Not necessary in vehicles with the optional keyless drive.