2016 VOLVO V60 CROSS COUNTRY engine oil
[x] Cancel search: engine oilPage 337 of 402

10 Maintenance and servicing
10
}}
335
Checking and adding oil
G021734
Location of the filler cap and dipstick
NOTE
Before checking the oil: •The car should be parked on a level surface.
• If the engine is warm
, wait for at least
10 – 15 minutes after the engine hasbeen switched off.
G021737
The oil level must be between the MIN and MAX
marks on the dipstick
Checking the oil1. Pull out the dipstick and wipe it with a
lint-free rag.
2. Reinsert the dipstick, pull it out, and check the oil level. The level must be between the MIN and MAX marks.
3. Add oil if necessary. If the level is close to the MIN mark, add approximately
0.5 US quarts (0.5 liters) of oil.
4. Recheck the level and add more oil if necessary until the level is near the MAX
mark.
WARNING
Do not allow oil to spill onto or come into contact with hot exhaust pipe surfaces.
Electronic oil level sensor (4-cylinder engines only)
Oil filler cap
No action is necessary until a message is dis- played, see the following illustration.
Page 338 of 402
||
10 Maintenance and servicing
10
336* Option/accessory, for more information, see Introduction.
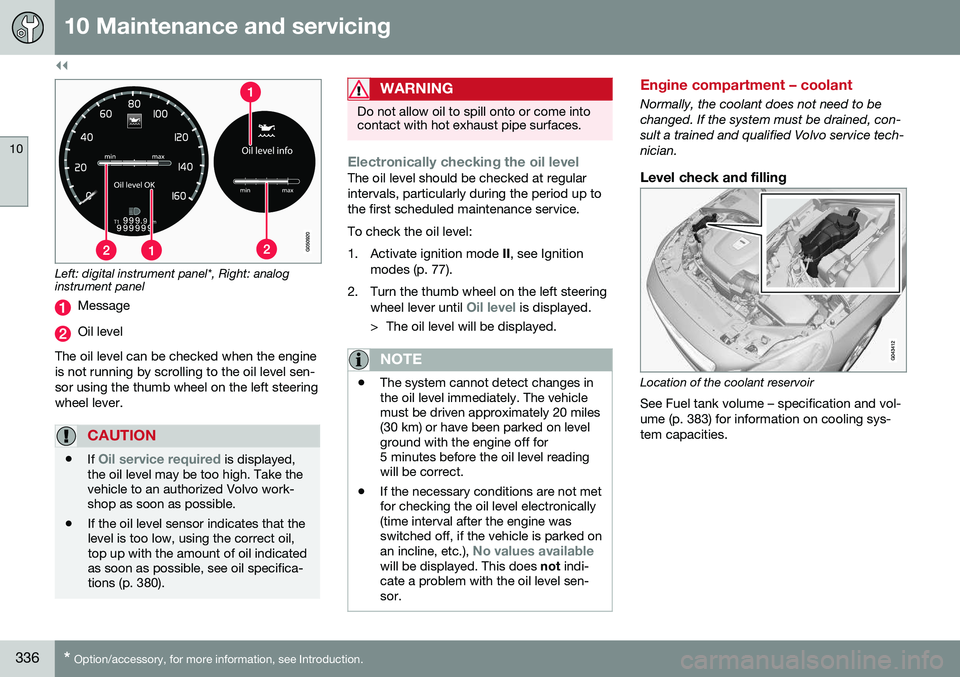
Left: digital instrument panel*, Right: analog instrument panel
Message
Oil level
The oil level can be checked when the engine is not running by scrolling to the oil level sen-sor using the thumb wheel on the left steeringwheel lever.
CAUTION
• If Oil service required is displayed,
the oil level may be too high. Take the vehicle to an authorized Volvo work-shop as soon as possible.
• If the oil level sensor indicates that thelevel is too low, using the correct oil,top up with the amount of oil indicatedas soon as possible, see oil specifica-tions (p. 380).
WARNING
Do not allow oil to spill onto or come into contact with hot exhaust pipe surfaces.
Electronically checking the oil levelThe oil level should be checked at regular intervals, particularly during the period up tothe first scheduled maintenance service. To check the oil level:
1. Activate ignition mode
II, see Ignition
modes (p. 77).
2. Turn the thumb wheel on the left steering wheel lever until
Oil level is displayed.
> The oil level will be displayed.
NOTE
• The system cannot detect changes in the oil level immediately. The vehiclemust be driven approximately 20 miles(30 km) or have been parked on levelground with the engine off for5 minutes before the oil level readingwill be correct.
• If the necessary conditions are not metfor checking the oil level electronically(time interval after the engine wasswitched off, if the vehicle is parked on an incline, etc.),
No values availablewill be displayed. This does
not indi-
cate a problem with the oil level sen- sor.
Engine compartment – coolant
Normally, the coolant does not need to be changed. If the system must be drained, con-sult a trained and qualified Volvo service tech-nician.
Level check and filling
Location of the coolant reservoir
See Fuel tank volume – specification and vol- ume (p. 383) for information on cooling sys-tem capacities.
Page 339 of 402

10 Maintenance and servicing
10
}}
337
CAUTION
•If necessary, top up the cooling sys- tem with Volvo Genuine Coolant/Anti-freeze only (a 50/50 mix of water andantifreeze).
• Different types of antifreeze/coolantmay not be mixed.
• If the cooling system is drained, itshould be flushed with clean water orpremixed anti-freeze before it is refilledwith the correct mixture of water/anti-freeze.
• The cooling system must always bekept filled to the correct level, and thelevel must be between the
MIN and
MAX marks. If it is not kept filled, there
can be high local temperatures in theengine which could result in damage.Check coolant regularly!
• Do not top up with water only. Thisreduces the rust-protective and anti-freeze qualities of the coolant and hasa lower boiling point. It can also causedamage to the cooling system if itshould freeze.
• Do not use chlorinated tap water in thevehicle's cooling system.
WARNING
•Never remove the expansion tank cap while the engine is warm. Wait until theengine cools.
• If it is necessary to top off the coolantwhen the engine is warm, unscrew theexpansion tank cap slowly so that theoverpressure dissipates.
Engine compartment – brake fluid
The brake fluid should always be between the MIN
and MAX marks on the inside of the res-
ervoir.
Location of the brake fluid reservoir
Page 340 of 402
||
10 Maintenance and servicing
10
338
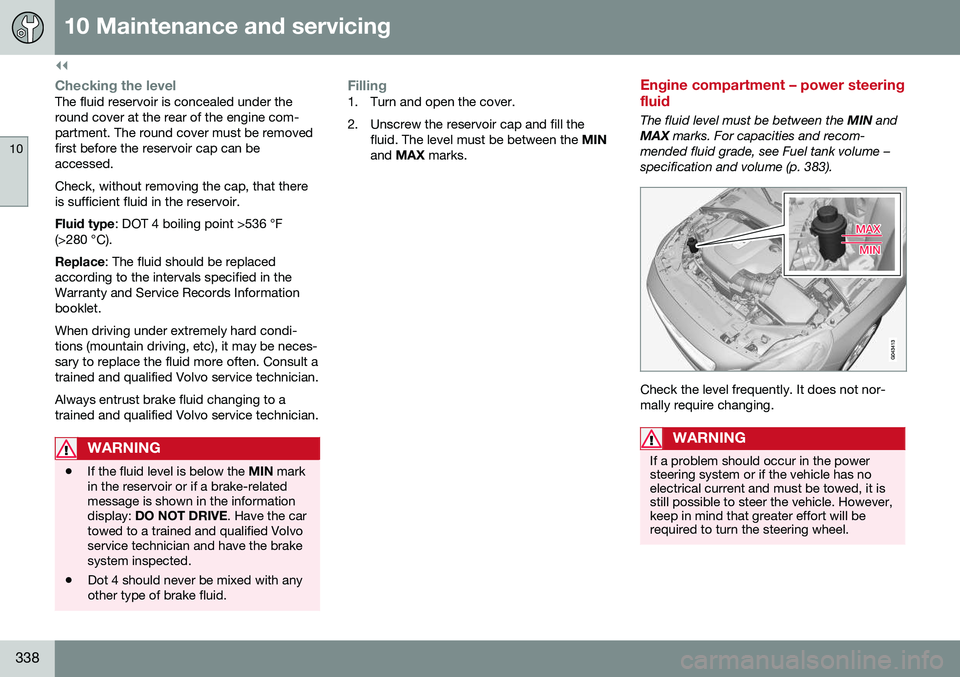
Checking the levelThe fluid reservoir is concealed under the round cover at the rear of the engine com-partment. The round cover must be removedfirst before the reservoir cap can beaccessed. Check, without removing the cap, that there is sufficient fluid in the reservoir. Fluid type: DOT 4 boiling point >536 °F
(>280 °C).Replace : The fluid should be replaced
according to the intervals specified in the Warranty and Service Records Informationbooklet. When driving under extremely hard condi- tions (mountain driving, etc), it may be neces-sary to replace the fluid more often. Consult atrained and qualified Volvo service technician. Always entrust brake fluid changing to a trained and qualified Volvo service technician.
WARNING
• If the fluid level is below the
MIN mark
in the reservoir or if a brake-related message is shown in the informationdisplay: DO NOT DRIVE . Have the car
towed to a trained and qualified Volvoservice technician and have the brakesystem inspected.
• Dot 4 should never be mixed with anyother type of brake fluid.
Filling1. Turn and open the cover.
2. Unscrew the reservoir cap and fill the
fluid. The level must be between the MIN
and MAX marks.
Engine compartment – power steering fluid
The fluid level must be between the MIN and
MAX marks. For capacities and recom-
mended fluid grade, see Fuel tank volume – specification and volume (p. 383).
Check the level frequently. It does not nor- mally require changing.
WARNING
If a problem should occur in the power steering system or if the vehicle has noelectrical current and must be towed, it isstill possible to steer the vehicle. However,keep in mind that greater effort will berequired to turn the steering wheel.
Page 342 of 402
||
10 Maintenance and servicing
10
340* Option/accessory, for more information, see Introduction.
CAUTION
Never touch the glass of bulbs with your fingers. Grease and oils from your fingersvaporize in the heat and will leave adeposit on the reflector, which will damageit.
WARNING
• The engine should not be running when changing bulbs.
• If the engine has been running justprior to replacing bulbs in the head-light housing, please keep in mind thatcomponents in the engine compart-ment will be hot.
WARNING
•
Active Bending Lights* – due to the high voltage used by these headlights,these bulbs should only be replacedby a trained and qualified Volvo serv-ice technician.
• Turn off the lights and remove theremote key from the ignition beforechanging any bulbs.
Related information
•
Bulbs – headlight housing (p. 340)
• Bulbs – taillight housing (p. 344)
• Bulbs – vanity mirror lighting (p. 346) •
Bulbs – cargo area lighting (p. 345)
• Bulbs – license plate lighting (p. 345)
Bulbs – headlight housing
The entire headlight housing must be lifted out when replacing all front bulbs.
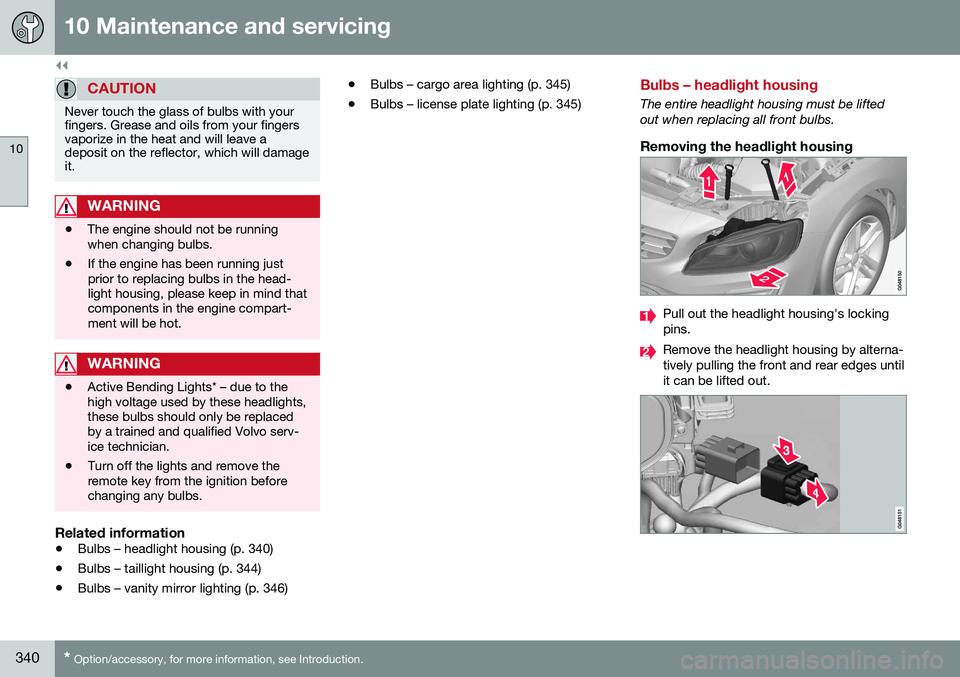
Removing the headlight housing
Pull out the headlight housing's locking pins.
Remove the headlight housing by alterna- tively pulling the front and rear edges untilit can be lifted out.
Page 358 of 402
||
10 Maintenance and servicing
10
356* Option/accessory, for more information, see Introduction.
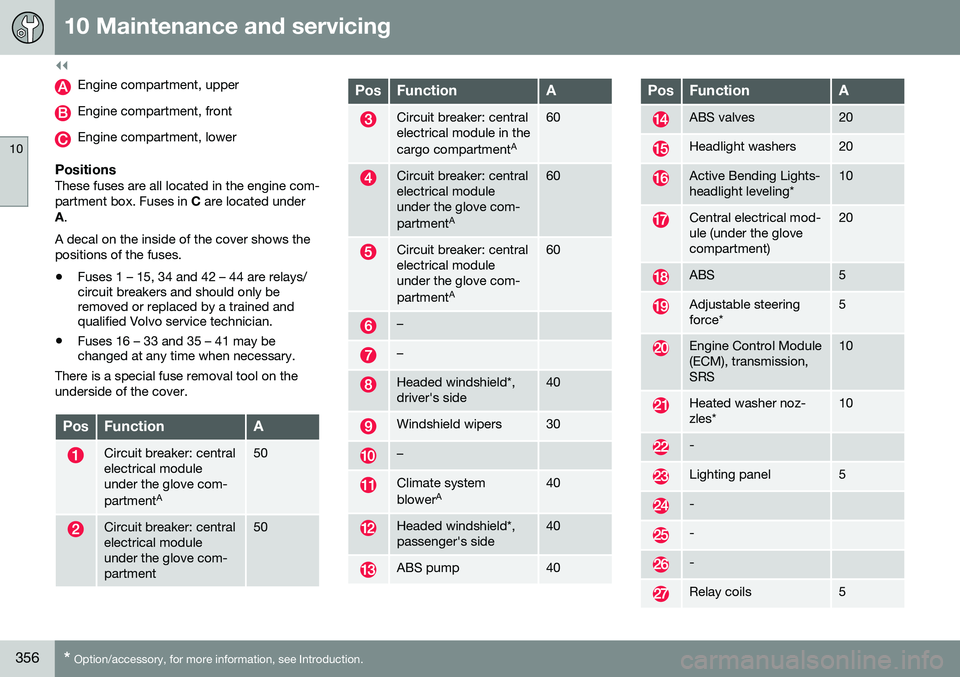
Engine compartment, upper
Engine compartment, front
Engine compartment, lower
PositionsThese fuses are all located in the engine com- partment box. Fuses in C are located under
A .
A decal on the inside of the cover shows thepositions of the fuses. • Fuses 1 – 15, 34 and 42 – 44 are relays/ circuit breakers and should only beremoved or replaced by a trained andqualified Volvo service technician.
• Fuses 16 – 33 and 35 – 41 may bechanged at any time when necessary.
There is a special fuse removal tool on the underside of the cover.
PosFunctionA
Circuit breaker: central electrical moduleunder the glove com- partment A50
Circuit breaker: central electrical moduleunder the glove com-partment50
PosFunctionA
Circuit breaker: central electrical module in the cargo compartment A60
Circuit breaker: central electrical moduleunder the glove com- partmentA60
Circuit breaker: central electrical moduleunder the glove com- partmentA60
–
–
Headed windshield*, driver's side40
Windshield wipers30
–
Climate system blowerA40
Headed windshield*, passenger's side40
ABS pump40
PosFunctionA
ABS valves20
Headlight washers20
Active Bending Lights- headlight leveling*10
Central electrical mod- ule (under the glovecompartment)20
ABS5
Adjustable steering force*5
Engine Control Module (ECM), transmission,SRS10
Heated washer noz- zles*10
-
Lighting panel5
-
-
-
Relay coils5
Page 359 of 402

10 Maintenance and servicing
10
* Option/accessory, for more information, see Introduction.357
PosFunctionA
Auxiliary lights*20
Horn15
Relay coils, Engine Control Module (ECM)10
Control module - auto- matic transmission15
A/C compressor (not 4-cyl. engines)15
Relay-coils A/C, relay coils in engine com-partment cold zone forStart/Stop5
Starter motor relay A30
Engine control module (4-cyl. engines) Ignition coils (5-cyl. engine)20
Engine Control Module (4-cyl. engines)20
Engine Control Module (5-cyl. engine)10
PosFunctionA
4-cyl. engines: mass air meter, thermostat,EVAP valve10
5-cyl. engine: Injection system, engine controlmodule15
A/C compressor (5-cyl. engine), engine valves,oil level sensor (5-cyl.only)10
Engine valves/oil pump/center heatedoxygen sensor (4-cyl.engines)15
Front/rear heated oxy- gen sensors (4-cyl.engines), EVAP valve(5-cyl. engine), heatedoxygen sensors (5-cyl.engine)15
Oil pump/crankcase ventilation heater/cool-ant pump (5-cyl.engines)10
Ignition coils (4-cyl. engines)15
PosFunctionA
Fuel leakage detection (5-cyl. engine), controlmodule for radiatorshutter (5-cyl. engine)5
Fuel leakage detection, A/C solenoid (4-cyl.engines)7.5
Coolant pump (4-cyl. engines)50
Cooling fan60 (4/5- cyl.engines)
80 (6-cyl. engines)
Power steering100
A
This position is not used on vehicles with the optional Start/Stop function, refer to the table "Engine compart-ment cold zone" in Fuses – engine compartment cold zone(Start/Stop only) (p. 362).
Related information
• Fuses – glove compartment (p. 358)
• Fuses – cargo area/trunk (p. 361)
Page 375 of 402
11 Specifications
11
373
List of labelsVehicle Emission Control Information. Your Volvo is designed to meet all appli- cable emission standards, as evidencedby the certification label on the undersideof the hood. For further information regar-ding these regulations, please consultyour Volvo retailer.
Engine oil. This label contains the recom-
mended engine oil specifications.
Vehicle Identification Number (VIN). The VIN plate is located on the top left surface of the dashboard. The VehicleIdentification Number (VIN) should alwaysbe quoted in all correspondence concern-ing your vehicle with the retailer and whenordering parts.
Tire inflation pressures. This label indi-
cates the correct inflation pressures for the tires that were on the vehicle when itleft the factory.
Federal Motor Vehicle Safety Stand- ards (FMVSS) specifications (USA) andMinistry of Transport (CMVSS) stand- ards (Canada). Your Volvo is designed to
meet all applicable safety standards, as evidenced by the certification label on thedriver's side B-pillar (the structural mem-ber at the side of the vehicle, at the rearof the driver's door opening). This labelalso includes codes for paint color, etc.For further information regarding theseregulations, please consult your Volvoretailer. U.S. models have the upperdecal; Canadian models have the lowerone.
Related information
• Weights (p. 378)
• Engine specifications (p. 379)