2016 VOLVO V60 CROSS COUNTRY warning
[x] Cancel search: warningPage 334 of 402

||
10 Maintenance and servicing
10
332
where any retailer can access or search for this information using your vehicle's VIN num-ber. This number can be found in your war-ranty booklet or on the dashboard at thelower left corner of the windshield.
–Select Maintenance & repairSend
vehicle data.
Booking information and vehicle dataWhen you opt to book service from your vehi- cle, booking information and vehicle data willbe transmitted. Vehicle data consists of anumber of parameters in the following areas:
• Service requirements
• Function status
• Fluid levels
• Odometer reading (mileage)
• Vehicle Identification Number (VIN)
• The vehicle's software version
Related information
•Volvo ID (p. 21)
Maintenance – opening/closing hood
The hood is opened by first releasing the lock from the passenger compartment and thenpressing the release control.
Opening and closing the hood
Turn the handle located under the left side of the dash approximately 20-25degrees clockwise to release the hoodlock.
Lift the hood slightly. Press the release control (located under the right front edgeof the hood) to the left, and lift the hood.
WARNING
Check that the hood locks properly when closed.
Related information
•Maintenance – owner maintenance (p. 328)
• Engine compartment – overview (p. 333)
Page 335 of 402
10 Maintenance and servicing
10
}}
333
Engine compartment – overview
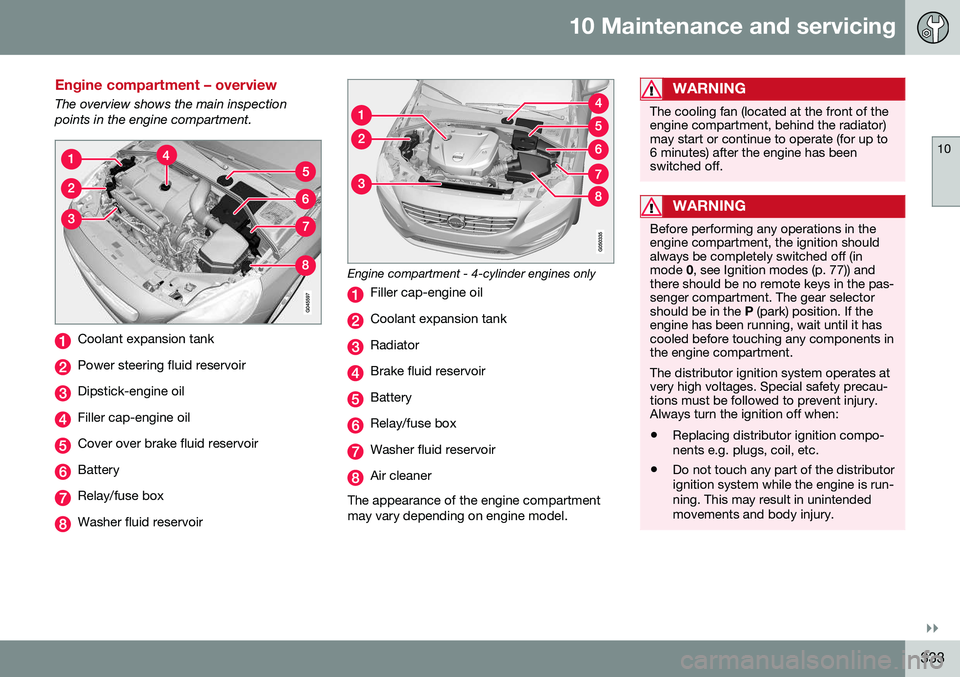
The overview shows the main inspection points in the engine compartment.
Coolant expansion tank
Power steering fluid reservoir
Dipstick-engine oil
Filler cap-engine oil
Cover over brake fluid reservoir
Battery
Relay/fuse box
Washer fluid reservoir
Engine compartment - 4-cylinder engines only
Filler cap-engine oil
Coolant expansion tank
Radiator
Brake fluid reservoir
Battery
Relay/fuse box
Washer fluid reservoir
Air cleaner
The appearance of the engine compartment may vary depending on engine model.
WARNING
The cooling fan (located at the front of the engine compartment, behind the radiator)may start or continue to operate (for up to6 minutes) after the engine has beenswitched off.
WARNING
Before performing any operations in the engine compartment, the ignition shouldalways be completely switched off (inmode 0, see Ignition modes (p. 77)) and
there should be no remote keys in the pas-senger compartment. The gear selectorshould be in the P (park) position. If the
engine has been running, wait until it hascooled before touching any components inthe engine compartment. The distributor ignition system operates at very high voltages. Special safety precau-tions must be followed to prevent injury.Always turn the ignition off when:
• Replacing distributor ignition compo- nents e.g. plugs, coil, etc.
• Do not touch any part of the distributorignition system while the engine is run-ning. This may result in unintendedmovements and body injury.
Page 337 of 402

10 Maintenance and servicing
10
}}
335
Checking and adding oil
G021734
Location of the filler cap and dipstick
NOTE
Before checking the oil: •The car should be parked on a level surface.
• If the engine is warm
, wait for at least
10 – 15 minutes after the engine hasbeen switched off.
G021737
The oil level must be between the MIN and MAX
marks on the dipstick
Checking the oil1. Pull out the dipstick and wipe it with a
lint-free rag.
2. Reinsert the dipstick, pull it out, and check the oil level. The level must be between the MIN and MAX marks.
3. Add oil if necessary. If the level is close to the MIN mark, add approximately
0.5 US quarts (0.5 liters) of oil.
4. Recheck the level and add more oil if necessary until the level is near the MAX
mark.
WARNING
Do not allow oil to spill onto or come into contact with hot exhaust pipe surfaces.
Electronic oil level sensor (4-cylinder engines only)
Oil filler cap
No action is necessary until a message is dis- played, see the following illustration.
Page 338 of 402
||
10 Maintenance and servicing
10
336* Option/accessory, for more information, see Introduction.
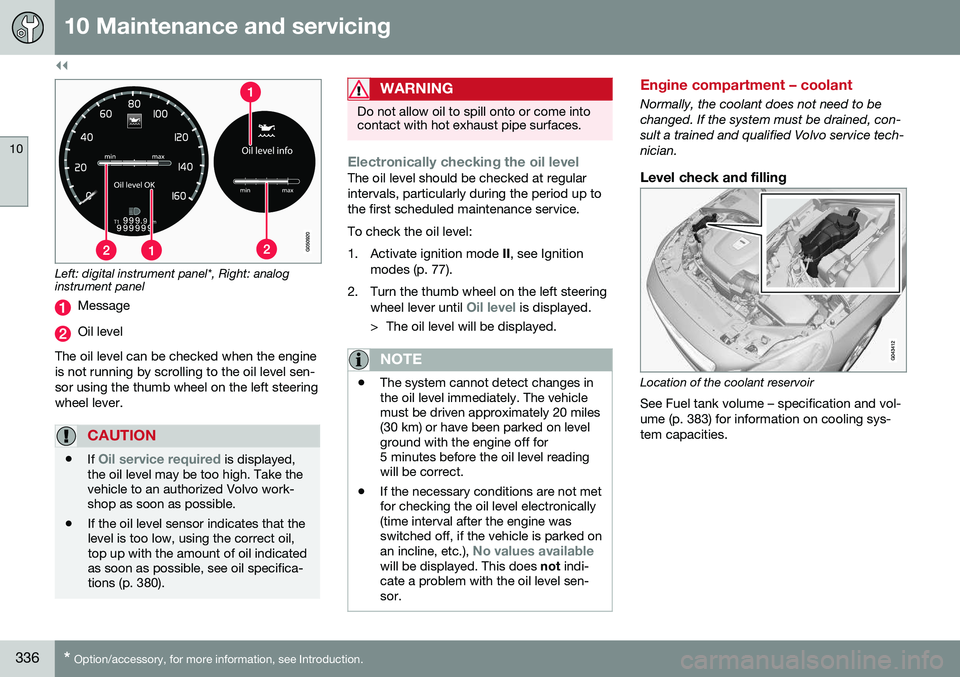
Left: digital instrument panel*, Right: analog instrument panel
Message
Oil level
The oil level can be checked when the engine is not running by scrolling to the oil level sen-sor using the thumb wheel on the left steeringwheel lever.
CAUTION
• If Oil service required is displayed,
the oil level may be too high. Take the vehicle to an authorized Volvo work-shop as soon as possible.
• If the oil level sensor indicates that thelevel is too low, using the correct oil,top up with the amount of oil indicatedas soon as possible, see oil specifica-tions (p. 380).
WARNING
Do not allow oil to spill onto or come into contact with hot exhaust pipe surfaces.
Electronically checking the oil levelThe oil level should be checked at regular intervals, particularly during the period up tothe first scheduled maintenance service. To check the oil level:
1. Activate ignition mode
II, see Ignition
modes (p. 77).
2. Turn the thumb wheel on the left steering wheel lever until
Oil level is displayed.
> The oil level will be displayed.
NOTE
• The system cannot detect changes in the oil level immediately. The vehiclemust be driven approximately 20 miles(30 km) or have been parked on levelground with the engine off for5 minutes before the oil level readingwill be correct.
• If the necessary conditions are not metfor checking the oil level electronically(time interval after the engine wasswitched off, if the vehicle is parked on an incline, etc.),
No values availablewill be displayed. This does
not indi-
cate a problem with the oil level sen- sor.
Engine compartment – coolant
Normally, the coolant does not need to be changed. If the system must be drained, con-sult a trained and qualified Volvo service tech-nician.
Level check and filling
Location of the coolant reservoir
See Fuel tank volume – specification and vol- ume (p. 383) for information on cooling sys-tem capacities.
Page 339 of 402

10 Maintenance and servicing
10
}}
337
CAUTION
•If necessary, top up the cooling sys- tem with Volvo Genuine Coolant/Anti-freeze only (a 50/50 mix of water andantifreeze).
• Different types of antifreeze/coolantmay not be mixed.
• If the cooling system is drained, itshould be flushed with clean water orpremixed anti-freeze before it is refilledwith the correct mixture of water/anti-freeze.
• The cooling system must always bekept filled to the correct level, and thelevel must be between the
MIN and
MAX marks. If it is not kept filled, there
can be high local temperatures in theengine which could result in damage.Check coolant regularly!
• Do not top up with water only. Thisreduces the rust-protective and anti-freeze qualities of the coolant and hasa lower boiling point. It can also causedamage to the cooling system if itshould freeze.
• Do not use chlorinated tap water in thevehicle's cooling system.
WARNING
•Never remove the expansion tank cap while the engine is warm. Wait until theengine cools.
• If it is necessary to top off the coolantwhen the engine is warm, unscrew theexpansion tank cap slowly so that theoverpressure dissipates.
Engine compartment – brake fluid
The brake fluid should always be between the MIN
and MAX marks on the inside of the res-
ervoir.
Location of the brake fluid reservoir
Page 340 of 402
||
10 Maintenance and servicing
10
338
Checking the levelThe fluid reservoir is concealed under the round cover at the rear of the engine com-partment. The round cover must be removedfirst before the reservoir cap can beaccessed. Check, without removing the cap, that there is sufficient fluid in the reservoir. Fluid type: DOT 4 boiling point >536 °F
(>280 °C).Replace : The fluid should be replaced
according to the intervals specified in the Warranty and Service Records Informationbooklet. When driving under extremely hard condi- tions (mountain driving, etc), it may be neces-sary to replace the fluid more often. Consult atrained and qualified Volvo service technician. Always entrust brake fluid changing to a trained and qualified Volvo service technician.
WARNING
• If the fluid level is below the
MIN mark
in the reservoir or if a brake-related message is shown in the informationdisplay: DO NOT DRIVE . Have the car
towed to a trained and qualified Volvoservice technician and have the brakesystem inspected.
• Dot 4 should never be mixed with anyother type of brake fluid.
Filling1. Turn and open the cover.
2. Unscrew the reservoir cap and fill the
fluid. The level must be between the MIN
and MAX marks.
Engine compartment – power steering fluid
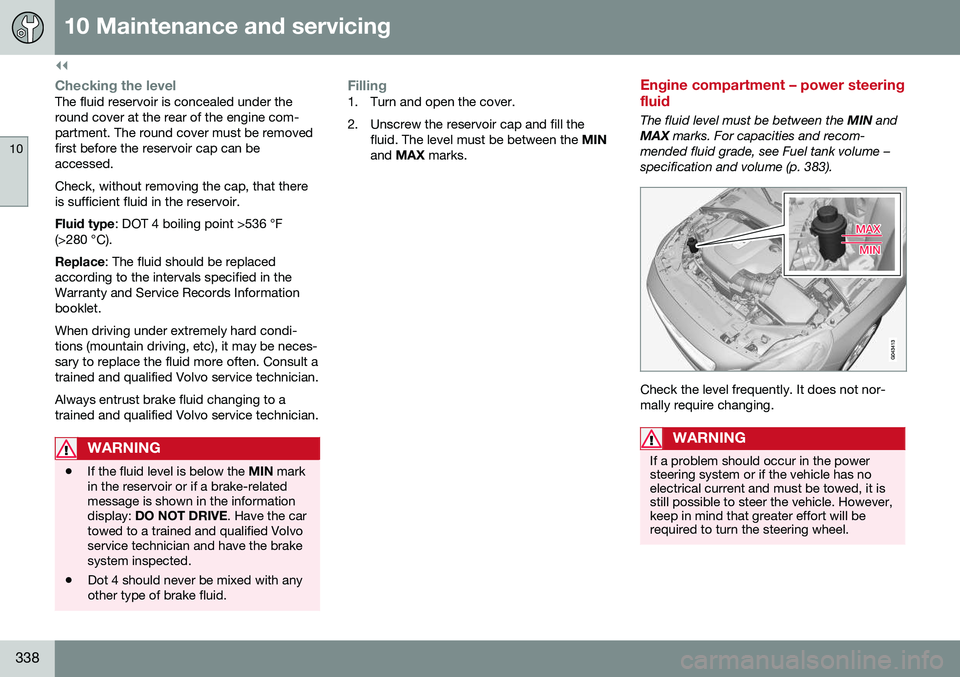
The fluid level must be between the MIN and
MAX marks. For capacities and recom-
mended fluid grade, see Fuel tank volume – specification and volume (p. 383).
Check the level frequently. It does not nor- mally require changing.
WARNING
If a problem should occur in the power steering system or if the vehicle has noelectrical current and must be towed, it isstill possible to steer the vehicle. However,keep in mind that greater effort will berequired to turn the steering wheel.
Page 342 of 402
||
10 Maintenance and servicing
10
340* Option/accessory, for more information, see Introduction.
CAUTION
Never touch the glass of bulbs with your fingers. Grease and oils from your fingersvaporize in the heat and will leave adeposit on the reflector, which will damageit.
WARNING
• The engine should not be running when changing bulbs.
• If the engine has been running justprior to replacing bulbs in the head-light housing, please keep in mind thatcomponents in the engine compart-ment will be hot.
WARNING
•
Active Bending Lights* – due to the high voltage used by these headlights,these bulbs should only be replacedby a trained and qualified Volvo serv-ice technician.
• Turn off the lights and remove theremote key from the ignition beforechanging any bulbs.
Related information
•
Bulbs – headlight housing (p. 340)
• Bulbs – taillight housing (p. 344)
• Bulbs – vanity mirror lighting (p. 346) •
Bulbs – cargo area lighting (p. 345)
• Bulbs – license plate lighting (p. 345)
Bulbs – headlight housing
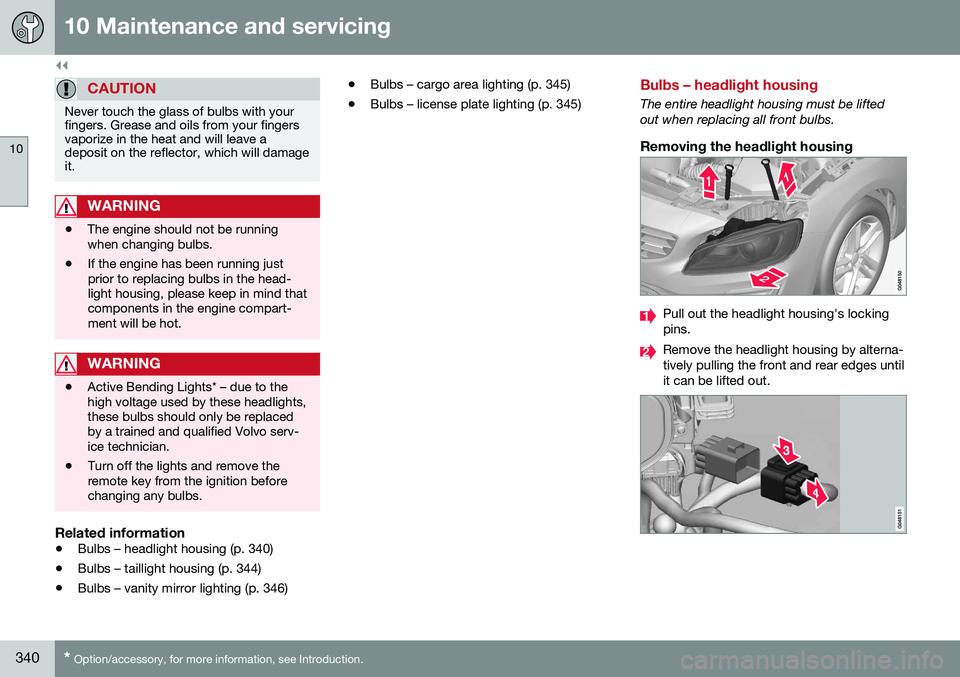
The entire headlight housing must be lifted out when replacing all front bulbs.
Removing the headlight housing
Pull out the headlight housing's locking pins.
Remove the headlight housing by alterna- tively pulling the front and rear edges untilit can be lifted out.
Page 352 of 402
10 Maintenance and servicing
10
350
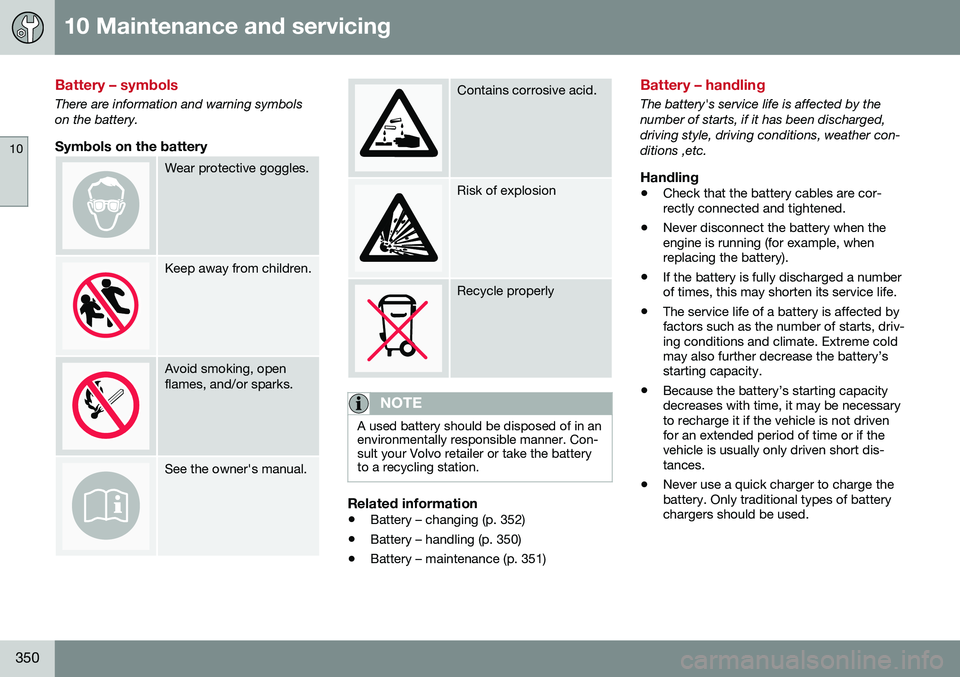
Battery – symbols
There are information and warning symbols on the battery.
Symbols on the battery
Wear protective goggles.
Keep away from children.
Avoid smoking, open flames, and/or sparks.
See the owner's manual.
Contains corrosive acid.
Risk of explosion
Recycle properly
NOTE
A used battery should be disposed of in an environmentally responsible manner. Con-sult your Volvo retailer or take the batteryto a recycling station.
Related information
•Battery – changing (p. 352)
• Battery – handling (p. 350)
• Battery – maintenance (p. 351)
Battery – handling
The battery's service life is affected by the number of starts, if it has been discharged,driving style, driving conditions, weather con-ditions ,etc.
Handling
• Check that the battery cables are cor- rectly connected and tightened.
• Never disconnect the battery when theengine is running (for example, whenreplacing the battery).
• If the battery is fully discharged a numberof times, this may shorten its service life.
• The service life of a battery is affected byfactors such as the number of starts, driv-ing conditions and climate. Extreme coldmay also further decrease the battery’sstarting capacity.
• Because the battery’s starting capacitydecreases with time, it may be necessaryto recharge it if the vehicle is not drivenfor an extended period of time or if thevehicle is usually only driven short dis-tances.
• Never use a quick charger to charge thebattery. Only traditional types of batterychargers should be used.