2016 VOLVO V60 CROSS COUNTRY high beam
[x] Cancel search: high beamPage 93 of 402

03 Instruments and controls
03
* Option/accessory, for more information, see Introduction.91
Cornering lights 18Models equipped with ABL also have front cornering lights that temporarily provide extralight to the front left or right of the vehicle atlow speeds when making a sharp turn (forexample, when turning into a parking space)or when the turn signals are used. This feature is activated when: •
High or low beam headlights are on
and
• The vehicle's speed is below 20 mph (30 km/h)
The feature is also activated when the vehicle is backing up. The cornering lights are deactivated when the vehicle's speed exceeds approx. 25 mph(40 km/h).
Related information
• Lighting panel (p. 87)
• High/low beam headlights (p. 88)
• Active high beams (AHB)* (p. 88)
Auxiliary lights*
If the vehicle is fitted with auxiliary lights, the driver can use the
MY CAR menu system to
choose to deactivate and turn these lights onand off along with the high beam headlights. The auxiliary lights must be connected to the vehicle's electrical system, which should onlybe done by a trained and authorized Volvoservice technician. See My Car – introduction(p. 74) for more information about the menusystem.
Instrument and "theater" lighting
Instrument lightingIllumination of the display and instrument lights will vary, depending on ignition mode. The display lighting is automatically subdued in darkness and the sensitivity is set with thethumb wheel. The intensity of the instrument lighting is adjusted with the thumb wheel.
"Theater" lightingWhen the overhead courtesy lighting hasgone out and the engine is running, severalLEDs located near the roof console illuminateto provide faint lighting for the occupants ofthe front seats. This lighting goes out justafter the overhead courtesy lighting when thevehicle is locked.
Related information
• Lighting panel (p. 87)
• Front interior lighting (p. 94)
• Rear interior lighting (p. 95)
• Ignition modes (p. 77)
18
Certain models only
Page 94 of 402

03 Instruments and controls
03
92
Parking lights
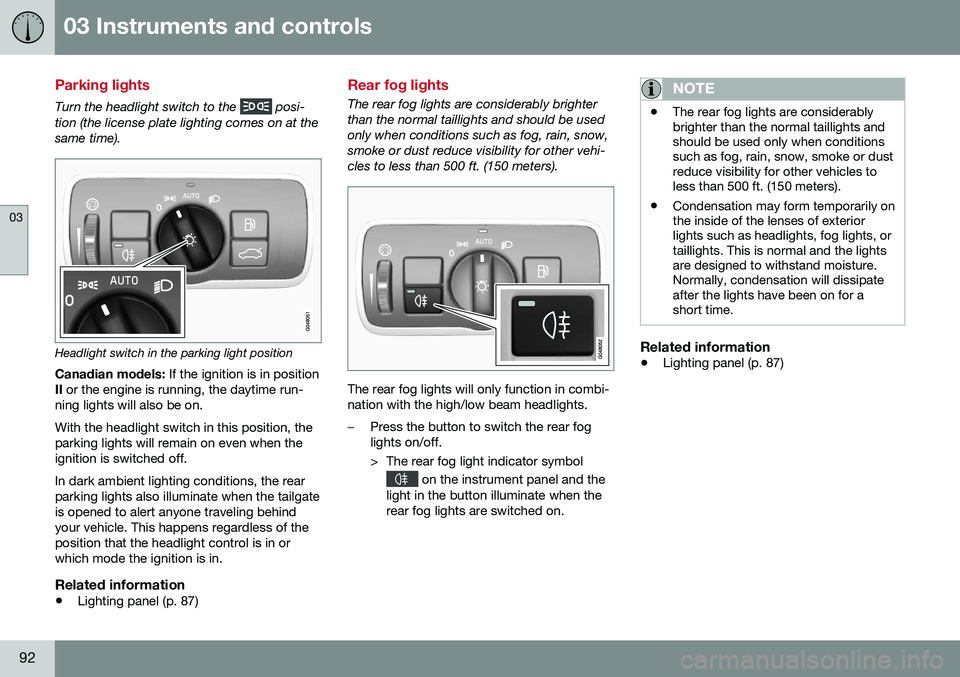
Turn the headlight switch to the posi-
tion (the license plate lighting comes on at the same time).
Headlight switch in the parking light position
Canadian models: If the ignition is in position
II or the engine is running, the daytime run-
ning lights will also be on. With the headlight switch in this position, the parking lights will remain on even when theignition is switched off. In dark ambient lighting conditions, the rear parking lights also illuminate when the tailgateis opened to alert anyone traveling behindyour vehicle. This happens regardless of theposition that the headlight control is in orwhich mode the ignition is in.
Related information
• Lighting panel (p. 87)
Rear fog lights
The rear fog lights are considerably brighter than the normal taillights and should be usedonly when conditions such as fog, rain, snow,smoke or dust reduce visibility for other vehi-cles to less than 500 ft. (150 meters).
The rear fog lights will only function in combi- nation with the high/low beam headlights.
–Press the button to switch the rear fog lights on/off.
> The rear fog light indicator symbol
on the instrument panel and the
light in the button illuminate when the rear fog lights are switched on.
NOTE
• The rear fog lights are considerably brighter than the normal taillights andshould be used only when conditionssuch as fog, rain, snow, smoke or dustreduce visibility for other vehicles toless than 500 ft. (150 meters).
• Condensation may form temporarily onthe inside of the lenses of exteriorlights such as headlights, fog lights, ortaillights. This is normal and the lightsare designed to withstand moisture.Normally, condensation will dissipateafter the lights have been on for ashort time.
Related information
•
Lighting panel (p. 87)
Page 99 of 402

03 Instruments and controls
03
}}
* Option/accessory, for more information, see Introduction.97
Rain sensor*
The rain sensor automatically regulates wiper speed according to the amount of water onthe windshield. The sensitivity of the rain sensor can be adjusted moving the thumb wheel up (thewipers will sweep the windshield more fre-quently) or down (the wipers will sweep thewindshield less frequently).
NOTE
The wipers will make an extra sweep each time the thumb wheel is adjusted upward.
When the rain sensor is activated, the symbol
will illuminate in the instrument panel.
Activating and setting the sensitivityWhen activating the rain sensor, the vehicle must be running or in ignition mode II and the
windshield wiper lever must be in position 0
or in the single sweep position. Activate the rain sensor by pressing the but- ton
. The windshield wipers will make
one sweep. Press the lever up for the wipers to make an extra sweep. The rain sensor returns to activemode when the stalk is released back toposition 0.
DeactivatingDeactivate the rain sensor by pressing the button
or press the lever down to
another wiper position. The rain sensor is automatically deactivated when the key is removed from the ignitionslot or five minutes after the ignition has beenswitched off.
CAUTION
The rain sensor should be deactivated when washing the car in an automatic carwash, etc. If the rain sensor function is lefton, the wipers will start inadvertently in thecar wash and could be damaged.
Windshield washer
Move the lever toward the steering wheel to start the windshield and headlight washers.After the lever is released the wipers makeseveral extra sweeps.
Washing function
Heated washer nozzles*The washer nozzles are heated automatically in cold weather to help prevent the washerfluid from freezing.
High-pressure headlight washing*High-pressure headlight washing consumes alarge quantity of washer fluid. To save fluid,the headlights are washed using two alterna-tives:
• Low/high beam headlights on.
The
headlights will be washed the first time the windshield is washed. Thereafter, theheadlights will only be washed once for
Page 201 of 402

07 Driver support
07
}}
199
City Safety – operation
Using City Safety™
NOTE
The City Safety™ function is activated automatically each time the engine hasbeen switched off and restarted.
On and OffIn certain situations, it may be desirable to switch City Safety™ off, such as when drivingin close quarters where leaves, branches, etc.may obscure the hood and windshield. When the engine is running, City Safety™ can be switched off as follows: Press My Car in the center console control
panel and go to
SettingsCar settings
Driver support systemsCity Safety.
Select
Off.
If the engine is switched off, City Safety™ will reactivate when the engine is restarted.
WARNING
The laser sensor emits light when the igni- tion is in mode II or higher, even if City
Safety™ has been switched off.
To switch City Safety™ on again:
• Follow the same procedure as for switch- ing City Safety™ off but select
On.
Related information
•City Safety – introduction (p. 197)
• City Safety – function (p. 198)
• City Safety – limitations (p. 199)
• City Safety – troubleshooting (p. 200)
• City Safety – symbols and messages (p. 202)
• City Safety – Laser sensor (p. 203)
• My Car – introduction (p. 74)
City Safety – limitations
Limitations
WARNING
The laser sensor has certain limitations and its function may be reduced (or it maynot function at all) in conditions such asheavy rain or snowfall, or by dense fog orthick, blowing dust or snow. Condensa-tion, dirt, ice or snow on the windshieldmay also interfere with the sensor’s func-tion.
The sensor used by City Safety™ is designed to detect cars and other larger motor vehiclesahead of your vehicle in both daylight anddarkness. Objects such as warning flags hanging from long objects on the roof or accessories suchas auxiliary lights or protective arches on thefront of the vehicle that are higher than thehood may also impede the sensor’s function. Braking distance to the vehicle ahead increa- ses on slippery road surfaces, which mayreduce City Safety’s capacity to avoid a colli-sion. In situations like this, the stability sys-tem (see Stability system – introduction(p. 169)) will help provide the best possiblebraking capacity and stability. City Safety™ emits a laser beam and meas- ures the way in which the light is reflected.
Page 205 of 402

07 Driver support
07
}}
203
City Safety – Laser sensor
The laser sensor
The upper decal describes the laser beam's classification and contains the following text: Invisible Laser radiation – Do not view directly with optical instruments (magnifiers) – Class1M laser product. The lower decal describes the laser beam's physical data and contains the text: IEC 60825-1:1993 + A2:2001. Complies with FDA performance standards for laser prod-ucts except for deviations pursuant to LaserNotice No. 50, dated July 26th, 2001 The laser beam's physical data is listed in the following table:
Maximum pulse energy2.64 μJ
Maximum average output45 mW
Pulse length33 ns
Divergence (horizontal × verti- cal)28° × 12°
NOTE
The function of aftermarket laser detectors may be affected by City Safety's laser sen-sor.
WARNING
The laser sensor emits light when the igni- tion is in mode II or higher, even if City
Safety™ has been switched off.
WARNING
Eye injury may occur if any of the following points are not followed: • It is essential that all pertinent instruc- tions be followed when handling laserinstruments. Testing, repairing, remov-ing, adjusting and/or replacing anycomponents in the laser sensor mayonly be done by a trained and qualifiedVolvo service technician.
• Do not remove the laser sensor(including removal of the lenses). Alaser sensor that has been removedbelongs to laser class 3B according tostandard IEC 60825-1. Devices in laserclass 3B present a risk of injury to theeyes.
• The laser sensor’s connector must bedisconnected before the sensor isremoved from the windshield.
• The laser sensor must be mounted inplace on the windshield before con-necting the sensor’s connector.
• Do not view the laser sensor (whichemits spreading, invisible laser beams)with optical instruments from a dis-tance of less than 4 inches (100 mm).
Related information
•
City Safety – introduction (p. 197)
• City Safety – function (p. 198)
• City Safety – operation (p. 199)
Page 214 of 402

07 Driver support
07
212* Option/accessory, for more information, see Introduction.
The camera’s limitations
The camera has the same limitations as the human eye. The camera is used by Pedestrian and Cyclist Detection with Full Auto Brake Collision warn-ing – introduction (p. 204), Active High Beams(Active high beams (AHB)* (p. 88)), Road SignInformation (Road Sign Information (RSI)* –introduction (p. 174)) and Driver Alert System(Driver Alert System (p. 217)) with LaneDeparture Warning or Lane Keeping Aid.
NOTE
• To help protect the camera in very hot conditions, it may be temporarilyswitched off for approximately 15minutes after the engine has beenstarted.
• Keep the section of the windshield infront of the camera clean and free ofice, snow, or condensation.
WARNING
•
The camera has the same type of limi- tations as the human eye, i.e., it can-not see as well in heavy snowfall orrain, thick fog or in heavy blowing dustor snow. In such conditions, systemsdepending on the camera may experi-ence greatly reduced functionality ormay be temporarily deactivated.
• Never place any objects, decals, etc.,on the windshield in front of the cam-era. This could reduce or block thecamera’s function, and could causeone or more of the systems that utilizethe camera to stop functioning.
• Strong sunlight, reflections from theroad surface, ice or snow covering theroad, a dirty road surface, or unclearlane marker lines may drasticallyreduce the camera’s capacity todetect the side of a lane, a pedestrian,a cyclist or another vehicle.
Related information
•
Collision warning – introduction (p. 204)
• Collision warning* – function (p. 206)
• Collision warning* – operation (p. 207)
• Collision warning* – Pedestrian detection (p. 209)
• Collision warning* – Cyclist detection(p. 208)
• Collision warning* – limitations (p. 210) •
Collision warning – troubleshooting(p. 213)
• Collision warning – symbols and mes-sages (p. 215)
• Road Sign Information (RSI)* – introduc-tion (p. 174)
• Driver Alert System (p. 217)
• Active high beams (AHB)* (p. 88)
Page 281 of 402

08 Starting and driving
08
}}
279
Engine and cooling system
Under special conditions, for example when driving in hilly terrain, extreme heat or withheavy loads, there is a risk that the engine andcooling system will overheat. Proceed as follows to avoid overheating the engine. •Maintain a low speed when driving with a trailer up long, steep hills. For informa-tion, see Towing a trailer (p. 287)
• Do not turn the engine off immediatelywhen stopping after a hard drive.
WARNING
The cooling fan may start or continue to operate (for up to 6 minutes) after theengine has been switched off.
•
Remove any auxiliary lights from in front of the grille when driving in hot weatherconditions.
• Do not exceed engine speeds of4500 rpm if driving with a trailer in hillyterrain. The oil temperature could becometoo high.
Conserving electrical current
Keep the following in mind to help minimize battery drain:
• When the engine is not running, avoid using ignition mode
II. Many electrical
systems (the audio system, the optionalnavigation system, power windows, etc)will function in ignition modes 0 and I.
These modes reduce drain on the battery.
• Please keep in mind that using systems,accessories, etc., that consume a greatdeal of current when the engine is notrunning could result in the battery beingcompletely drained. Driving or having theengine running for approximately15 minutes will help keep the batterycharged.
• The optional 12-volt socket in the cargoarea (p. 138) area provides electrical cur-rent even with the ignition switched off,which drains the battery.
Before a long distance trip
It is always worthwhile to have your vehicle checked by a trained and qualified Volvo serv-ice technician before driving long distances.Your retailer will also be able to supply youwith bulbs, fuses, spark plugs and wiperblades for your use in the event that problemsoccur. As a minimum, the following items should be checked before any long trip:
• Check that engine runs smoothly and that fuel consumption is normal.
• Check for fuel, oil, and fluid leakage.
• Have the transmission oil level (p. 383)checked.
• Check condition of drive belts.
• Check state of the battery's charge.
• Examine tires carefully (the spare tire aswell), and replace those that areworn (p. 295). Check tire pres-sure (p. 302).
• The brakes, front wheel alignment, andsteering gear should be checked by atrained and qualified Volvo service techni-cian only.
• Check all lights, including high beams.
• Reflective warning triangles are legallyrequired in some states/provinces.
• Have a word with a trained and qualifiedVolvo service technician if you intend to
Page 343 of 402

10 Maintenance and servicing
10
}}
341
CAUTION
When disconnecting the connector, pull on the connector itself and not on the wiring.
Unplug the wiring connector by holding down the clip with your thumb.
Pull the connector out with the other hand.
5. Lift out the headlight housing and place it on a soft surface to avoid scratching thelens.
6. Replace the defective bulb(s).
Reinserting the headlight housing
1. Plug in the connector until it clicks into place. 2. Reinstall the headlight housing and lock-
ing pins. The short locking pin should be closest to the grille. Check that they arecorrectly inserted. The headlight housing must be properly in place and the wiring connector cor-rectly reconnected before the lighting isswitched on or the remote key is insertedinto the ignition slot.
3. Check that the lights function properly.
Related information
• Bulbs – introduction (p. 339)
• Bulbs – cover (p. 341)
• Bulbs – specifications (p. 346)
Bulbs – cover
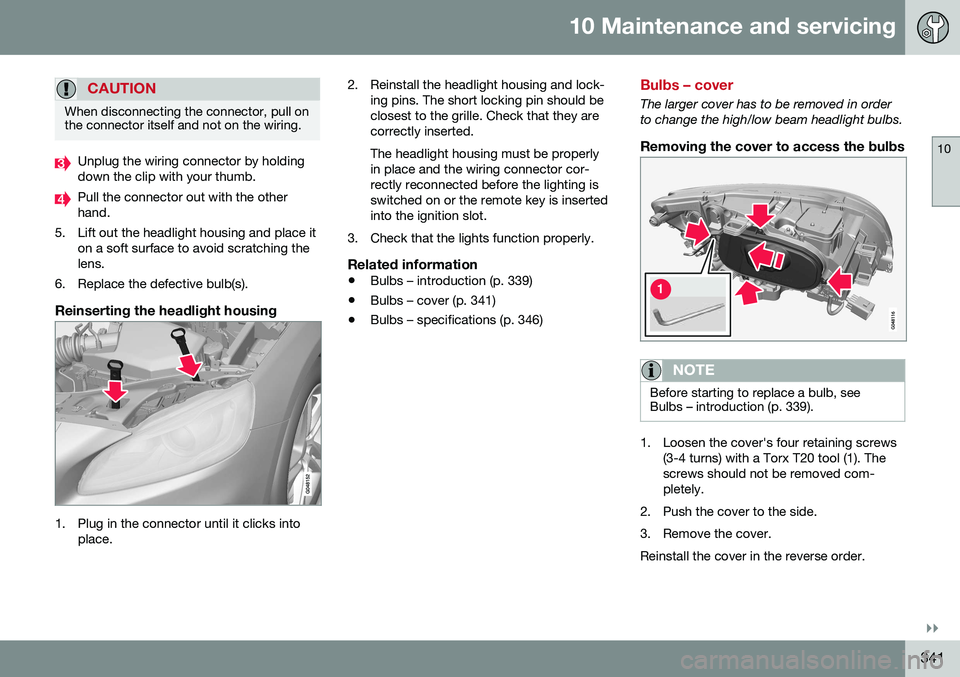
The larger cover has to be removed in order to change the high/low beam headlight bulbs.
Removing the cover to access the bulbs
NOTE
Before starting to replace a bulb, see Bulbs – introduction (p. 339).
1. Loosen the cover's four retaining screws
(3-4 turns) with a Torx T20 tool (1). The screws should not be removed com-pletely.
2. Push the cover to the side.
3. Remove the cover.Reinstall the cover in the reverse order.