2016 VOLVO S80 dashboard
[x] Cancel search: dashboardPage 37 of 380

02 Safety
02
35
Airbag decals
Airbag decal on the outside of both sun visors
Passenger's side airbag decal
WARNING
•Children must never be allowed in the front passenger's seat.
• Occupants in the front passenger'sseat must never sit on the edge of theseat, sit leaning toward the instrumentpanel or otherwise sit out of position.
• The occupant's back must be asupright as comfort allows and beagainst the seat back with the seatbelt properly fastened.
• Feet must be on the floor, e.g., not onthe dash, seat or out of the window.
WARNING
•
No objects or accessory equipment, e.g. dashboard covers, may be placedon, attached to, or installed near theair bag hatch (the area above the glovecompartment) or the area affected byairbag deployment.
• There should be no loose articles,such as coffee cups on the floor, seat,or dashboard area.
• Never try to open the airbag cover onthe steering wheel or the passenger'sside dashboard. This should only bedone by a trained and qualified Volvoservice technician.
• Failure to follow these instructions canresult in injury to the vehicle occu-pants.
Related information
•
Occupant Weight Sensor (p. 36)
• Side impact protection (SIPS) airbags (p. 39)
• Inflatable Curtain (IC) (p. 41)
• Supplemental Restraint System (SRS)(p. 31)
Page 121 of 380

04 Climate
04
* Option/accessory, for more information, see Introduction.119
Climate – sensors
The climate system utilizes a number of sen- sors to help regulate the temperature andhumidity level in the passenger compartment.
Sensor location
• The sunlight sensor is located on the top side of the dashboard.
NOTE
The sunlight sensor monitors which side of the car that is most exposed to sunlight.This can mean that the temperature maydiffer between the right and left-side airvents, even if the temperatures set for bothsides of the passenger compartment arethe same.
•The temperature sensor for the passen- ger compartment is located below the cli-mate control panel.
• The outside (ambient) temperature sensoris located on the door mirror.
• The humidity sensor* is located in theinterior rearview mirror.
NOTE
Do not cover or block the sensors with clothing or other objects.
Related information
•
Climate – general information (p. 118)
Air quality
The passenger compartment has been designed to be pleasant and comfortable,even for people with asthma and contactallergies.
Passenger compartment filterReplace the cabin air filter with a new one atthe recommended intervals. Please refer toyour Warranty and Service Records Informa-tion booklet, or consult a trained and qualifiedVolvo service technician for these intervals.The filter should be replaced more often whendriving under dirty and dusty conditions. Thefilter cannot be cleaned and therefore shouldalways be replaced with a new one.
NOTE
There are different types of cabin air filters. Ensure that the correct type is installed.
Interior Air Quality System (IAQS)A multifilter helps reduce gases and particles in the incoming air, thereby reducing the lev-els of odors and contaminants entering thevehicle. The air quality sensor detectsincreased levels of contaminants in the out-side air. When the air quality sensor detectscontaminated outside air, the air intake closesand the air inside the passenger compart-ment is recirculated, i.e., no outside air entersthe vehicle. The filter also cleans recirculatedpassenger compartment air.
NOTE
Contact your Volvo retailer for IAQS air fil- ter replacement intervals.
Materials used in the cabinThe materials used in the cabin have been developed to help minimize the amount ofdust and make the cabin easier to keepclean. All floor mats can be easily removedfor cleaning. Use car cleaning products rec-ommended by Volvo. See also the informa-tion in Cleaning the interior (p. 347).
Related information
•Climate – general information (p. 118)
• Interior Air Quality System (IAQS)* (p. 120)
• Climate – menu settings (p. 120)
Page 123 of 380
04 Climate
04
* Option/accessory, for more information, see Introduction.121
Air distribution – general
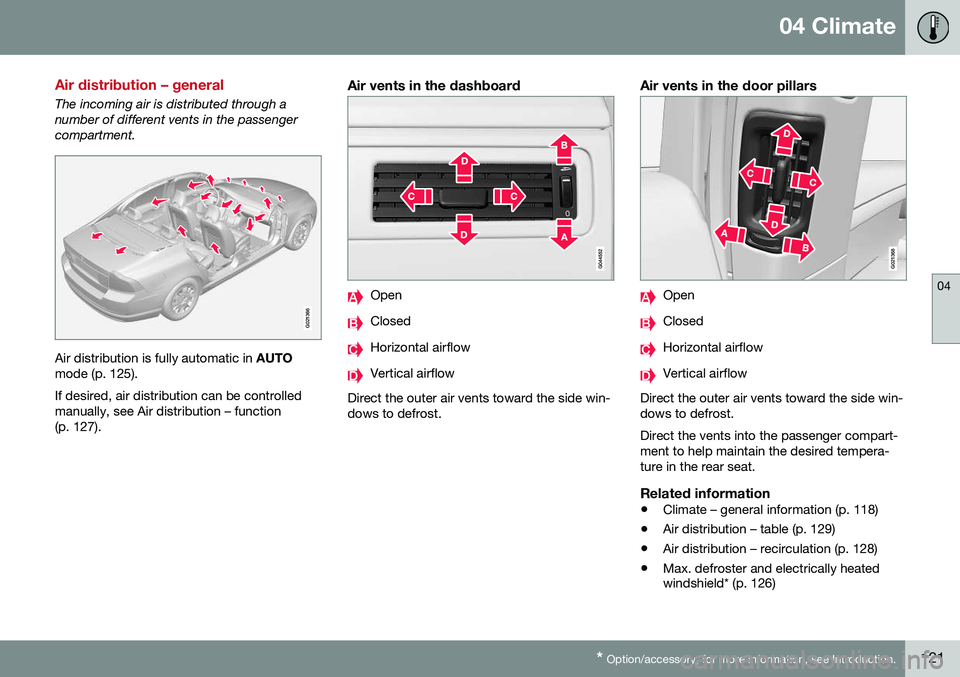
The incoming air is distributed through a number of different vents in the passengercompartment.
G021366
Air distribution is fully automatic in AUTO
mode (p. 125). If desired, air distribution can be controlled manually, see Air distribution – function(p. 127).
Air vents in the dashboard
Open
Closed
Horizontal airflow
Vertical airflow
Direct the outer air vents toward the side win- dows to defrost.
Air vents in the door pillars
G021368
Open
Closed
Horizontal airflow
Vertical airflow
Direct the outer air vents toward the side win- dows to defrost. Direct the vents into the passenger compart- ment to help maintain the desired tempera-ture in the rear seat.
Related information
• Climate – general information (p. 118)
• Air distribution – table (p. 129)
• Air distribution – recirculation (p. 128)
• Max. defroster and electrically heated windshield* (p. 126)
Page 124 of 380
04 Climate
04
122* Option/accessory, for more information, see Introduction.
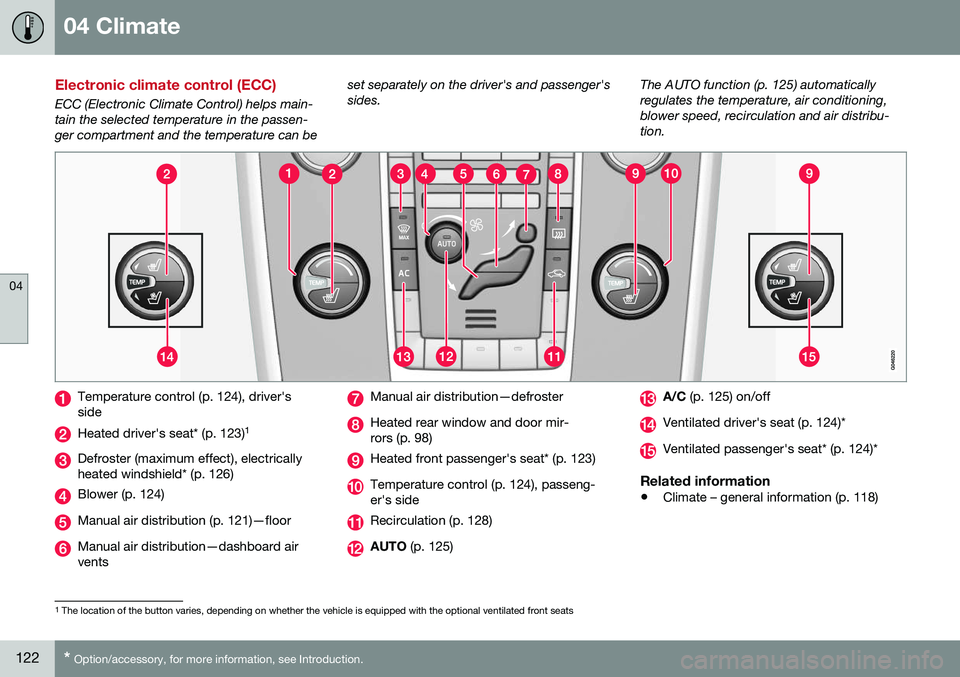
Electronic climate control (ECC)
ECC (Electronic Climate Control) helps main- tain the selected temperature in the passen-ger compartment and the temperature can be set separately on the driver's and passenger'ssides.
The AUTO function (p. 125) automaticallyregulates the temperature, air conditioning,blower speed, recirculation and air distribu-tion.
Temperature control (p. 124), driver's side
Heated driver's seat* (p. 123)
1
Defroster (maximum effect), electrically heated windshield* (p. 126)
Blower (p. 124)
Manual air distribution (p. 121)—floor
Manual air distribution—dashboard air vents
Manual air distribution—defroster
Heated rear window and door mir- rors (p. 98)
Heated front passenger's seat* (p. 123)
Temperature control (p. 124), passeng- er's side
Recirculation (p. 128)
AUTO
(p. 125)
A/C (p. 125) on/off
Ventilated driver's seat (p. 124)*
Ventilated passenger's seat* (p. 124)*
Related information
•Climate – general information (p. 118)
1
The location of the button varies, depending on whether the vehicle is equipped with the optional ventilated front seats
Page 129 of 380
04 Climate
04
127
Related information
•Climate – general information (p. 118)
• Automatic climate control (p. 125)
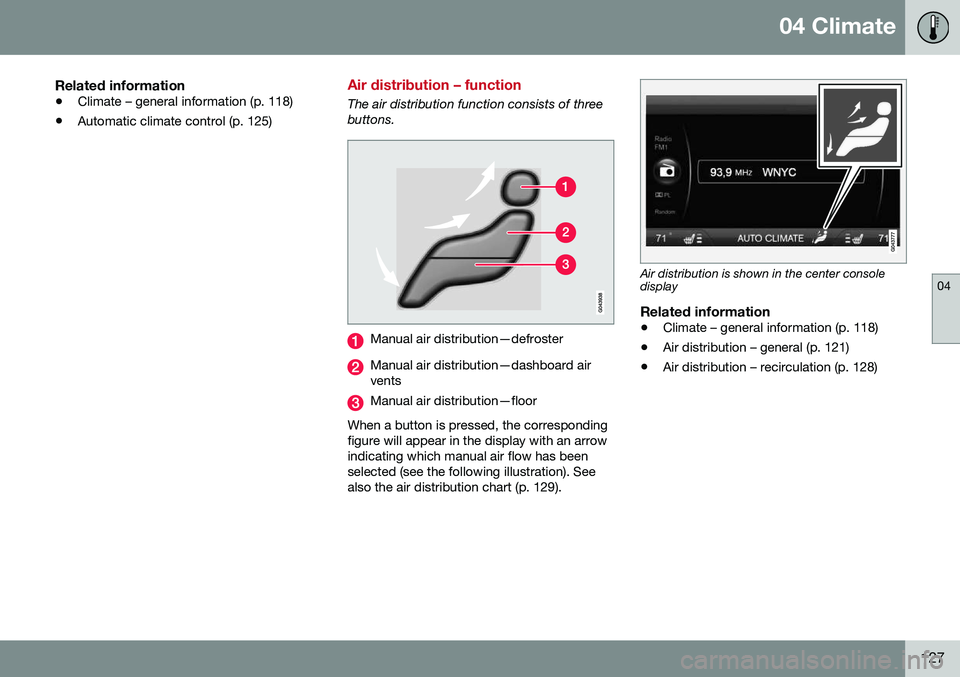
Air distribution – function
The air distribution function consists of three buttons.
Manual air distribution—defroster
Manual air distribution—dashboard air vents
Manual air distribution—floor
When a button is pressed, the corresponding figure will appear in the display with an arrowindicating which manual air flow has beenselected (see the following illustration). Seealso the air distribution chart (p. 129).
Air distribution is shown in the center console display
Related information
• Climate – general information (p. 118)
• Air distribution – general (p. 121)
• Air distribution – recirculation (p. 128)
Page 131 of 380
04 Climate
04
}}
129
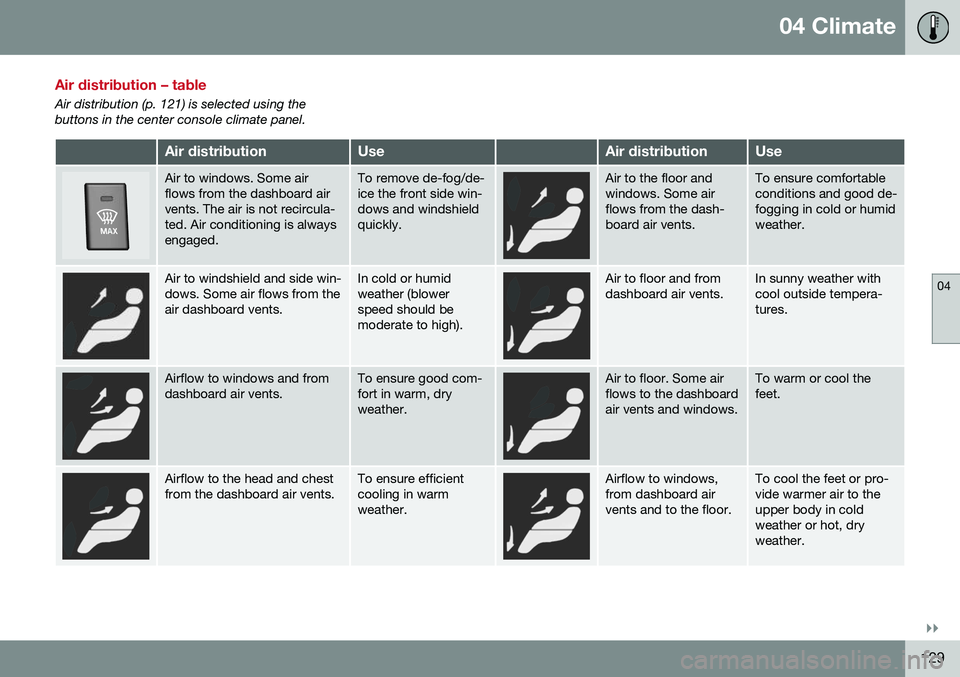
Air distribution – table
Air distribution (p. 121) is selected using the buttons in the center console climate panel.
Air distributionUseAir distributionUse
Air to windows. Some air flows from the dashboard airvents. The air is not recircula-ted. Air conditioning is alwaysengaged.To remove de-fog/de- ice the front side win-dows and windshieldquickly.Air to the floor and windows. Some airflows from the dash-board air vents.To ensure comfortable conditions and good de-fogging in cold or humidweather.
Air to windshield and side win- dows. Some air flows from theair dashboard vents.In cold or humid weather (blowerspeed should bemoderate to high).Air to floor and from dashboard air vents.In sunny weather with cool outside tempera-tures.
Airflow to windows and from dashboard air vents.To ensure good com- fort in warm, dryweather.Air to floor. Some air flows to the dashboardair vents and windows.To warm or cool the feet.
Airflow to the head and chest from the dashboard air vents.To ensure efficient cooling in warmweather.Airflow to windows, from dashboard airvents and to the floor.To cool the feet or pro- vide warmer air to theupper body in coldweather or hot, dryweather.
Page 146 of 380

||
06 Locks and alarm
06
144* Option/accessory, for more information, see Introduction.
After a short pause, press the Unlock button a second time within 10 seconds to unlockthe other doors and the trunk. This function can be changed so that all doors unlock at the same time by pressing My Car and going to
SettingsCar
settings
Lock settingsChange doors
unlock setting. For a description of the menu
system, see My Car – introduction (p. 70).
Approach lighting – As you approach
the vehicle, press the button on the remote key to light the interior lighting, parking lights,license plate lighting and the lights in the doormirrors*. These lights will switch off automatically after 30, 60 or 90 seconds. For a description of themenu system, see My Car – introduction(p. 70).
Unlock/open trunk
Press once: This unlocks the trunk (but does
not open it) and disarms the alarm (the alarm indicator light on the dashboard will go out). Ifthe trunk is not opened within two minutes itwill automatically relock and the alarm will berearmed. Press twice: This both unlocks the trunk and
pops it open slightly.
NOTE
Any excess weight (snow, etc.) on the trunk lid may prevent it from opening.
For information on opening the trunk from the passenger compartment, see Locking/unlocking – trunk (p. 156). After closing, the trunk will not automatically relock. Press Lock to relock it and rearm thealarm.
Panic alarm – This button can be used
to attract attention during emergency situa- tions. To activate the panic alarm, press and hold this button for at least 3 seconds or press ittwice within 3 seconds. The turn signals andhorn will be activated. The panic alarm willstop automatically after 2 minutes and45 seconds. To deactivate, wait approximately 5 seconds and press the button again. The Panic alarm button will not unlock the vehicle.
Related information
• Locking/unlocking – from inside (p. 154)
• Locking/unlocking – from the outside (p. 153)
• Locking/unlocking confirmation (p. 141)
Remote key – range
The remote key has a range of approximately 60 ft. (20 m) from the vehicle.
NOTE
Buildings or other obstacles may interfere with the function of the remote key. Thevehicle can also be locked or unlockedwith the key blade, see Alarm-related func-tions (p. 160).
If the remote key is removed from the vehicle while the engine is running or if the ignition isin mode
I or II and all of the doors are closed,
a message will appear in the instrument paneldisplay and there will be an audible signal. When the remote key is returned to the vehi- cle, the message will be erased and the audi-ble signal will stop after one of the followinghas been done: • The remote key is inserted in the ignition slot
• The vehicle's speed exceeds 20 mph(30 km/h)
• The
OK button on the left steering wheel
lever is pressed
Related information
• Remote key – functions (p. 143)
Page 158 of 380
06 Locks and alarm
06
156
Locking/unlocking – trunk
The trunk can be locked, unlocked and opened in several ways.
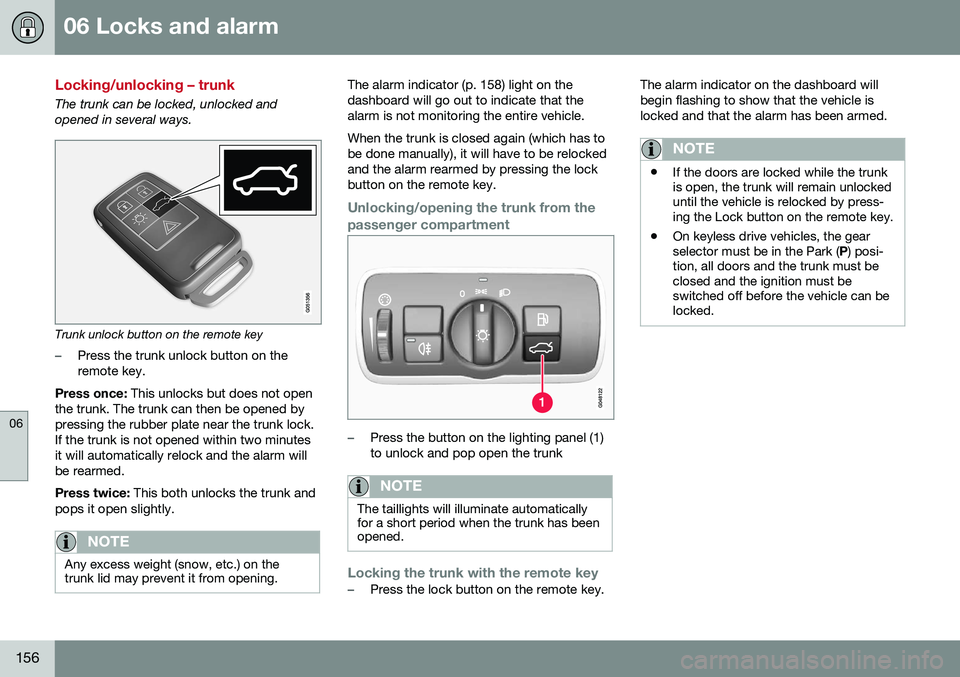
Trunk unlock button on the remote key
–Press the trunk unlock button on the remote key.
Press once: This unlocks but does not open
the trunk. The trunk can then be opened bypressing the rubber plate near the trunk lock.If the trunk is not opened within two minutesit will automatically relock and the alarm willbe rearmed. Press twice: This both unlocks the trunk and
pops it open slightly.
NOTE
Any excess weight (snow, etc.) on the trunk lid may prevent it from opening.
The alarm indicator (p. 158) light on the dashboard will go out to indicate that thealarm is not monitoring the entire vehicle. When the trunk is closed again (which has to be done manually), it will have to be relockedand the alarm rearmed by pressing the lockbutton on the remote key.
Unlocking/opening the trunk from the passenger compartment
–Press the button on the lighting panel (1) to unlock and pop open the trunk
NOTE
The taillights will illuminate automatically for a short period when the trunk has beenopened.
Locking the trunk with the remote key–Press the lock button on the remote key. The alarm indicator on the dashboard will begin flashing to show that the vehicle islocked and that the alarm has been armed.
NOTE
•
If the doors are locked while the trunk is open, the trunk will remain unlockeduntil the vehicle is relocked by press-ing the Lock button on the remote key.
• On keyless drive vehicles, the gearselector must be in the Park (
P) posi-
tion, all doors and the trunk must beclosed and the ignition must beswitched off before the vehicle can belocked.