2016 VOLVO S80 display
[x] Cancel search: displayPage 38 of 380

02 Safety
02
36
Occupant Weight Sensor
The Occupant Weight Sensor (OWS) is designed to meet the regulatory requirementsof Federal Motor Vehicle Safety Standard(FMVSS) 208 and is designed to disable (willnot inflate) the passenger's side front airbagunder certain conditions.
2
2
G017724
Occupant Weight Sensor (OWS) indicator light
Disabling the passenger's side frontairbag
Volvo recommends that ALL occupants (adults and children) shorter than 4 feet7 inches (140 cm) be seated in the back seatof any vehicle with a front passenger side air-bag (p. 32), and be properly restrained fortheir size and weight. For child safety recom-mendations, see Child safety (p. 45). The OWS works with sensors that are part of the front passenger's seat and seatbelt (p. 28). The sensors are designed to detect the presence of a properly seatedoccupant and determine if the passenger'sside front airbag should be enabled (mayinflate) or disabled (will not inflate). The OWS will disable (will not inflate) the pas- senger's side front airbag when:
• the front passenger's seat is unoccupied, or has small/medium objects in the frontseat,
• the system determines that an infant ispresent in a rear-facing infant seat that isinstalled according to the manufacturer'sinstructions,
• the system determines that a small childis present in a forward-facing childrestraint that is installed according to themanufacturer's instructions,
• the system determines that a small childis present in a booster seat,
• a front passenger takes his/her weight offof the seat for a period of time,
• a child or a small person occupies thefront passenger's seat.
The OWS uses a PASSENGER AIRBAG OFF indicator lamp which will illuminate and stayon to remind you that the passenger's sidefront airbag is disabled. The PASSENGERAIRBAG OFF indicator lamp is located in theoverhead console, near the base of the rear-view mirror.
NOTE
When the ignition is switched on, the OWS indicator light will go on for up to 10 sec-onds while the system performs a self-diagnostic test.
However, if a fault is detected in the system:
• The OWS indicator light will stay on
• The SRS warning light (p. 31) will come on and stay on
• The message
Pass. Airbag OFF Service
urgent will be displayed in the informa-
tion display.
WARNING
If a fault in the system is detected and indicated as described, be aware that thepassenger's side front airbag will notdeploy in the event of a collision. In thiscase, the SRS system and OccupantWeight Sensor should be inspected by atrained and qualified Volvo service techni-cian as soon as possible.
Page 46 of 380

02 Safety
02
44* Option/accessory, for more information, see Introduction.
Crash mode – general information
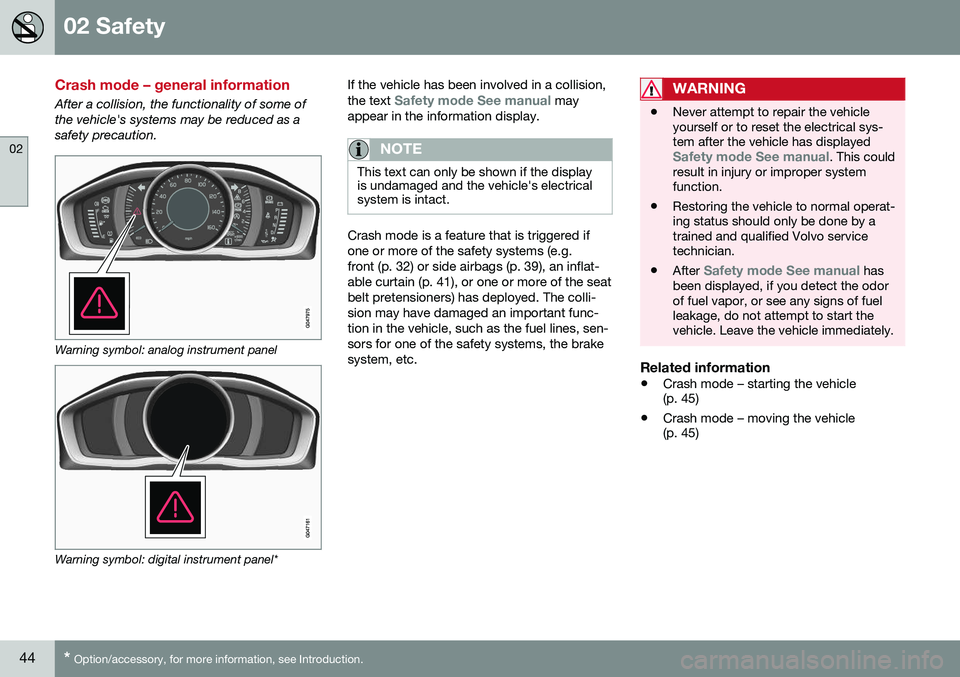
After a collision, the functionality of some of the vehicle's systems may be reduced as asafety precaution.
Warning symbol: analog instrument panel
Warning symbol: digital instrument panel* If the vehicle has been involved in a collision, the text
Safety mode See manual may
appear in the information display.
NOTE
This text can only be shown if the display is undamaged and the vehicle's electricalsystem is intact.
Crash mode is a feature that is triggered if one or more of the safety systems (e.g.front (p. 32) or side airbags (p. 39), an inflat-able curtain (p. 41), or one or more of the seatbelt pretensioners) has deployed. The colli-sion may have damaged an important func-tion in the vehicle, such as the fuel lines, sen-sors for one of the safety systems, the brakesystem, etc.
WARNING
• Never attempt to repair the vehicle yourself or to reset the electrical sys-tem after the vehicle has displayed
Safety mode See manual. This could
result in injury or improper system function.
• Restoring the vehicle to normal operat-ing status should only be done by atrained and qualified Volvo servicetechnician.
• After
Safety mode See manual has
been displayed, if you detect the odor of fuel vapor, or see any signs of fuelleakage, do not attempt to start thevehicle. Leave the vehicle immediately.
Related information
• Crash mode – starting the vehicle (p. 45)
• Crash mode – moving the vehicle(p. 45)
Page 47 of 380

02 Safety
02
}}
45
Crash mode – starting the vehicle
If Crash mode has been set Crash mode (p. 44)) and damage to the vehicle isminor and there is no fuel leakage, you mayattempt to start the engine. To do so:
1. Remove the remote key from the ignitionslot and open the driver's door. If a mes- sage is displayed that the ignition is on,press the start button.
2. Close the driver's door and reinsert the remote key in the ignition slot.
3. Try to start the vehicle.
WARNING
If the message Safety mode See manualis still displayed, the vehicle should not be driven and must be towed. Concealedfaults may make the vehicle difficult tocontrol.
Related information
• Crash mode – general information (p. 44)
• Crash mode – moving the vehicle (p. 45)
Crash mode – moving the vehicle
If the message Normal mode appears after
an attempt has been made to start the engine, Starting the vehicle after a crash (p. 45), thevehicle may be moved carefully from its pres-ent position, if for example, it is blocking traf-fic. It should, however, not be moved fartherthan is absolutely necessary.
WARNING
Even if the vehicle appears to be drivable after Crash mode has been set, it shouldnot be driven or towed (pulled by anothervehicle). There may be concealed damagethat could make it difficult or impossible tocontrol. The vehicle should be transportedon a flatbed tow truck to a trained andqualified Volvo service technician forinspection/repairs.
Related information
• Crash mode – general information (p. 44)
Child safety
Children should always be seated safely when traveling in the vehicle.
General informationVolvo recommends the proper use of restraintsystems (p. 47) for all occupants includingchildren. Remember that, regardless of ageand size, a child should always be properlyrestrained in a vehicle. Your vehicle is also equipped with ISOFIX/ LATCH attachments (p. 54), which make itmore convenient to install child seats. Some restraint systems for children are designed to be secured in the vehicle by lapbelts or the lap portion of a lap-shoulder belt.Such child restraint systems can help protectchildren in vehicles in the event of an acci-dent only if they are used properly. However,children could be endangered in a crash if thechild restraints are not properly secured in thevehicle. Failure to follow the installationinstructions for your child restraint can resultin your child striking the vehicle's interior in asudden stop. Holding a child in your arms is NOT a suitable substitute for a child restraint system. In anaccident, a child held in a person's arms canbe crushed between the vehicle's interior andan unrestrained person. The child could alsobe injured by striking the interior, or by beingejected from the vehicle during a suddenmaneuver or impact. The same can also hap-
Page 61 of 380

03 Instruments and controls
03
}}
59
Instrument overview
This overview shows the location of the instrument panel and center console displays,and controls/buttons/switches.
Page 63 of 380

03 Instruments and controls
03
* Option/accessory, for more information, see Introduction.61
FunctionSee
Controls for menus and messages, turnsignals, high/lowbeams, trip computer(p. 70), (p. 88),(p. 82),(p. 109)
Paddles for manually shifting gears*(p. 240)
Cruise control(p. 168)
Horn, airbag(p. 81), (p. 32)
Main instrument panel(p. 62)
Infotainment system/ Bluetooth hands-freecontrolsSensus Info- tainmentsupplement
START/STOP ENGINE button(p. 72)
Ignition slot(p. 72)
Display for infotain- ment system func-tions and menus(p. 106), Sensus Info-tainmentsupplement
Hazard warning flash- ers(p. 88)
Door handle–
FunctionSee
In-door control pan- els (power windows,mirrors, central lock-ing button)(p. 94), (p. 96),(p. 154)
Controls for the info- tainment system andmenus(p. 70), Sensus Info-tainmentsupplement
Climate system con- trols(p. 122)
Gear selector(p. 238)
Controls for active chassis (Four-C)*(p. 162)
Wipers and washers(p. 91), (p. 92)
Steering wheel adjustment(p. 81)
Parking brake(p. 254)
Hood opening control(p. 312)
FunctionSee
Power seat* adjust- ment controls(p. 75)
Lighting panel, but- tons for opening fuelfiller door and unlock-ing and opening thetrunk(p. 82), (p. 263),(p. 156)
Related information
• Information displays – ambient tempera- ture sensor (p. 71)
• Information displays – trip odometer andclock (p. 72)
Page 64 of 380

03 Instruments and controls
03
62* Option/accessory, for more information, see Introduction.
Information displays – introduction
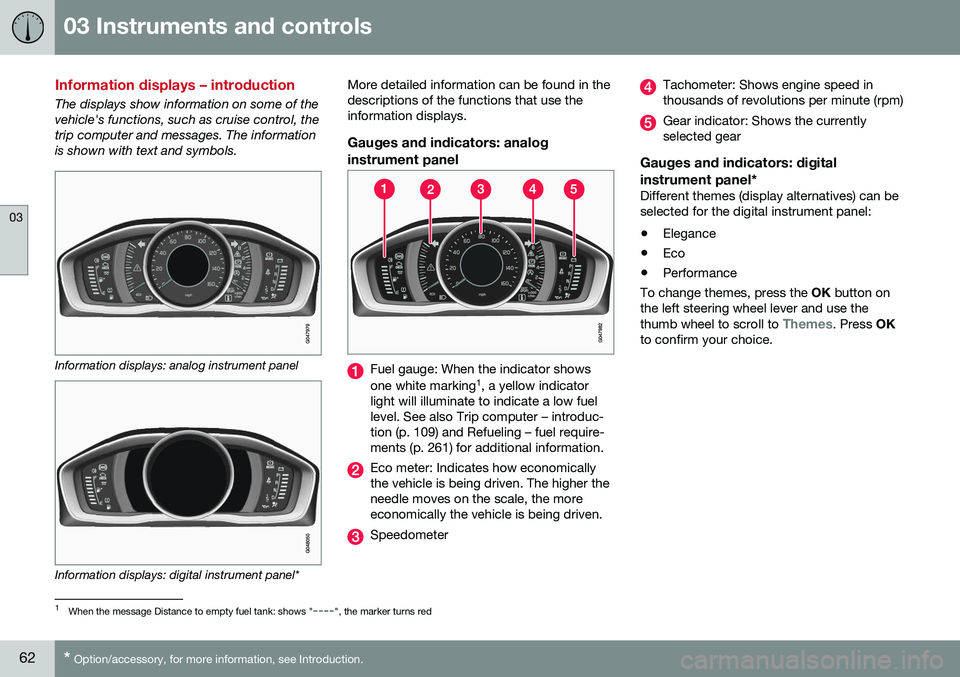
The displays show information on some of the vehicle's functions, such as cruise control, thetrip computer and messages. The informationis shown with text and symbols.
Information displays: analog instrument panel
Information displays: digital instrument panel* More detailed information can be found in the descriptions of the functions that use theinformation displays.
Gauges and indicators: analog
instrument panel
Fuel gauge: When the indicator shows one white marking 1
, a yellow indicator
light will illuminate to indicate a low fuel level. See also Trip computer – introduc-tion (p. 109) and Refueling – fuel require-ments (p. 261) for additional information.
Eco meter: Indicates how economically the vehicle is being driven. The higher theneedle moves on the scale, the moreeconomically the vehicle is being driven.
Speedometer
Tachometer: Shows engine speed in thousands of revolutions per minute (rpm)
Gear indicator: Shows the currently selected gear
Gauges and indicators: digital instrument panel*
Different themes (display alternatives) can be selected for the digital instrument panel: • Elegance
• Eco
• Performance
To change themes, press the OK button on
the left steering wheel lever and use the thumb wheel to scroll to
Themes. Press OK
to confirm your choice.
1 When the message Distance to empty fuel tank: shows "----", the marker turns red
Page 66 of 380

||
03 Instruments and controls
03
64
Indicator and warning symbols
Indicator and warning symbols: analog instru- ment panel
Indicator symbols
Indicator and warning symbols
Warning symbols
Indicator and warning symbols: digital instrument panel
Indicator symbols
Indicator and warning symbols
Warning symbols
Function checkAll indicator and warning symbols light up in ignition mode II or when the engine is started.
When the engine has started, all the symbolsshould go out except the parking brake sym-bol, which only goes out when the brake isdisengaged. If the engine does not start or if the function check is carried out in ignition mode II, all
symbols go out after 5 seconds except themalfunction indicator light, which may indi-cate a fault in the vehicle's emissions system,and the symbol for low oil pressure. Some of the symbols shown may not beavailable in all markets or models.
Related information
•
Instrument overview (p. 59)
• Information displays – indicator symbols (p. 66)
• Information displays – warning symbols(p. 68)
Page 67 of 380

03 Instruments and controls
03
}}
* Option/accessory, for more information, see Introduction.65
Eco Guide* and Power Meter*
Eco guide and Power guide are two gauges in the instrument panel that help improve drivingeconomy. The vehicle also stores driving-related statis- tics in the form of a bar graph, see Trip com-puter – Trip statistics (p. 116).
Introduction
To display or remove these functions from theinstrument panel, select the "Eco" theme (seeInformation displays – introduction (p. 62)). Driving statistics are also stored and can be displayed in the form of a bar chart (see Tripcomputer – Trip statistics (p. 116)).
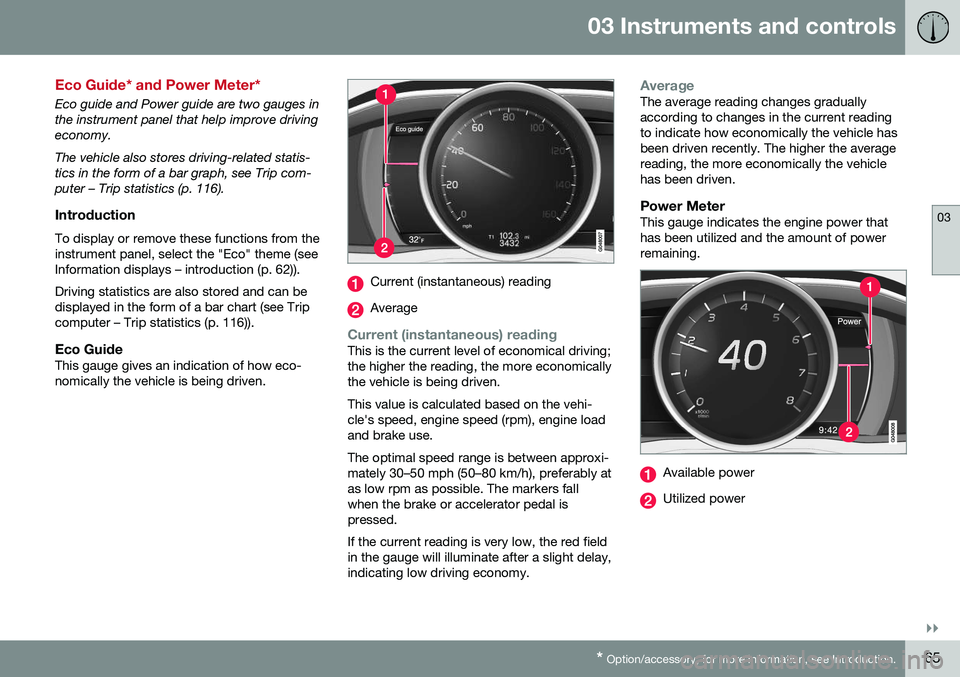
Eco GuideThis gauge gives an indication of how eco-nomically the vehicle is being driven.
Current (instantaneous) reading
Average
Current (instantaneous) readingThis is the current level of economical driving; the higher the reading, the more economicallythe vehicle is being driven. This value is calculated based on the vehi- cle's speed, engine speed (rpm), engine loadand brake use. The optimal speed range is between approxi- mately 30–50 mph (50–80 km/h), preferably atas low rpm as possible. The markers fallwhen the brake or accelerator pedal ispressed. If the current reading is very low, the red field in the gauge will illuminate after a slight delay,indicating low driving economy.
AverageThe average reading changes gradually according to changes in the current readingto indicate how economically the vehicle hasbeen driven recently. The higher the averagereading, the more economically the vehiclehas been driven.
Power MeterThis gauge indicates the engine power thathas been utilized and the amount of powerremaining.
Available power
Utilized power