2016 VOLVO S80 ECU
[x] Cancel search: ECUPage 54 of 380
||
02 Safety
02
52
WARNING
•A small child's head represents a con- siderable part of its total weight and itsneck is still very weak. Volvo recom-mends that children up to age 4 travel,properly restrained, facing rearward. Inaddition, Volvo recommends that chil-dren should ride rearward facing, prop-erly restrained, as long as possible.
• Convertible child seats should be instal-led in the rear seat only.
• A rear-facing convertible seat shouldnot be positioned behind the driver'sseat unless there is adequate space forsafe installation.
2. Attach the seat belt to the convertible
seat according to the manufacturer's instructions.
G022848
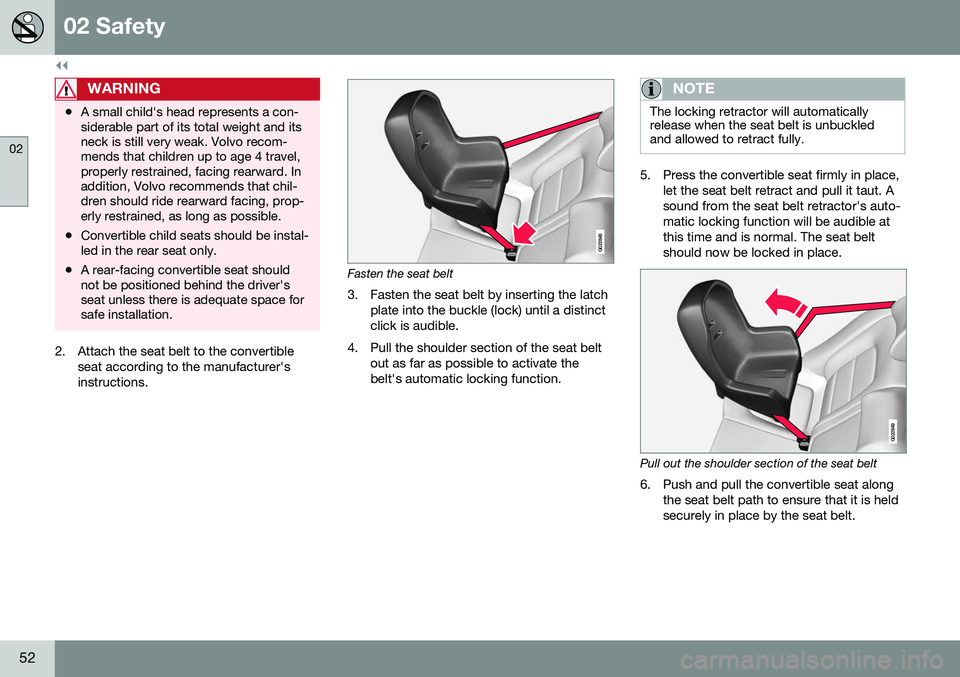
Fasten the seat belt
3. Fasten the seat belt by inserting the latch plate into the buckle (lock) until a distinct click is audible.
4. Pull the shoulder section of the seat belt out as far as possible to activate thebelt's automatic locking function.
NOTE
The locking retractor will automatically release when the seat belt is unbuckledand allowed to retract fully.
5. Press the convertible seat firmly in place, let the seat belt retract and pull it taut. A sound from the seat belt retractor's auto-matic locking function will be audible atthis time and is normal. The seat beltshould now be locked in place.
G022849
Pull out the shoulder section of the seat belt
6. Push and pull the convertible seat along the seat belt path to ensure that it is held securely in place by the seat belt.
Page 55 of 380
02 Safety
02
}}
53
WARNING
It should not be possible to move the child restraint (child seat) more than 1 in.(2.5 cm) in any direction along the seat beltpath.
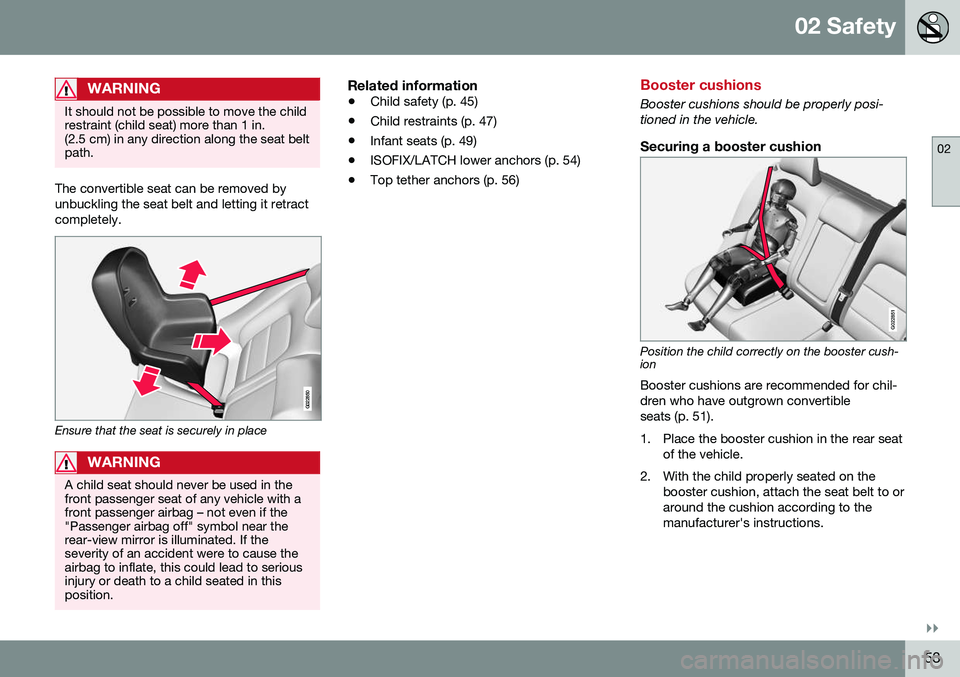
The convertible seat can be removed by unbuckling the seat belt and letting it retractcompletely.
G022850
Ensure that the seat is securely in place
WARNING
A child seat should never be used in the front passenger seat of any vehicle with afront passenger airbag – not even if the"Passenger airbag off" symbol near therear-view mirror is illuminated. If theseverity of an accident were to cause theairbag to inflate, this could lead to seriousinjury or death to a child seated in thisposition.
Related information
•Child safety (p. 45)
• Child restraints (p. 47)
• Infant seats (p. 49)
• ISOFIX/LATCH lower anchors (p. 54)
• Top tether anchors (p. 56)
Booster cushions
Booster cushions should be properly posi- tioned in the vehicle.
Securing a booster cushion
G022851
Position the child correctly on the booster cush- ion
Booster cushions are recommended for chil- dren who have outgrown convertibleseats (p. 51).
1. Place the booster cushion in the rear seat of the vehicle.
2. With the child properly seated on the booster cushion, attach the seat belt to or around the cushion according to themanufacturer's instructions.
Page 57 of 380
02 Safety
02
55
To access the anchors1. Put the child restraint in position.
2. Kneel on the child restraint to press downthe seat cushion and locate the anchors by feel.
3. Fasten the attachment on the child restraint's lower straps to the ISOFIX/LATCH/LATCH lower anchors.
4. Firmly tension the lower child seat straps according to the manufacturer's instruc-tions.
WARNING
Volvo's ISOFIX/LATCH anchors conform to FMVSS/CMVSS standards. Always refer tothe child restraint system's manual forweight and size ratings.
NOTE
•The rear seat's center position is not equipped with ISOFIX/LATCH loweranchors. When installing a childrestraint in this position, attach therestraint's top tether strap (if it is soequipped) to the top tether anchoragepoint and secure the restraint with thevehicle's center seat belt.
• Always follow your child seat manufac-turer's installation instructions, anduse both ISOFIX/LATCH lower anchorsand top tethers whenever possible.
G018631
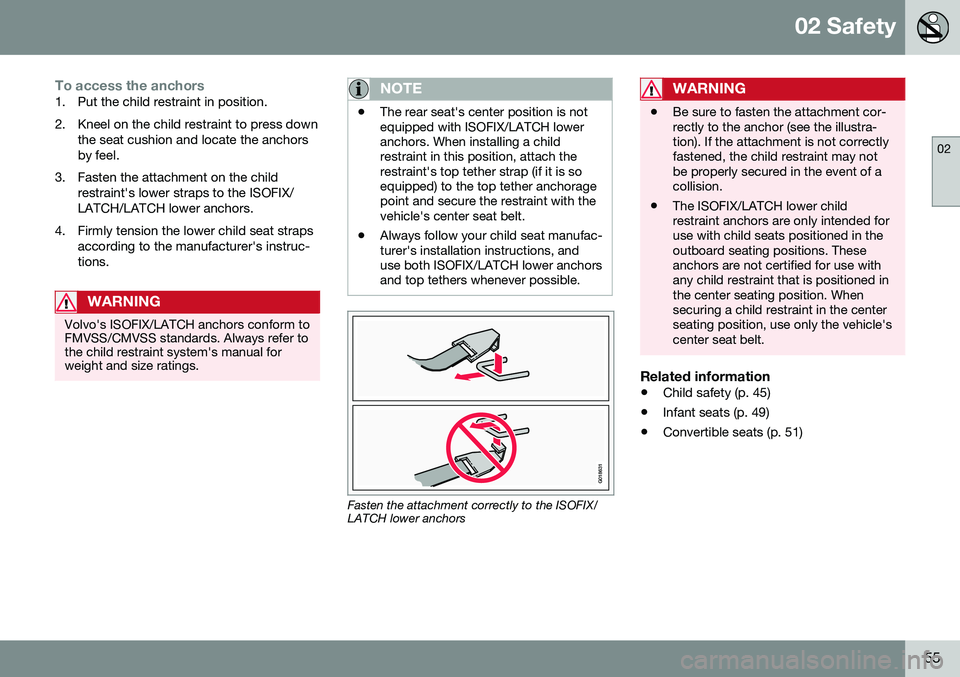
Fasten the attachment correctly to the ISOFIX/ LATCH lower anchors
WARNING
•
Be sure to fasten the attachment cor- rectly to the anchor (see the illustra-tion). If the attachment is not correctlyfastened, the child restraint may notbe properly secured in the event of acollision.
• The ISOFIX/LATCH lower childrestraint anchors are only intended foruse with child seats positioned in theoutboard seating positions. Theseanchors are not certified for use withany child restraint that is positioned inthe center seating position. Whensecuring a child restraint in the centerseating position, use only the vehicle'scenter seat belt.
Related information
•
Child safety (p. 45)
• Infant seats (p. 49)
• Convertible seats (p. 51)
Page 58 of 380
02 Safety
02
56
Top tether anchors
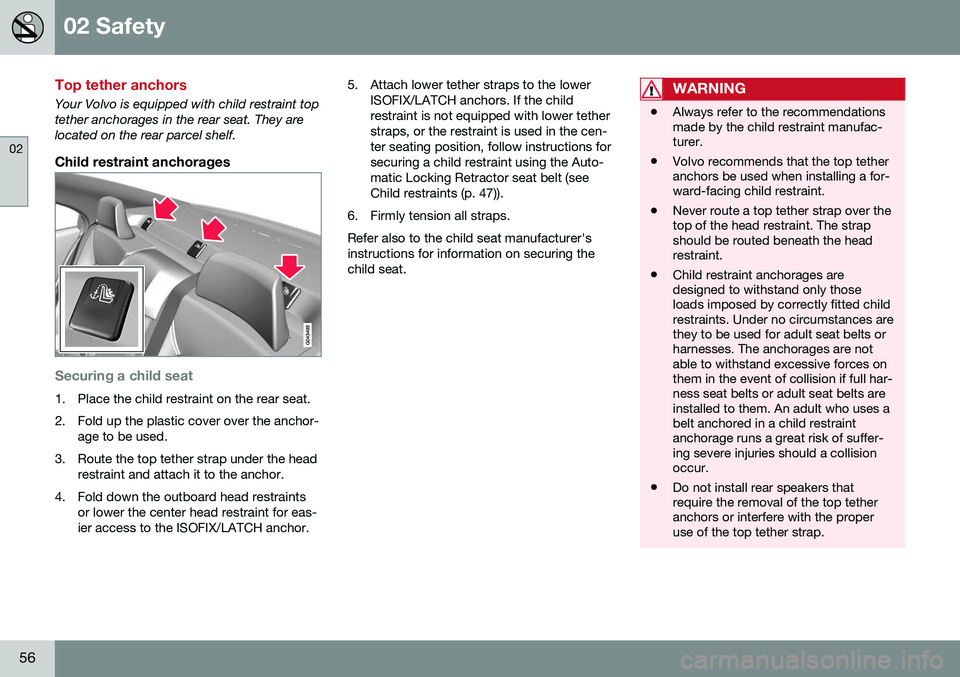
Your Volvo is equipped with child restraint top tether anchorages in the rear seat. They arelocated on the rear parcel shelf.
Child restraint anchorages
Securing a child seat
1. Place the child restraint on the rear seat.
2. Fold up the plastic cover over the anchor-age to be used.
3. Route the top tether strap under the head restraint and attach it to the anchor.
4. Fold down the outboard head restraints or lower the center head restraint for eas- ier access to the ISOFIX/LATCH anchor. 5. Attach lower tether straps to the lower
ISOFIX/LATCH anchors. If the childrestraint is not equipped with lower tetherstraps, or the restraint is used in the cen-ter seating position, follow instructions forsecuring a child restraint using the Auto-matic Locking Retractor seat belt (seeChild restraints (p. 47)).
6. Firmly tension all straps. Refer also to the child seat manufacturer's instructions for information on securing thechild seat.
WARNING
• Always refer to the recommendations made by the child restraint manufac-turer.
• Volvo recommends that the top tetheranchors be used when installing a for-ward-facing child restraint.
• Never route a top tether strap over thetop of the head restraint. The strapshould be routed beneath the headrestraint.
• Child restraint anchorages aredesigned to withstand only thoseloads imposed by correctly fitted childrestraints. Under no circumstances arethey to be used for adult seat belts orharnesses. The anchorages are notable to withstand excessive forces onthem in the event of collision if full har-ness seat belts or adult seat belts areinstalled to them. An adult who uses abelt anchored in a child restraintanchorage runs a great risk of suffer-ing severe injuries should a collisionoccur.
• Do not install rear speakers thatrequire the removal of the top tetheranchors or interfere with the properuse of the top tether strap.
Page 76 of 380

||
03 Instruments and controls
03
74* Option/accessory, for more information, see Introduction.
Ignition mode I–With the remote key fully pressed into the ignition slot 8
, press START/STOP
ENGINE briefly.
Ignition mode II–With the remote key fully pressed into the ignition slot 8
, press START/STOP
ENGINE for approximately 2 seconds.
Returning to mode 0To return to mode 0 from mode II or I, press
START/STOP ENGINE briefly.
Starting and stopping the engineSee Starting the engine (p. 233) and Switch- ing off the engine (p. 235) for information onstarting the engine and switching it off.
Emergency towingSee Towing the vehicle (p. 269) for importantinformation about the remote key when thevehicle is being towed.
Related information
•Inserting/removing remote key (p. 72)
Front seats
The front seats can be adjusted in a number of ways to help provide the most comfortableseating position.
Raise/lower the seat, pump up/down.
Front-rear adjustment: lift the bar and move the seat to the position of yourchoice.
Raise/lower front edge of seat cushion, pump up/down.
Backrest tilt: turn the control to adjust the angle of the backrest.
Electronic lumbar support*. Press the button to adjust.
Control panel for power seat*, see Front seats – power seat (p. 75).
WARNING
•Do not adjust the seat while driving. The seat should be adjusted so thatthe brake pedal can be depressedfully. In addition, position the seat asfar rearward as comfort and controlallow.
• Check that the seat is securely lockedinto position after adjusting.
Related information
•
Front seats – power seat (p. 75)
• Rear seats – folding backrest (p. 80)
• Rear seats – head restraints (p. 78)
8
Not necessary in vehicles with the optional keyless drive.
Page 77 of 380
03 Instruments and controls
03
}}
* Option/accessory, for more information, see Introduction.75
Front seats – folding backrest*
The front passenger's seat backrest can be folded down to make it easier to transportlong objects.
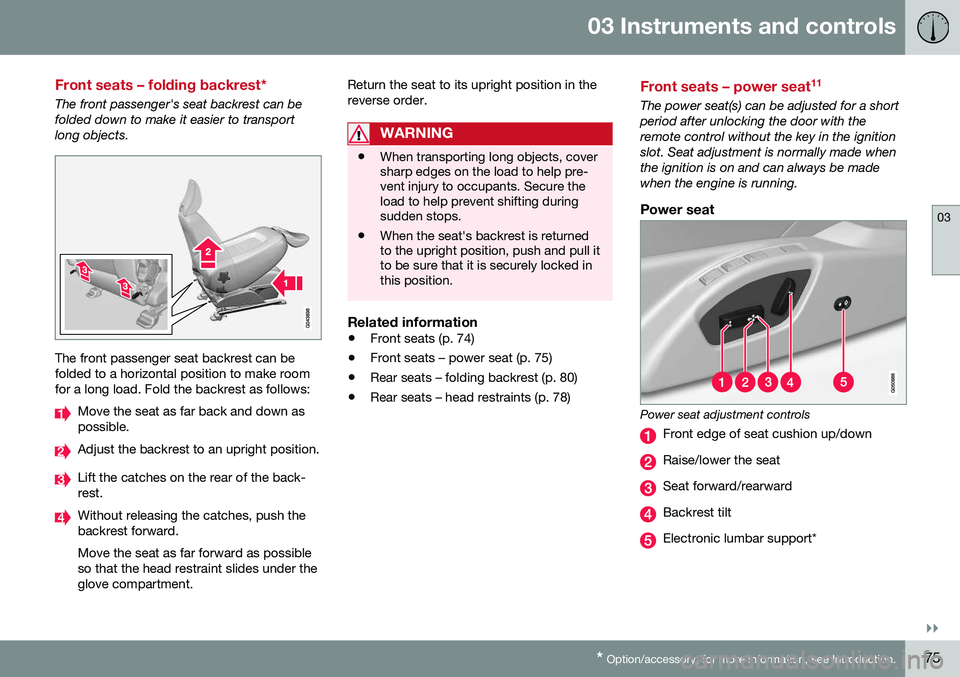
The front passenger seat backrest can be folded to a horizontal position to make roomfor a long load. Fold the backrest as follows:
Move the seat as far back and down as possible.
Adjust the backrest to an upright position.
Lift the catches on the rear of the back- rest.
Without releasing the catches, push the backrest forward. Move the seat as far forward as possible so that the head restraint slides under theglove compartment. Return the seat to its upright position in thereverse order.
WARNING
•
When transporting long objects, cover sharp edges on the load to help pre-vent injury to occupants. Secure theload to help prevent shifting duringsudden stops.
• When the seat's backrest is returnedto the upright position, push and pull itto be sure that it is securely locked inthis position.
Related information
•
Front seats (p. 74)
• Front seats – power seat (p. 75)
• Rear seats – folding backrest (p. 80)
• Rear seats – head restraints (p. 78)
Front seats – power seat 11
The power seat(s) can be adjusted for a short period after unlocking the door with theremote control without the key in the ignitionslot. Seat adjustment is normally made whenthe ignition is on and can always be madewhen the engine is running.
Power seat
Power seat adjustment controls
Front edge of seat cushion up/down
Raise/lower the seat
Seat forward/rearward
Backrest tilt
Electronic lumbar support*
Page 82 of 380

03 Instruments and controls
03
80
Rear seats – folding backrest
The rear seat head restraints and backrests can be folded down. The center headrestraint can be raised/lowered according tothe passenger's height.
Folding down the rear seat backrests
The rear seat backrests are split and can be folded down together or separately1. Pull the release control handle(s).
2. Fold the backrest forward. Adjust the center seat head restraint if necessary.
NOTE
When the backrests are folded down, move the outboard head restraints forwardslightly so that they do not catch on theseat cushion.
CAUTION
To help avoid damage to the upholstery, there should be no objects on the rear seatand the seat belt should not be buckledwhen the backrest is folded down.
WARNING
•Keep vehicle doors and trunk locked and keep keys out of a child’s reach.Unsupervised children could lockthemselves in an open trunk and riskinjury. Children should be taught not toplay in vehicles.
• On hot days, the temperature in thetrunk or vehicle interior can rise veryquickly. Exposure of people to thesehigh temperatures for even a shortperiod of time can cause heat-relatedinjury or death. Small children are par-ticularly at risk.
WARNING
•
When one or more sections of the backrest is returned to the uprightposition, check that it is properlylocked in place by pushing and pullingit.
• Return the outboard head restraints tothe upright position.
• Long loads should always be securelyanchored to help avoid injury in theevent of a sudden stop.
• Always turn the engine off and applythe parking brake when loading/unloading the vehicle.
• Place the transmission in the Park (
P)
position to help prevent inadvertentmovement of the gear selector.
• On hot days, the temperature in thevehicle interior can rise very quickly.Exposure of people to these high tem-peratures for even a short period oftime can cause heat-related injury ordeath. Small children are particularly atrisk.
Related information
•
Front seats (p. 74)
• Front seats – power seat (p. 75)
• Rear seats – head restraints (p. 78)
Page 102 of 380
03 Instruments and controls
03
100
The earth is divided into 15 magnetic zones. The correct zone must be selected for thecompass to work correctly.
1. Put the ignition in mode II.
2. Using a pen or similar object, press and hold the button on the rear side of mirror for at least 3 seconds. The number for thecurrent area will be shown.
3. Press the button repeatedly until the number for the required geographic area(1 – 15) is shown.
4. The display will revert to showing the compass direction after several seconds.Power moonroof – introduction
The moonroof controls are located in the ceil- ing console near the rearview mirror. The moonroof's sun visor opens automatically but has to be closed manually. There is a wind blocker in the moonroof's front edge. The moonroof 19
controls are located in the
ceiling console near the rearview mirror. The moonroof can be opened vertically and hori-zontally. The vehicle's ignition must be inmode I or II for the moonroof to be operated.
CAUTION
• Remove ice and snow before opening the moonroof.
• Do not operate the moonroof if it isfrozen closed.
• Never place heavy objects on themoonroof.
VisorThe moonroof features a sliding visor. The visor slides open automatically when themoonroof is opened, and must be closedmanually.
Wind blocker
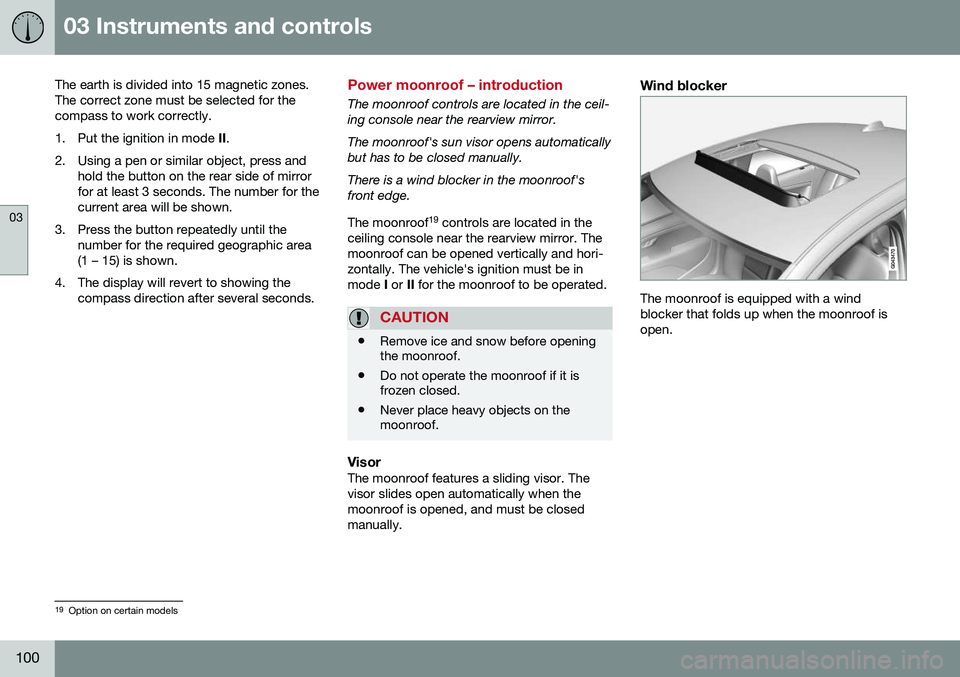
The moonroof is equipped with a wind blocker that folds up when the moonroof isopen.
19
Option on certain models