Page 3 of 211
Exterior door release lever ⇒ Doors
Exterior mirrors ⇒ Mirrors
Additional turn signal ⇒ Lights⇒ Changing bulbs
Jacking points ⇒ Changing a wheel
Front view
Fig. 2 Overview of the front of the vehicle
Key for ⇒ Fig. 2:
Mirror base with laser sensor for the city emergency brake function ⇒ City emergency
brake function
Windscreen
Front windscreen wipers ⇒ Windscreen wiper and washer
Bonnet ⇒ Preparation for working in the engine compartment
Bonnet release lever ⇒ Preparation for working in the engine compartment
Headlights ⇒ Lights, ⇒ Changing bulbs
Fog lights ⇒ Lights⇒ Changing bulbs
Mounting for the front towing eye behind a cover ⇒ Tow-starting and towing
Front number plate holder
Rear view
Fig. 3 Overview of the rear of the vehicle
Key for ⇒ Fig. 3:
Page 4 of 211

Roof aerial ⇒ Consumer information
High-mounted brake light
Rear window
- Rear window heating ⇒ Heating, ventilating, cooling
Rear wiper ⇒ Windscreen wiper and washer
Tailgate ⇒ Tailgate
Tail light cluster ⇒ Lights⇒ Changing bulbs
Grip with tailgate release button ⇒ Tailgate
Number plate lights ⇒ Changing bulbs
Rear number plate holder
ParkPilot sensors ⇒ ParkPilot
Vehicle interior
Overview of the driver door
Fig. 4 Overview of the controls in the driver door (left-hand drive vehiclesyf�����7�K�H���F�R�Q�W�U�R�O�V���D�U�H�
mirrored in right-hand drive vehicles
Key for ⇒ Fig. 4:
Button for operating the electric window in the driver door ⇒ Windows or stowage
compartment ⇒ Stowage area
Door release lever ⇒ Doors
Indicator lamp for SAFELOCK mechanism ⇒ Central locking system
Rotary knob for adjusting the electrical exterior mirrors ⇒ Mirrors
- Exterior mirror setting
- Exterior mirror heating
Central locking button for locking and unlocking the vehicle ⇒ Central locking
system
Handle for releasing the bonnet ⇒ Preparation for working in the engine compartment
Stowage compartment with drink holder ⇒ Stowage area⇒ Drink holder
Other available control elements
Depending on the level of equipment, the vehicle may have manual windows and/or manual
adjustment of the exterior mirrors ⇒ Mirrors.
Overview of the driver side
Page 201 of 211

Changing bulbs in the front headlights
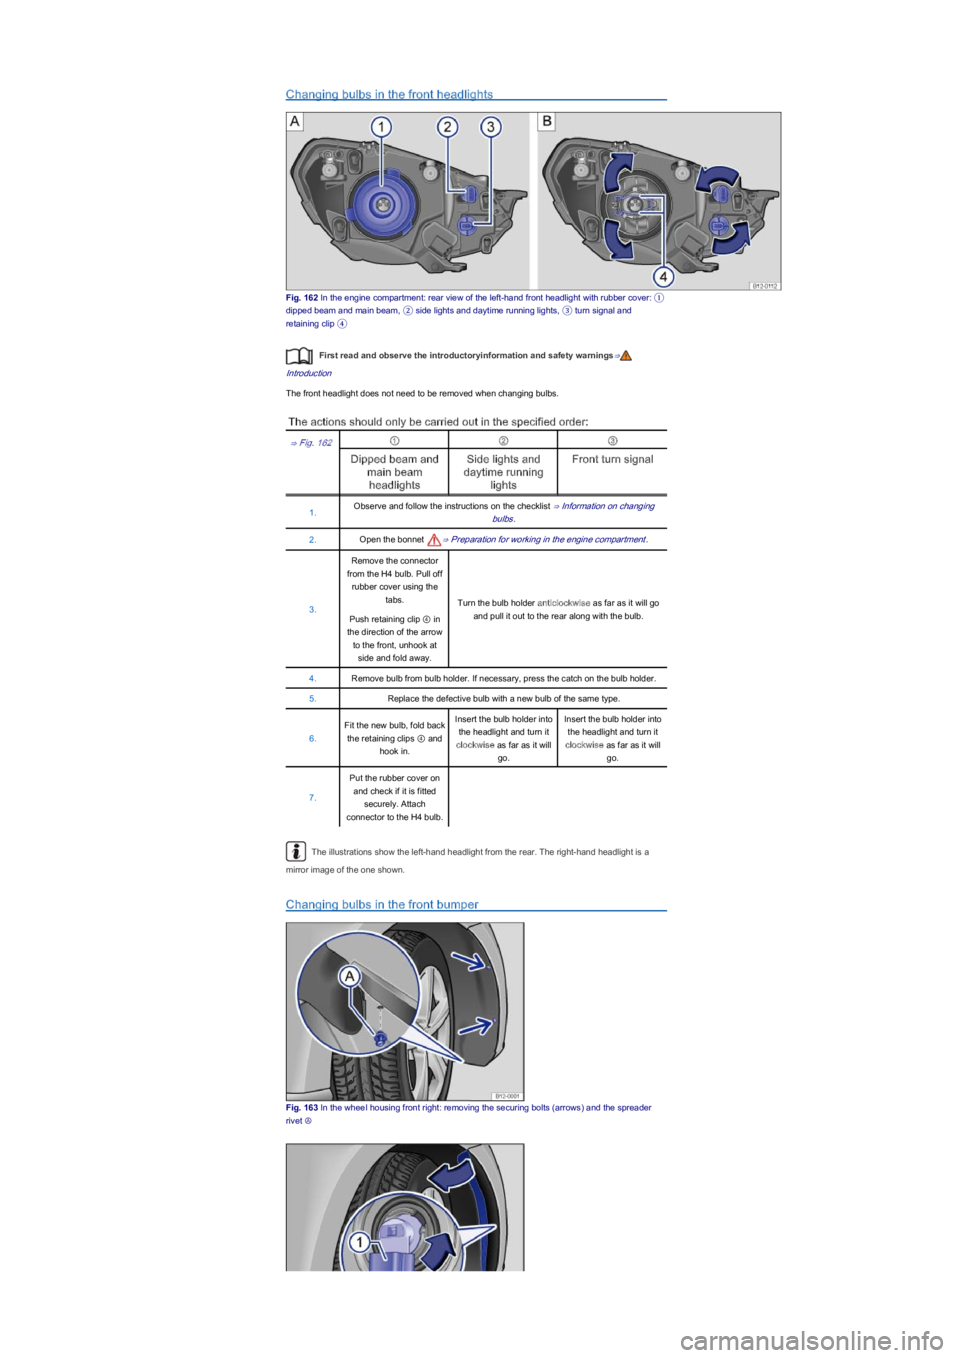
Fig. 162 In the engine compartment: rear view of the left-hand front headlight with rubber cover: ①
dipped beam and main beam, ② side lights and daytime running lights, ③ turn signal and
retaining clip �\b
First read and observe the introductoryinformation and safety warnings⇒
Introduction
The front headlight does not need to be removed when changing bulbs.
The actions should only be carried out in the specified order:
⇒ Fig. 162①②③
Dipped beam and
main beam
headlights
Side lights and
daytime running
lights
Front turn signal
1.Observe and follow the instructions on the checklist ⇒ Information on changing
bulbs.
2.Open the bonnet ⇒ Preparation for working in the engine compartment.
3.
Remove the connector
from the H4 bulb. Pull off
rubber cover using the
tabs.Turn the bulb holder anticlockwise as far as it will go
and pull it out to the rear along with the bulb.Push retaining clip ④ in
the direction of the arrow
to the front, unhook at
side and fold away.
4.Remove bulb from bulb holder. If necessary, press the catch on the bulb holder.
5.Replace the defective bulb with a new bulb of the same type.
6.
Fit the new bulb, fold back
the retaining clips ④ and
hook in.
Insert the bulb holder into
the headlight and turn it
clockwise as far as it will
go.
Insert the bulb holder into
the headlight and turn it
clockwise as far as it will
go.
7.
Put the rubber cover on
and check if it is fitted
securely. Attach
connector to the H4 bulb.
The illustrations show the left-hand headlight from the rear. The right-hand headlight is a
mirror image of the one shown.
Changing bulbs in the front bumper
Fig. 163 In the wheeI housing front right: removing the securing bolts (arrowsyf���D�Q�G���W�K�H���V�S�U�H�D�G�H�U�
rivet Ⓐ