Page 152 of 211

recommends that the protective coating on the underside of the vehicle and on the running gear
should be checked regularly and repaired if necessary.
Cleaning the engine compartment
First read and observe the introductoryinformation and safety warnings⇒
Introduction
The engine compartment of any motor vehicle is a hazardous area ⇒ Preparation for working in the
engine compartment.
The engine compartment should be cleaned by a qualified workshop. An incorrect cleaning
procedure could possibly remove corrosion protection and damage electrical components.
Furthermore, water could enter the vehicle interior directly via the plenum chamber ⇒.
If the engine compartment is very dirty, we recommend that you always proceed to a qualified
workshop to have it cleaned by a professional mechanic. Volkswagen recommends using a
Volkswagen dealership for this purpose.
Plenum chamber
The plenum chamber is located in the engine compartment between the windscreen and the engine
and has a perforated cover. Air from outside is drawn in from the plenum chamber and is passed
into the vehicle interior via the heating and air conditioning system.
Leaves and other loose objects must be removed from the cover of the plenum chamber at regular
intervals using a vacuum cleaner or by hand.
In the interests of environmental protection, the engine compartment should be washed only
in specially provided wash bays. This prevents toxic waste water containing oil, grease and fuel
from entering the sewerage system. In some districts, washing the engine compartment anywhere
else may be prohibited.
Cleaning and caring for the interior
Introduction
This chapter contains information on the followingsubjects:
⇒ Seat covers
⇒ Cleaning cloth seat covers, fabric trim and Alcantara upholstery
⇒ Cleaning and caring for natural leather covers
⇒ Cleaning leatherette upholstery
⇒ Cleaning stowage compartments, drink holders and ash trays
⇒ Cleaning and caring for the dash panel, wooden trims and plastic parts
⇒ Cleaning seat belts
Modern fabrics, such as dark denim, are often not colourfast. Light-coloured upholstery (soft
materials or leatheryf���L�V���S�D�U�W�L�F�X�O�D�U�O�\���V�H�Q�V�L�W�L�Y�H���W�R���V�W�D�L�Q�L�Q�J���F�D�X�V�H�G���E�\���W�K�H�V�H���I�D�E�U�L�F�V�����H�Y�H�Q���L�I���\�R�X���D�U�H�
careful. This is not caused by a fault in the upholstery, but by the non-colourfast nature of the
garments.
Leaving stains, dirt and other deposits on the surface of vehicle components and cloth seat covers
for a long time can make it difficult to clean and treat them. Stains, dirt and deposits may become
impossible to remove, particularly if left for a long time.
Additional information and warnings:
\f
Page 156 of 211
However, slight colour variations will arise in normal use.
Mild soap solution: two tablespoons neutral soap diluted in one litre of water.
Cleaning leatherette upholstery
First read and observe the introductoryinformation and safety warnings⇒
Introduction
Please observe the following notes prior to cleaning the leatherette upholstery ⇒ Cleaning
upholstery on seat cushions with seat heating, electrically adjustable seats, or seats containing
airbag components.
Only use water and neutral detergents to clean the leatherette upholstery.
Cleaning stowage compartments, drink holders and ash trays
Fig. 128 In the centre console: stowage compartment with drink holder
Fig. 129 Ashtray with snuffer, removed and opened
First read and observe the introductoryinformation and safety warnings⇒
Introduction
Cleaning stowage compartments and drink holders
\f
Page 165 of 211

If possible, stow the spare wheel, temporary spare wheel or the removed wheel safely in the
luggage compartment. In vehicles with a breakdown set, the removed wheel cannot be secured.
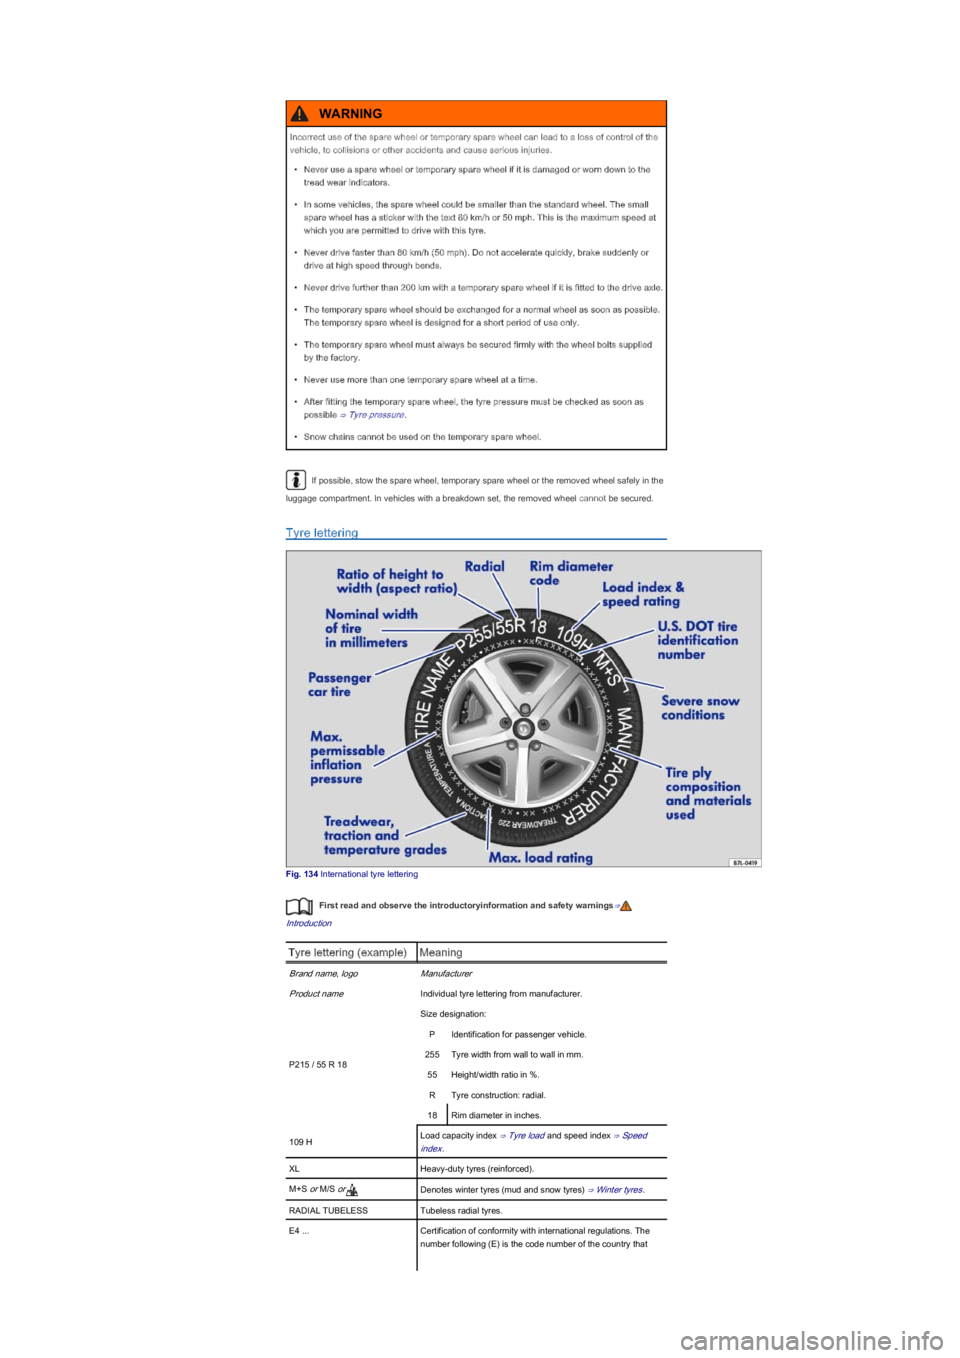
Tyre lettering
Fig. 134 International tyre lettering
First read and observe the introductoryinformation and safety warnings⇒
Introduction
Tyre lettering (exampleyfMeaning
Brand name, logoManufacturer
Product nameIndividual tyre lettering from manufacturer.
P215 / 55 R 18
Size designation:
PIdentification for passenger vehicle.
255Tyre width from wall to wall in mm.
55Height/width ratio in yb�.
RTyre construction: radial.
18Rim diameter in inches.
109 HLoad capacity index ⇒ Tyre load and speed index ⇒ Speed
index.
XLHeavy-duty tyres (reinforcedyf�.
M+S or M/S orDenotes winter tyres (mud and snow tyresyf� ⇒ Winter tyres.
RADIAL TUBELESSTubeless radial tyres.
E4 ...Certification of conformity with international regulations. The
number following (Eyf���L�V���W�K�H���F�R�G�H���Q�X�P�E�H�U���R�I���W�K�H���F�R�X�Q�W�U�\���W�K�D�W�
Incorrect use of the spare wheel or temporary spare wheel can lead to a loss of control of the
vehicle, to collisions or other accidents and cause serious injuries.
\f
Page 186 of 211
Stowage
Fig. 146 In the luggage compartment: floor covering held in upright position
First read and observe the introductoryinformation and safety warnings⇒
Introduction
The vehicle tools, spare wheel, emergency spare wheel or breakdown set are located in the
luggage compartment under the floor covering ⇒ Fig. 146.
\f
Page 187 of 211
Vehicle jack. Before you return the vehicle jack to the toolbox, fully wind in the claw. To
stow the vehicle jack securely the crank lever must be braced against the side of the jack.
Box spanner for wheel bolts.
Vehicles with a natural gas engine
In vehicles with natural gas engines delivered with a second wheel set, the toolkit is kept in a
seperate bag. Volkswagen recommends not keeping the bag in the vehicle all the time but only
when it is necessary for changing to winter or summer tyres.
Hubcaps
Introduction
This chapter contains information on the followingsubjects:
⇒ Centre cover
⇒ Wheel cover
⇒ Wheel bolt caps
Additional information and warnings:
\f
Page 202 of 211

Fig. 164 Changing the bulbs in the headlights
First read and observe the introductoryinformation and safety warnings⇒
Introduction
The actions should only be carried out in the specified order:
1.Observe and follow the instructions on the checklist ⇒ Information on changing bulbs.
2.Use the screwdriver from the toolkit to unscrew the two securing bolts in the wheel
housing trim ⇒ Fig. 163 (arrowsyf� ⇒ Vehicle toolkit.
3.Unscrew the front spreader rivet at the bottom of the wheel housing trim ⇒ Fig. 163Ⓐ
and remove it completely.
4.Grip the edge of the wheel housing trim in between the holes for the securing bolts and
push it gently towards the vehicle interior to release the clip located behind the trim.
5.Carefully push the wheel housing trim to one side.
6.Release the connector ⇒ Fig. 164① and pull it off.
7.Turn the bulb holder ⇒ Fig. 164anticlockwise in the direction of the arrow as far as it will
go and pull it out to the rear along with the bulb.
8.Replace the defective bulb with a new bulb of the same type.
9.Insert the bulb holder into the headlight and turn it clockwise as far as it will go.
10.Connect the connector ⇒ Fig. 164① to the bulb holder. The connector should click into
place.
11.Return the wheel housing trim to its original position, ensuring that the clip engages.
12.Insert the spreader river in the wheel housing trim and the bumper and push in fully
⇒ Fig. 163Ⓐ.
13.Use the screwdriver to screw in the two securing bolts ⇒ Fig. 163 (arrowsyf�.
Changing bulbs in the tail light cluster
Fig. 165 In the side of the luggage compartment: A: removing the cover, B: removing the tail light
cluster
Fig. 166 Tail light cluster: C: removing the bulb holder, B: removing the bulbs
First read and observe the introductoryinformation and safety warnings⇒
Introduction
The steps should only be carried out in the specified order.
Removing the tail light cluster
1.Observe and follow the instructions on the checklist ⇒ Information on changing bulbs.
2.Open the tailgate ⇒ Tailgate.
3.Carefully lever off the cover ① ⇒ Fig. 165A.
4.Pull the lock ③ on the connector ② in the direction of the arrow ⇒ Fig. 165B. Use the
screwdriver from the vehicle tools for this purpose.
5.Press the catch ④ and pull off the connector ② ⇒ Fig. 165B.
Page 205 of 211

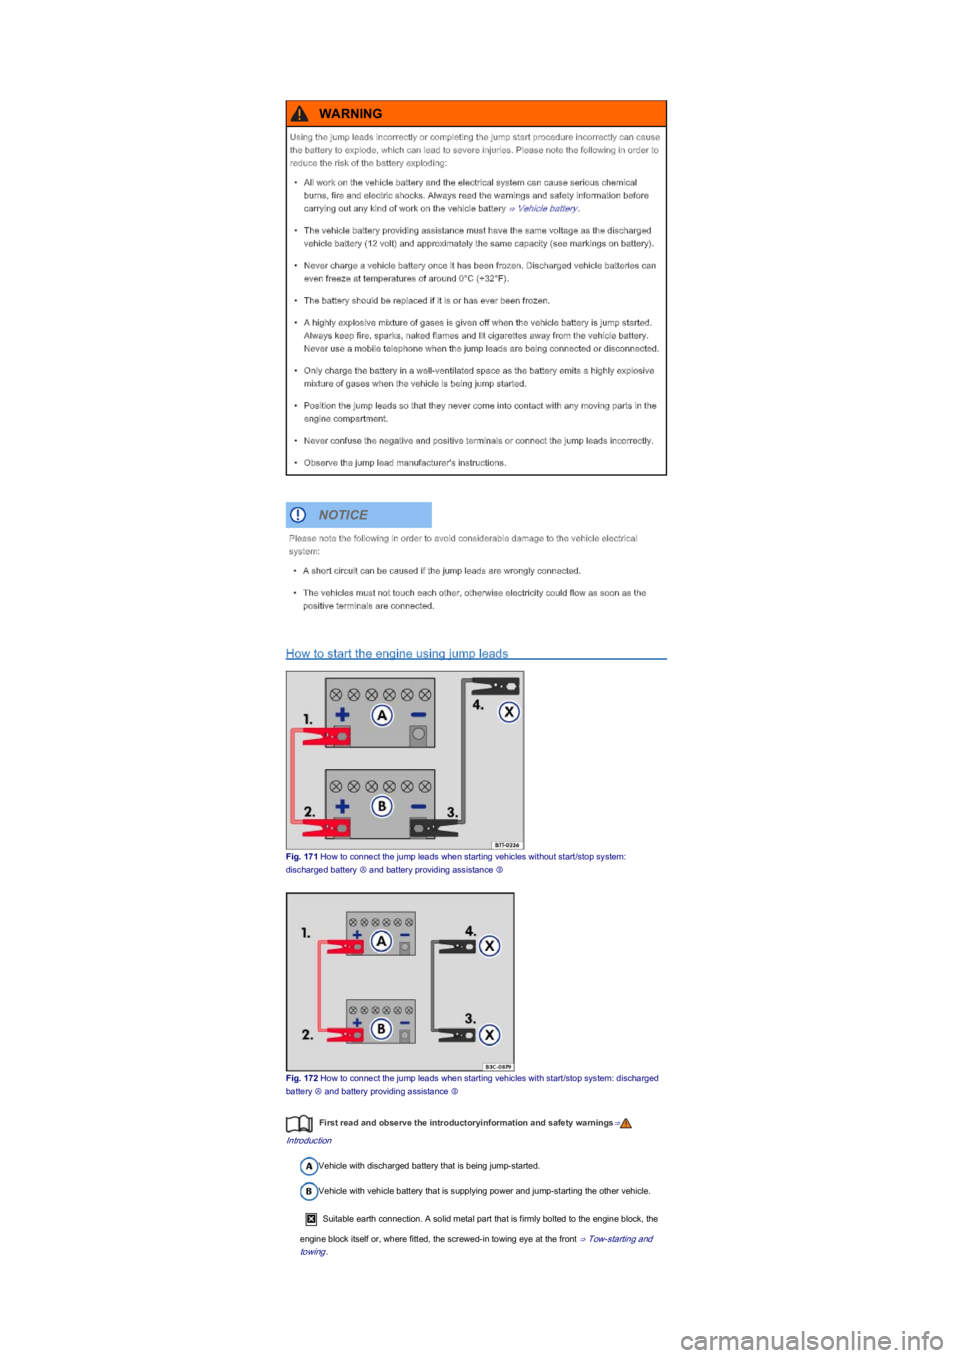
How to start the engine using jump leads
Fig. 171 How to connect the jump leads when starting vehicles without start/stop system:
discharged battery Ⓐ and battery providing assistance Ⓑ
Fig. 172 How to connect the jump leads when starting vehicles with start/stop system: discharged
battery Ⓐ and battery providing assistance Ⓑ
First read and observe the introductoryinformation and safety warnings⇒
Introduction
Vehicle with discharged battery that is being jump-started.
Vehicle with vehicle battery that is supplying power and jump-starting the other vehicle.
Suitable earth connection. A solid metal part that is firmly bolted to the engine block, the
engine block itself or, where fitted, the screwed-in towing eye at the front ⇒ Tow-starting and
towing.
Using the jump leads incorrectly or completing the jump start procedure incorrectly can cause
the battery to explode, which can lead to severe injuries. Please note the following in order to
reduce the risk of the battery exploding:
\f
Page 207 of 211
⇒ Fitting the front towing eye
⇒ Driving tips when towing
Observe any legal requirements when towing or tow-starting.
For technical reasons, vehicles with a discharged battery must not be tow-started.
For technical reasons, vehicles with an automated manual gearbox must not be tow started
unless it has been ascertained that the gearbox is in position N⇒ When a vehicle with an
automated manual gearbox has to be towed:.
Towing a vehicle when the engine is switched off and the ignition is switched on discharges the
vehicle battery. In some vehicles battery charge level, the drop in voltage can be large enough after
just a few minutes that electrical consumers in the vehicle will no longer function, e.g. the hazard
warning lights.
Additional information and warnings:
\f