Page 100 of 233

98LightingAdaptive forward lighting
Cornering light Depending on the steering angle,
vehicle speed and gear selected
when cornering, an additional light
will illuminate the corner of the road
on the respective side.
The cornering light is switched off
automatically after prolonged use and
at vehicle speeds above 25 mph.
Hazard warning flashers
Operated by pressing ¨.
In the event of hard braking, the
hazard warning flashers may turn on automatically. Switch off by pressing
¨ .
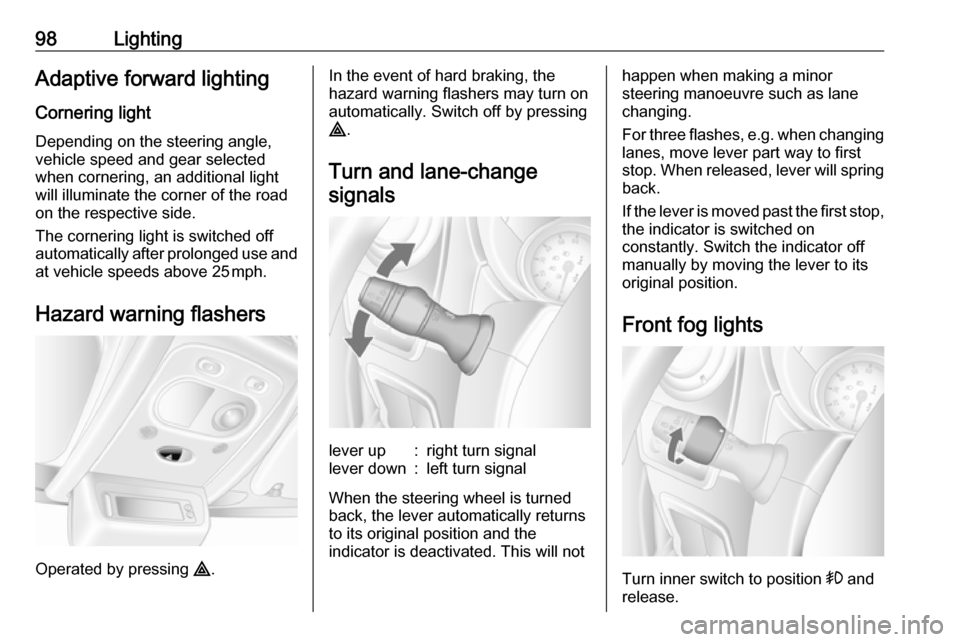
Turn and lane-change signalslever up:right turn signallever down:left turn signal
When the steering wheel is turned
back, the lever automatically returns
to its original position and the
indicator is deactivated. This will not
happen when making a minor
steering manoeuvre such as lane
changing.
For three flashes, e.g. when changing lanes, move lever part way to first
stop. When released, lever will spring
back.
If the lever is moved past the first stop,
the indicator is switched on
constantly. Switch the indicator off
manually by moving the lever to its
original position.
Front fog lights
Turn inner switch to position > and
release.
Page 103 of 233
Lighting101Rear reading lightsCombi, Bus
Operate rocker switch on the
instrument panel:
press l:onpress OFF:off
Courtesy lights c 3 99.
Each reading light can then be
switched on or off individually and
directed as required.
Lighting features
Exit lighting
Headlights come on for approx.
30 seconds after the vehicle is parked and the system is activated.
Activating 1. Switch off ignition.
2. Remove ignition key.
3. Pull turn signal lever towards steering wheel.
This action can be repeated up to
four times.
Page 148 of 233

146Driving and operatingTrajectory lane display (1)
Depending on version, the trajectory
lane (1) of the vehicle is shown in blue
on the Info-Display. It shows the path of the vehicle in accordance with the
steering angle.
Fixed lane display (2)
The fixed lane display (2) shows the
path of the vehicle if the wheels are
kept straight.
Guide lines (3, 4, 5) are used together
with the fixed lane display (2) and
indicate the distance behind the
vehicle.The guide line intervals are as
follows:3 (red):30 cm4 (yellow):70 cm5 (green):150 cmSettings
Settings, e.g. brightness, can be set
via the Infotainment system. Refer to
Infotainment system manual for
further information.
Deactivation
The camera is deactivated after a
delay if reverse gear is not engaged.
Fault
The rear view camera may not operate properly when:
● the surrounding is dark
● the sun or the beam of headlights
is shining directly into the camera lens
● ice, snow, mud, or anything else covers the camera lens. Clean
the lens, rinse it with water, and
wipe it with a soft cloth
● the rear doors/tailgate are not closed correctly
● the vehicle had a rear-end accident
● there are extreme temperature changes
Lane departure warning
The lane departure warning system
uses a front camera to observe the
lane markings between which the
vehicle is driving. The system detects
lane changes and warns the driver in
the event of an unintended lane
change via visual and acoustic
signals.
Criteria for the detection of an
unintended lane change are:
● no operation of turn and lane- change signals
● no active steering
If the driver is performing these
actions, no warning will be issued.
Page 149 of 233

Driving and operating147Activation
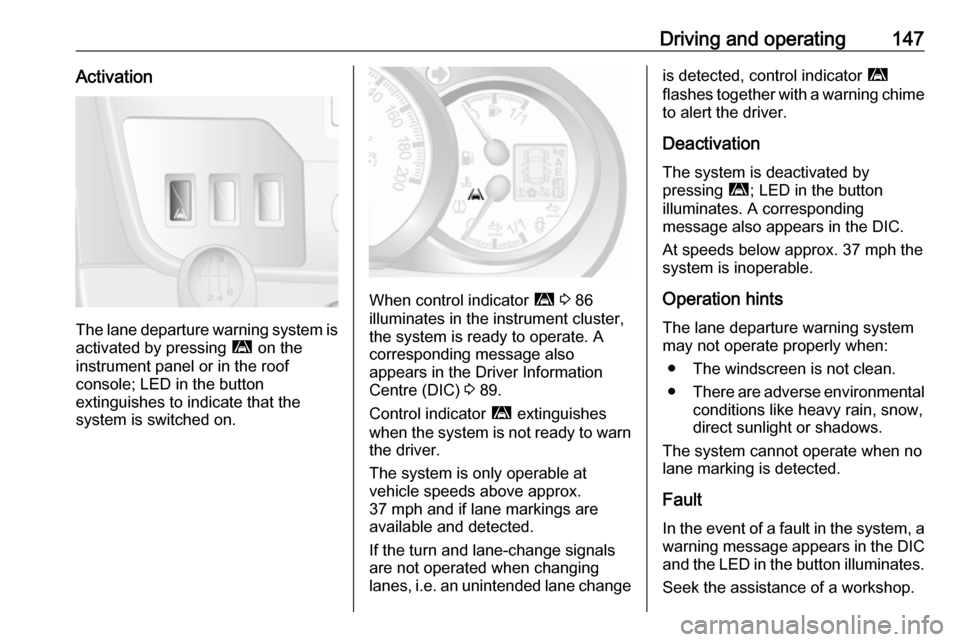
The lane departure warning system isactivated by pressing ì on the
instrument panel or in the roof
console; LED in the button
extinguishes to indicate that the
system is switched on.
When control indicator ì 3 86
illuminates in the instrument cluster,
the system is ready to operate. A
corresponding message also
appears in the Driver Information
Centre (DIC) 3 89.
Control indicator ì extinguishes
when the system is not ready to warn the driver.
The system is only operable at
vehicle speeds above approx.
37 mph and if lane markings are
available and detected.
If the turn and lane-change signals
are not operated when changing
lanes, i.e. an unintended lane change
is detected, control indicator ì
flashes together with a warning chime
to alert the driver.
Deactivation The system is deactivated by
pressing ì; LED in the button
illuminates. A corresponding
message also appears in the DIC.
At speeds below approx. 37 mph the
system is inoperable.
Operation hints The lane departure warning system
may not operate properly when:
● The windscreen is not clean.
● There are adverse environmental
conditions like heavy rain, snow,
direct sunlight or shadows.
The system cannot operate when no
lane marking is detected.
Fault
In the event of a fault in the system, a warning message appears in the DIC
and the LED in the button illuminates.
Seek the assistance of a workshop.
Page 153 of 233

Driving and operating151level. Since engine power decreases
as altitude increases due to the air
becoming thinner, therefore reducing
climbing ability, the permissible gross
train weight also decreases by 10%
for every 1000 metres of additional
altitude. The gross train weight does
not have to be reduced when driving
on roads with slight inclines (less than
8%, e.g. motorways).
The permissible gross train weight
must not be exceeded. This weight is
specified on the identification plate
3 199.
Vertical coupling load
The vertical coupling load is the load
exerted by the trailer on the coupling
ball. It can be varied by changing the
weight distribution when loading the
trailer.
The maximum permissible vertical
coupling load is specified on the
towing equipment identification plate
and in the vehicle documents. Always aim for the maximum load, especially
in the case of heavy trailers. The
vertical coupling load should never
fall below 25 kg.In the case of trailer loads of
1200 kg or more, the vertical coupling load should not be less than 50 kg.
Rear axle load
When the trailer is coupled and the
towing vehicle fully loaded (including
all occupants), the permissible rear
axle load (see identification plate or
vehicle documents) must not be
exceeded.
Towing equipmentCaution
When operating without a trailer,
remove the coupling ball bar.
Towing equipment audible
warning
For vehicles fitted with towing
equipment, when connected to a
trailer the pitch of the audible warning
changes upon operation of the turn
signals.
The pitch of the audible warning will
change if a turn signal light on the
trailer or the towing vehicle fails.
Trailer stability assist
If the system detects snaking
movements, engine power is reduced
and the vehicle/trailer combination is
selectively braked until the snaking ceases. While the system is working,keep steering wheel as still as
possible.
Trailer stability assist (TSA) is a
function of the Electronic Stability
Program (ESP) 3 137.
Page 155 of 233

Vehicle care153Vehicle careGeneral Information...................154
Accessories and vehicle modifications .......................... 154
Vehicle storage ........................154
End-of-life vehicle recovery .....155
Vehicle checks ........................... 155
Performing work ......................155
Bonnet ..................................... 155
Engine oil ................................. 156
Engine coolant ......................... 157
Power steering fluid .................158
Washer fluid ............................ 159
Brakes ..................................... 159
Brake fluid ............................... 159
Vehicle battery ......................... 159
Diesel fuel filter ........................161
Diesel fuel system bleeding .....161
Wiper blade replacement ........162
Bulb replacement .......................162
Headlights ............................... 162
Adaptive forward lighting .........164
Fog lights ................................. 165
Front turn signal lights .............165
Tail lights ................................. 166
Side turn signal lights ..............167Centre high-mounted brake
light ......................................... 167
Number plate light ...................168
Interior lights ............................ 168
Instrument panel illumination ...169
Electrical system ........................170
Fuses ....................................... 170
Engine compartment fuse box . 171
Instrument panel fuse box .......171
Load compartment fuse box ....172
Vehicle tools .............................. 174
Tools ........................................ 174
Wheels and tyres .......................175
Tyres ....................................... 175
Winter tyres ............................. 176
Tyre designations ....................176
Tyre pressure .......................... 176
Tyre pressure monitoring system .................................... 177
Tread depth ............................. 179
Changing tyre and wheel size . 179 Wheel covers ........................... 180
Tyre chains .............................. 180
Tyre repair kit .......................... 180
Wheel changing .......................184
Spare wheel ............................ 185
Jump starting ............................. 188Towing....................................... 190
Towing the vehicle ...................190
Towing another vehicle ...........191
Appearance care .......................192
Exterior care ............................ 192
Interior care ............................. 193
Page 167 of 233
Vehicle care165
5. Detach bulb from bulb holder andrenew the bulb.
6. Insert the bulb holder, engaging the two lugs in the reflectorhousing and rotate clockwise to
secure.
7. Reattach wiring connector to bulb.
8. Replace protective cover.
Fog lights
Have the front fog light bulbs replaced
by a workshop.
Front turn signal lights
1. Remove protective cover.
2. Detach wiring connector from bulb.
3. Rotate bulb holder anti-clockwise to disengage.
4. Withdraw bulb holder from reflector housing.
5. Detach bulb from bulb holder andrenew the bulb.
6. Insert the bulb holder, engaging the two lugs in the reflectorhousing and rotate clockwise to
secure.
7. Reattach wiring connector to bulb.
8. Replace protective cover.
Page 168 of 233

166Vehicle careTail lightsRear brake, tail, turn signal,
reverse and fog tail lights
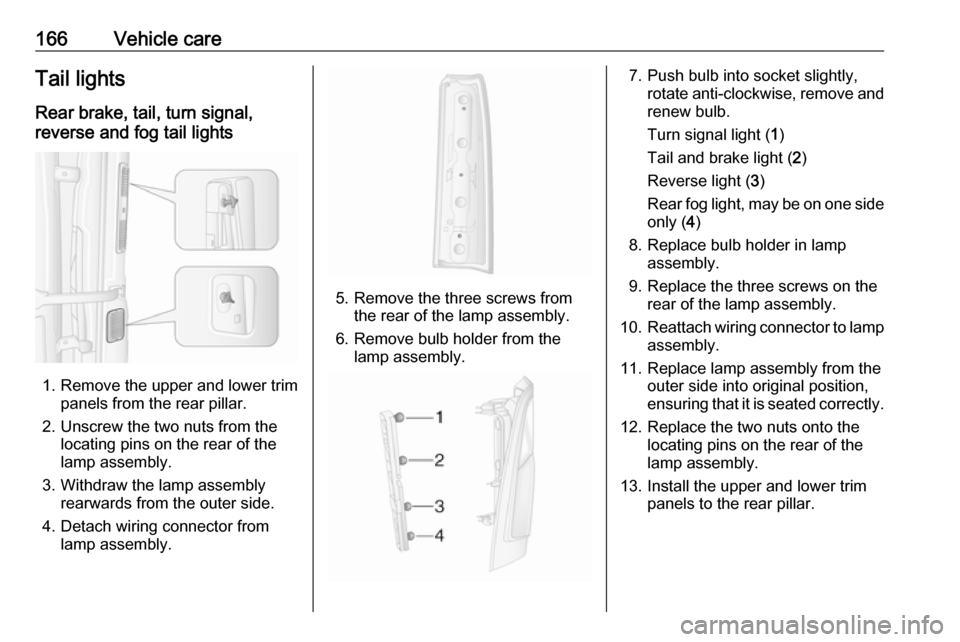
1. Remove the upper and lower trim panels from the rear pillar.
2. Unscrew the two nuts from the locating pins on the rear of the
lamp assembly.
3. Withdraw the lamp assembly rearwards from the outer side.
4. Detach wiring connector from lamp assembly.
5. Remove the three screws from the rear of the lamp assembly.
6. Remove bulb holder from the lamp assembly.
7. Push bulb into socket slightly, rotate anti-clockwise, remove and
renew bulb.
Turn signal light ( 1)
Tail and brake light ( 2)
Reverse light ( 3)
Rear fog light, may be on one side only ( 4)
8. Replace bulb holder in lamp assembly.
9. Replace the three screws on the rear of the lamp assembly.
10. Reattach wiring connector to lamp
assembly.
11. Replace lamp assembly from the outer side into original position,
ensuring that it is seated correctly.
12. Replace the two nuts onto the locating pins on the rear of the
lamp assembly.
13. Install the upper and lower trim panels to the rear pillar.