Page 114 of 233

112Climate control● Select P in the menu bar and
confirm.
● Select desired preset memory number 1, 2 or 3 and confirm.
● Select day and confirm.
● Select hour and confirm.
● Select minutes and confirm.
● Select Y or x and confirm.
● If necessary, adjust the runtime duration prior to departure and
confirm.
The next preset memory number to
be activated is underlined and the
weekday is displayed. Repeat the
procedure to programme the other
preset memory numbers.
Pressing X during the procedure will
exit without storing programme
adjustments.
To delete a preset departure time,
follow the steps for programming until
heating symbol Y flashes. Press q
or r until oFF appears in the display
and confirm.
Heating stops automatically
5 minutes after the programmed departure time.Notice
The remote control system features
a temperature sensor which
calculates the runtime according to
the ambient temperature and the desired heating level (ECO or
HIGH). The system starts
automatically between 5 and
60 minutes prior to the programmed
departure time.
Set weekday, time and heating
duration Ö
If the vehicle battery is disconnected or its voltage is too low, the unit will
need to be reset.
● Select Ö and confirm.
● Select weekday and confirm.
● Change hours and confirm.
● Change minutes and confirm. ● Change the default heating duration and confirm.
Heating level Y
The preferred heating level for
programmed departure times can be set to either ECO or HIGH.Select Y and confirm. ECO or HIGH
flashes in the display. Adjust using
q or r and confirm.
Page 156 of 233

154Vehicle careGeneral Information
Accessories and vehicle modifications
We recommend the use of genuine
parts and accessories and factory
approved parts specific for your
vehicle type. We cannot assess or guarantee reliability of other products
- even if they have a regulatory or
otherwise granted approval.
Do not make any modifications to the electrical system, e.g. changes of
electronic control units (chip tuning).Caution
When transporting the vehicle on
a train or on a recovery vehicle, the
mud flaps might be damaged.
Vehicle storage
Storage for a long period of time
If the vehicle is to be stored for several months:
● Wash and wax the vehicle.
● Have the wax in the engine compartment and underbody
checked.
● Clean and preserve rubber seals.
● Change engine oil.
● Drain washer fluid reservoir. ● Check coolant antifreeze and corrosion protection.
● Adjust tyre pressure to the value specified for full load.
● Park vehicle in a dry, well ventilated place. Engage first or
reverse gear. Prevent the vehicle
from rolling.
● Do not apply parking brake.● Open bonnet, close all doors and
lock the vehicle.
● Disconnect the clamp from the negative terminal of the vehicle
battery. Beware that all systems
are not functional, e.g. anti-theft
alarm system.
Putting back into operation When the vehicle is to be put back into
operation:
● Connect the clamp to the negative terminal of the vehicle
battery. Activate the electronics
of the power windows.
● Check tyre pressure.
● Fill up the washer fluid reservoir. ● Check the engine oil level.
● Check the coolant level.
● Fit the number plate, if necessary.
Page 186 of 233

184Vehicle careWheel changingSome vehicles are equipped with a
tyre repair kit instead of a spare wheel
3 180.
Make the following preparations and
observe the following information:
● Park the vehicle on a level, firm and non-slippery surface. The
front wheels must be in the
straight-ahead position.
● Apply the parking brake and engage first gear or reverse gear
(manual transmission) or N
(manual transmission
automated).
● Switch off the air suspension system 3 122.
● Remove the spare wheel 3 185.
● Never change more than one wheel at a time.
● Use the jack only to change wheels in case of puncture, not
for seasonal winter or summer
tyre change.
● The jack is maintenance-free.● If the ground on which the vehicle
is standing is soft, a solid board
(max. 1 cm thick) should be
placed under the jack.
● No people or animals may be in the vehicle when it is jacked-up.
● Never crawl under a jacked-up vehicle.
● Do not start the engine when the vehicle is raised on the jack.
● Clean wheel bolts/nuts and their threads before mounting thewheel.9 Warning
Do not grease wheel bolt, wheel
nut and wheel nut cone.
1. Remove the wheel cover using the hook supplied. Vehicle tools
3 174.
2. Install the wheel wrench ensuring that it locates securely and loosen
each wheel bolt/nut by half a turn.
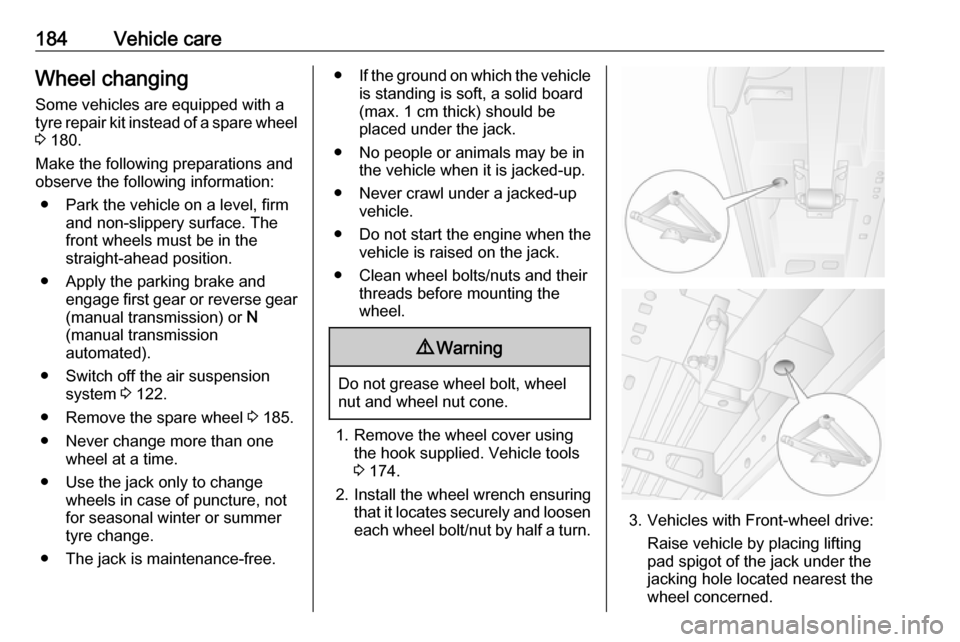
3. Vehicles with Front-wheel drive:
Raise vehicle by placing lifting
pad spigot of the jack under the
jacking hole located nearest the
wheel concerned.