2016 TOYOTA TUNDRA hood open
[x] Cancel search: hood openPage 5 of 588

5
1
9 8
7 5 4
3
2
10
6
6-4. Using the other interior featuresOther interior features ....... 382• Sun visors ..................... 382
• Vanity mirrors................ 382
• Clock ............................. 383
• Outside temperature
display........................... 384
• Power outlets ................ 385
• Armrest ......................... 387
• Assist grips ................... 388
Garage door opener .......... 389
Compass ........................... 395
7-1. Maintenance and care Cleaning and protecting the vehicle exterior .......... 400
Cleaning and protecting the vehicle interior ........... 402
7-2. Maintenance Maintenance requirements ................... 405
General maintenance ........ 407
Emission inspection and maintenance (I/M)
programs ......................... 410
7-3. Do-it-yourself maintenance Do-it-yourself service precautions ..................... 411
Hood.................................. 413
Engine compartment ......... 414
Tires .................................. 424
Tire inflation pressure........ 432
Wheels .............................. 435
Air conditioning filter .......... 438
Wireless remote control battery ............................. 441
Checking and replacing fuses ............................... 443
Light bulbs ......................... 446 8-1. Essential information
Emergency flashers ........... 464
If your vehicle has to be stopped in
an emergency.................. 465
8-2. Steps to take in an emergency
If your vehicle needs to be towed .......................... 466
If you think something is wrong............................... 471
Fuel pump shut off system ............................. 472
If a warning light turns on or a warning buzzer
sounds ............................. 473
If a warning message is displayed ......................... 480
If you have a flat tire .......... 484
If the engine will not start ................................. 499
If the shift lever cannot be shifted from P ............. 500
If the vehicle battery is discharged ....................... 502
If your vehicle overheats.... 505
If the vehicle becomes stuck ................................ 507
7Maintenance and care
8When trouble arises
Page 15 of 588
15Pictorial index
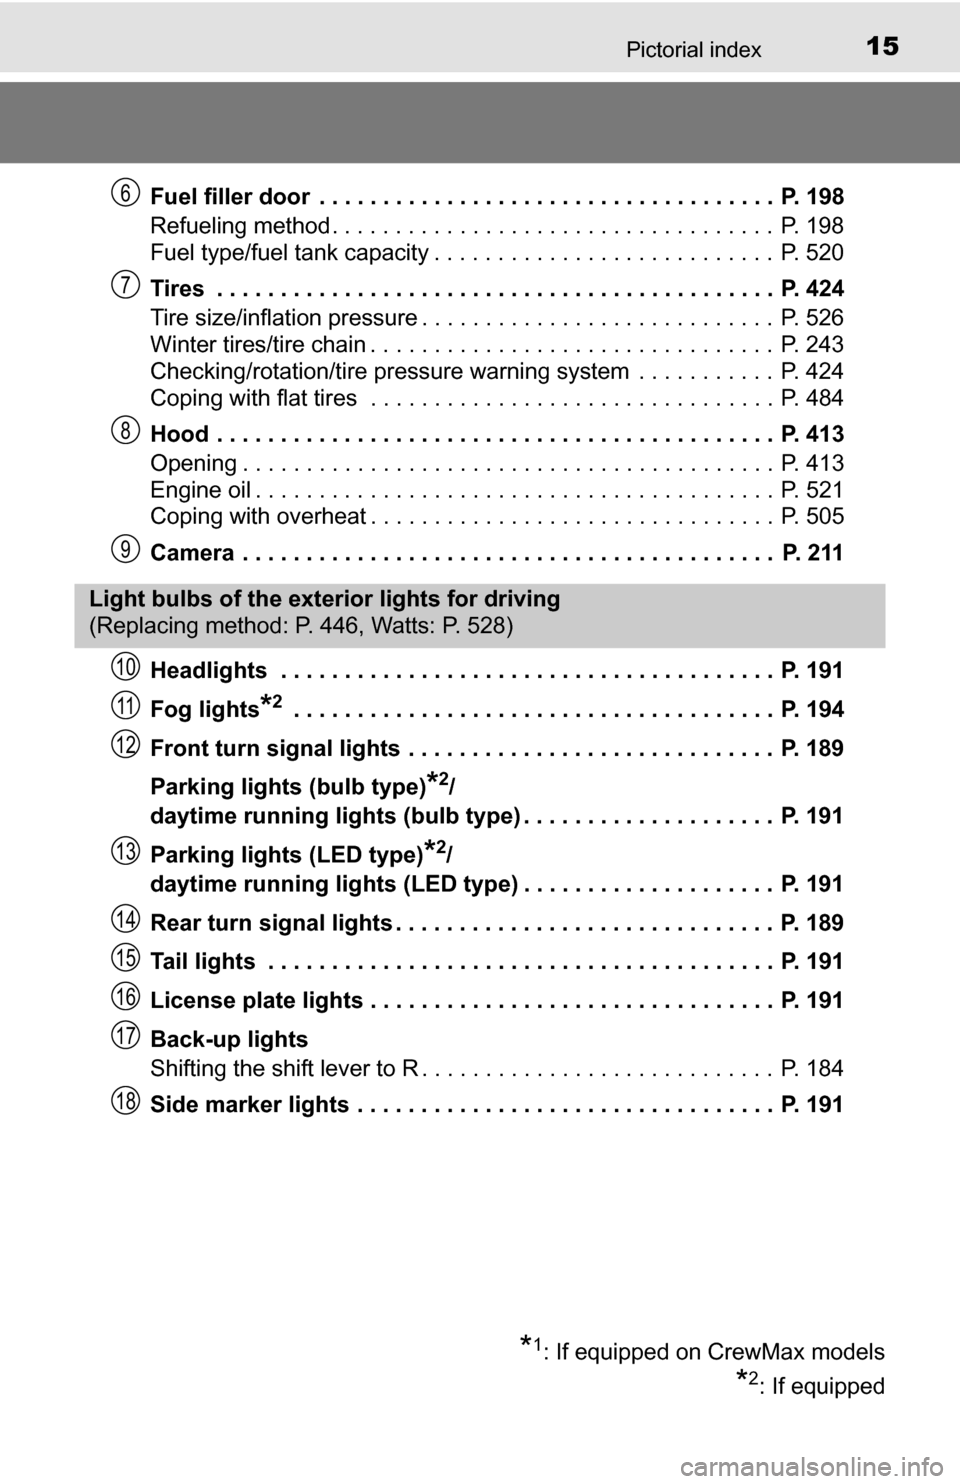
Fuel filler door . . . . . . . . . . . . . . . . . . . . . . . . . . . . . . . . . . . . P. 198
Refueling method . . . . . . . . . . . . . . . . . . . . . . . . . . . . . . . . . . . P. 198
Fuel type/fuel tank capacity . . . . . . . . . . . . . . . . . . . . . . . . . . . P. 520
Tires . . . . . . . . . . . . . . . . . . . . . . . . . . . . . . . . . . . . . . . . . . . . P. 424
Tire size/inflation pressure . . . . . . . . . . . . . . . . . . . . . . . . . . . . P. 526
Winter tires/tire chain . . . . . . . . . . . . . . . . . . . . . . . . . . . . . . . . P. 243
Checking/rotation/tire pressure warning system . . . . . . . . . . . P. 424
Coping with flat tires . . . . . . . . . . . . . . . . . . . . . . . . . . . . . . . . P. 484
Hood . . . . . . . . . . . . . . . . . . . . . . . . . . . . . . . . . . . . . . . . . . . . P. 413
Opening . . . . . . . . . . . . . . . . . . . . . . . . . . . . . . . . . . . . . . . . . . P. 413
Engine oil . . . . . . . . . . . . . . . . . . . . . . . . . . . . . . . . . . . . . . . . . P. 521
Coping with overheat . . . . . . . . . . . . . . . . . . . . . . . . . . . . . . . . P. 505
Camera . . . . . . . . . . . . . . . . . . . . . . . . . . . . . . . . . . . . . . . . . . P. 211
Headlights . . . . . . . . . . . . . . . . . . . . . . . . . . . . . . . . . . . . . . . P. 191
Fog lights
*2 . . . . . . . . . . . . . . . . . . . . . . . . . . . . . . . . . . . . . . P. 194
Front turn signal lights . . . . . . . . . . . . . . . . . . . . . . . . . . . . . P. 189
Parking lights (bulb type)
*2/
daytime running lights (bulb type) . . . . . . . . . . . . . . . . . . . . P. 191
Parking lights (LED type)
*2/
daytime running lights (LED type) . . . . . . . . . . . . . . . . . . . . P. 191
Rear turn signal lights . . . . . . . . . . . . . . . . . . . . . . . . . . . . . . P. 189
Tail lights . . . . . . . . . . . . . . . . . . . . . . . . . . . . . . . . . . . . . . . . P. 191
License plate lights . . . . . . . . . . . . . . . . . . . . . . . . . . . . . . . . P. 191
Back-up lights
Shifting the shift lever to R . . . . . . . . . . . . . . . . . . . . . . . . . . . . P. 184
Side marker lights . . . . . . . . . . . . . . . . . . . . . . . . . . . . . . . . . P. 191
6
7
8
9
Light bulbs of the exterior lights for driving
(Replacing method: P. 446, Watts: P. 528)
*1: If equipped on CrewMax models
*2: If equipped
10
11
12
13
14
15
16
17
18
Page 55 of 588
551-1. For safe use
1
For safety and security
Safety information for children
●Double Cab and CrewMax models: It is recommended that children
sit in the rear seats to avoid accidental contact with the shift lever,
wiper switch, etc.
● Use the rear door child-protector lock (Double Cab and CrewMax
models) or the window lock switch (if equipped) to avoid children
opening the door while driving or operating the power window acci-
dentally.
● Do not let small children operate equipment which may catch or
pinch body parts, such as the pow er window, hood, tailgate, seats,
etc.
Observe the following precautions when children are in the vehi-
cle.
Use a child restraint system appropriate for the child, until the
child becomes large enough to pr operly wear the vehicle’s seat
belt.
CAUTION
Never leave children unattended in the vehicle, and never allow children to
have or use the key.
Children may be able to start the vehicle or shift the vehicle into neut\
ral.
There is also a danger that children may injure themselves by playing with
the windows, the moon roof or other features of the vehicle. In addition, heat
build-up or extremely cold temperatures inside the vehicle can be fatal to
children.
Page 80 of 588

801-2. Theft deterrent system
Alarm
The alarm uses light and sound to give an alert when an intrusion is
detected.
The alarm is triggered in the following situations when the alarm is
set:
●A locked door is unlocked or opened in any way other than using a
key or wireless remote control. (The doors will lock again automati-
cally.)
● The hood is opened.
● Vehicles with the glass breakage sensor: The side windows are
tapped or broken.
Close the doors and hood, and
lock all the doors. The system will
be set automatically after 30 sec-
onds.
The indicator light changes from
being on to flashing when the sys-
tem is set.
Do one of the following to d eactivate or stop the alarms:
● Unlock the doors.
● Turn the engine switch to the “ACC” or “ON” position, or start the
engine. (The alarm will be deactivated or stopped after a few sec-
onds.)
: If equipped
The alarm
Setting the alarm system
Deactivating or stopping the alarm
Page 81 of 588
811-2. Theft deterrent system
1
For safety and security
■System maintenance
The vehicle has a maintenance-free type alarm system.
■ Items to check before locking the vehicle
To prevent unexpected triggering of the alarm and vehicle theft, make sure of
the following:
●Nobody is in the vehicle.
● The windows and moon roof (if equipped) are closed before the alarm is set.
● No valuables or other personal items are left in the vehicle.
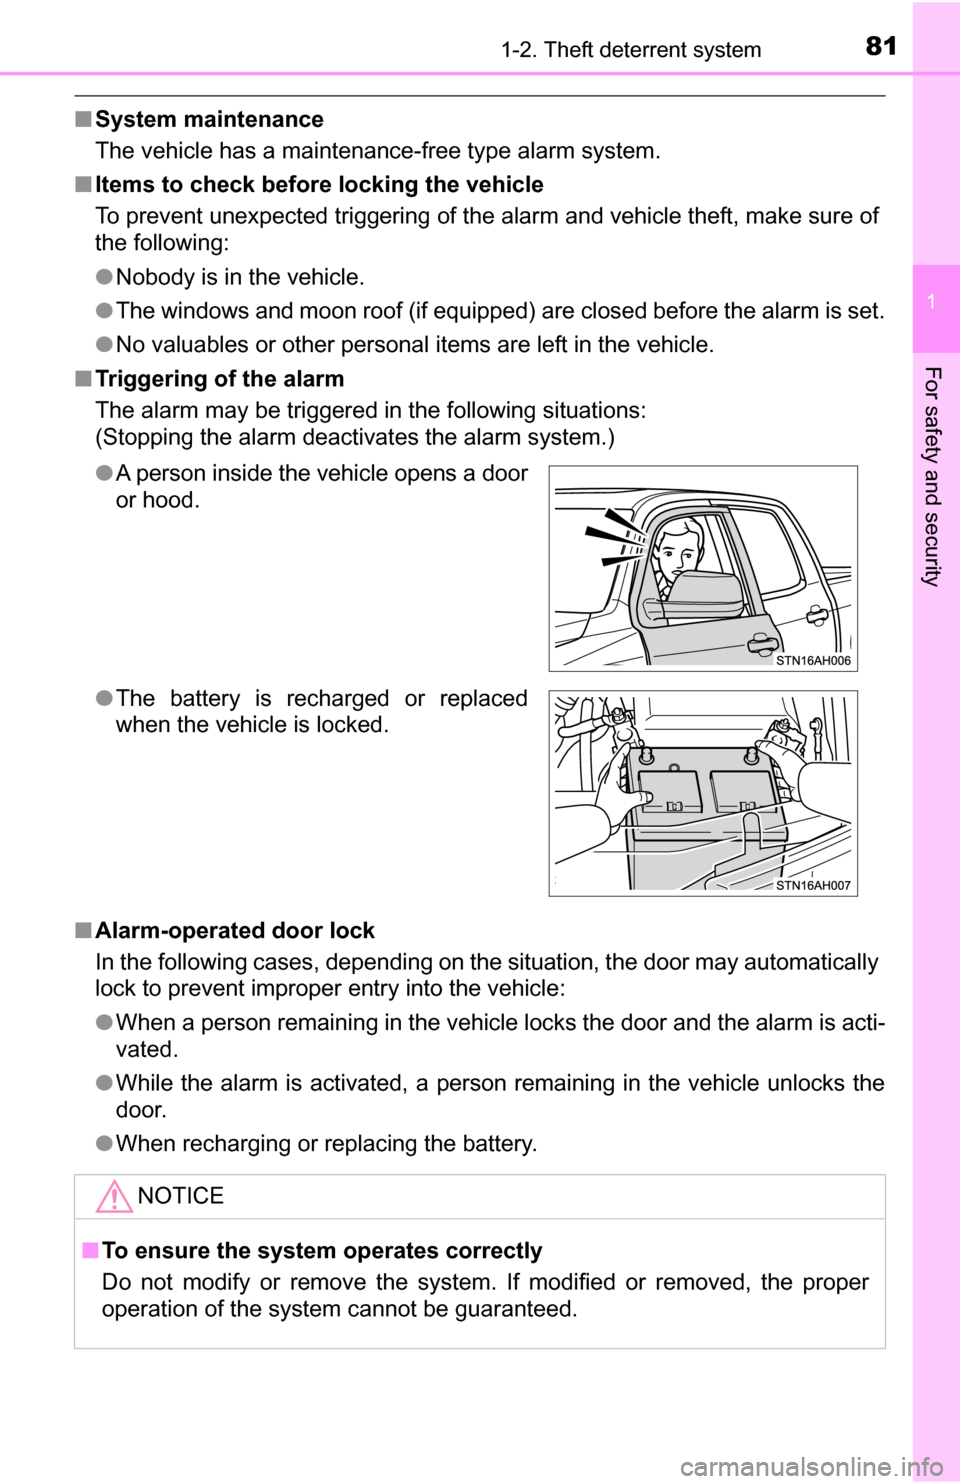
■ Triggering of the alarm
The alarm may be triggered in the following situations:
(Stopping the alarm deactivates the alarm system.)
■ Alarm-operated door lock
In the following cases, depending on the situation, the door may automatically
lock to prevent improper entry into the vehicle:
●When a person remaining in the vehicle locks the door and the alarm is acti-
vated.
● While the alarm is activated, a person remaining in the vehicle unlocks the
door.
● When recharging or replacing the battery.
●
A person inside the vehicle opens a door
or hood.
● The battery is recharged or replaced
when the vehicle is locked.
NOTICE
■To ensure the system operates correctly
Do not modify or remove the system. If modified or removed, the proper
operation of the system cannot be guaranteed.
Page 397 of 588
3976-4. Using the other interior features
6
Interior features
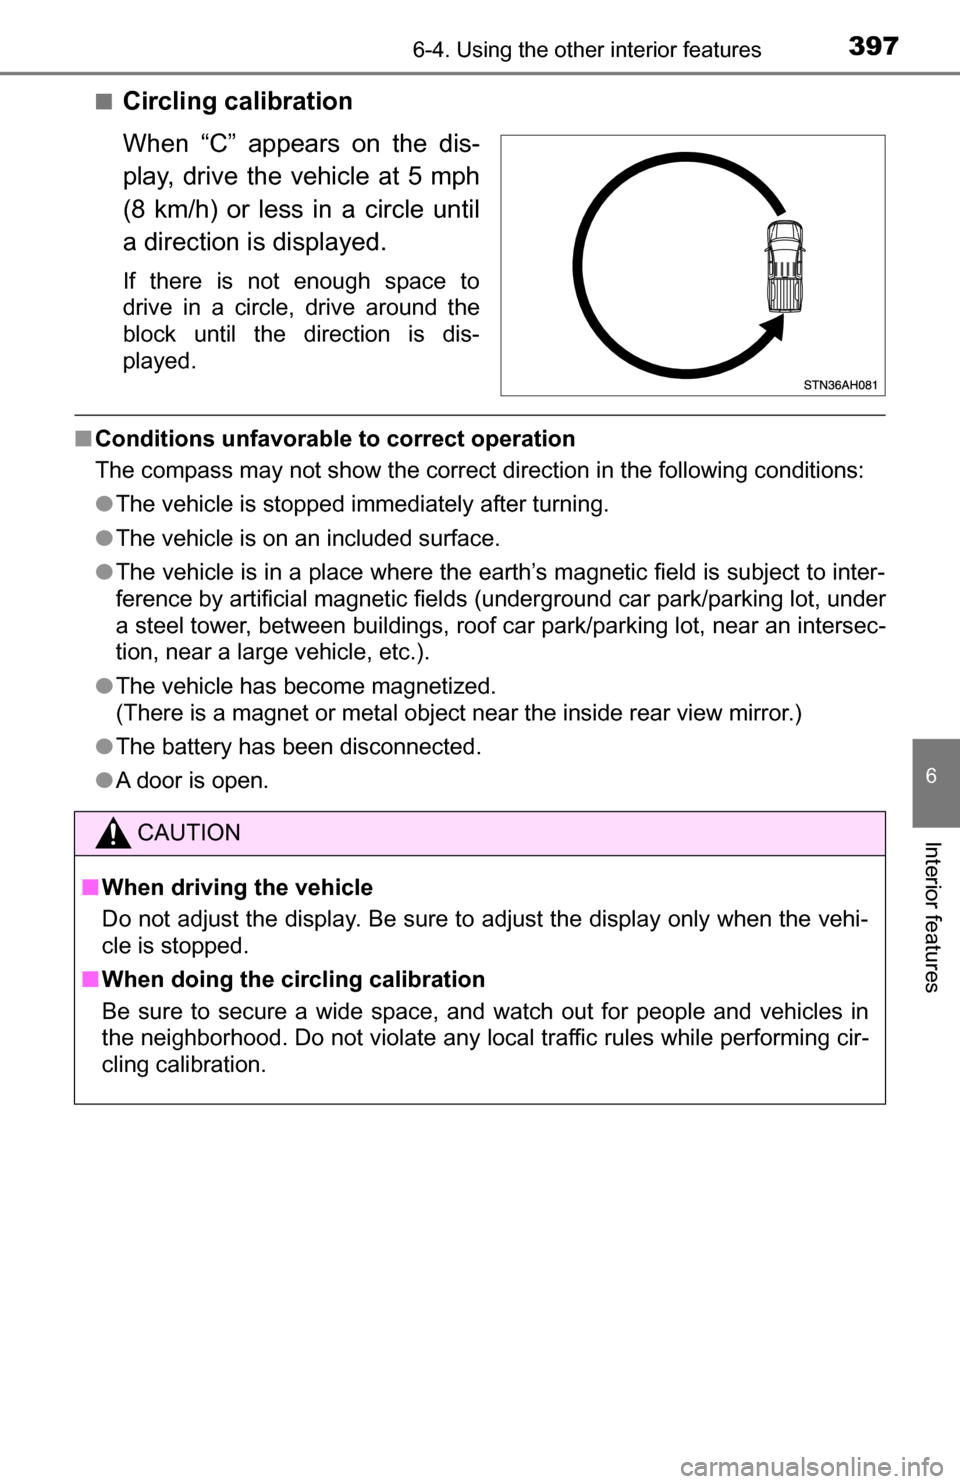
■Circling calibration
When “C” appears on the dis-
play, drive the vehicle at 5 mph
(8 km/h) or less in a circle until
a direction is displayed.
If there is not enough space to
drive in a circle, drive around the
block until the direction is dis-
played.
■Conditions unfavorable to correct operation
The compass may not show the correct direction in the following conditions:
●The vehicle is stopped immediately after turning.
● The vehicle is on an included surface.
● The vehicle is in a place where the earth’s magnetic field is subject to inter-
ference by artificial magnetic fields (underground car park/parking lot, under
a steel tower, between buildings, roof car park/parking lot, near an intersec-
tion, near a large vehicle, etc.).
● The vehicle has become magnetized.
(There is a magnet or metal object near the inside rear view mirror.)
● The battery has been disconnected.
● A door is open.
CAUTION
■ When driving the vehicle
Do not adjust the display. Be sure to adjust the display only when the vehi-
cle is stopped.
■ When doing the circling calibration
Be sure to secure a wide space, and watch out for people and vehicles in
the neighborhood. Do not violate any local traffic rules while performing cir-
cling calibration.
Page 413 of 588
4137-3. Do-it-yourself maintenance
7
Maintenance and care
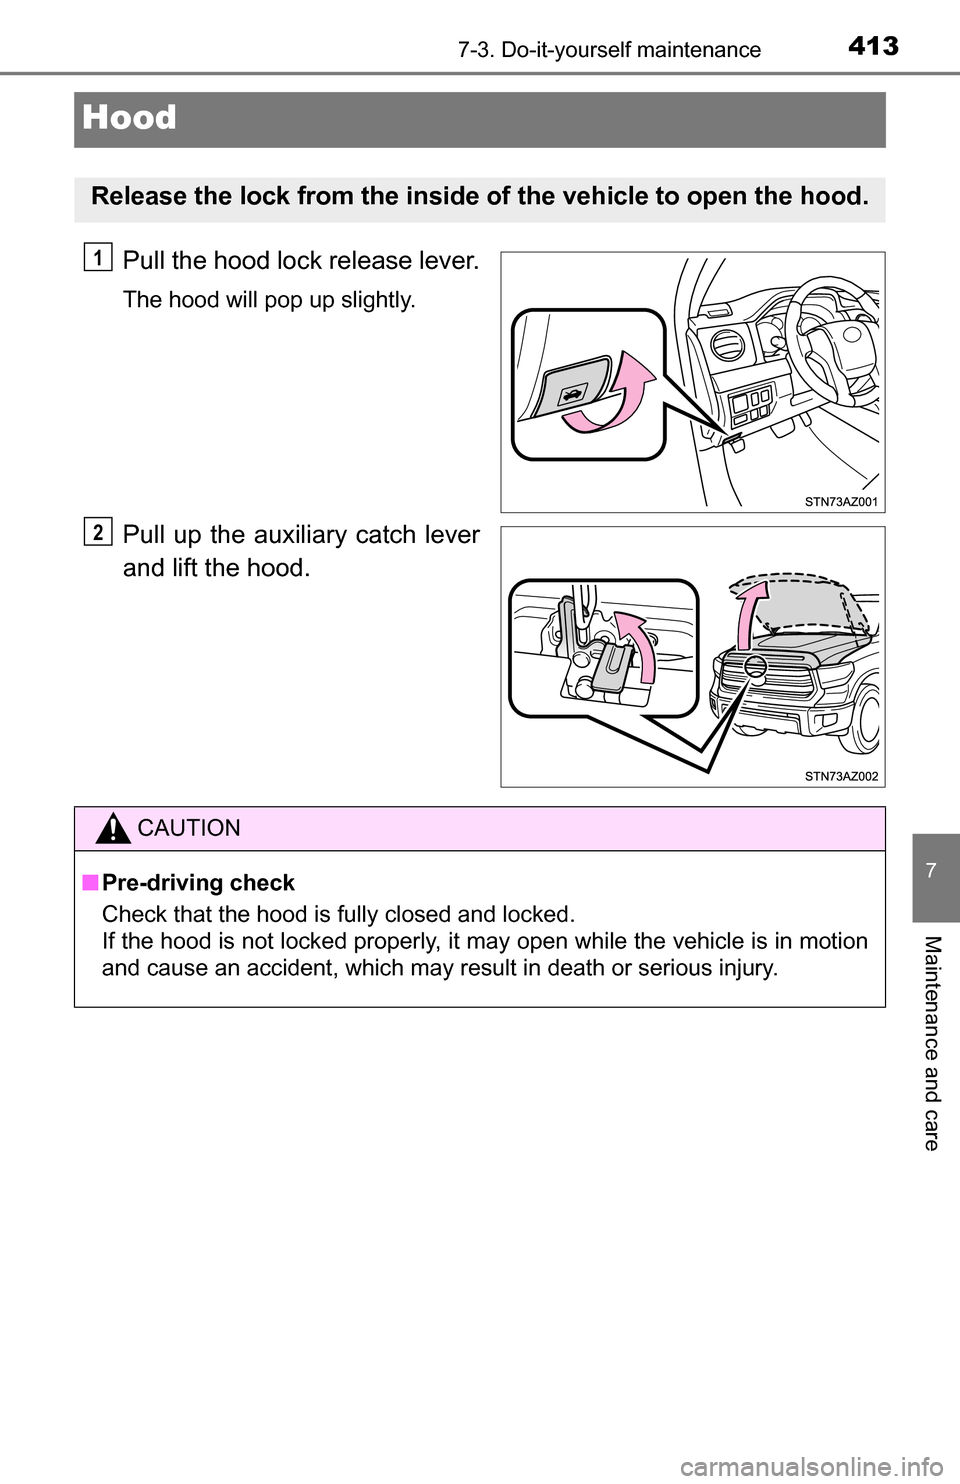
Hood
Pull the hood lock release lever.
The hood will pop up slightly.
Pull up the auxiliary catch lever
and lift the hood.
Release the lock from the inside of the vehicle to open the hood.
1
2
CAUTION
■ Pre-driving check
Check that the hood is fully closed and locked.
If the hood is not locked properly, it may open while the vehicle is in motion
and cause an accident, which may result in death or serious injury.
Page 502 of 588
5028-2. Steps to take in an emergency
If the vehicle battery is discharged
If you have a set of jumper (or booster) cables and a second vehicle
with a 12-volt battery, you can jump start your vehicle by following the
steps below.
Confirm that the key and wire-
less remote control (if
equipped) are being carried.
When connecting the jumper (or
booster) cables, depending on the
situation, the alarm may activate
and the doors may lock. ( P. 81)
Open the hood. (P. 413)
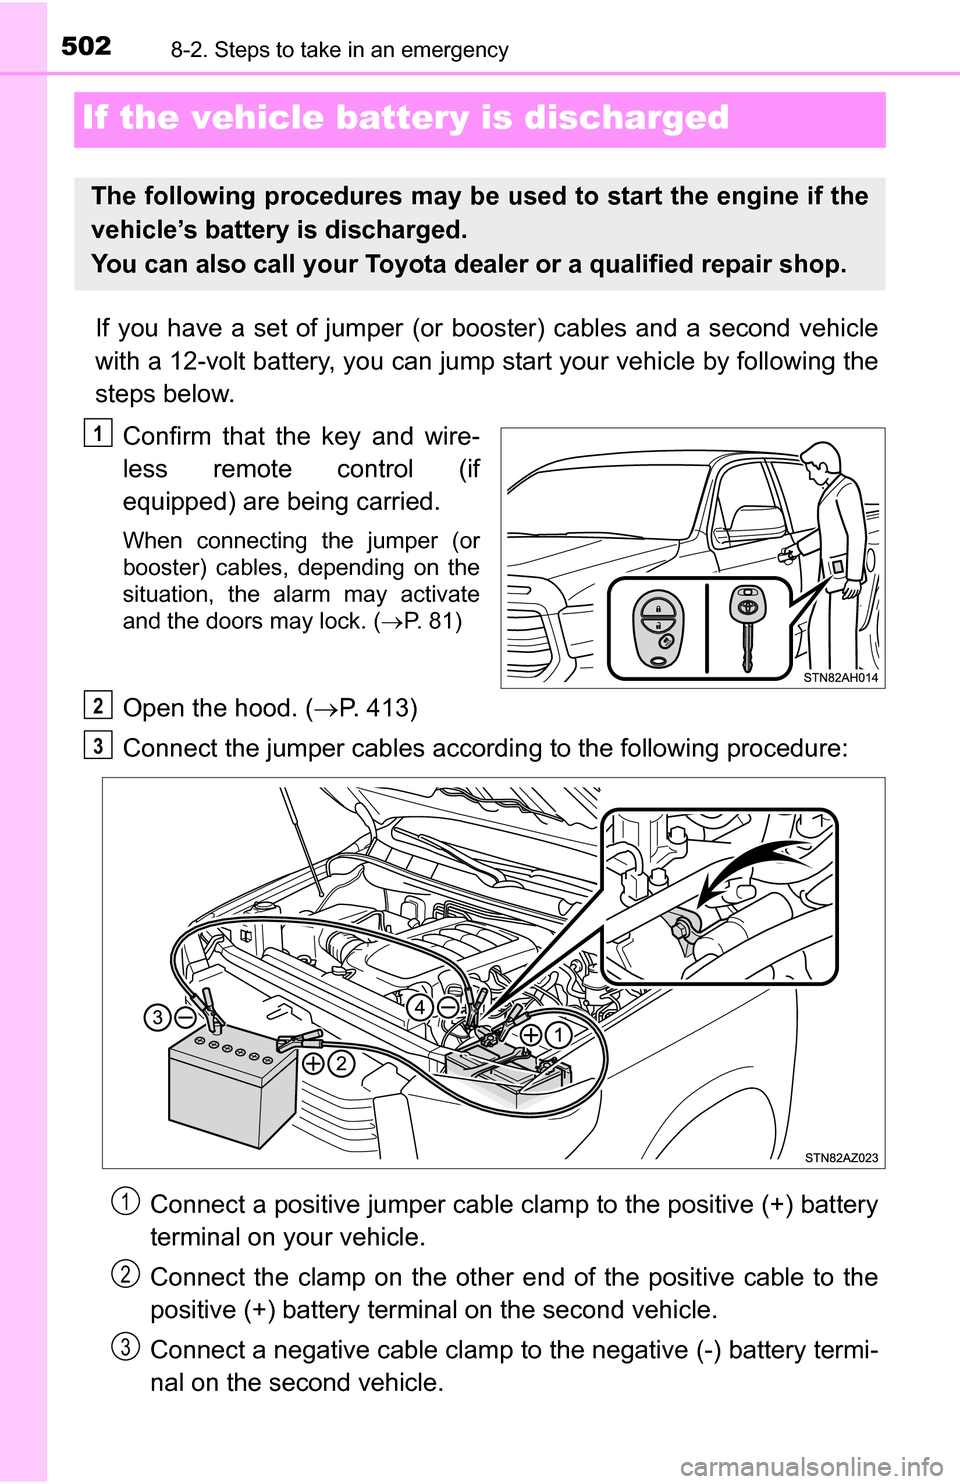
Connect the jumper cables according to the following procedure:
Connect a positive jumper cable clamp to the positive (+) battery
terminal on your vehicle.
Connect the clamp on the other e nd of the positive cable to the
positive (+) battery terminal on the second vehicle.
Connect a negative cable clamp to the negative (-) battery termi-
nal on the second vehicle.
The following procedures may be used to start the engine if the
vehicle’s battery is discharged.
You can also call your Toyota de aler or a qualified repair shop.
1
2
3
1
2
3