2016 TOYOTA TUNDRA brakes
[x] Cancel search: brakesPage 240 of 588
2404-5. Using the driving support systems
Trailer brake controller
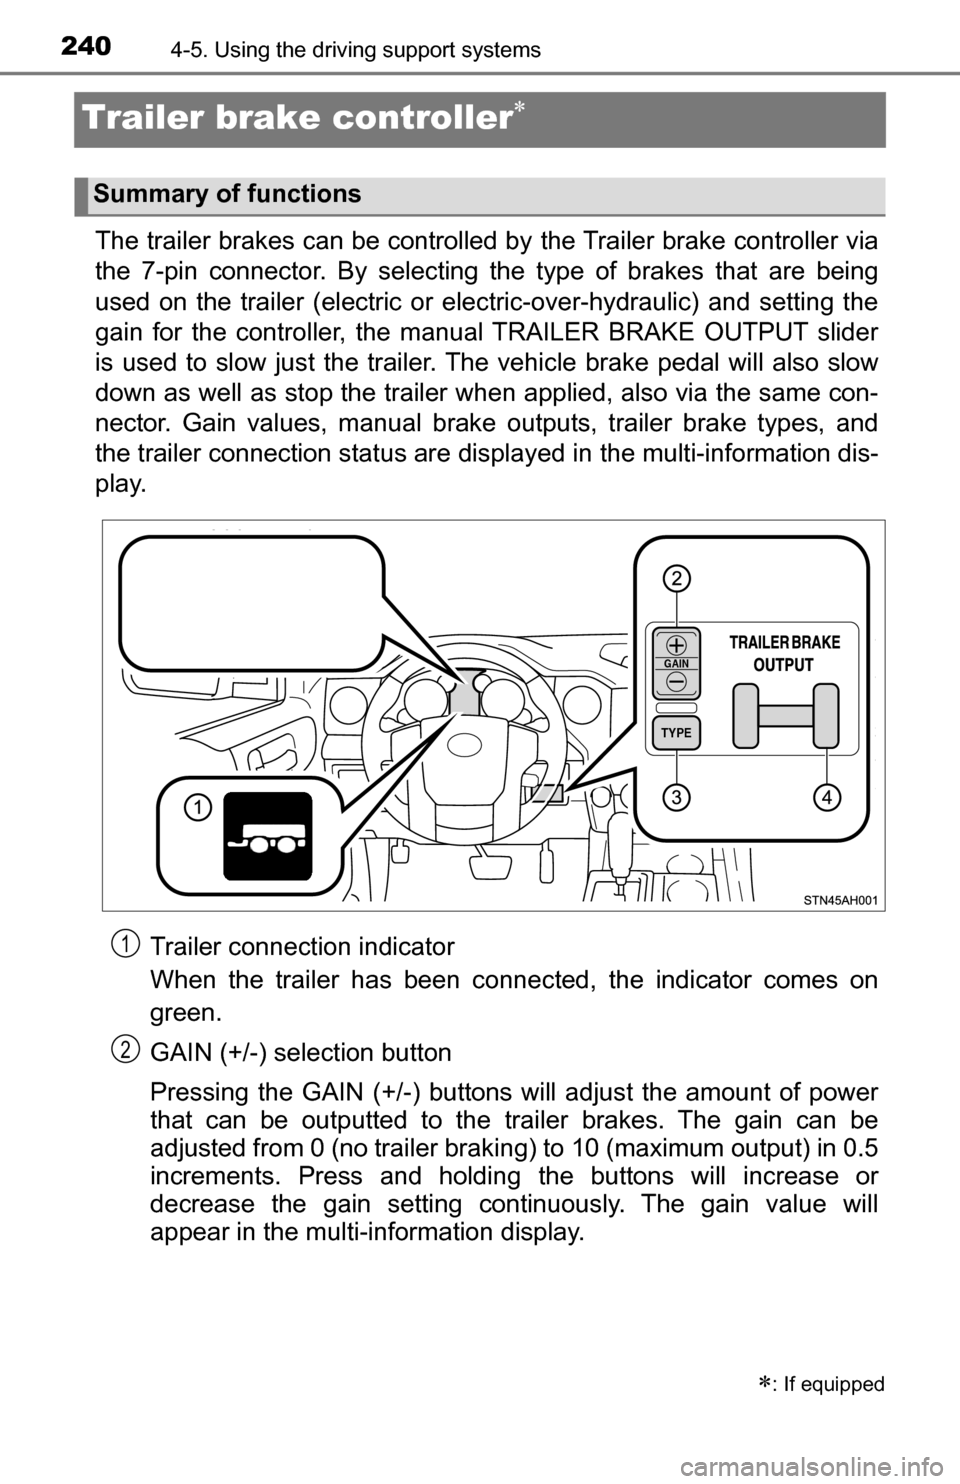
The trailer brakes can be controlled by the Trailer brake controller via
the 7-pin connector. By selecting th e type of brakes that are being
used on the trailer (electric or electric-over-hydraulic) and setting the
gain for the controller, the manual TRAILER BRAKE OUTPUT slider
is used to slow just the trailer. The vehicle brake pedal will also slow
down as well as stop the trailer when applied, also via the same con-
nector. Gain values, manual brake outputs, trailer brake types, and
the trailer connection stat us are displayed in the multi-information dis-
play.
Trailer connection indicator
When the trailer has been connected, the indicator comes on
green.
GAIN (+/-) selection button
Pressing the GAIN (+/-) buttons will adjust the amount of power
that can be outputted to the trailer brakes. The gain can be
adjusted from 0 (no trailer braki ng) to 10 (maximum output) in 0.5
increments. Press and holding the buttons will increase or
decrease the gain setting continuously. The gain value will
appear in the multi-information display.
: If equipped
Summary of functions
TYPE
GAIN
1
2
Page 241 of 588
2414-5. Using the driving support systems
4
Driving
Trailer brake TYPE selection button
Trailer brake type can be selected by pressing the trailer brake TYPE
selection button on the trailer brake controller. Trailer brake TYPE selec-
tion button will cycle through electric trailer brake and electric-over-
hydraulic trailer brakes. The combination meter will show which trailer
brake type is selected in the multi-information display after pressing the
trailer brake TYPE selection button.
Manual TRAILER BRAKE OUTPUT slider
Adjusting this slider position will engage the trailer’s brakes only. If the
manual TRAILER BRAKE OUTPUT slider is used while the vehicle
brake is applied, the greater of the two outputs will be sent to the trailer
brakes.
Gain setting on trailer brake controller should be set for a specific tow-
ing condition. Gain setting should be adjusted each time the vehicle
load, trailer load, road conditions, or weather changes. Setting the
gain value to 0 will disable the trailer brake controller output.
Make sure the trailer brakes are in good working condition and
functioning normally. See trailer dealer if necessary.
Hook up the trailer and make proper electrical connections.
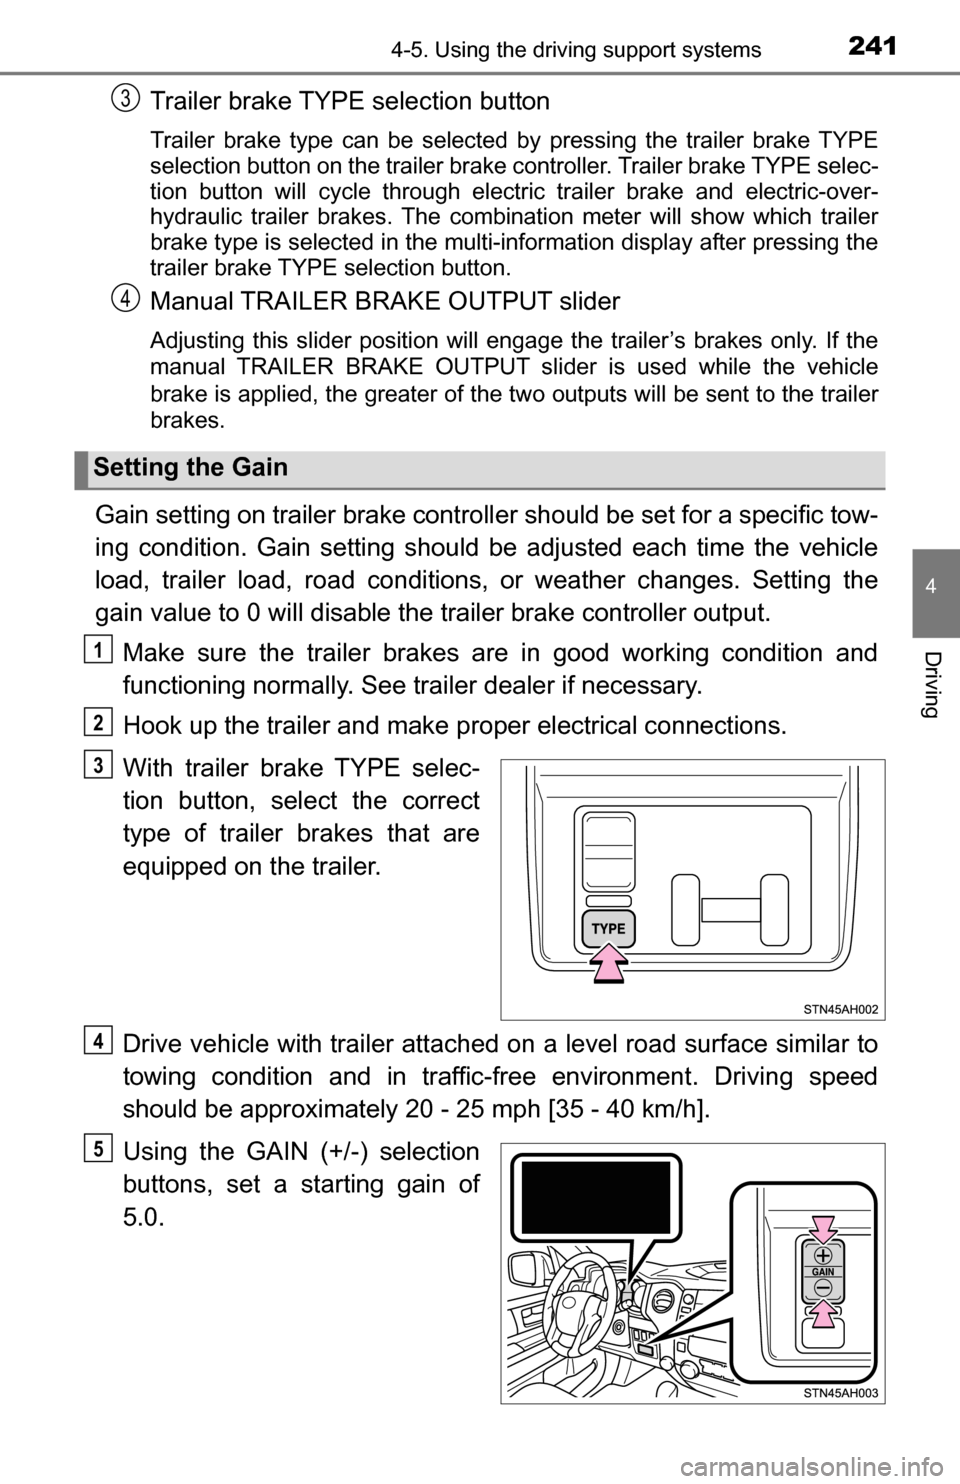
With trailer brake TYPE selec-
tion button, select the correct
type of trailer brakes that are
equipped on the trailer.
Drive vehicle with trailer attached on a level road surface similar to
towing condition and in traffic-free environment. Driving speed
should be approximately 20 - 25 mph [35 - 40 km/h].
Using the GAIN (+/-) selection
buttons, set a starting gain of
5.0.
Setting the Gain
3
4
1
2
3
4
5
Page 242 of 588
![TOYOTA TUNDRA 2016 2.G Owners Manual 2424-5. Using the driving support systems
While driving 20 - 25 mph [35 - 40 km/h], fully apply the manual
TRAILER BRAKE OUTPUT
slider.
Adjust the gain setting, using the GAIN (+/-) selection buttons TOYOTA TUNDRA 2016 2.G Owners Manual 2424-5. Using the driving support systems
While driving 20 - 25 mph [35 - 40 km/h], fully apply the manual
TRAILER BRAKE OUTPUT
slider.
Adjust the gain setting, using the GAIN (+/-) selection buttons](/manual-img/14/6842/w960_6842-241.png)
2424-5. Using the driving support systems
While driving 20 - 25 mph [35 - 40 km/h], fully apply the manual
TRAILER BRAKE OUTPUT
slider.
Adjust the gain setting, using the GAIN (+/-) selection buttons, to
either increase or decrease to just below the point of trailer wheel
lock-up.
For confirmation, repeat steps and until desired gain setting
is reached (just below point of trailer wheel lock-up).
■ When using the trailer brake control system
Please turn off the intuitive parking assist while towing a trailer. If left on,
sonar sensors will detect the trailer being towed.
■ When setting the gain
Wheel lock-up occurs when the trailer wheel squeals or tire smoke occurs.
Trailer wheels may not lock-up while driving heavily loaded trailer. During this
case, adjust the Trailer gain to the highest allowable setting for the towing
condition.
■ When disconnecting and reco nnecting battery terminals
The gain setting data will be reset.
CAUTION
■ Trailer brake type setting
It is the responsibility of the driver to make sure the trailer brakes are func-
tioning normally and adjusted appropriately. Failure to check and maintain
trailer brakes may result in loss of vehicle control, crash, or serious injury.
Trailer brake control system will work with most electric and electric-over-
hydraulic trailer braking systems up to 3 axles (24A output to trailer brakes).
Please be sure to test compatibility with the system at low speeds and in a
safe area. When a warning message appears in the multi-information dis-
play (P. 483), the gain setting may be too high. Please use the trailer
brakes with reduced gain. If there is still a problem, have the vehicle
inspected by your Toyota dealer immediately.
Some electric-over-hydraulic trailer brakes will take some minimum output
to activate. Trailer brake control system will not work with trailer hydraulic
surge brakes.
■ When driving on slippery road surfaces
When stopping with ABS activated, output to the trailer might be reduced in
order to reduce the likelihood of trailer to sway or trailer wheels to lock. The
trailer is not equipped with ABS. Drive safely on slippery road surfaces.
6
7
867
Page 243 of 588

2434-6. Driving tips
4
Driving
Winter driving tips
●Use fluids that are appropriate to the prevailing outside tempera-
tures. • Engine oil
• Engine coolant
• Washer fluid
● Have a service technician ins pect the condition of the battery.
● Have the vehicle fitted with four snow tires or purchase a set of tire
chains for the rear tires.
Ensure that all tires are the same size and brand, and that chains match
the size of the tires.
Perform the following accordin g to the driving conditions:
● Do not try to forcibly open a window or move a wiper that is frozen.
Pour warm water over the frozen area to melt the ice. Wipe away
the water immediately to prevent it from freezing.
● To ensure proper operation of the climate control system fan,
remove any snow that has accumulated on the air inlet vents in
front of the windshield.
● Check for and remove any excess ice or snow that may have accu-
mulated on the exterior lights, vehicle’s roof, chassis, around the
tires or on the brakes.
● Remove any snow or mud from the bottom of your shoes before
getting in the vehicle.
Accelerate the vehicle slowly, keep a safe distance between you and
the vehicle ahead, and drive at a reduced speed suitable to road con-
ditions.
Carry out the necessary preparations and inspections before
driving the vehicle in winter. Al ways drive the vehicle in a man-
ner appropriate to the prevailing weather conditions.
Preparation for winter
Before driving the vehicle
When driving the vehicle
Page 249 of 588
2494-6. Driving tips
4
Driving
■Additional information for off-road driving
For owners in U.S. mainland, Hawaii and Puerto Rico:
To obtain additional information pertaining to driving your vehicle off-road,
consult the following organizations.
● State and Local Parks and Recreation Departments
● State Motor Vehicle Bureau
● Recreational Vehicle Clubs
● U.S. Forest Service and Bureau of Land Management
CAUTION
■ Off-road driving precautions
Always observe the following precautions to minimize the risk of death, seri-
ous injury or damage to your vehicle:
● Drive carefully when off the road. Do not take unnecessary risks by driving
in dangerous places.
● Do not grip the steering wheel spokes when driving off-road. A bad bump
could jerk the wheel and injure your hands. Keep both hands and espe-
cially your thumbs on the outside of the rim.
● Always check your brakes for effectiveness immediately after driving in
sand, mud, water or snow.
● After driving through tall grass, mud, rock, sand, rivers, etc., check that
there is no grass, bush, paper, rags, stone, sand, etc., adhering or trapped
on the underbody. Clear off any such matter from the underbody. If the
vehicle is used with these materials trapped or adhering to the underbody,
a breakdown or fire could occur.
● In a rollover crash, an unbelted person is significantly more likely to die
than a person wearing a seat belt. Therefore, the driver and all passengers
should fasten their seat belts whenever the vehicle is moving.
● When driving off-road or in rugged terrain, do not drive at excessive
speeds, jump, make sharp turns, strike objects, etc. This may cause loss
of control or vehicle rollover causing death or serious injury. You are also
risking expensive damage to your vehicle’s suspension and chassis.
Page 408 of 588
4087-2. Maintenance
Vehicle interior
ItemsCheck points
Accelerator pedal• The accelerator pedal should move smoothly(without uneven pedal effort or catching).
Automatic transmission
“Park” mechanism• When parked on a slope and the shift lever isin P, is the vehicle securely stopped?
Brake pedal
• Does the brake pedal move smoothly?
• Does the brake pedal have appropriate clear-ance from the floor? ( P. 526)
• Does the brake pedal have the correct amount of free play? ( P. 526)
Brakes
• The vehicle should not pull to one side when
the brakes are applied.
• The brakes should work effectively.
• The brake pedal should not feel spongy.
• The brake pedal should not get too close to the floor when the brakes are applied.
Head restraints• Do the head restraints move smoothly andlock securely?
Indicators/buzzers• Do the indicators and buzzers function prop-erly?
Parking brake
• Does the parking brake pedal movesmoothly?
• When parked on a slope and the parking brake is on, is the vehicle securely stopped?
Seat belts• Do the seat belts operate smoothly?
• The seat belts should not be damaged.
Seats• Do the seat controls operate properly?
Steering wheel
• Does the steering wheel rotate smoothly?
• Does the steering wheel have the correctamount of free play?
• There should not be any strange sounds com-
ing from the steering wheel.
Page 465 of 588
465
8
When trouble arises
8-1. Essential information
If your vehicle has to be stopped in an
emergency
Steadily step on the brake pedal with both feet and firmly depress it.
Do not pump the brake pedal repeatedly as this will increase the effort
required to slow the vehicle.
Shift the shift lever to N.
If the shift lever is shifted to N
After slowing down, stop the vehicle in a safe place by the road.
Stop the engine.
If the shift lever cannot be shifted to N
Keep depressing the brake pedal with both feet to reduce vehicle
speed as much as possible.
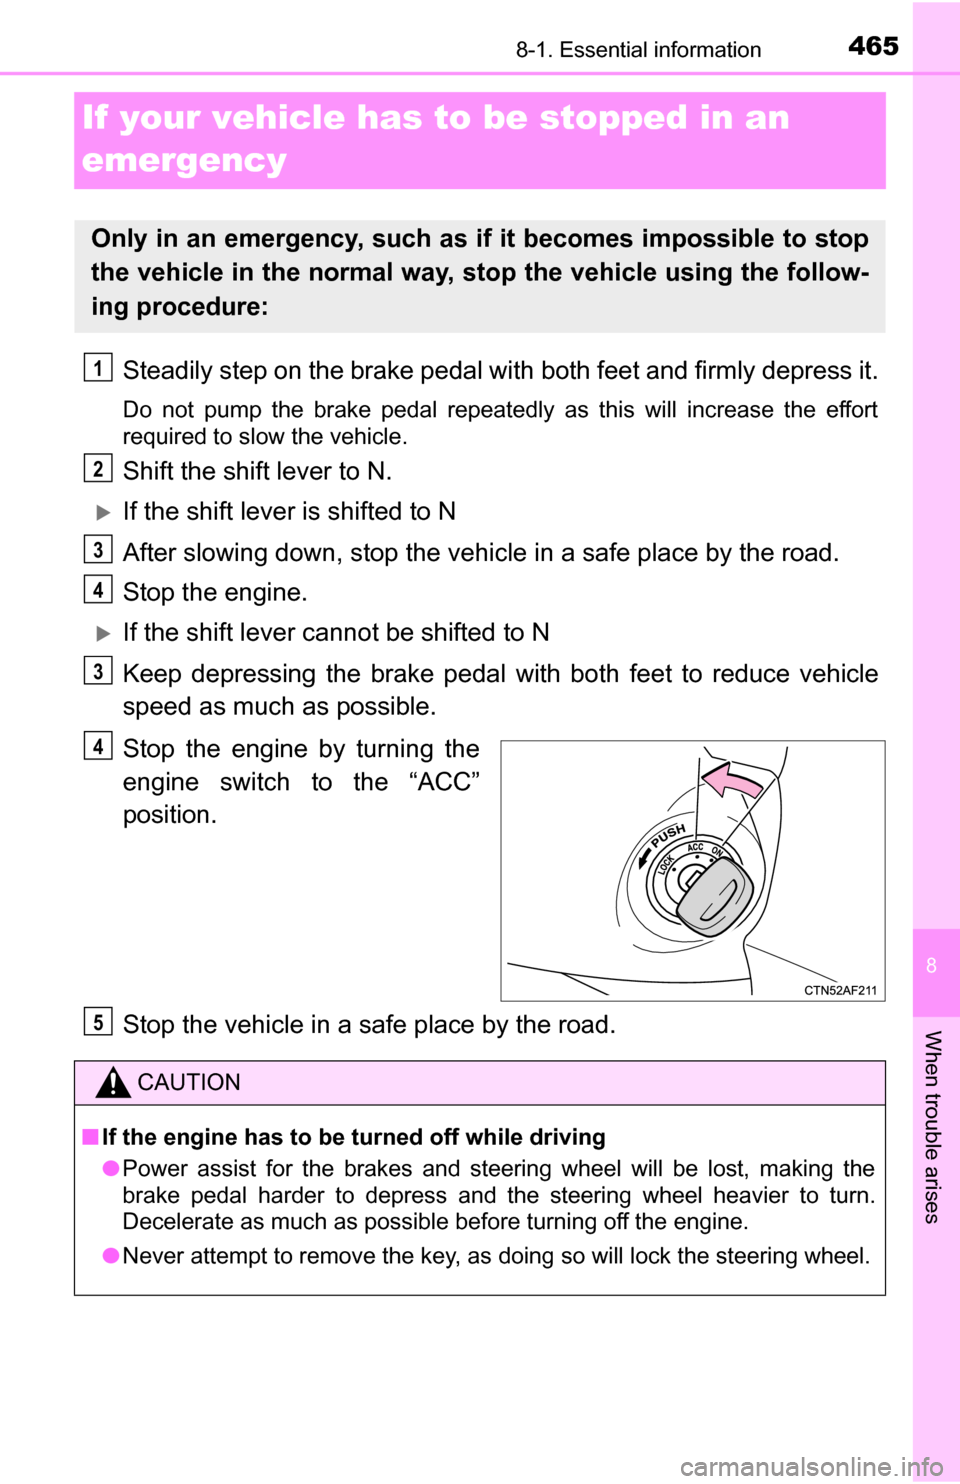
Stop the engine by turning the
engine switch to the “ACC”
position.
Stop the vehicle in a safe place by the road.
Only in an emergency, such as if it becomes impossible to stop
the vehicle in the normal way, st op the vehicle using the follow-
ing procedure:
1
2
3
4
3
4
CAUTION
■ If the engine has to be turned off while driving
● Power assist for the brakes and steering wheel will be lost, making the
brake pedal harder to depress and the steering wheel heavier to turn.
Decelerate as much as possible before turning off the engine.
● Never attempt to remove the key, as doing so will lock the steering wheel.
5
Page 468 of 588
4688-2. Steps to take in an emergency
If a tow truck is not available in an emergency, your vehicle may be
temporarily towed using cables or chains secured to the emergency
towing hooks. This should only be attempted on hard surfaced roads
for at most 50 miles (80 km) at 18 mph (30km/h).
A driver must be in the vehicle to steer and operate the brakes. The
vehicle’s wheels, drive train, axles, steering and brakes must be in
good condition.
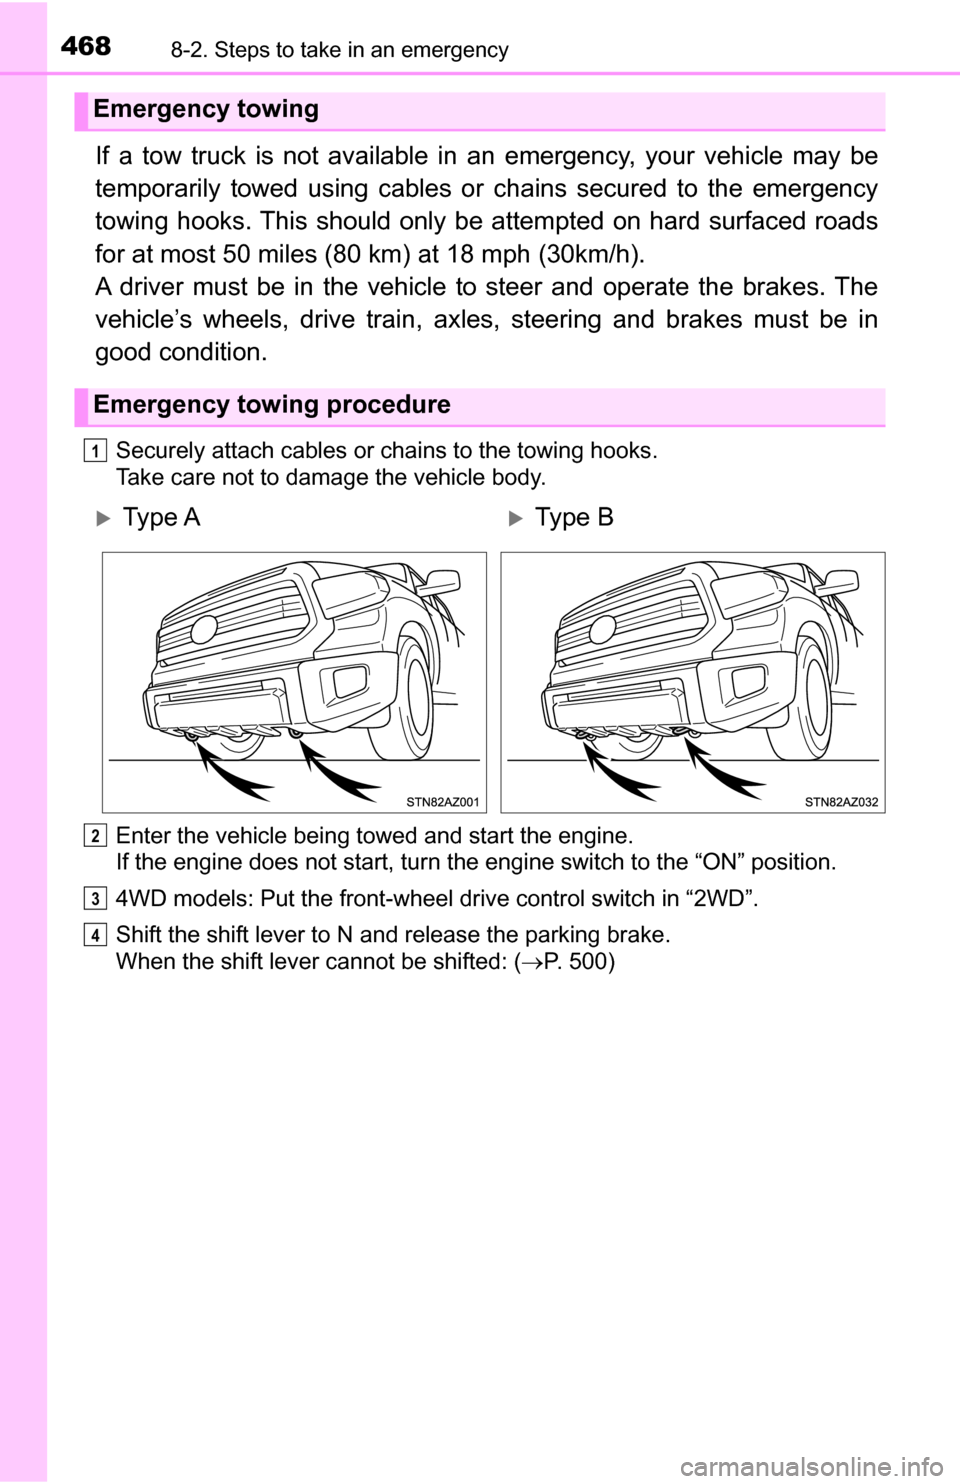
Securely attach cables or chains to the towing hooks.
Take care not to damage the vehicle body.
Enter the vehicle being towed and start the engine.
If the engine does not start, turn the engine switch to the “ON” position.
4WD models: Put the front-wheel drive control switch in “2WD”.
Shift the shift lever to N and release the parking brake.
When the shift lever cannot be shifted: (P. 500)
Emergency towing
Emergency towing procedure
1
Ty p e AType B
2
3
4