Page 390 of 588
3906-4. Using the other interior features
■Programming HomeLink®
Point the remote control
transmitter for the device 1 to
3 in. (25 to 75 mm) from the
HomeLink
® buttons.
Keep the HomeLink® indicator
light in view while programming.
Press and hold one of the
HomeLink® buttons and the
transmitter button. When the
HomeLink
® indicator light
changes from a slow to a
rapid flash, you can release
both buttons.
If the HomeLink® indicator light
comes on but does not flash, or
flashes rapidly for 2 seconds
and remains lit, the HomeLink
®
button is already programmed.
Use the other buttons or follow
the “Reprogramming a Home-
Link
® button” instructions. ( P.
393)
1
2
Page 391 of 588

3916-4. Using the other interior features
6
Interior features
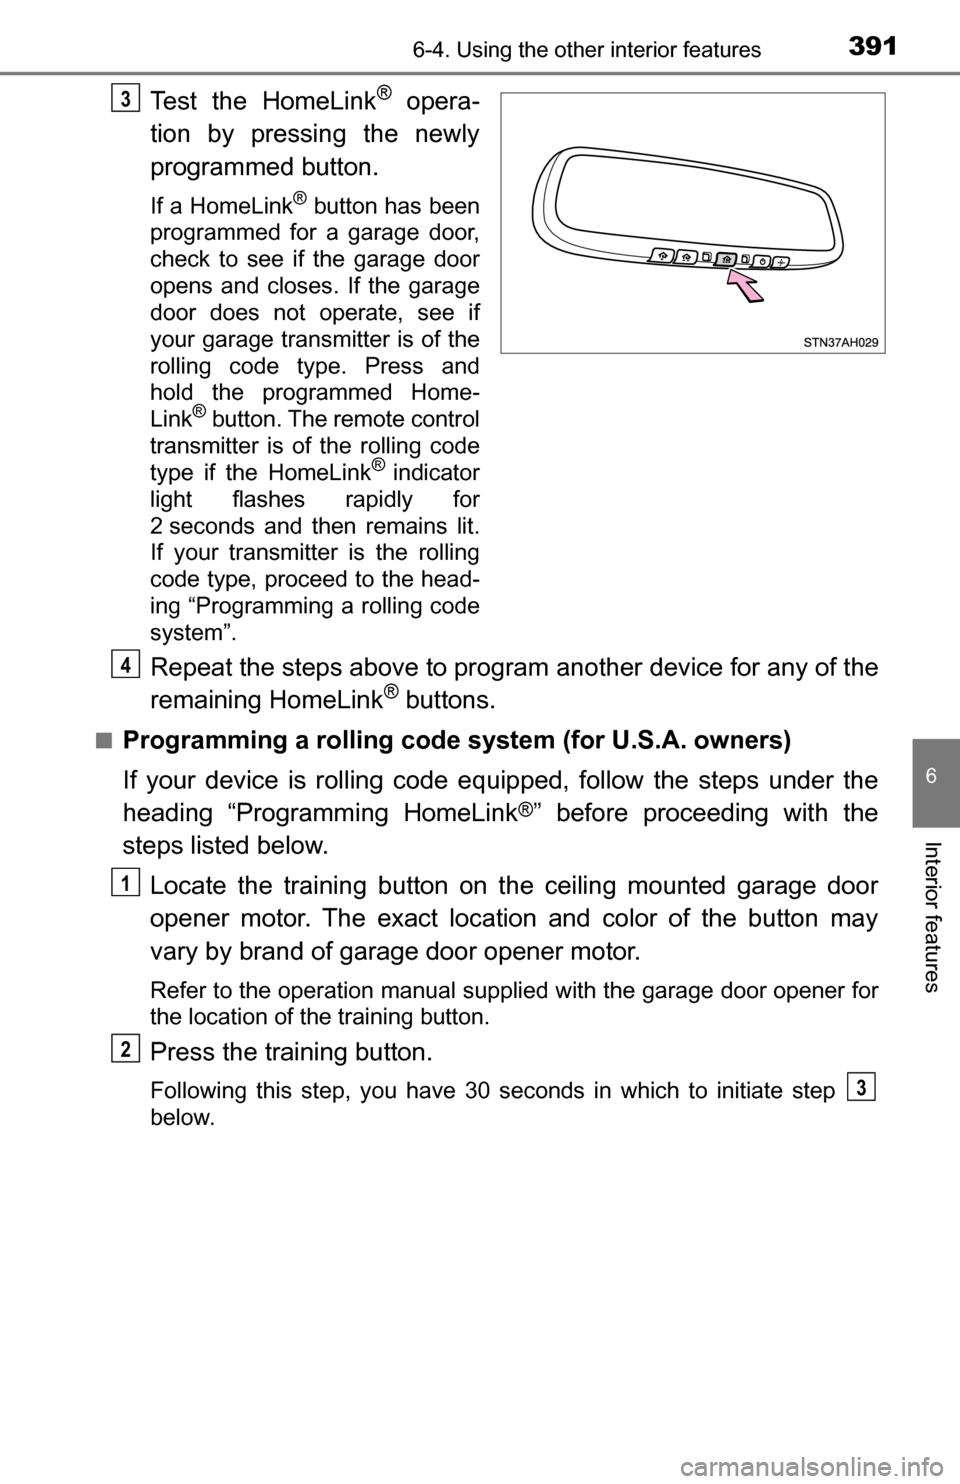
Test the HomeLink® opera-
tion by pressing the newly
programmed button.
If a HomeLink® button has been
programmed for a garage door,
check to see if the garage door
opens and closes. If the garage
door does not operate, see if
your garage transmitter is of the
rolling code type. Press and
hold the programmed Home-
Link
® button. The remote control
transmitter is of the rolling code
type if the HomeLink
® indicator
light flashes rapidly for
2 seconds and then remains lit.
If your transmitter is the rolling
code type, proceed to the head-
ing “Programming a rolling code
system”.
Repeat the steps above to program another device for any of the
remaining HomeLink® buttons.
■Programming a rolling code sys tem (for U.S.A. owners)
If your device is rolling code eq uipped, follow the steps under the
heading “Programming HomeLink
®” before proceeding with the
steps listed below.
Locate the training button on the ceiling mounted garage door
opener motor. The exact location and color of the button may
vary by brand of garage door opener motor.
Refer to the operation manual supplied with the garage door opener for
the location of the training button.
Press the training button.
Following this step, you have 30 seconds in which to initiate step
below.
3
4
1
2
3
Page 392 of 588

3926-4. Using the other interior features
Press and hold the vehicle’s programmed HomeLink® button for
2 seconds and release it. Repea t this step once again. The
garage door may open.
If the garage door opens, the programming process is complete. If the
door does not open, press and release the button a third time. This third
press and release will complete the programming process by opening
the garage door.
The ceiling mounted garage door opener motor should now recognize
the HomeLink
® signal and operate the garage door.
Repeat the steps above to program another rolling code system
for any of the remaining HomeLink® buttons.
■Programming an entry gate (for U.S.A. owners)/Programming a
devices in the Canadian market
Place the remote control transmitter 1 to 3 in. (25 to 75 mm)
away from the HomeLink
® buttons.
Keep the HomeLink® indicator light in view while programming.
Press and hold the selected HomeLink® button.
Repeatedly press and release (cyc le) the remote control trans-
mitter for 2 seconds each until step is completed.
When the HomeLink
® indicator light starts to flash rapidly,
release the buttons.
Test the HomeLink
® operation by pressing the newly pro-
grammed button. Check to see if the gate/device operates cor-
rectly.
Repeat the steps above to program another device for any of the
remaining HomeLink
® buttons.
■Programming other devices
To program other devices such as home security systems, home
door locks and lighting, contact your Toyota dealer for assistance.
■Reprogramming a button
The individual HomeLink
® buttons cannot be erased but can be
reprogrammed. To reprogram a button, follow the “Reprogramming
a HomeLink
® button” instructions.
3
4
1
2
3
4
4
5
6
Page 394 of 588

3946-4. Using the other interior features
■Before programming
●Install a new battery in the remote control transmitter.
● The battery side of the remote control transmitter must be pointed away
from the HomeLink
® button.
■ Certification for the garage door opener
For vehicles sold in the U.S.A.
FCC ID: NZLWZLHL4
NOTE:
This device complies with Part 15 of the FCC Rules. Operation is subject to
the following two conditions: (1) this device may not cause harmful interfer-
ence, and (2) this device must accept any interference received, including
interference that may cause undesired operation.
FCC WARNING:
Changes or modifications not expressly approved by the party responsible for
compliance could void the user’s authority to operate the equipment.
For vehicles sold in Canada
NOTE:
Operation is subject to the following two conditions: (1) this device may not
cause interference, and (2) this device must accept any interference, includ-
ing interference that may cause undesired operation of the device.
■ When support is necessary
Visit on the web at www.homelink.com
or call 1-800-355-3515.
CAUTION
■When programming a garage door or other remote control device
The garage door or other device may operate, so ensure people and
objects are out of danger to prevent potential harm.
■ Conforming to federal safety standards
Do not use the HomeLink
® compatible transceiver with any garage door
opener or device that lacks safety stop and reverse features as required by
federal safety standards.
This includes any garage door that cannot detect an interfering object. A
door or device without these features increases the risk of death or ser\
ious
injury.
Page 399 of 588
399
7Maintenance and care
7-1. Maintenance and careCleaning and protecting the vehicle exterior .......... 400
Cleaning and protecting the vehicle interior ........... 402
7-2. Maintenance Maintenance requirements ................... 405
General maintenance ........ 407
Emission inspection and maintenance (I/M)
programs ......................... 410 7-3. Do-it-yourself maintenance
Do-it-yourself service precautions ..................... 411
Hood ................................. 413
Engine compartment ......... 414
Tires .................................. 424
Tire inflation pressure ....... 432
Wheels .............................. 435
Air conditioning filter.......... 438
Wireless remote control battery ............................. 441
Checking and replacing fuses ............................... 443
Light bulbs......................... 446
Page 441 of 588
4417-3. Do-it-yourself maintenance
7
Maintenance and care
Wireless remote control battery
Lithium battery CR2032Remove the cover using a coin
protected with tape, etc.
Remove the depleted battery.
Insert a new battery with the “+”
terminal facing up.
: If equipped
Replace the battery with a new one if it is depleted.
You will need the following items:
Replacing the battery
1
2
Page 442 of 588
4427-3. Do-it-yourself maintenance
■Use a CR2032 lithium battery
●Batteries can be purchased at your Toyota dealer, local electrical appliance
shops or camera stores.
● Replace only with the same or equivalent type recommended by the manu-
facturer.
● Dispose of used batteries according to local laws.
■ If the key battery is depleted
The following symptoms may occur:
●The wireless remote control will not function properly.
● The operational range will be reduced.
CAUTION
■ Removed battery and other parts
Keep away from children. These parts are small and if swallowed by a child,
they can cause choking. Failure to do so could result in death or serious
injury.
NOTICE
■For normal operation after replacing the battery
Observe the following precautions to prevent accidents:
● Always work with dry hands.
Moisture may cause the battery to rust.
● Do not touch or move any other component inside the remote control.
● Do not bend either of the battery terminals.
Page 502 of 588

5028-2. Steps to take in an emergency
If the vehicle battery is discharged
If you have a set of jumper (or booster) cables and a second vehicle
with a 12-volt battery, you can jump start your vehicle by following the
steps below.
Confirm that the key and wire-
less remote control (if
equipped) are being carried.
When connecting the jumper (or
booster) cables, depending on the
situation, the alarm may activate
and the doors may lock. ( P. 81)
Open the hood. (P. 413)
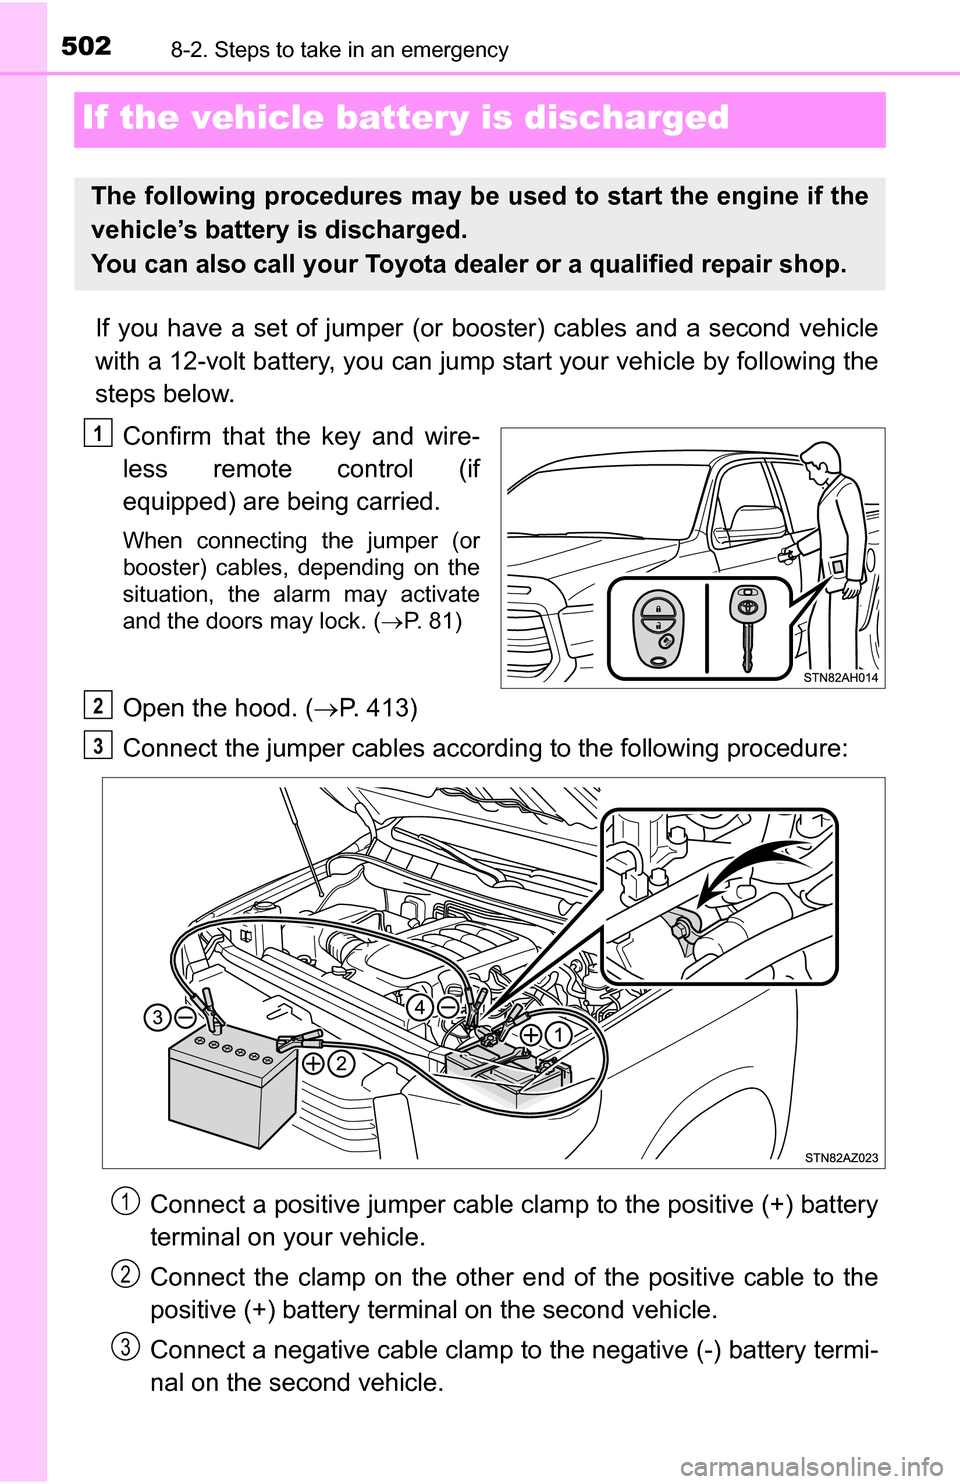
Connect the jumper cables according to the following procedure:
Connect a positive jumper cable clamp to the positive (+) battery
terminal on your vehicle.
Connect the clamp on the other e nd of the positive cable to the
positive (+) battery terminal on the second vehicle.
Connect a negative cable clamp to the negative (-) battery termi-
nal on the second vehicle.
The following procedures may be used to start the engine if the
vehicle’s battery is discharged.
You can also call your Toyota de aler or a qualified repair shop.
1
2
3
1
2
3