Page 116 of 588

1163-3. Adjusting the seats
Driving position memory (driver’s seat)
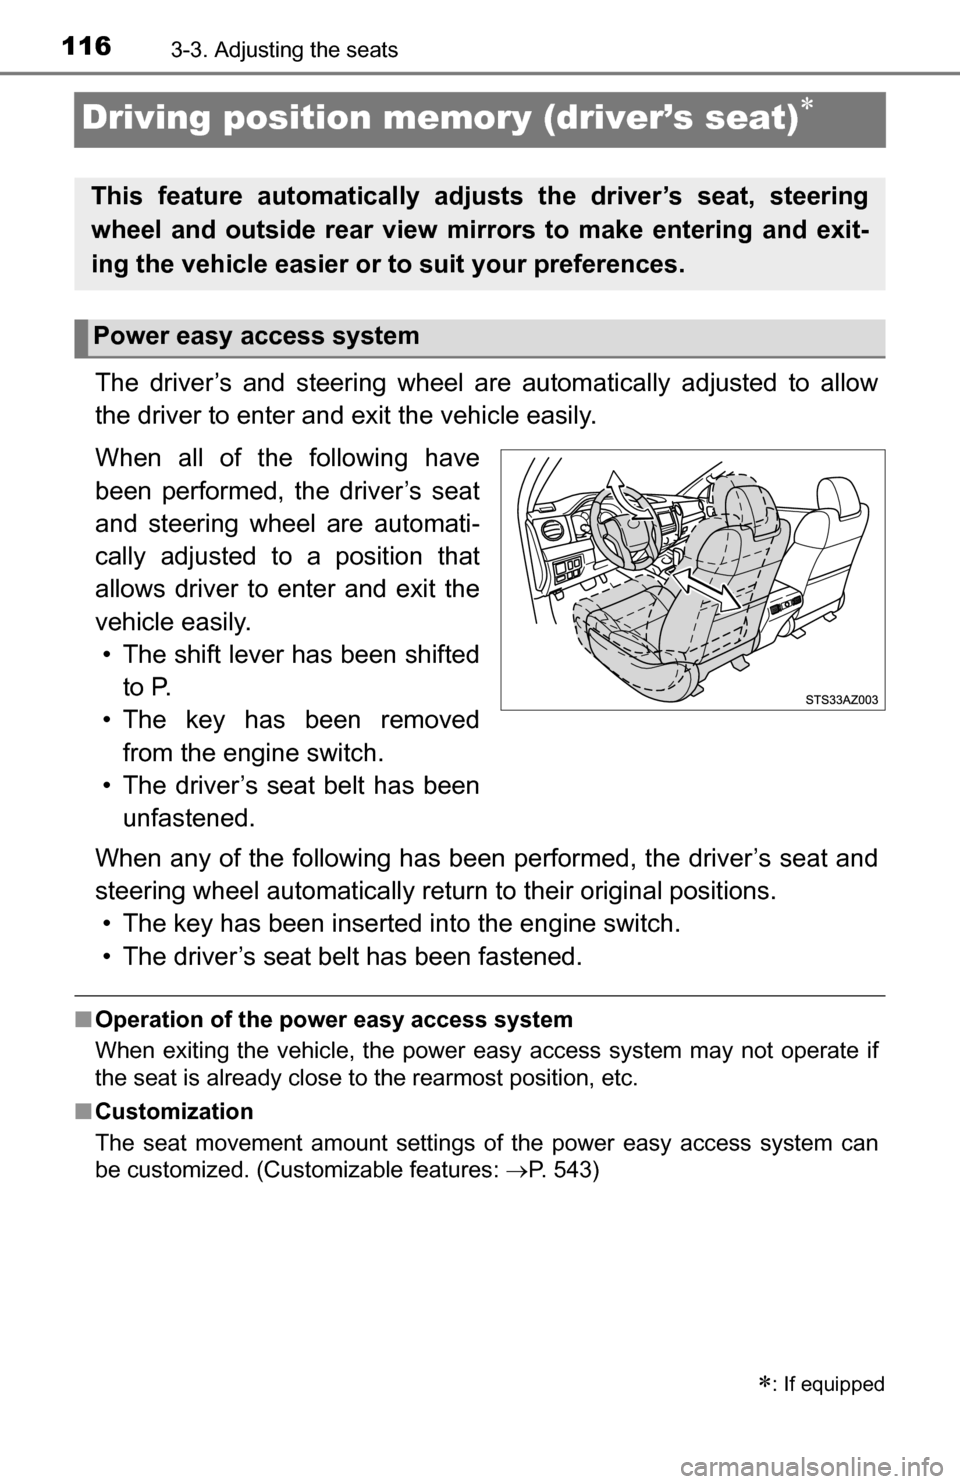
The driver’s and steering wheel are automatically adjusted to allow
the driver to enter and exit the vehicle easily.
When all of the following have
been performed, the driver’s seat
and steering wheel are automati-
cally adjusted to a position that
allows driver to enter and exit the
vehicle easily. • The shift lever has been shifted to P.
• The key has been removed from the engine switch.
• The driver’s seat belt has been unfastened.
When any of the following has been performed, the driver’s seat and
steering wheel automatically retu rn to their original positions.
• The key has been inserted into the engine switch.
• The driver’s seat belt has been fastened.
■ Operation of the power easy access system
When exiting the vehicle, the power easy access system may not operate if
the seat is already close to the rearmost position, etc.
■ Customization
The seat movement amount settings of the power easy access system can
be customized. (Customizable features: P. 543)
: If equipped
This feature automatically adjusts the driver’s seat, steering
wheel and outside rear view mirrors to make entering and exit-
ing the vehicle easier or to suit your preferences.
Power easy access system
Page 117 of 588
1173-3. Adjusting the seats
3
Operation of each component
Your preferred driving position (the position of the driver’s seat, steer-
ing wheel and outside rear view mirrors) can be recorded and recalled
by pressing a button.
Two different driving positions can be recorded into memory.
■Recording procedureCheck that the shift lever is in P.
Turn the engine switch to the “ON” position.
Adjust the driver’s seat, steering wheel, and outside rear view
mirrors to the desired positions.
While pressing the “SET”
button, or within 3 seconds
after the “SET” button is
pressed, press button “1” or
“2” until the buzzer sounds.
If the selected button has
already been preset, the previ-
ously recorded position will be
overwritten.
■
Recall procedure
Check that the shift lever is in P.
Turn the engine switch to the “ON” position.
Press one of the buttons for
the driving position you want
to recall until the buzzer
sounds.
Driving position memory
1
2
3
4
1
2
3
Page 127 of 588
1273-4. Adjusting the steering wheel and mirrors
3
Operation of each component
Inside rear view mirror
The height of the rear view mirror can be adjusted to suit your driving
posture.
Adjust the height of the rear view
mirror by moving it up and down.
Manual anti-glare inside rear view mirror
Reflected light from the headlights of vehicles behind can be reduced
by operating the lever.
Normal position
Anti-glare position
The rear view mirror’s position can be adjusted to enable suffi-
cient confirmation of the rear view.
Adjusting the height of rear view mirror
Anti-glare function
1
2
Page 128 of 588
1283-4. Adjusting the steering wheel and mirrors
Auto anti-glare inside rear view mirror
Responding to the level of brightne ss of the headlights of vehicles
behind, the reflected light is automatically reduced.
Changing automatic anti-glare
function mode
ON/OFF
When the automatic anti-glare
function is in ON mode, the indica-
tor illuminates.
The function will set to ON mode
each time the engine switch is
turned to the “ON” position.
Pressing the button turns the func-
tion to OFF mode. (The indicator
also turns off.)
■ To prevent sensor error (vehicles with auto anti-glare inside rear view
mirror)
■ If a sun visor interferes with the mirror
To ensure that the sensors operate prop-
erly, do not touch or cover them.
Hold and rotate the mirror to adjust the
support.
Page 130 of 588
1303-4. Adjusting the steering wheel and mirrors
Outside rear view mirrors
Manually adjustable type
Adjust the mirror up and down, in
or out by pushing the mirror sur-
face.
Power-adjustable type (type A)
To select a mirror to adjust,
press the switch. Left
Right
To adjust the mirror, press the
switch. Up
Right
Down
Left
Adjustment procedure
1
1
2
2
1
2
3
4
Page 133 of 588

1333-4. Adjusting the steering wheel and mirrors
3
Operation of each component
■Mirror operating conditions (power-adjustable type)
The engine switch is in the “ACC” or “ON” position.
■ When the mirrors are fogg ed up (vehicles with outside rear view mirror
defoggers)
Turn on the mirror defoggers to defog the mirrors. ( P. 346, 353)
■ Automatic adjustment of the mirror angle (vehicles with driving position
memory)
A desired mirror face angle can be entered to memory and recalled automati-
cally by the driving position memory. ( P. 116)
■ Auto anti-glare function (if equipped)
When the anti-glare inside rear view mirr or is set to automatic mode, the out-
side rear view mirrors will activate in conjunction with the anti-glare inside
rear view mirror to reduce reflected light. ( P. 128)
CAUTION
■Important points while driving
Observe the following precautions while driving.
Failure to do so may result in loss of control of the vehicle and cause an
accident, resulting in death or serious injury.
● Do not adjust the mirrors while driving.
● Do not drive with the mirrors folded.
● Both the driver and passenger side mirrors must be extended and properly
adjusted before driving.
■ When a mirror is moving (power-adjustable type)
To avoid personal injury and mirror malfunction, be careful not to get your
hand caught by the moving mirror.
■ When the mirror defoggers are oper ating (vehicles with outside rear
view mirror defoggers)
Do not touch the rear view mirror surfaces, as they can become very hot
and burn you.
Page 148 of 588

1484-1. Before driving
CAUTION
Observe the following precautions.
Failure to do so may result in death or serious injury.
■When starting the vehicle
Always keep your foot on the brake pedal while stopped with the engine
running. This prevents the vehicle from creeping.
■ When driving the vehicle
● Do not drive if you are unfamiliar with the location of the brake and accel-
erator pedals to avoid depressing the wrong pedal.
• Accidentally depressing the accelerator pedal instead of the brake
pedal will result in sudden acceleration that may lead to an accident.
• When backing up, you may twist your body around, leading to difficulty
in operating the pedals. Make sure to operate the pedals properly.
• Make sure to keep a correct driving posture even when moving the vehicle only slightly. This allows you to depress the brake and accelera-
tor pedals properly.
• Depress the brake pedal using your right foot. Depressing the brake
pedal using your left foot may delay response in an emergency, result-
ing in an accident.
● Do not drive the vehicle over or stop the vehicle near flammable materials.
The exhaust system and exhaust gases can be extremely hot. These hot
parts may cause a fire if there is any flammable material nearby.
● During normal driving, do not turn off the engine. Turning the engine off
while driving will not cause loss of steering or braking control, but the
power assist to these systems will be lost. This will make it more difficult to
steer and brake, so you should pull over and stop the vehicle as soon as it
is safe to do so.
However, in the event of an emergency, such as if it becomes impossible
to stop the vehicle in the normal way: P. 465
● Use engine braking (downshift) to maintain a safe speed when driving
down a steep hill.
Using the brakes continuously may cause the brakes to overheat and lose
effectiveness. ( P. 184)
● Do not adjust the positions of the steering wheel, the seat, or the inside or
outside rear view mirrors while driving.
Doing so may result in a loss of vehicle control.
● Always check that all passengers’ arms, heads or other parts of their body
are not outside the vehicle.
Page 177 of 588

1774-1. Before driving
4
Driving
■Before towing
Check that the following conditions are met:
●Ensure that your vehicle’s tires are properly inflated. ( P. 526)
● Trailer tires are inflated according to the trailer manufacturer’s recommen-
dation.
● All trailer lights work as required by law.
● All lights work each time you connect them.
● The trailer ball is set at the proper height for the coupler on the trailer.
● The trailer is level when it is hitched.
Do not drive if the trailer is not level, and check for improper tongue weight,
overloading, worn suspension, or other possible causes.
● The trailer cargo is securely loaded.
● The rear view mirrors conform to all applicable federal, state/provincial or
local regulations. If they do not, install rear view mirrors appropriate for tow-
ing purposes.
● Depress TOW/HAUL button (if equipped). ( P. 187)
● The manual headlight leveling dial is correctly adjusted. ( P. 192)
■ Break-in schedule
If your vehicle is new or equipped with any new power train components
(such as an engine, transmission, differential or wheel bearing), Toyota rec-
ommends that you do not tow a trailer until the vehicle has been driven for
over 500 miles (800 km).
After the vehicle has been driven for over 500 miles (800 km), you can start
towing. However, for the next 500 miles (800 km), drive the vehicle at a speed
of less than 50 mph (80 km/h) when towing a trailer, and avoid full throttle
acceleration.
■ Maintenance
●If you tow a trailer, your vehicle will require more frequent maintenance due
to the additional load. (See “Owner’s Warranty Information Booklet” or
“Scheduled Maintenance Guide”/“Owner’s Manual Supplement”.)
● Retighten the fixing bolts of the towing ball and bracket after approximately
600 miles (1000 km) of trailer towing.