Page 222 of 588

2224-5. Using the driving support systems
The Blind Spot Monitor function uses radar sensors to detect vehicles
that are traveling in an adjacent lane in the area that is not reflected in
the outside rear view mirror (the b lind spot), and advises the driver of
the vehicles existence via the outside rear view mirror indicator.
CAUTION
■ Handling the radar sensor
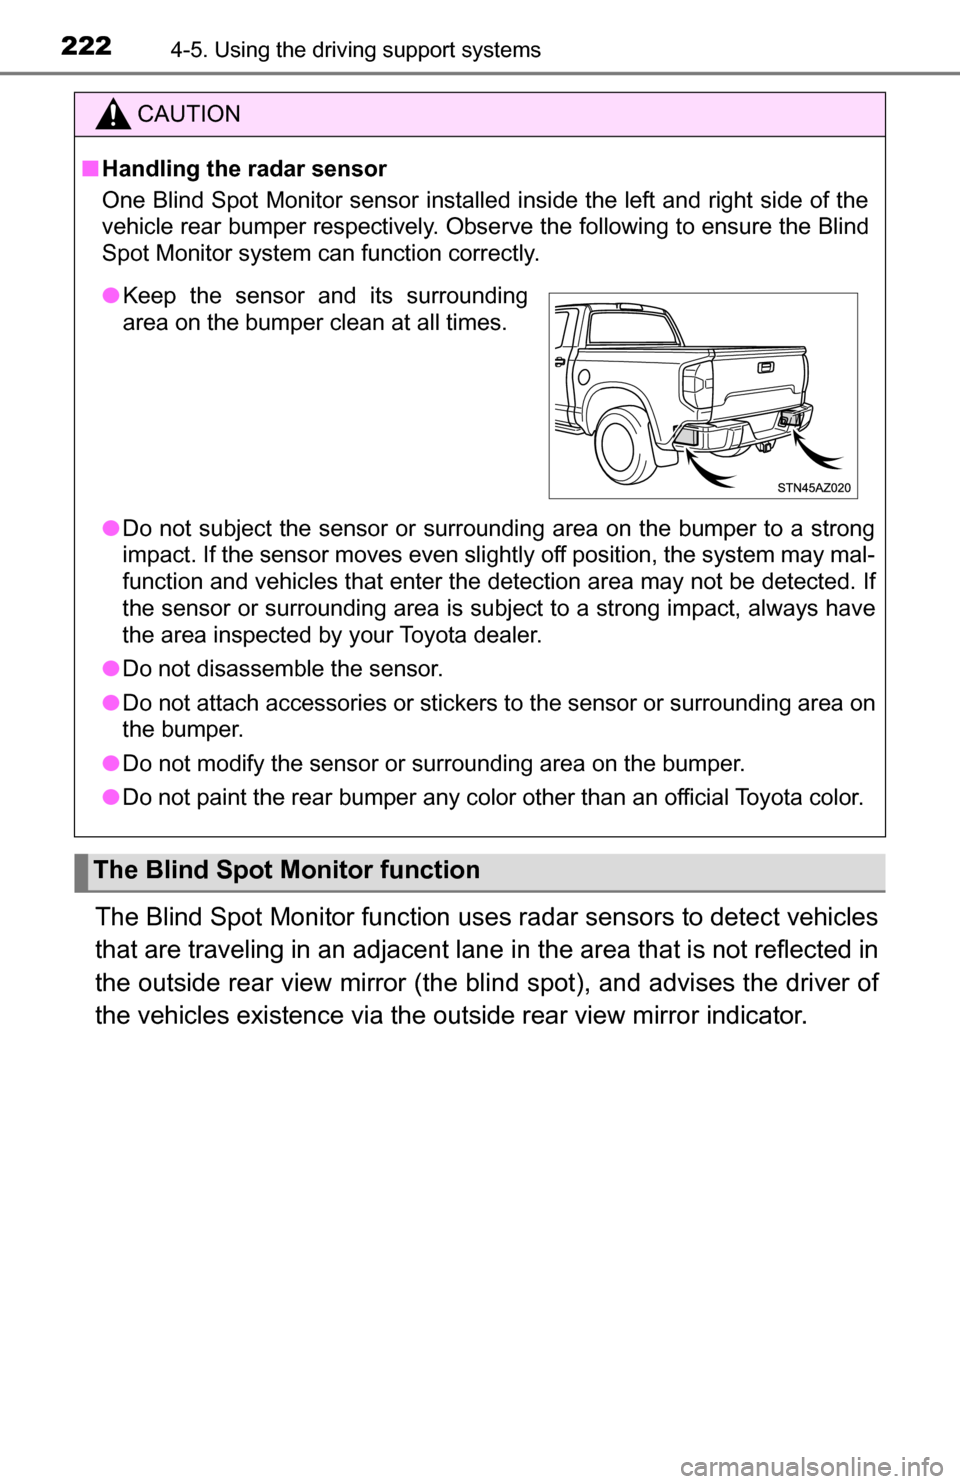
One Blind Spot Monitor sensor installed inside the left and right side of the
vehicle rear bumper respectively. Obse rve the following to ensure the Blind
Spot Monitor system can function correctly.
● Do not subject the sensor or surrounding area on the bumper to a strong
impact. If the sensor moves even slightly off position, the system may mal-
function and vehicles that enter the detection area may not be detected. If
the sensor or surrounding area is subject to a strong impact, always have
the area inspected by your Toyota dealer.
● Do not disassemble the sensor.
● Do not attach accessories or stickers to the sensor or surrounding area on
the bumper.
● Do not modify the sensor or surrounding area on the bumper.
● Do not paint the rear bumper any color other than an official Toyota color.
The Blind Spot Monitor function
●Keep the sensor and its surrounding
area on the bumper clean at all times.
Page 234 of 588
2344-5. Using the driving support systems
The slip indicator light will flash
while the TRAC/VSC/A-TRAC/
Trailer Sway Control systems are
operating.
If the vehicle gets stuck in fresh snow or mud, VSC/Trailer Sway Con-
trol/TRAC systems may reduce power from the engine to the wheels.
You may need to turn the system off to enable you to rock the vehicle
in order to free it.
■TRAC off mode
Press the VSC off switch.
The “AUTO LSD” indicator will
come on.
The system is in TRAC off and
AUTO LSD, VSC, Trailer Sway
Control on mode.
Press the switch again to turn
the system back on.
When the TRAC/VSC/A-TRAC/Trailer Sway Control systems are
operating
Disabling the VSC/Trailer Sw ay Control/TRAC systems (2WD
models and 2WD mode on 4WD models)
Page 237 of 588

2374-5. Using the driving support systems
4
Driving
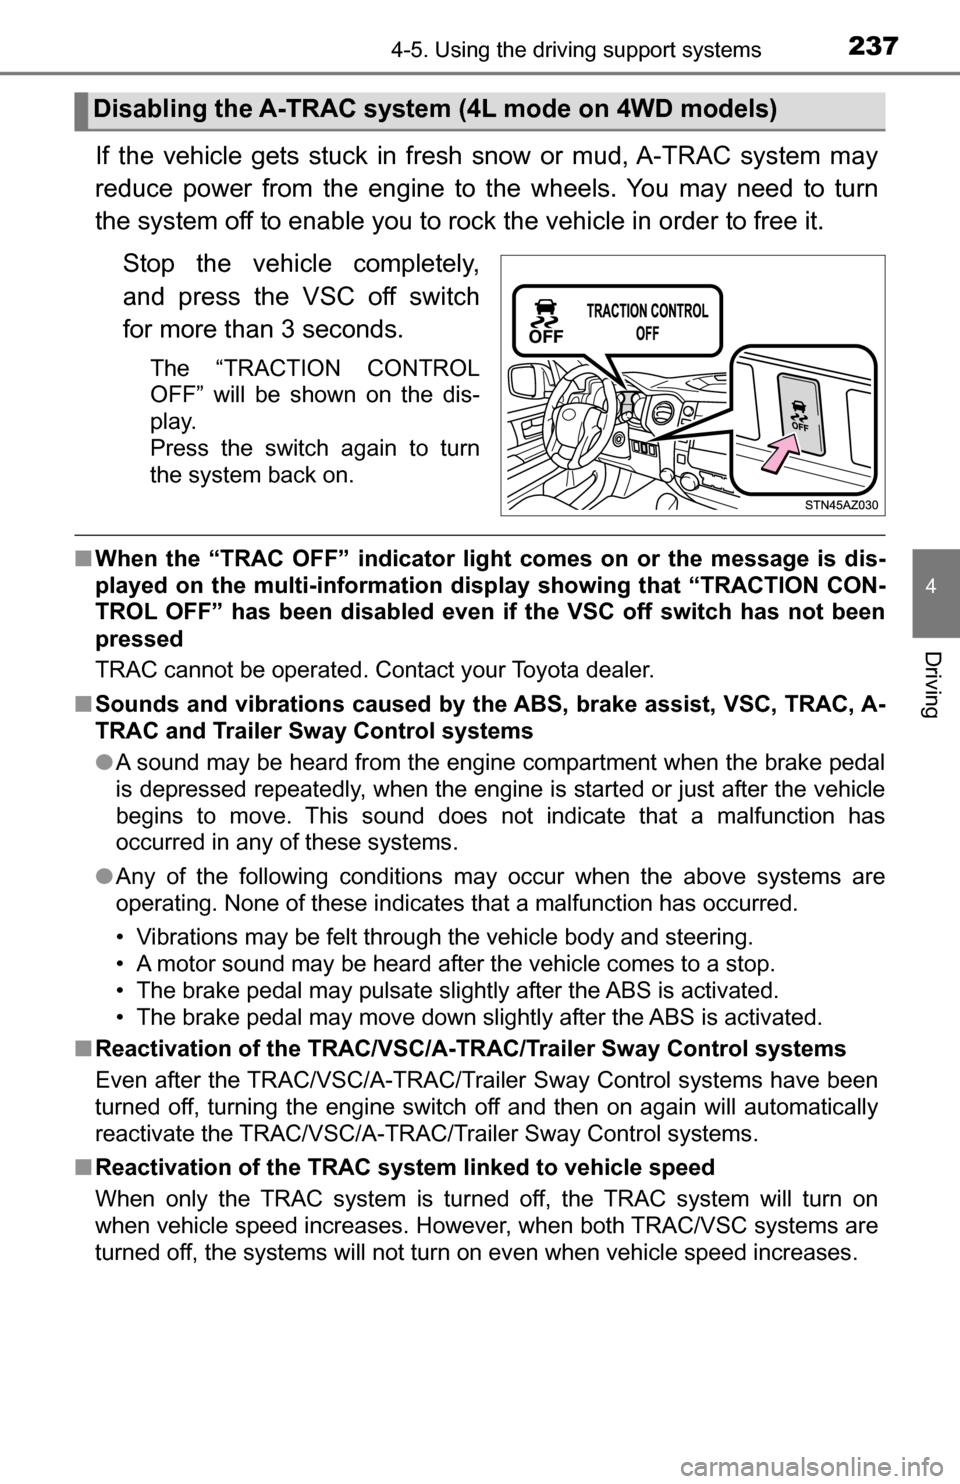
If the vehicle gets stuck in fresh snow or mud, A-TRAC system may
reduce power from the engine to the wheels. You may need to turn
the system off to enable you to rock the vehicle in order to free it.Stop the vehicle completely,
and press the VSC off switch
for more than 3 seconds.
The “TRACTION CONTROL
OFF” will be shown on the dis-
play.
Press the switch again to turn
the system back on.
■When the “TRAC OFF” indicator light comes on or the message is dis-
played on the multi-information disp lay showing that “TRACTION CON-
TROL OFF” has been disabled even if the VSC off switch has not been
pressed
TRAC cannot be operated. Contact your Toyota dealer.
■ Sounds and vibrations caused by the ABS, brake assist, VSC, TRAC, A-
TRAC and Trailer Sway Control systems
●A sound may be heard from the engine compartment when the brake pedal
is depressed repeatedly, when the engine is started or just after the vehicle
begins to move. This sound does not indicate that a malfunction has
occurred in any of these systems.
● Any of the following conditions may occur when the above systems are
operating. None of these indicates that a malfunction has occurred.
• Vibrations may be felt through the vehicle body and steering.
• A motor sound may be heard after the vehicle comes to a stop.
• The brake pedal may pulsate slightly after the ABS is activated.
• The brake pedal may move down slightly after the ABS is activated.
■ Reactivation of the TRAC/VSC/A-T RAC/Trailer Sway Control systems
Even after the TRAC/VSC/A-TRAC/Trailer Sway Control systems have been
turned off, turning the engine switch off and then on again will automatically
reactivate the TRAC/VSC/A-TRAC/Trailer Sway Control systems.
■ Reactivation of the TRAC system linked to vehicle speed
When only the TRAC system is turned off, the TRAC system will turn on
when vehicle speed increases. However, when both TRAC/VSC systems are
turned off, the systems will not turn on even when vehicle speed increases.
Disabling the A-TRAC system (4L mode on 4WD models)
Page 238 of 588

2384-5. Using the driving support systems
■If the brake system overheats
TRAC or A-TRAC will cease operation, and the slip indicator will change from
flashing to being on continuously to alert the driver. Stop the vehicle in a safe
place. (There is no problem with continuing normal driving.)
■ Shifting to “4L”
VSC and Trailer Sway Control are automatically turned off.
CAUTION
■The ABS does not operate effectively when
● The limits of tire gripping performance have been exceeded (such as
excessively worn tires on a snow covered road).
● The vehicle hydroplanes while driving at high speed on wet or slick roads.
■ Stopping distance when the ABS is operating may exceed that of nor-
mal conditions
The ABS is not designed to shorten the vehicle’s stopping distance. Always
maintain a safe distance from the vehicle in front of you, especially in the
following situations:
● When driving on dirt, gravel or snow-covered roads
● When driving with tire chains
● When driving over bumps in the road
● When driving over roads with potholes or uneven surfaces
■ TRAC or A-TRAC may not operate effectively when
Directional control and power may not be achievable while driving on slip-
pery road surfaces, even if the TRAC or A-TRAC system is operating.
Drive the vehicle carefully in conditions where stability and power may be
lost.
■ When the VSC and Trailer Sway Control are activated
The slip indicator light flashes. Always drive carefully. Reckless driving may
cause an accident. Exercise particular care when the indicator light flashes.
■ When the TRAC/VSC/A-TRAC/Trailer Sway Control systems are turned
off
Be especially careful and drive at a speed appropriate to the road condi-
tions. As these are the systems to help ensure vehicle stability and driving
force, do not turn the TRAC/VSC/A-TRAC/Trailer Sway Control systems off
unless necessary.
Page 243 of 588

2434-6. Driving tips
4
Driving
Winter driving tips
●Use fluids that are appropriate to the prevailing outside tempera-
tures. • Engine oil
• Engine coolant
• Washer fluid
● Have a service technician ins pect the condition of the battery.
● Have the vehicle fitted with four snow tires or purchase a set of tire
chains for the rear tires.
Ensure that all tires are the same size and brand, and that chains match
the size of the tires.
Perform the following accordin g to the driving conditions:
● Do not try to forcibly open a window or move a wiper that is frozen.
Pour warm water over the frozen area to melt the ice. Wipe away
the water immediately to prevent it from freezing.
● To ensure proper operation of the climate control system fan,
remove any snow that has accumulated on the air inlet vents in
front of the windshield.
● Check for and remove any excess ice or snow that may have accu-
mulated on the exterior lights, vehicle’s roof, chassis, around the
tires or on the brakes.
● Remove any snow or mud from the bottom of your shoes before
getting in the vehicle.
Accelerate the vehicle slowly, keep a safe distance between you and
the vehicle ahead, and drive at a reduced speed suitable to road con-
ditions.
Carry out the necessary preparations and inspections before
driving the vehicle in winter. Al ways drive the vehicle in a man-
ner appropriate to the prevailing weather conditions.
Preparation for winter
Before driving the vehicle
When driving the vehicle
Page 257 of 588

2575-1. Basic Operations
5
Multimedia
By touching the screen with your finger, you can control the Audio
system, hands-free system, etc.
■Drag*
Touch the screen with your finger and move the screen to the
desired position.
●Scrolling the lists
● Using scroll bar in lists
■Flick*
Touch the screen with your finger and then quickly move the
screen.
●Scrolling the main screen page
● Returning to the menu screen from the sub-menu screen (screen
one level below)
*: The above operations may not be performed on all screens.
■When using the touch screen
●If the screen is cold, the display may be dark, or the system may seem to be
operating slightly slower than normal.
● The screen may seem dark and hard to see when viewed through sun-
glasses. Change your angle of viewing, adjust the display on the “Display
Settings” screen ( P. 264) or remove your sunglasses.
■ Using cellular phones
Interference may be heard through the multimedia system's speakers if a cel-
lular phone is being used inside or close to the vehicle while the multimedia
system is operating.
Operating the touch screen
Page 258 of 588
2585-1. Basic Operations
CAUTION
■Laser product
THIS PRODUCT IS A CLASS I LASER PRODUCT. USE OF CONTROLS
OR ADJUSTMENTS OR PERFORMANCE OF PROCEDURES OTHER
THAN THOSE SPECIFIED HEREIN MAY RESULT IN HAZARDOUS
RADIATION EXPOSURE. DO NOT OPEN COVERS AND DO NOT
REPAIR BY YOURSELF. REFER SERVICING TO QUALIFIED
PERSONNEL.
NOTICE
■To avoid damaging the touch screen
● To prevent damaging the screen, lightly touch the screen buttons with your
finger.
● Do not use objects other than your finger to touch the screen.
● Wipe off fingerprints using a glass cleaning cloth. Do not use chemical
cleaners to clean the screen, as they may damage the touch screen.
■ To prevent battery discharge
Do not leave the multimedia system on longer than necessary when the
engine is off.
■ To avoid damaging the multimedia system
Take care not to spill drinks or other fluids on the multimedia system.
Page 264 of 588
2645-2. Setup
Display settings
Press the “SETUP” button.
Select “Display” on the “Setup” screen.Adjust general screen con-
trast/brightness
Adjust camera screen con-
trast/brightness
Changes to day mode.
Select “General” or “Camera” on the “Display Settings” screen.
Adjust the display as desired by selecting “+” or “-”.
When the headlights are tur ned on, the screen dims.
However, the screen can be switch ed to day mode by selecting “Day
Mode”.
The screen will stay in day mode when the headlights are turned on until
“Day Mode” is selected again.
Settings are available for adjusting the contrast and brightness
of the screen.
Screen for display settings
1
2
1
2
3
Adjusting the screen contrast/brightness
Day mode
1
2