2016 TOYOTA SIENNA height
[x] Cancel search: heightPage 31 of 668
311-1. For safe use
SIENNA_OM_OM08013U_(U)
1
For safety and security
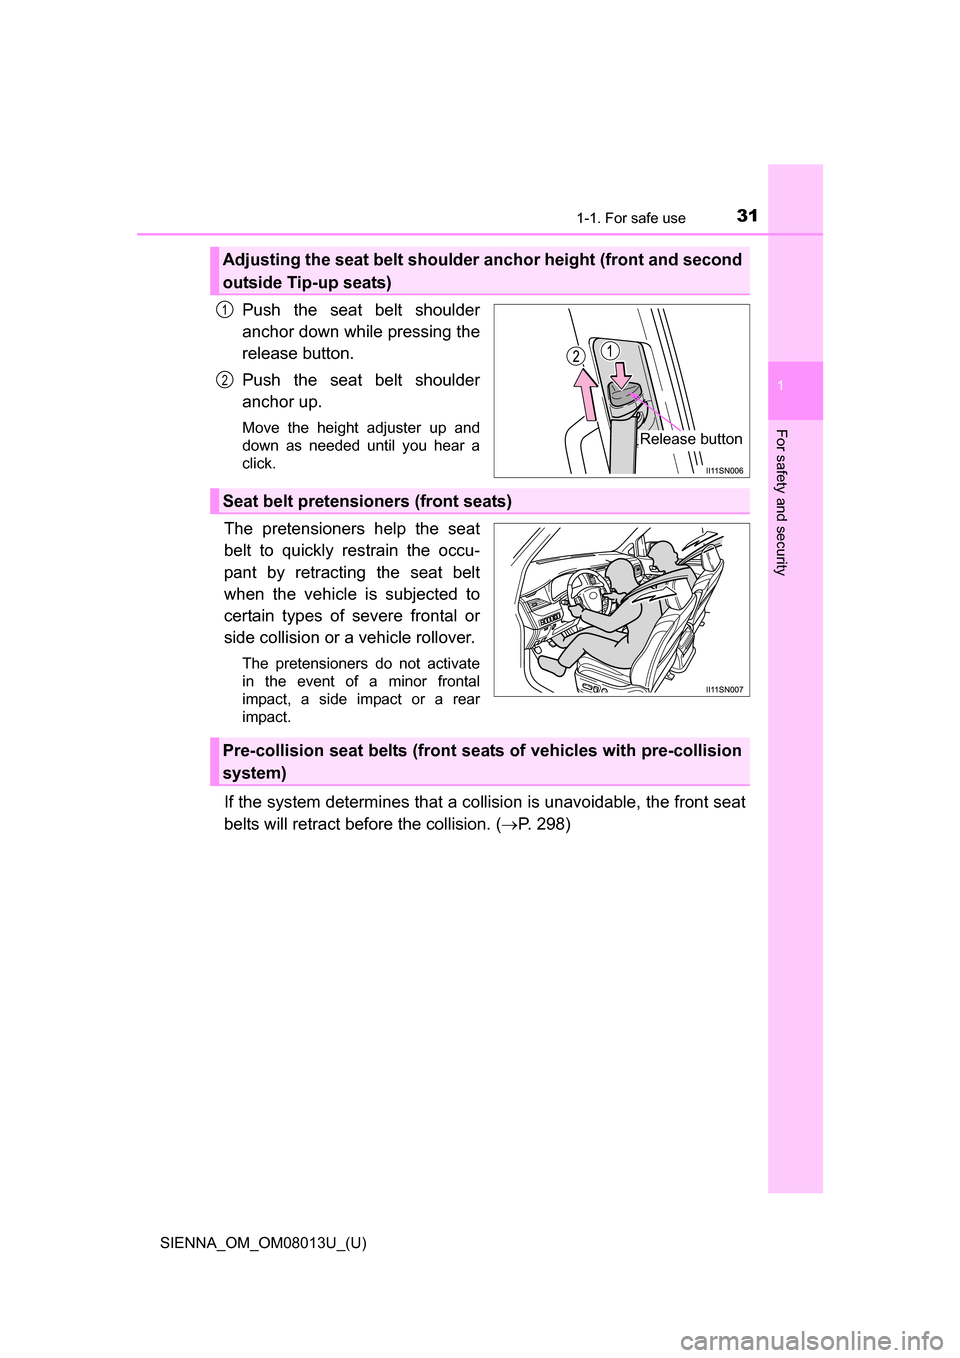
Push the seat belt shoulder
anchor down while pressing the
release button.
Push the seat belt shoulder
anchor up.
Move the height adjuster up and
down as needed until you hear a
click.
The pretensioners help the seat
belt to quickly restrain the occu-
pant by retracting the seat belt
when the vehicle is subjected to
certain types of severe frontal or
side collision or a vehicle rollover.
The pretensioners do not activate
in the event of a minor frontal
impact, a side impact or a rear
impact.
If the system determines that a collision is unavoidable, the front seat
belts will retract before the collision. ( P. 298)
Adjusting the seat belt shoulder anchor height (front and second
outside Tip-up seats)
Release button
1
2
Seat belt pretensioners (front seats)
Pre-collision seat belts (front seats of vehicles with pre-collision
system)
Page 149 of 668
149
SIENNA_OM_OM08013U_(U)
3-3. Adjusting the seats
3
Operation of each component
Front seats
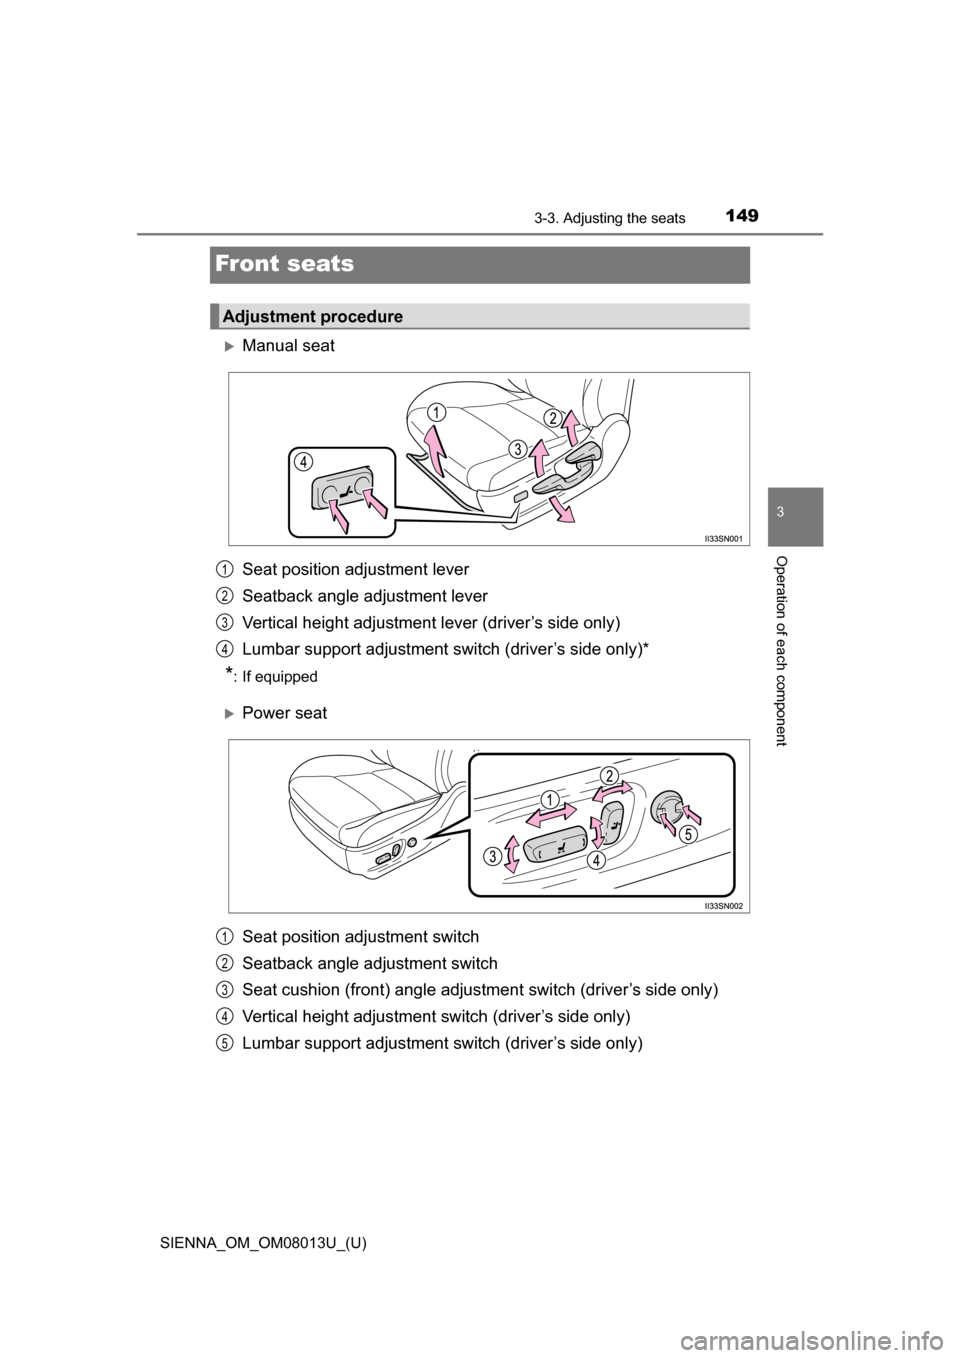
Manual seat
Seat position adjustment lever
Seatback angle adjustment lever
Vertical height adjustment lever (driver’s side only)
Lumbar support adjustment switch (driver’s side only)*
*: If equipped
Power seat
Seat position adjustment switch
Seatback angle adjustment switch
Seat cushion (front) angle adjust ment switch (driver’s side only)
Vertical height adjustment switch (driver’s side only)
Lumbar support adjustment switch (driver’s side only)
Adjustment procedure
1
2
3
4
1
2
3
4
5
Page 175 of 668
SIENNA_OM_OM08013U_(U)
1753-3. Adjusting the seats
3
Operation of each component
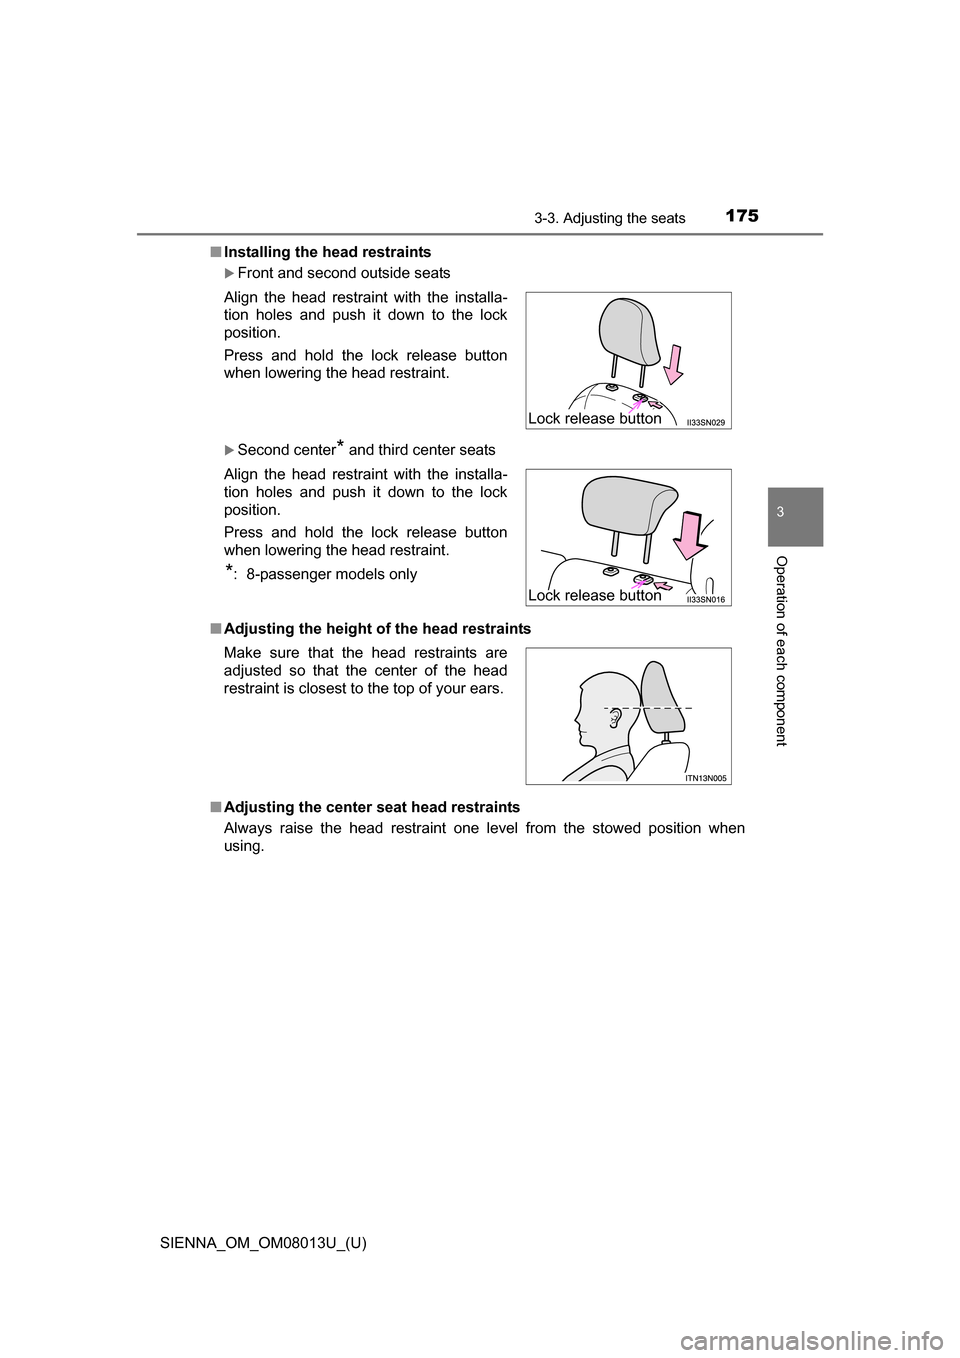
■Installing the head restraints
Front and second outside seats
Second center* and third center seats
■ Adjusting the height of the head restraints
■ Adjusting the center s eat head restraints
Always raise the head restraint one level from the stowed position when
using. Align the head restraint with the installa-
tion holes and push it down to the lock
position.
Press and hold the lock release button
when lowering the head restraint.
Align the head restraint with the installa-
tion holes and push it down to the lock
position.
Press and hold the lock release button
when lowering the head restraint.
*: 8-passenger models only
Make sure that the head restraints are
adjusted so that the center of the head
restraint is closest to the top of your ears.
Lock release button
Lock release button
Page 179 of 668
1793-4. Adjusting the steering wheel and mirrors
3
Operation of each component
SIENNA_OM_OM08013U_(U)
Inside rear view mirror
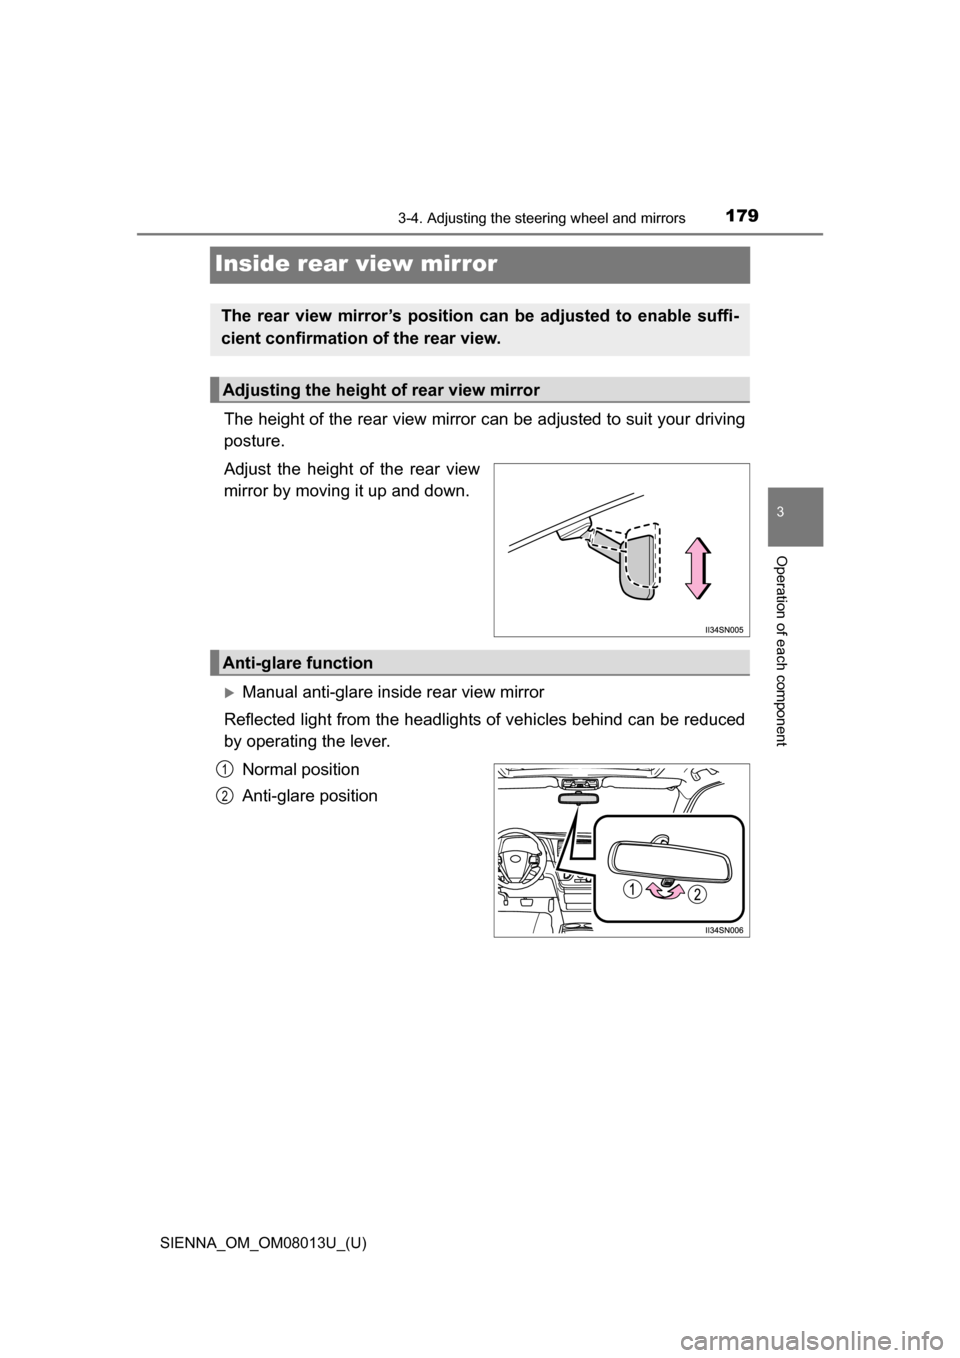
The height of the rear view mirror can be adjusted to suit your driving
posture.
Adjust the height of the rear view
mirror by moving it up and down.
Manual anti-glare inside rear view mirror
Reflected light from the headlights of vehicles behind can be reduced
by operating the lever.
Normal position
Anti-glare position
The rear view mirror’s position can be adjusted to enable suffi-
cient confirmation of the rear view.
Adjusting the height of rear view mirror
Anti-glare function
1
2
Page 220 of 668
220
SIENNA_OM_OM08013U_(U)
4-1. Before driving
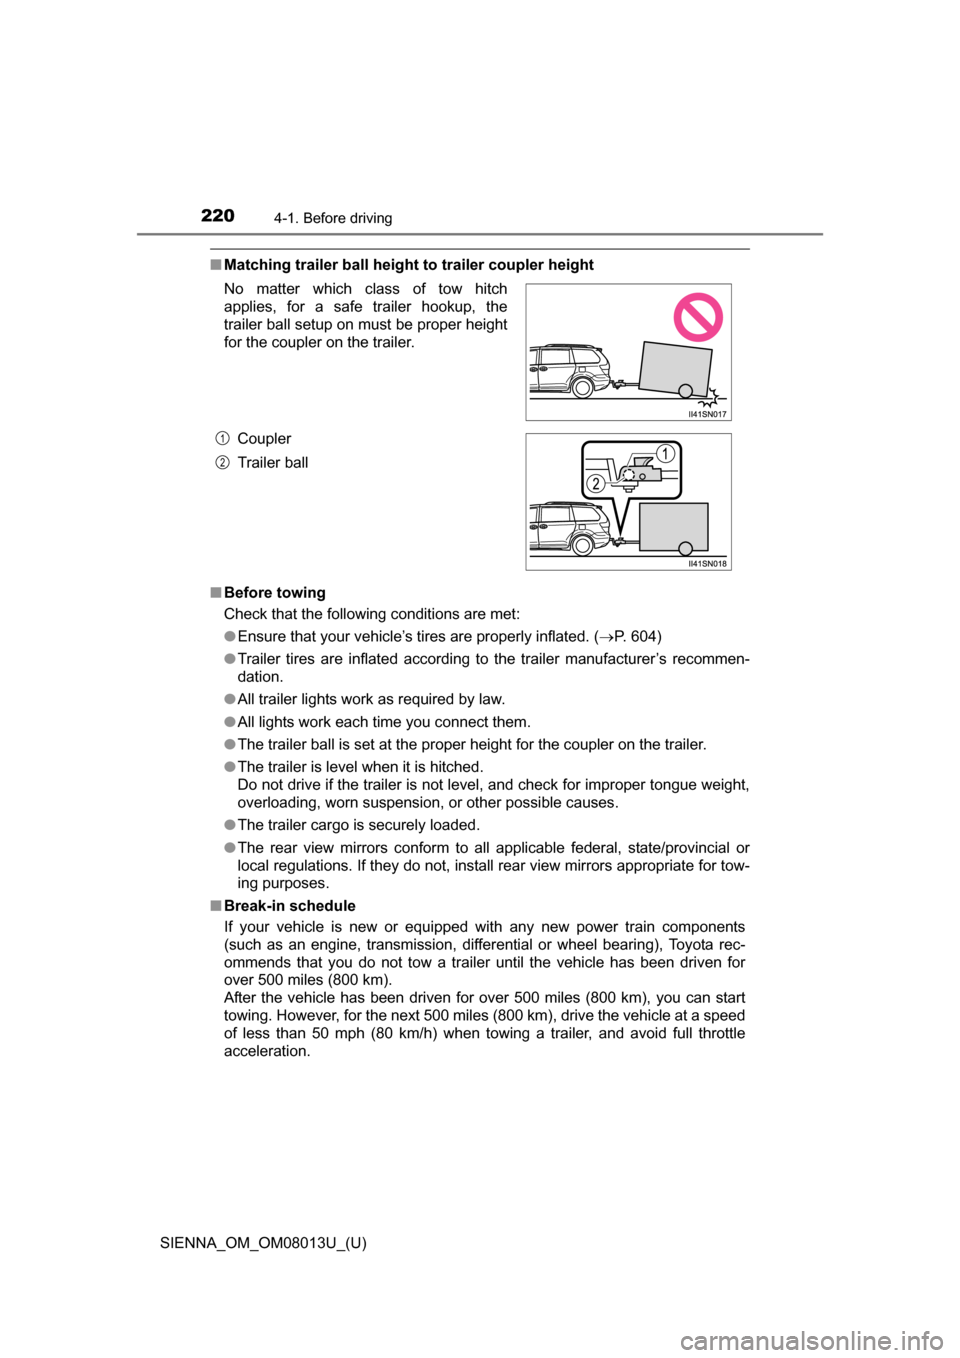
■Matching trailer ball height to trailer coupler height
■ Before towing
Check that the following conditions are met:
●Ensure that your vehicle’s tires are properly inflated. ( P. 604)
● Trailer tires are inflated according to the trailer manufacturer’s recommen-
dation.
● All trailer lights work as required by law.
● All lights work each time you connect them.
● The trailer ball is set at the proper height for the coupler on the trailer.
● The trailer is level when it is hitched.
Do not drive if the trailer is not level, and check for improper tongue weight,
overloading, worn suspension, or other possible causes.
● The trailer cargo is securely loaded.
● The rear view mirrors conform to all applicable federal, state/provincial or
local regulations. If they do not, install rear view mirrors appropriate for tow-
ing purposes.
■ Break-in schedule
If your vehicle is new or equipped with any new power train components
(such as an engine, transmission, differ ential or wheel bearing), Toyota rec-
ommends that you do not tow a trailer until the vehicle has been driven for
over 500 miles (800 km).
After the vehicle has been driven for over 500 miles (800 km), you can start
towing. However, for the next 500 miles (800 km), drive the vehicle at a speed
of less than 50 mph (80 km/h) when towing a trailer, and avoid full throttle
acceleration. No matter which class of tow hitch
applies, for a safe trailer hookup, the
trailer ball setup on must be proper height
for the coupler on the trailer.
Coupler
Trailer ball
1
2
Page 301 of 668
SIENNA_OM_OM08013U_(U)
3014-5. Using the driving support systems
4
Driving
■Conditions that may trigger the system even if there is no possibility of a
collision
In any of the following situations where the frontal area of the radar sensor is
interrupted, the radar sensor may detect possibility of a frontal collision and
the system may be activated.
●When passing by an oncoming vehicle in a curve or a turn to the right or the
left.
● When rapidly approaching an obstacle ahead (e.g. preceding vehicle, toll
gate barrier, etc.)
● When there is a structural object (billboard, low ceiling, fluorescent light,
etc.) above the uphill road ahead
● When driving on a narrow road or through under a low overhead structure
(bridge, tunnel, fly-under, etc.)
● When driving on an uneven road surface
● When there is a metal object, bump, or protrusion on the road surface
● When vehicle’s front part is raised or lowered depending on loading condi-
tions
● When the direction of radar sensor is misaligned by strong impact applied
on an area around the radar sensor, etc.
● When there is an obstacle (guard rail, etc.) by the roadside at the entrance
to a curve
● When the front of your vehicle is pointing upwards (caused by towing a
trailer, during emergency towing or putting a heavy load in the luggage com-
partment etc.)
When the system is activated in the situations described above, there is also
a possibility that the seat belts will retract quickly and the brakes may be
applied with a force greater than normal. When the seat belt is locked in the
retracted position, stop the vehicle in a safe place, release the seat belt and
refasten it.
■ Obstacles not detected
The sensor cannot detect plastic obstacles such as traffic cones. There may
also be occasions when the radar sens or cannot detect pedestrians, animals,
bicycles, motorcycles, trees, or snowdrifts.
■ Situations in which the pre-collis ion system does not function properly
The system may not function effectively in situations such as the following:
● On roads with sharp bends or uneven surfaces
● If a vehicle suddenly moves in front of your vehicle, such as at an intersec-
tion
● If a vehicle suddenly cuts in front of your vehicle, such as when overtaking
● In inclement weather such as heavy rain, fog, snow or sand storms
● When your vehicle is skidding such as the VSC system off
● When an extreme change in vehicle height occurs
● When the axis of the radar is out of adjustment
Page 309 of 668
SIENNA_OM_OM08013U_(U)
3094-5. Using the driving support systems
4
Driving
■The Blind Spot Monitor function is operational when
●The BSM main switch is set to on
● Vehicle speed is greater than approximately 10 mph (16 km/h).
■ The Blind Spot Monitor function will detect a vehicle when
●A vehicle in an adjacent lane overtakes your vehicle.
● Another vehicle enters the detection area when it changes lanes.
■ Conditions under which the Blind Spot Monitor function will not detect a
vehicle
The Blind Spot Monitor function is not designed to detect the following types
of vehicles and/or objects:
● Small motorcycles, bicycles, pedestrians etc.
*
●Vehicles traveling in the opposite direction
● Guardrails, walls, signs, parked vehicles and similar stationary objects
*
●Following vehicles that are in the same lane*
●Vehicles driving 2 lanes across from your vehicle*
*
: Depending on conditions, detection of a vehicle and/or object may occur.
■ Conditions under which the Blind Spot Monitor function may not func-
tion correctly
●The Blind Spot Monitor function may not detect vehicles correctly in the fol-
lowing conditions:
• During bad weather such as heavy rain, fog, snow etc.
• When ice or mud etc. is attached to the rear bumper
• When driving on a road surface that is wet due to rain, standing water etc.
• When there is a significant difference in speed between your vehicle and
the vehicle that enters the detection area
• When a vehicle is in the detection area from a stop and remains in the detection area as your vehicle accelerates
• When driving up or down consecutive steep inclines, such as hills, a dip
in the road etc.
• When multiple vehicles approach with only a small gap between each vehicle
• When vehicle lanes are wide, and the vehicle in the next lane is too far away from your vehicle
• When the vehicle that enters the detection area is traveling at about the
same speed as your vehicle
• When there is a significant difference in height between your vehicle and
the vehicle that enters the detection area
• Directly after the BSM main switch is set to on
• When towing a trailer
• When items such as a bicycle carrier ar e installed on the rear of the vehi-
cle
Page 567 of 668
5678-2. Steps to take in an emergency
SIENNA_OM_OM08013U_(U)
8
When trouble arises
NOTICE
■When replacing the tires
When removing or fitting the wheels, tires or the tire pressure warning
valve and transmitter, contact your Toyota dealer as the tire pressure
warning valve and transmitter may be damaged if not handled correctly.
■When driving over bumps
If a vehicle has a flat tire, the vehicle height will be lower than usual.
Ensure that nothing strikes the bottom of the vehicle.
■To avoid damaging the tire pressure warning valves and transmit-
ters
When a tire is repaired with liquid sealants, the tire pressure warning
valve and transmitter may not operate properly. If a liquid sealant is
used, contact your Toyota dealer or other qualified service shop as soon
as possible. Make sure to replace the tire pressure warning valve and
transmitter when replacing the tire. ( P. 493)