Page 239 of 324

239
1. BASIC OPERATION
NAVIGATION SYSTEM
8
4. TRAFFIC INFORMATION
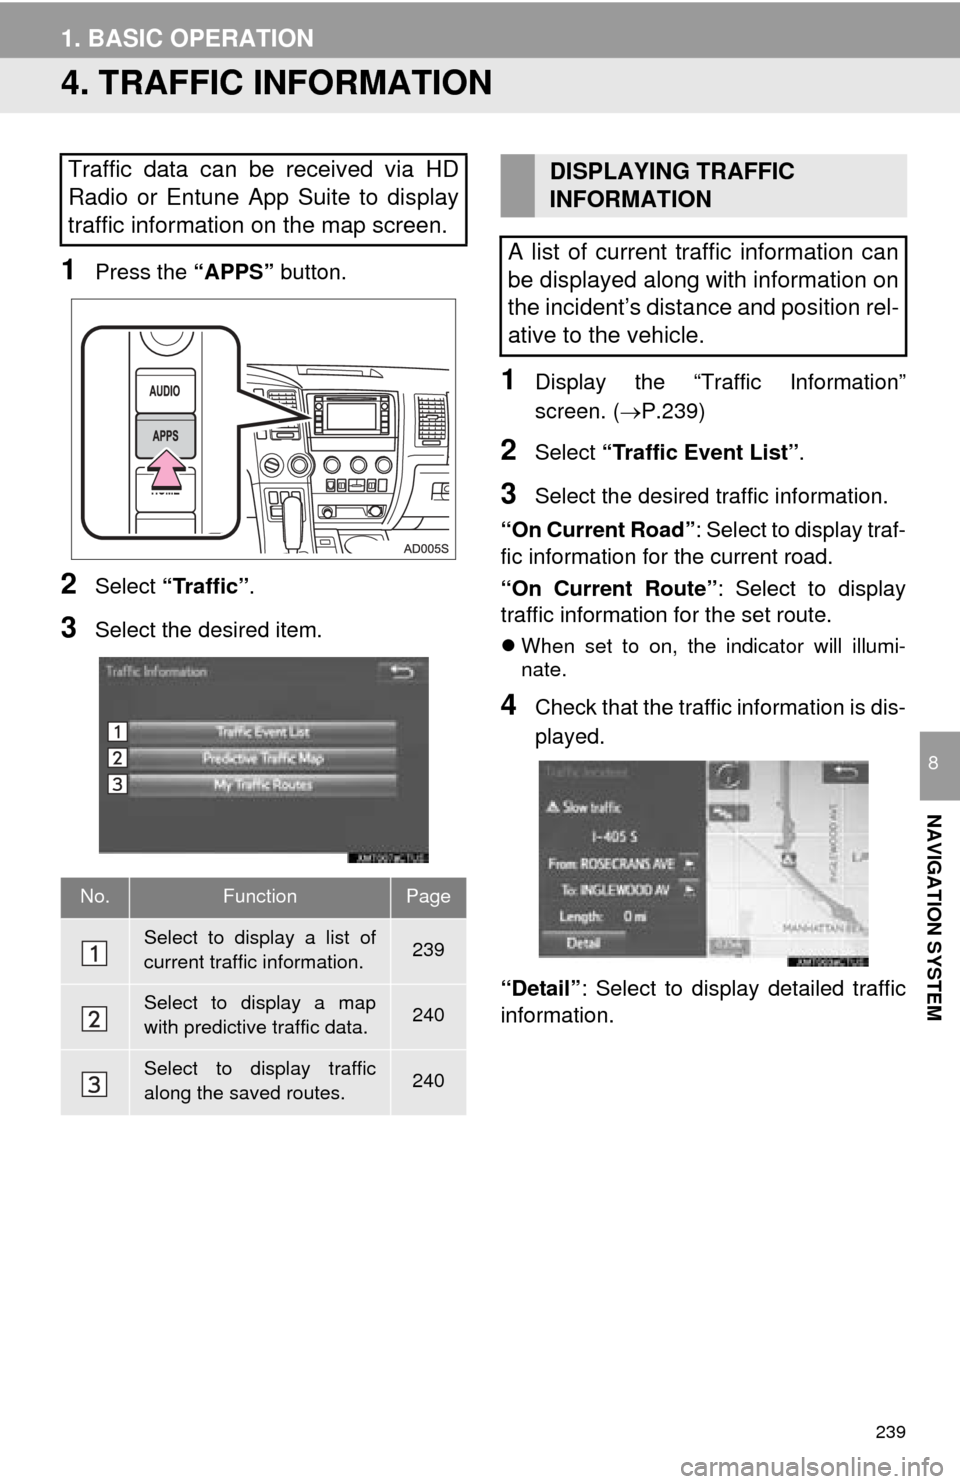
1Press the “APPS” button.
2Select “Traffic” .
3Select the desired item.
1Display the “Traffic Information”
screen. (P.239)
2Select “Traffic Event List” .
3Select the desired traffic information.
“On Current Road” : Select to display traf-
fic information for the current road.
“On Current Route” : Select to display
traffic information for the set route.
When set to on, the indicator will illumi-
nate.
4Check that the traffic information is dis-
played.
“Detail” : Select to display detailed traffic
information.
Traffic data can be received via HD
Radio or Entune App Suite to display
traffic information on the map screen.
No.FunctionPage
Select to display a list of
current traffic information.239
Select to display a map
with predictive traffic data.240
Select to display traffic
along the saved routes.240
DISPLAYING TRAFFIC
INFORMATION
A list of current traffic information can
be displayed along with information on
the incident’s distance and position rel-
ative to the vehicle.
Page 241 of 324
241
1. BASIC OPERATION
NAVIGATION SYSTEM
8
1Select “Options” on the map screen.
2Select “Map Information” .
3Select “Traffic Information” .
When set to on, the indicator will illumi-
nate.
4Check that the traffic information is dis-
played.
DISPLAYING TRAFFIC
INFORMATION ON THE MAPNo.Information/Function
The icons show traffic incident, road
repair, traffic obstacles, etc. Select to
display traffic information and start
voice guidance for the traffic informa-
tion.
The color of the arrow changes de-
pending on the traffic information re-
ceived.
The indicator is displayed as follows.
: Traffic information has
been received.
: Traffic information has
been received via HD.
No icon: Traffic information has not
been received.
Page 243 of 324
243
2. DESTINATION SEARCH
NAVIGATION SYSTEM
8
Select to set a destination from preset destinations.245
Select to delete set destinations.266
No.FunctionPage
Page 245 of 324

245
2. DESTINATION SEARCH
NAVIGATION SYSTEM
8
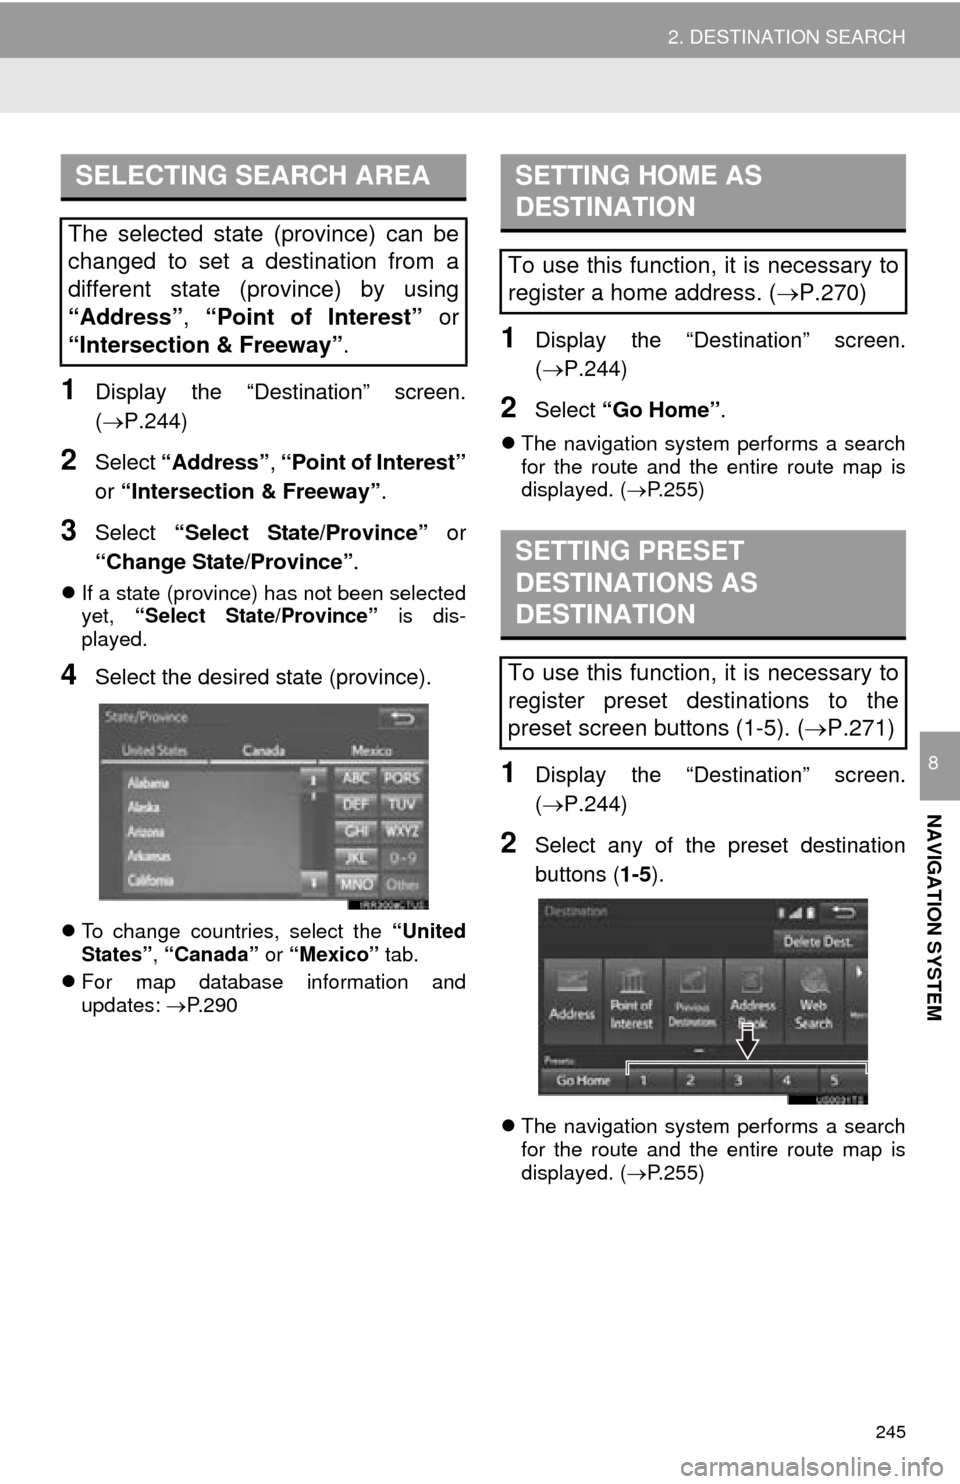
1Display the “Destination” screen.
(P.244)
2Select “Address” , “Point of Interest”
or “Intersection & Freeway” .
3Select “Select State/Province” or
“Change State/Province” .
If a state (province) has not been selected
yet, “Select State/Province” is dis-
played.
4Select the desired state (province).
To change countries, select the “United
States”, “Canada” or “Mexico” tab.
For map database information and
updates: P. 2 9 0
1Display the “Destination” screen.
(P.244)
2Select “Go Home” .
The navigation system performs a search
for the route and the entire route map is
displayed. ( P.255)
1Display the “Destination” screen.
(P.244)
2Select any of the preset destination
buttons ( 1-5).
The navigation system performs a search
for the route and the entire route map is
displayed. ( P.255)
SELECTING SEARCH AREA
The selected state (province) can be
changed to set a destination from a
different state (province) by using
“Address”, “Point of Interest” or
“Intersection & Freeway” .
SETTING HOME AS
DESTINATION
To use this function, it is necessary to
register a home address. (P.270)
SETTING PRESET
DESTINATIONS AS
DESTINATION
To use this function, it is necessary to
register preset destinations to the
preset screen buttons (1-5). ( P.271)
Page 247 of 324
247
2. DESTINATION SEARCH
NAVIGATION SYSTEM
8
1Select “Street Address” .
2Enter a house number and select
“OK”.
3Enter a street name and select “OK”.
4Select the desired street name.
5Enter a city name and select “OK”.
6Select the desired city name.
If the same address exists, the address
list screen will be displayed. Select the
desired address.
1Display the “Destination” screen.
(P.244)
2Select “Point of Interest” .
3Select the desired search method.
SEARCHING BY STREET
ADDRESS
INFORMATION
●A street name can be searched using
only the body part of its name.
For example: S WESTERN AVE
• A search can be performed by entering
“S WESTERN AVE”, “WESTERN AVE”
or “WESTERN”.
SEARCHING BY POINT OF
INTEREST
There are 3 methods to search for a
destination by Points of Interest.
No.FunctionPage
Select to search by name.248
Select to search by catego-
ry.249
Select to search by phone
number.250
Page 249 of 324
249
2. DESTINATION SEARCH
NAVIGATION SYSTEM
8
1Select “Category” .
2Select the desired search point.
3Select the desired POI category.
If there is more than 1 detailed item of the
selected category, the detailed list will be
displayed.
“List All Categories” : Select to display all
POI categories.
“Favorite POI Categories”: Select to use
the 6 POIs that have been previously
set.( P.279)
4Select the desired POI.
SEARCHING BY CATEGORY
No.Function
Select to set the search point from
near the current position.
Select to search for POIs along the
set route.
Select to set the search point from
near a city center. ( P.250)
Select to set the search point from
near a destination.
INFORMATION
● The names of POIs located within
approximately 200 miles (320 km) from
the selected search point can be dis-
played.
Page 250 of 324
250
2. DESTINATION SEARCH
When “Near a City Center in (area
name)” is selected
1Select “Near a City Center in (area
name)” .
2Enter a city name and select “OK”.
“Last 5 Cities” : Select the city name from
the list of the last 5 cities.
3Select the desired city name.
4Select “OK” when the city center map
screen is displayed.
5Follow the steps from 3 onward in
“SEARCHING BY CATEGORY”.
(P.249)
1Select “Phone #” .
2Enter a phone number and select
“OK”.
If there is more than 1 site with the same
number, the list screen will be displayed.
INFORMATION
●If the navigation system has never been
used, selecting the city name from “Last
5 Cities” will not be available.
SEARCHING BY PHONE
NUMBER
INFORMATION
●If there is no match for the entered
phone number, a list of identical num-
bers with different area codes will be dis-
played.
Page 251 of 324
251
2. DESTINATION SEARCH
NAVIGATION SYSTEM
8
1Display the “Destination” screen.
(P.244)
2Select “Previous Destinations” .
3Select the desired destination.
“Previous Start Point” : Select to display
the start point map of the previous guided
route.
“Delete” : Select to delete the previous
destination. ( P.277)1Display the “Destination” screen.
(P.244)
2Select “Address Book” .
3Select the desired address book entry.
SEARCHING FROM
PREVIOUS DESTINATIONS
INFORMATION
●The previous start point and up to 100
previously set destinations are displayed
on the screen.
SEARCHING BY ADDRESS
BOOK
To use this function, it is necessary to
register an address book entry.
( P.273)
“Options”: Select to register or edit
address book entries. ( P.273)