Page 123 of 324

123
7. REAR SEAT ENTERTAINMENT SYSTEM OPERATION
AUDIO SYSTEM
3
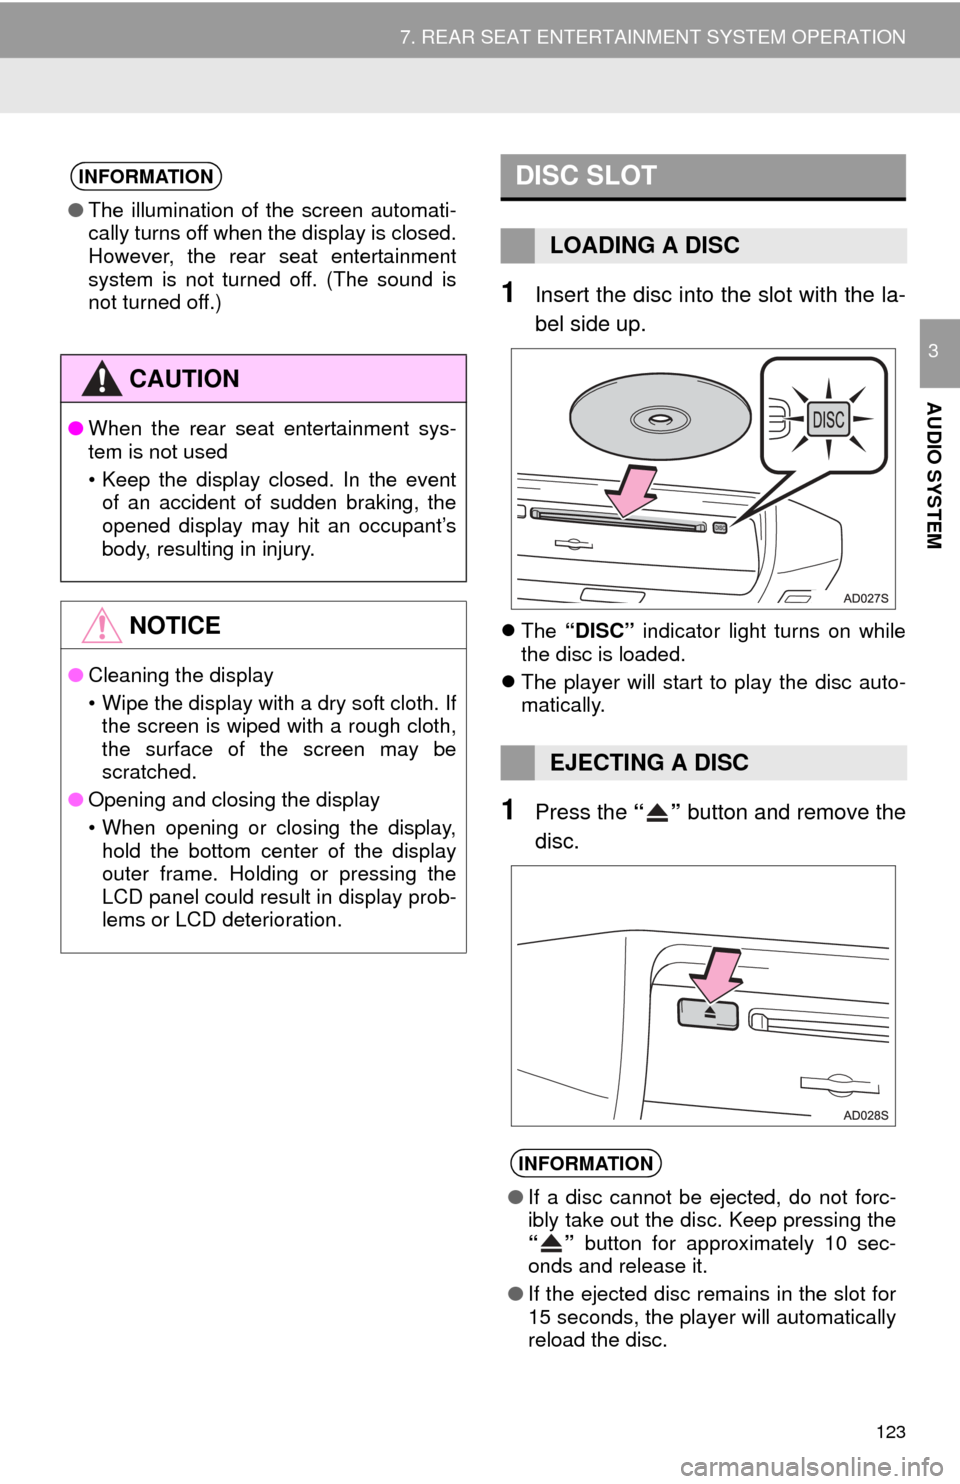
1Insert the disc into the slot with the la-
bel side up.
The “DISC” indicator light turns on while
the disc is loaded.
The player will start to play the disc auto-
matically.
1Press the “” button and remove the
disc.
INFORMATION
● The illumination of the screen automati-
cally turns off when the display is closed.
However, the rear seat entertainment
system is not turned off. (The sound is
not turned off.)
CAUTION
●When the rear seat entertainment sys-
tem is not used
• Keep the display closed. In the event
of an accident of sudden braking, the
opened display may hit an occupant’s
body, resulting in injury.
NOTICE
● Cleaning the display
• Wipe the display with a dry soft cloth. If
the screen is wiped with a rough cloth,
the surface of the screen may be
scratched.
● Opening and closing the display
• When opening or closing the display,
hold the bottom center of the display
outer frame. Holding or pressing the
LCD panel could result in display prob-
lems or LCD deterioration.
DISC SLOT
LOADING A DISC
EJECTING A DISC
INFORMATION
● If a disc cannot be ejected, do not forc-
ibly take out the disc. Keep pressing the
“” button for approximately 10 sec-
onds and release it.
● If the ejected disc remains in the slot for
15 seconds, the player will automatically
reload the disc.
Page 124 of 324
124
7. REAR SEAT ENTERTAINMENT SYSTEM OPERATION
1Insert the SD card with the label side
up, positioning the cut off corner to the
right.
To eject the SD card, push on the center
of the SD card. When it ejects slightly pull
it straight out.
SD CARD SLOTREMOTE CONTROLLER
The rear seat entertainment system
can be operated with the remote con-
troller. The system cannot be operated
by touching the switches on the screen
directly.
No.Function
Turning on/off the rear seat enter-
tainment system
Selecting a control icon
Inputting the selected control icon
Turning on/off the speaker output
Changing the screen size
Turning on the “VIDEO” mode
Adjusting the volume
Turning on the “SD” mode
Page 127 of 324

127
7. REAR SEAT ENTERTAINMENT SYSTEM OPERATION
AUDIO SYSTEM
3
1Remove the cover.
2Remove the depleted batteries and in-
stall 2 new AA batteries.
WHEN THE REMOTE
CONTROLLER BATTERIES
ARE FULLY DEPLETED
INFORMATION
●If the remote controller batteries are dis-
charged, the following symptoms may
occur.
• The rear seat entertainment system
control will not function properly.
• The operational range is reduced.
● When replacing the AA batteries
• Batteries can be purchased at your
Toyota dealer, electric appliance shop,
or camera stores.
• Replace only with the same or equiva- lent type recommended by a Toyota
dealer.
• Dispose of used batteries according to local laws.
CAUTION
● To prevent accidents and electric shock
• Do not disassemble or modify the
remote controller.
● When the remote controller is not used
• Stow the remote controller. Injuries
may result in the event of an accident
or sudden braking.
● Removed batteries and other parts
• Keep away from children. These parts
are small and if swallowed by a child
they can cause choking.
NOTICE
● To prevent damage to the remote con-
troller
• Keep the remote controller away from
direct sunlight, heat and high humidity.
• Do not drop or strike the remote con- troller against hard objects.
• Do not sit on or place heavy objects on the remote controller.
● For normal operation after replacing the
batteries, observe the following precau-
tions to prevent accidents.
• Always work with dry hands. Moisture
may cause the battery to rust.
• Do not touch or move any other com- ponents inside the remote controller.
• Do not bend any of the battery termi- nals.
Page 154 of 324

154
7. REAR SEAT ENTERTAINMENT SYSTEM OPERATION
CAUTION
●SD cards
• Keep away from children. These are
small and if swallowed by a child they
can cause choking.
NOTICE
● Failure to follow the precautions below
may result in damage to the SD cards or
the SD card slot.
• Do not insert anything other than an
SD card into the SD card slot.
• Do not stick levels or stickers on SD card. There is a possibility that it may
become impossible to eject the SD
card from inside the slot.
• Do not handle an SD card with wet hands. Doing so may cause electric
shock or a malfunction.
• Do not allow hands or metal objects to contact the interface pins of SD cards.
• Do not place SD cards on the instru- ment panel, on any place with direct
sunlight or in areas with a lot of mois-
ture.
• Do not use SD cards in any place where static electricity or electric noise
adversely affects SD cards. This may
cause data corruption or data loss.
• Always place the SD card in its storage case when not in use.
Page 181 of 324

181
1. REAR VIEW MONITOR SYSTEM
PERIPHERAL MONITORING SYSTEM
6
3. THINGS YOU SHOULD KNOW
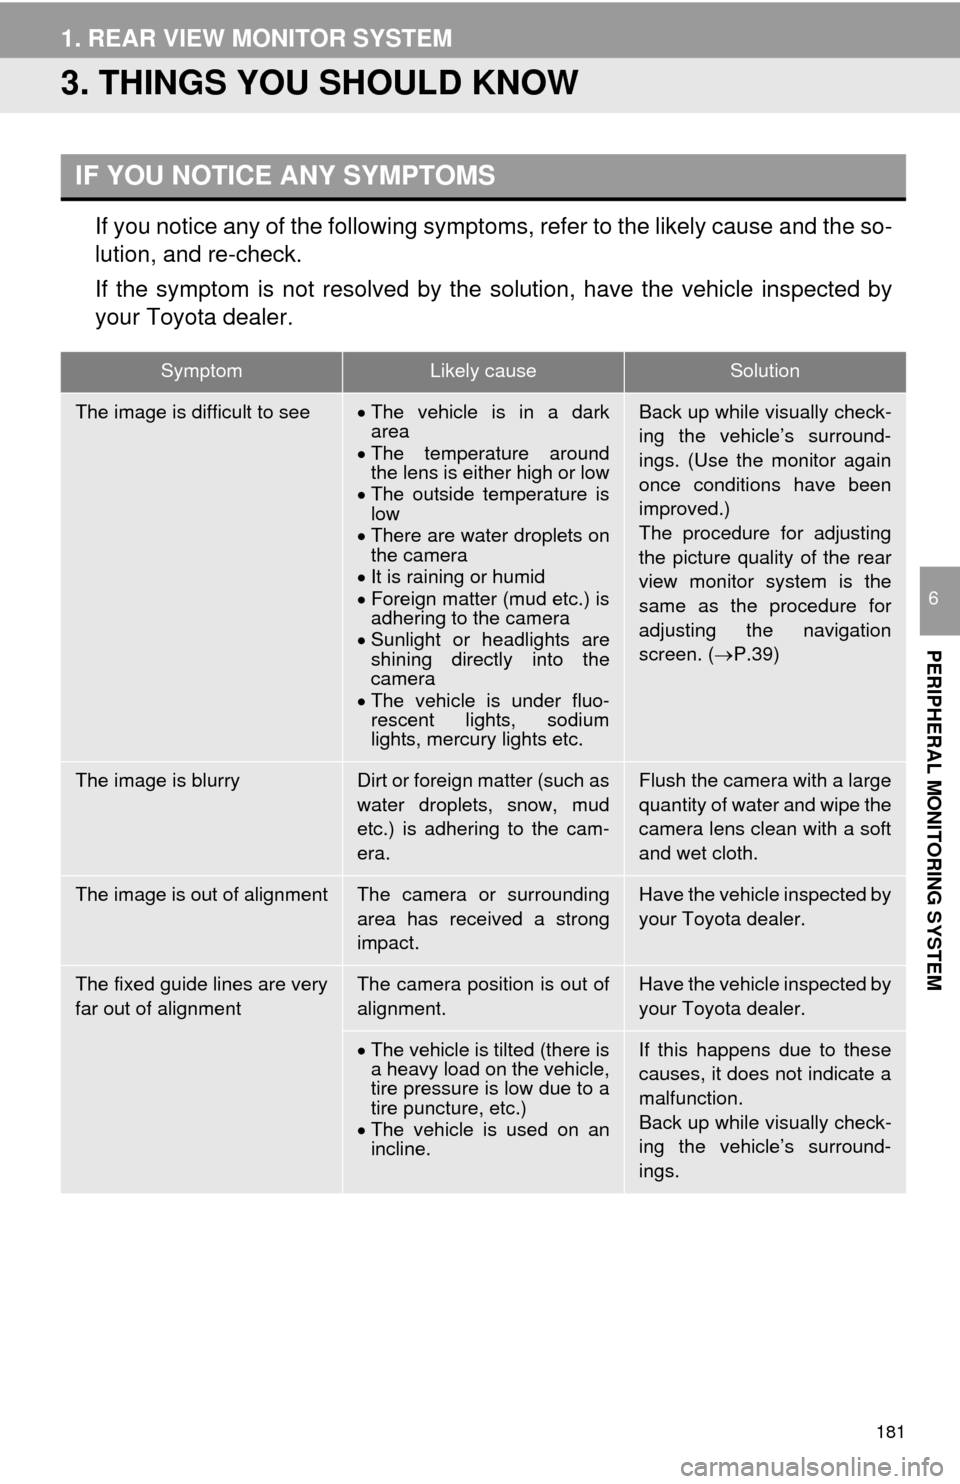
If you notice any of the following symptoms, refer to the likely cause and the so-
lution, and re-check.
If the symptom is not resolved by the solution, have the vehicle inspected by
your Toyota dealer.
IF YOU NOTICE ANY SYMPTOMS
SymptomLikely causeSolution
The image is difficult to seeThe vehicle is in a dark
area
The temperature around
the lens is either high or low
The outside temperature is
low
There are water droplets on
the camera
It is raining or humid
Foreign matter (mud etc.) is
adhering to the camera
Sunlight or headlights are
shining directly into the
camera
The vehicle is under fluo-
rescent lights, sodium
lights, mercury lights etc.Back up while visually check-
ing the vehicle’s surround-
ings. (Use the monitor again
once conditions have been
improved.)
The procedure for adjusting
the picture quality of the rear
view monitor system is the
same as the procedure for
adjusting the navigation
screen. ( P.39)
The image is blurryDirt or foreign matter (such as
water droplets, snow, mud
etc.) is adhering to the cam-
era.Flush the camera with a large
quantity of water and wipe the
camera lens clean with a soft
and wet cloth.
The image is out of alignmentThe camera or surrounding
area has received a strong
impact.Have the vehicle inspected by
your Toyota dealer.
The fixed guide lines are very
far out of alignmentThe camera position is out of
alignment.Have the vehicle inspected by
your Toyota dealer.
The vehicle is tilted (there is
a heavy load on the vehicle,
tire pressure is low due to a
tire puncture, etc.)
The vehicle is used on an
incline.If this happens due to these
causes, it does not indicate a
malfunction.
Back up while visually check-
ing the vehicle’s surround-
ings.