2016 TOYOTA PROACE VERSO battery
[x] Cancel search: batteryPage 266 of 504

266
Energy economy mode
System which manages the duration of use of certain functions to conserve a sufficient level of charge in the battery.After the engine has stopped, you can still use functions such as the audio and telematics system, windscreen wipers, dipped beam headlamps, courtesy lamps, etc. for a maximum combined duration of about forty minutes.
Switching to economy
mode
A message appears in the instrument panel screen indicating that the vehicle has switched to economy mode and the active functions are put on standby.
If a telephone call is being made at this time, it will be maintained for around 10 minutes with the Bluetooth hands-free system of your audio system.
Exiting economy mode
These functions are reactivated automatically next time the vehicle is driven.In order to restore the use of these functions immediately, start the engine and let it run:- for less than ten minutes, to use the equipment for approximately five minutes,- for more than ten minutes, to use the equipment for up to approximately thirty minutes.Let the engine run for the duration specified to ensure that the battery charge is sufficient.Do not repeatedly and continuously restart the engine in order to charge the battery.A flat battery prevents the engine from starting.For more information on the 12 V batter y, refer to the corresponding section.
Load reduction mode
System which manages the use of certain functions according to the level of charge remaining in the battery.When the vehicle is being driven, the load reduction function temporarily deactivates certain functions, such as the air conditioning, the heated rear screen...The deactivated functions are reactivated automatically as soon as conditions permit.
Practical information
Page 272 of 504
272
* According to engine.
Diesel engine
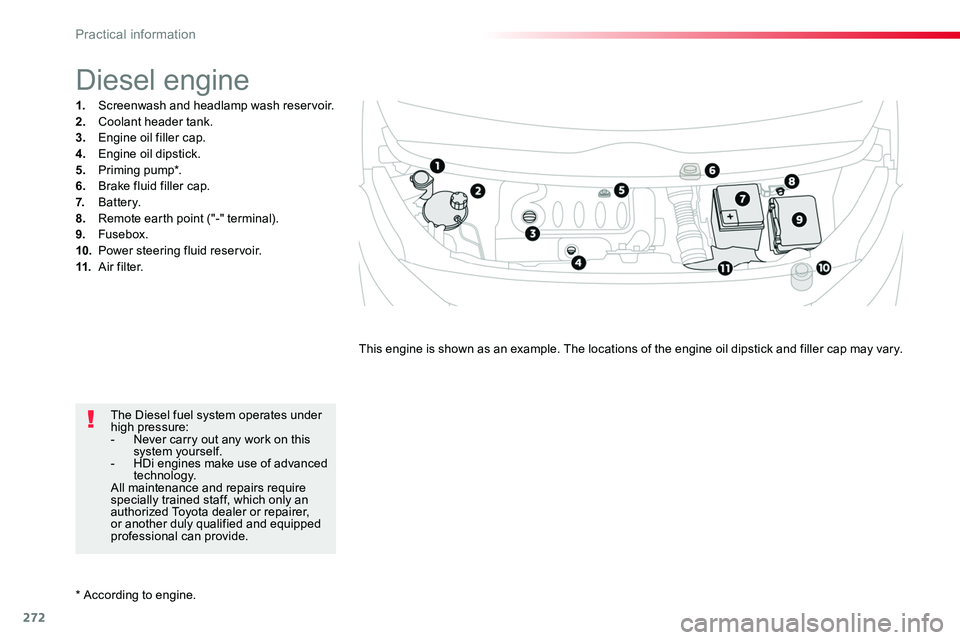
1. Screenwash and headlamp wash reservoir.2. Coolant header tank.3. Engine oil filler cap.4. Engine oil dipstick.5. Priming pump*.6. Brake fluid filler cap.7. Battery.8. Remote earth point ("-" terminal).
9. Fusebox.10. Power steering fluid reservoir.11. A i r f i l t e r.
This engine is shown as an example. The locations of the engine oil dipstick and filler cap may vary.
The Diesel fuel system operates under high pressure:- Never carry out any work on this system yourself.- HDi engines make use of advanced technology.All maintenance and repairs require specially trained staff, which only an authorized Toyota dealer or repairer, or another duly qualified and equipped professional can provide.
Practical information
Page 276 of 504

276
Checks
12 V battery
The battery does not require any maintenance.However, check regularly that the terminals are correctly tightened (versions without quick release terminals) and that the connections are clean.
Refer to the manufacturer's service schedule for details of the replacement intervals for these components.
Air filter and passenger compartment filter
Replace the oil filter each time the engine oil is changed.Refer to the manufacturer's service schedule for details of the replacement interval for this component.
Oil filter
Particle filter (Diesel)
The start of saturation of the particle filter is indicated by the temporary illumination of this warning lamp accompanied by a message in the multifunction screen.
As soon as the traffic conditions permit, regenerate the filter by driving at a speed of at least 40 mph (60 km/h) until the warning lamp goes off.If the warning lamp stays on, this indicates a low additive level.For more information on Checking levels, refer to the corresponding section.
On a new vehicle, the first particle filter regeneration operations may be accompanied by a "burning" smell, which is per fectly normal.Following prolonged operation of the
vehicle at very low speed or at idle, you may, in exceptional circumstances, notice the emission of water vapour at the exhaust on acceleration. This does not affect the behaviour of the vehicle or the environment.
Unless otherwise indicated, check these components in accordance with the manufacturer's service schedule and according to your engine.Other wise, have them checked by an authorized Toyota dealer or repairer, or another duly qualified and equipped professional.
For more information and the precautions to take before starting work on the 12 V batter y, refer to the corresponding section.
Depending on the environment (e.g. dusty atmosphere) and the use of the vehicle (e.g. city driving), replace them twice as often if necessary.A clogged passenger compartment filter may have an adverse effect on the per formance of the air conditioning system and generate undesirable odours.
Versions equipped with Stop & Start are fitted with a 12 V lead-acid battery of specific technology and specification.Its replacement should be carried out only by an authorized Toyota dealer or repairer, or another duly qualified and equipped professional.
Practical information
Page 313 of 504

313
FuseN°Rating(A)Functions
F110Electric power steering, clutch switch
F415Horn.
F520Front/rear screenwash pump.
F620Front/rear screenwash pump.
F710Rear 12 V accessory socket.
F820Single or double rear wipers.
F10/F1130Front and rear, exterior, interior locks.
F1310Front air conditioning controls, radio controls, gear lever, head-up display.
F145Alarm, ER A-GLONASS emergency call system.
F175Instrument panel.
F193Steering mounted controls.
F213Smart Entry & Start System or ignition switch.
F223Rain and sunshine sensor, multifunction detection camera.
F235Seat belt unfastened or not fastened display screen.
F245Touch screen, reversing camera and parking sensors.
F255Airbags.
F2920Audio system, touch screen, CD player, navigation.
F3115Audio system (battery +).
F3215Front 12 V accessory socket.
F345Blind spot monitoring system, door mirror electric controls.
F355Heated washer jets, headlamp beam height control.
F365Torch charger, rear courtesy lamp.
Version 1 (Eco)
The fuses described hereafter vary according to the equipment in your vehicle.
8
In the event of a breakdown
Page 314 of 504

314
FuseN°Rating(A)Functions
F13Smart Entry & Start System or ignition switch.
F55Touch screen, reversing camera and parking sensors.
F710Rear air conditioning controls, Hi-Fi amplifier.
F820Single or double rear wiper.
F10/F1130Front and rear, exterior, interior locks.
F123Alarm.
F1710Rear 12 V accessory socket.
F185ERA-GLONASS emergency call system.
F213Torch charger, rear courtesy lamp.
F223Glove box lamp, rear courtesy lamps.
F235Blind spot monitoring system, door mirror electric controls.
F245Steering mounted controls.
F255Headlamp beam height control.
F263Seat belt unfastened or not fastened display screen.
F273Rain and sunshine sensor, multifunction detection camera.
F2810Front air conditioning controls, radio controls, gear lever, head-up display.
F30A or B15Audio system (battery +).
F315Airbags.
F3315Front 12 V accessory socket.
F355Instrument panel.
F3620Audio system, touch screen, CD player, navigation.
Version 2 (Full)
The fuses described hereafter vary according to the equipment in your vehicle.
In the event of a breakdown
Page 315 of 504
315
Engine compartment fuses
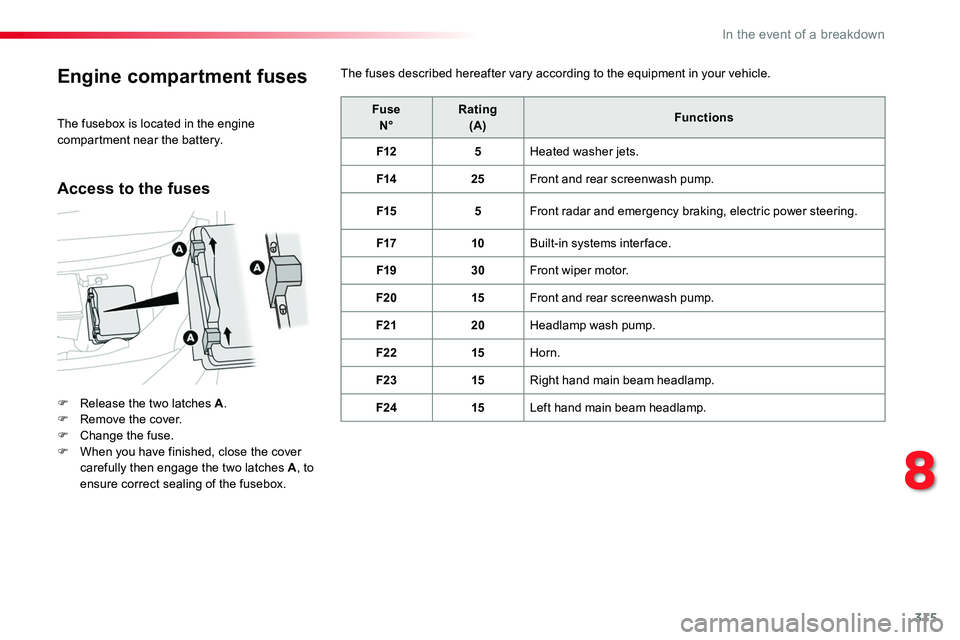
F Release the two latches A.F Remove the cover.F Change the fuse.F When you have finished, close the cover carefully then engage the two latches A, to ensure correct sealing of the fusebox.
FuseN°Rating(A)Functions
F125Heated washer jets.
F1425Front and rear screenwash pump.
F155Front radar and emergency braking, electric power steering.
F1710Built-in systems inter face.
F1930Front wiper motor.
F2015Front and rear screenwash pump.
F2120Headlamp wash pump.
F2215Horn.
F2315Right hand main beam headlamp.
F2415Left hand main beam headlamp.
The fusebox is located in the engine compartment near the battery.
The fuses described hereafter vary according to the equipment in your vehicle.
Access to the fuses
8
In the event of a breakdown
Page 316 of 504

316
12 V batteryThe battery is located under the bonnet.F Open the bonnet using the interior release lever, then the exterior safety catch.F Secure the bonnet stay.
Access to the battery
Procedure for starting the engine using another battery or charging a discharged battery.
General points
Lead-acid starter batteries
Protect your eyes and face before handling the battery.All operations on the battery must be carried out in a well ventilated area and away from naked flames and sources of sparks, so as to avoid the risk of explosion or fire.Wash your hands afterwards.
Versions equipped with Stop & Start are fitted with a 12 V lead-acid battery of specific technology and specification.Its replacement should be carried out only by an authorized Toyota dealer or repairer, or another duly qualified and equipped professional.
If your vehicle has an automatic gearbox, do not try to start the engine by pushing the vehicle.
Batteries contain harmful substances such as sulphuric acid and lead.They must be disposed of in accordance with regulations and must not, in any circumstances, be discarded with household waste.Take used remote control batteries and vehicle batteries to a special collection point.
For more information on the Bonnet and the Engine, refer to the corresponding section(s).
F Remove the plastic cover on the (+) terminal.The battery (-) terminal is not accessible.A remote earth point is provided at the front of the vehicle.
In the event of a breakdown
Page 317 of 504

317
Starting using another
battery
Never try to start the engine by connecting a battery charger.Never use a 24 V or higher battery b o o s t e r.First check that the slave battery has a nominal voltage of 12 V and a capacity at least equal to that of the discharged battery.The two vehicles must not be in contact with each other.Switch off the electrical consumers on both vehicles (audio system, wipers, lighting, ...).Ensure that the jump lead cables do not pass close to moving parts of the engine (cooling fan, belts, ...).Do not disconnect the (+) terminal when the engine is running.
F Raise the plastic cover on the (+) terminal, if your vehicle has one.F Connect the red cable to the positive terminal (+) of the flat battery A (at the metal elbow) then to the positive terminal (+) of the slave battery B or the b o o s t e r.F Connect one end of the green or black cable to the negative terminal (-) of the slave battery B or the booster (or earth point on the other vehicle).F Connect the other end of the green or black cable to the earth point C on the broken down vehicle.
F Start the engine of the vehicle with the good battery and leave it running for a few minutes.
F Operate the starter on the broken down vehicle and let the engine run.If the engine does not start straight away, switch off the ignition and wait a few moments before trying again.
When your vehicle's battery is discharged, the engine can be started using a slave battery (external or on another vehicle) and jump lead cables or a battery booster.
Some functions, including Stop & Start, are not available if the battery is not sufficiently charged.
F Wait until the engine returns to idle then disconnect the jump lead cables in the reverse order.F Refit the plastic cover to the (+) terminal, if your vehicle has one.F Allow the engine to run for at least 30 minutes, by driving or with the vehicle stationary, so that the battery reaches an adequate state of charge.
8
In the event of a breakdown