2016 TOYOTA PRIUS V change time
[x] Cancel search: change timePage 231 of 620

PRIUS v_OM_OM47B12U_(U)
2314-5. Using the driving support systems
4
Driving
■LDA indicator
Even if the LDA switch is pressed, when the LDA indicator does not come on
the system may have a malfunction. Have the vehicle inspected by your Toy-
ota dealer immediately.
■Alert buzzer for lane departure alert
Depending on the audio system sound level or air conditioning fan noise
while the audio system or air conditioning system is in use, it may be difficult
to hear the alert buzzer.
■After the vehicle has been parked in the sun
The LDA may not be available and a warning message will be displayed for a
while after driving has started. When the temperature in the cabin decreases
and the temperature around the camera sensor (P. 227) becomes suitable
for its operation, turn the LDA switch on again after a short time.
■If there are lane markers on only one side of the vehicle
The lane departure alert will not operate for the side on which lane markers
could not be recognized.
■Conditions in which the function may not operate correctly
In the following situations, the camera sensor may be unable to recognize
lane markers causing the lane departure alert function to operate incorrectly.
However, this does not indicate a malfunction.
●When there are shadows on the road running parallel with lane markers, or
if a shadow covers the lane markers
●When driving through an area with no lane markers, such as a toll booth, a
crossing or before a ticket checkpoint
●When the lane markers are broken, Botts’ dots (raised pavement markers)
or stones
●When lane markers are obscured or partially obscured by sand, dirt, etc.
●When driving on a road surface that is wet due to rain, previous rainfall,
standing water, etc.
●When the lane markers are yellow (These may be more difficult for the sys-
tem to recognize compared to white markers.)
●When the lane markers are on a curb, etc.
●When driving on a particularly bright road surface, such as concrete
●When driving on a road surface that is bright due to reflected light
●When driving in a location where the light level changes rapidly, such as the
entrance to or exit from a tunnel
●When sunlight or the headlights of oncoming vehicles are shining directly
into the camera lens
●When driving on roads that are branching or merging
●When driving on winding roads or roads that are uneven
Page 234 of 620

234
PRIUS v_OM_OM47B12U_(U)
4-5. Using the driving support systems
NOTICE
■To prevent damage to or incorrect operation of the LDA
Observe the following to ensure that the LDA system functions correctly
●Do not modify the headlights or attach stickers to the surface of the lights.
●Do not modify the suspension. When performing a replacement, contact
your Toyota dealer.
●Do not install or place anything on the hood or the grille. Also, do not install
a grille guard (bull bars, kangaroo bar, etc.).
●If your windshield needs repairs, contact your Toyota dealer.
■Camera sensor
Observe the following to ensure that the LDA system functions correctly
●Keep the windshield clean at all times.
Performance could be affected if the windshield is dirty, or if raindrops,
condensation or ice are adhering to the windshield.
●Do not spill liquids onto the camera sensor.
●Do not attach window tinting to the windshield.
●Do not install an antenna in front of the camera lens.
●If the windshield area in front of the camera sensor is fogged up, use the
windshield defogger to remove the fog from that area. (P. 366)
When it is cold, using the heater with air blowing to the feet may allow the
upper part of the windshield to fog up. This will have a negative effect on
the images.
●Do not scratch the camera lens, or let it get dirty.
When cleaning the inside of the windshield, be careful not to get any glass
cleaner, etc., on the lens. Also, do not touch the lens.
For lens repair, contact your Toyota dealer.
●Do not change the installation position or direction of the camera sensor or
remove it.
The direction of the camera sensor is precisely adjusted.
●Do not subject the camera sensor to strong impact or force, and do not
disassemble the camera sensor.
●When replacing the windshield, contact your Toyota dealer.
●Do not attach a sticker or other items to
the windshield near the camera sensor.
Page 254 of 620
254
PRIUS v_OM_OM47B12U_(U)
4-5. Using the driving support systems
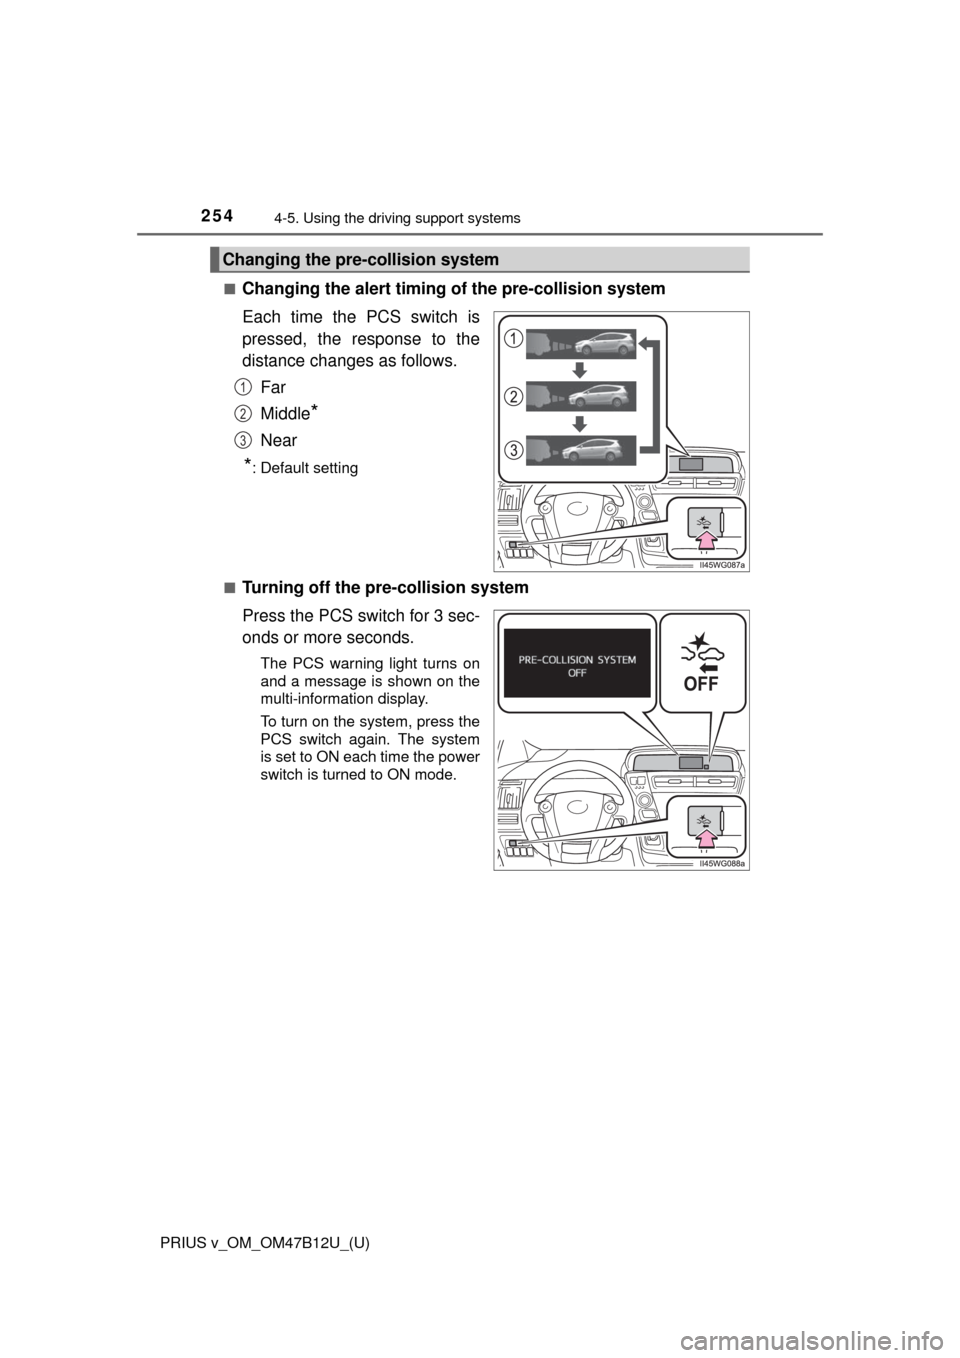
■Changing the alert timing of the pre-collision system
Each time the PCS switch is
pressed, the response to the
distance changes as follows.
Far
Middle
*
Near
*: Default setting
■
Turning off the pre-collision system
Press the PCS switch for 3 sec-
onds or more seconds.
The PCS warning light turns on
and a message is shown on the
multi-information display.
To turn on the system, press the
PCS switch again. The system
is set to ON each time the power
switch is turned to ON mode.
Changing the pre-collision system
1
2
3
Page 258 of 620

258
PRIUS v_OM_OM47B12U_(U)
4-5. Using the driving support systems
WARNING
■Limitations of the pre-collision system
It is the driver’s responsibility to drive safely. The driver should be aware of
the surroundings and strive for safe driving.
Do not rely on the pre-collision system instead of normal braking opera-
tions. This system does not avoid or reduce collisions in every situation.
Overly relying on the system and entrusting it with safety may cause an
unexpected accident which could lead to death or serious injury.
Although the system is designed for the purpose to support in avoiding colli-
sions or reducing the damage of a collision, the effect changes according to
various conditions. (P. 255)
Therefore, it does not always provide the same performance. Also, the pre-
collision braking does not work depending on the operating conditions of the
driver. When the driver has stepped on the brake pedal and is operating the
steering wheel, the system judges that the driver is taking avoiding action
and the automatic braking may not operate.
■Handling the radar sensor
Observe the following to ensure the pre-collision system can function effec-
tively.
Otherwise, the system may not function correctly and could result in an
accident.
●Keep the sensor and grille cover clean at all times.
Clean the sensor and grille cover with a soft cloth so you do not mark or
damage them.
●Do not subject the sensor or surrounding area to a strong impact.
If the sensor moves even slightly off position, the system may become
inaccurate or malfunction. If the sensor or surrounding area is subject to a
strong impact, always have the area inspected and adjusted by your
Toyota dealer.
●Do not disassemble the sensor.
●Do not attach accessories or stickers to the sensor, grille cover or sur-
rounding area.
●Do not modify or paint the sensor and grille cover.
●If the sensor needs to be replaced, contact your Toyota dealer.
Page 285 of 620
285
PRIUS v_OM_OM47B12U_(U)
5-3. Using the Multimedia system
5
Audio system
Selecting the audio source
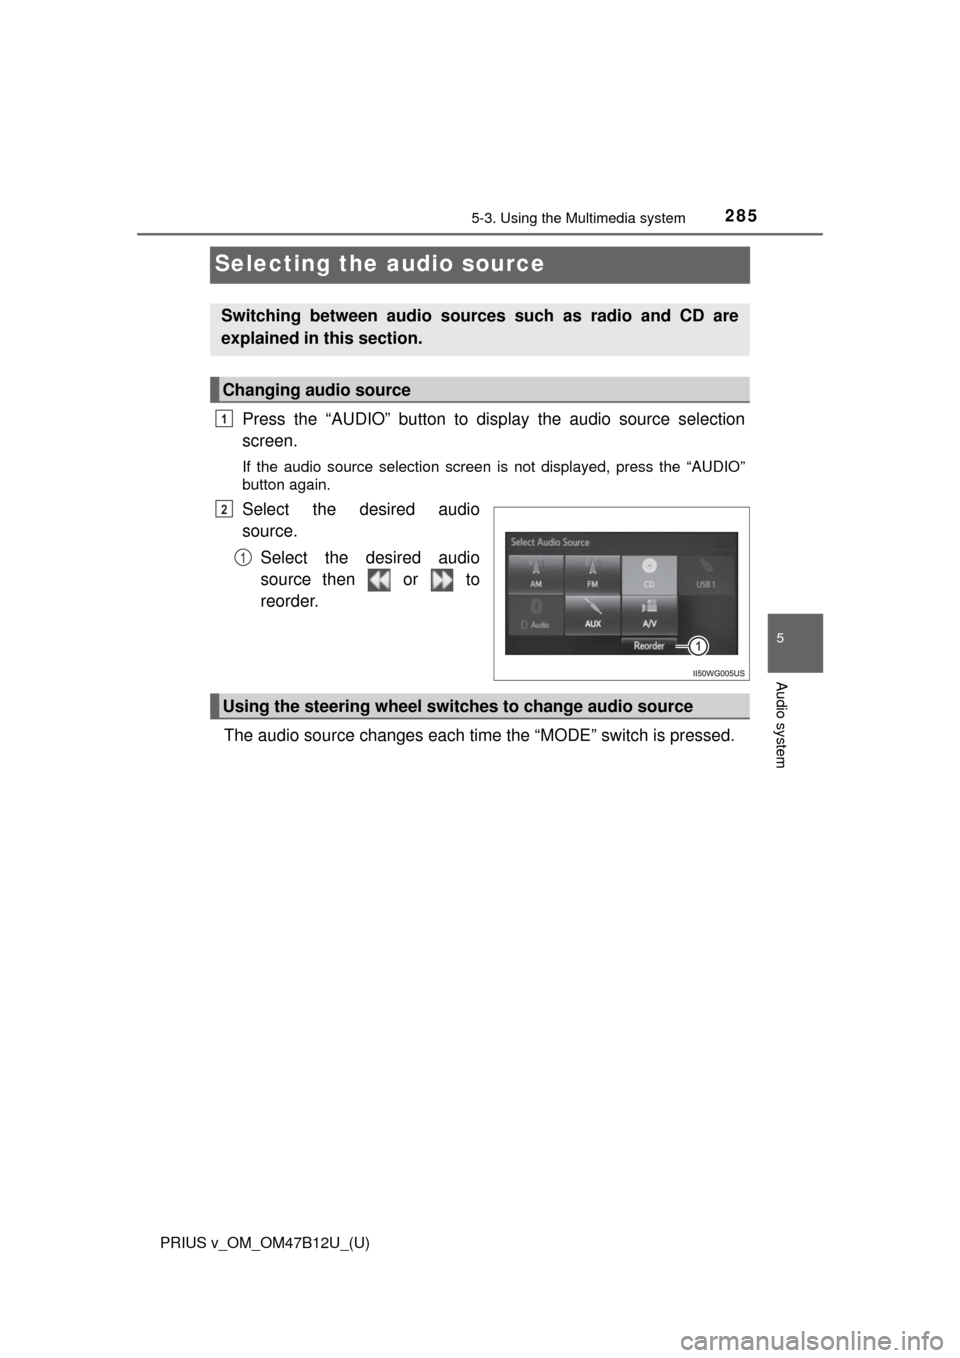
Press the “AUDIO” button to display the audio source selection
screen.
If the audio source selection screen is not displayed, press the “AUDIO”
button again.
Select the desired audio
source.
Select the desired audio
source then or to
reorder.
The audio source changes each time the “MODE” switch is pressed.
Switching between audio sources such as radio and CD are
explained in this section.
Changing audio source
1
2
1
Using the steering wheel switches to change audio source
Page 291 of 620
PRIUS v_OM_OM47B12U_(U)
2915-4. Using the radio
5
Audio system
Search for desired stations by turning the “TUNE SCROLL” knob or
pressing the “” or “” button on “SEEK/TRACK”.
Select “(add new)”.
To change the preset station to a different one, select and hold the preset
station.
Select “Yes”.
Select “OK” after setting the new preset station.
■Refreshing the station list
Select “Refresh” on the “Station List” screen.
To cancel the refresh, select “Cancel Refresh”.
■Reception sensitivity
●Maintaining perfect radio reception at all times is difficult due to the continu-
ally changing position of the antenna, differences in signal strength and sur-
rounding objects, such as trains, transmitters, etc.
●The radio antenna is mounted on the roof. The antenna can be removed
from the base by turning it.
Setting station presets
1
2
3
4
Page 300 of 620
3005-6. Using an external device
PRIUS v_OM_OM47B12U_(U)
■About iPod
●“Made for iPod” and “Made for iPhone” mean that an electronic accessory
has been designed to connect specifically to iPod or iPhone, respectively,
and has been certified by the developer to meet Apple performance stan-
dards.
●Apple is not responsible for the operation of this device or its compliance
with safety and regulatory standards. Please note that the use of this acces-
sory with iPod or iPhone may affect wireless performance.
●iPhone, iPod, iPod classic, iPod nano, and iPod touch are trademarks of
Apple Inc., registered in the U.S. and other countries. Lightning is a trade-
mark of Apple Inc.
■iPod cover art
●Depending on the iPod and songs in the iPod, iPod cover art may be dis-
played.
●This function can be changed to on/off. (P. 279)
●It may take time to display iPod cover art, and the iPod may not be operated
while the cover art display is in process.
●Only iPod cover art that is saved in JPEG format can be displayed.
■iPod functions
●When an iPod is connected and the audio source is changed to iPod mode,
the iPod will resume play from the same point in which it was last used.
●Depending on the iPod that is connected to the system, certain functions
may not be available. If a function is unavailable due to a malfunction (as
opposed to a system specification), disconnecting the device and recon-
necting it may resolve the problem.
●While connected to the system, the iPod cannot be operated with its own
controls. It is necessary to use the controls of the vehicle’s audio system
instead.
●When the battery level of an iPod is very low, the iPod may not operate. If
so, charge the iPod before use.
●Compatible models (P. 302)
Page 369 of 620
PRIUS v_OM_OM47B12U_(U)
3696-1. Using the air conditioning system and defogger
6
Interior features
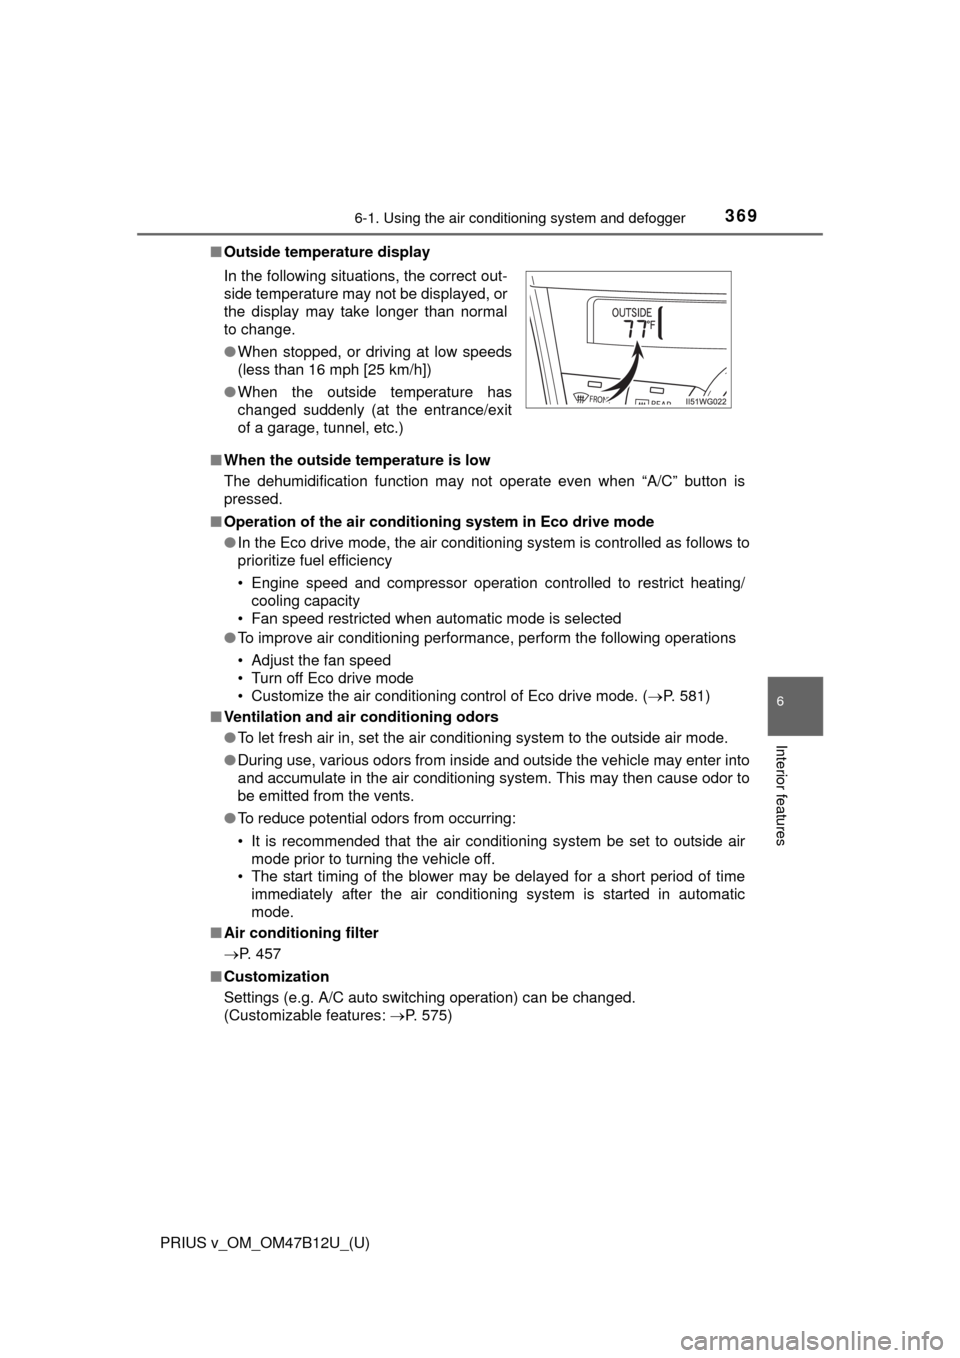
■Outside temperature display
■When the outside temperature is low
The dehumidification function may not operate even when “A/C” button is
pressed.
■Operation of the air conditioning system in Eco drive mode
●In the Eco drive mode, the air conditioning system is controlled as follows to
prioritize fuel efficiency
• Engine speed and compressor operation controlled to restrict heating/
cooling capacity
• Fan speed restricted when automatic mode is selected
●To improve air conditioning performance, perform the following operations
• Adjust the fan speed
• Turn off Eco drive mode
• Customize the air conditioning control of Eco drive mode. (P. 581)
■Ventilation and air conditioning odors
●To let fresh air in, set the air conditioning system to the outside air mode.
●During use, various odors from inside and outside the vehicle may enter into
and accumulate in the air conditioning system. This may then cause odor to
be emitted from the vents.
●To reduce potential odors from occurring:
• It is recommended that the air conditioning system be set to outside air
mode prior to turning the vehicle off.
• The start timing of the blower may be delayed for a short period of time
immediately after the air conditioning system is started in automatic
mode.
■Air conditioning filter
P. 457
■Customization
Settings (e.g. A/C auto switching operation) can be changed.
(Customizable features: P. 575) In the following situations, the correct out-
side temperature may not be displayed, or
the display may take longer than normal
to change.
●When stopped, or driving at low speeds
(less than 16 mph [25 km/h])
●When the outside temperature has
changed suddenly (at the entrance/exit
of a garage, tunnel, etc.)