Page 664 of 800
6648-2. Steps to take in an emergency
PRIUS_OM_OM47A29U_(U)
NOTICE
■To ensure the tire pressure warning system operates properly
Do not install tires with different specifications or makers, as the tire
pressure warning system may not operate properly.
Page 684 of 800

6848-2. Steps to take in an emergency
PRIUS_OM_OM47A29U_(U)
■The compact spare tire (if equipped)
●The compact spare tire is identified by the label “TEMPORARY USE
ONLY” on the tire sidewall.
Use the compact spare tire temporarily, and only in an emergency.
●Make sure to check the tire inflatio n pressure of the compact spare tire.
( P. 734)
■When using the compact spare tire (if equipped)
As the compact spare tire is not equipped with a tire pressure warning
valve and transmitter, lo w inflation pressure of the spare tire will not be
indicated by the tire pressure warning system. Also, if you replace the
compact spare tire after the tire pressure warning light comes on, the light
remains on.
■When the compact spare tire is equipped (if equipped)
The vehicle height may become lo wer when driving with the compact
spare tire compared to when driving with standard tires.
■If you have a flat front tire on a road covered with snow or ice (vehi-
cles with compact spare tire)
Install the compact spare tire on one of the rear wheels of the vehicle.
Perform the following steps and fit tire chains to the front tires:
Replace a rear tire with the compact spare tire.
Replace the flat front tire with the tire removed from the rear of the vehi-
cle.
Fit tire chains to the front tires.
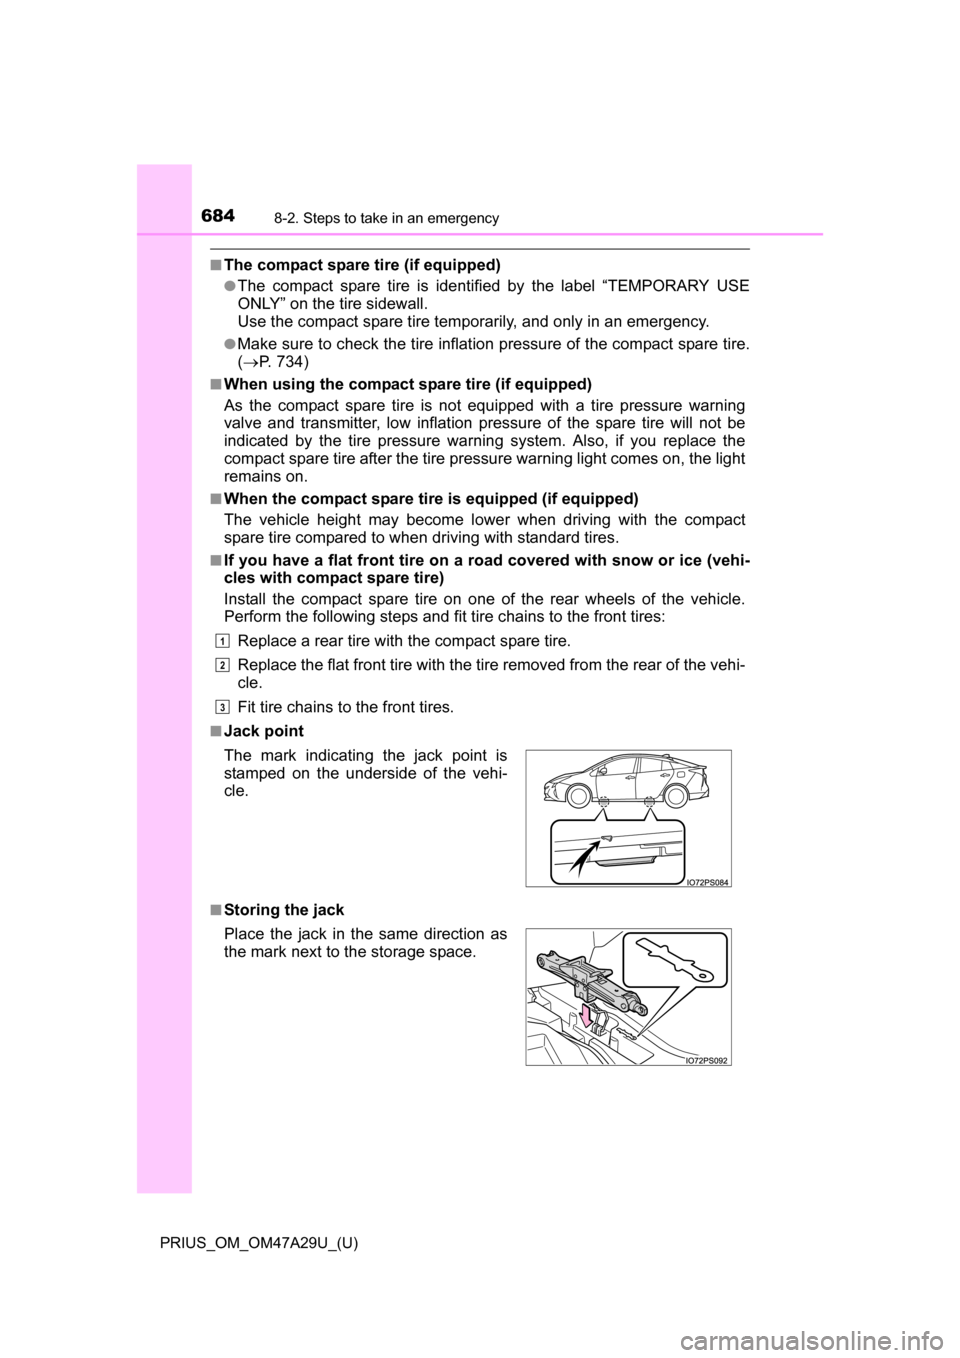
■Jack point
■Storing the jack The mark indicating the jack point is
stamped on the underside of the vehi-
cle.
Place the jack in the same direction as
the mark next to the storage space.
1
2
3
Page 686 of 800
6868-2. Steps to take in an emergency
PRIUS_OM_OM47A29U_(U)
NOTICE
■Be careful when driving over bumps with the compact spare tire
installed on the vehicle. (if equipped)
The vehicle height may become lower when driving with the compact
spare tire, compared to when driving with standard tires. Be careful
when driving over uneven road surfaces.
■Driving with tire chains and the compact spare tire (if equipped)
Do not fit tire chains to the compact spare tire.
Tire chains may damage the vehicle body and adversely affect driving
performance.
■When replacing the tires
When removing or fitting the wheels, tires or the tire pressure warning
valve and transmitter, contact your Toyota dealer as the tire pressure
warning valve and transmitter may be damaged if not handled correctly.
■Handling the decorative resin parts (for vehicles equipped with
17-inch tires)
P. 5 7 2
Page 688 of 800

6888-2. Steps to take in an emergency
PRIUS_OM_OM47A29U_(U)
●Stop the vehicle in a safe place on a hard, flat surface.
● Set the parking brake.
● Shift the shift position to P.
● Stop the hybrid system.
● Turn on the emergency flashers.
● Check the degree of the tire damage.
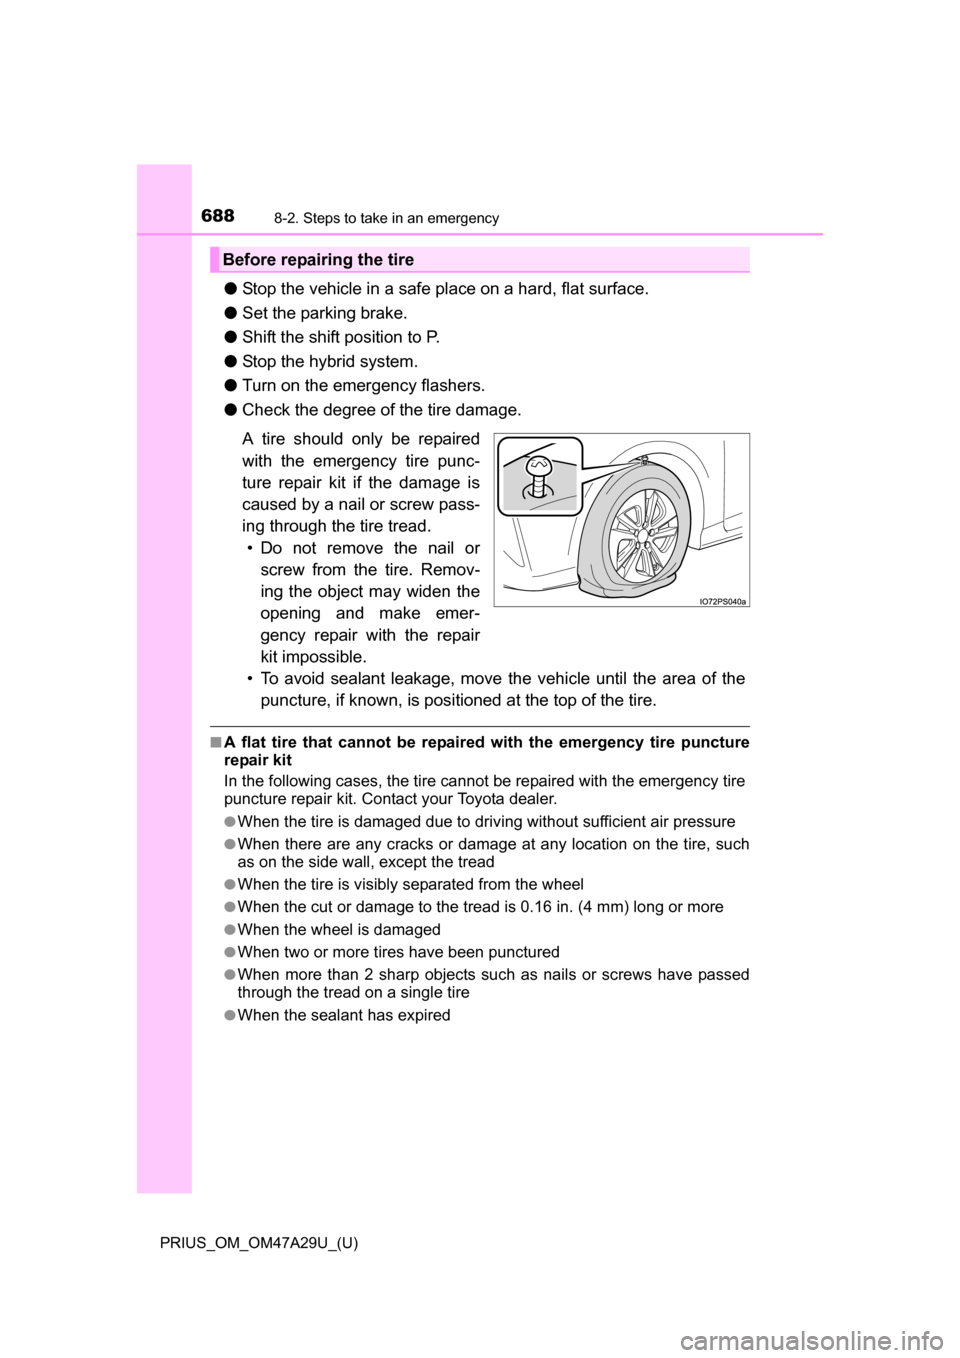
A tire should only be repaired
with the emergency tire punc-
ture repair kit if the damage is
caused by a nail or screw pass-
ing through the tire tread.
• Do not remove the nail or screw from the tire. Remov-
ing the object may widen the
opening and make emer-
gency repair with the repair
kit impossible.
• To avoid sealant leakage, move the vehicle until the area of the
puncture, if known, is positi oned at the top of the tire.
■A flat tire that cannot be repaired with the emergency tire puncture
repair kit
In the following cases, the tire cannot be repaired with the emergency tire
puncture repair kit. Contact your Toyota dealer.
●When the tire is damaged due to driv ing without sufficient air pressure
●When there are any cracks or damage at any location on the tire, such
as on the side wall, except the tread
●When the tire is visibly separated from the wheel
●When the cut or damage to the tread is 0.16 in. (4 mm) long or more
●When the wheel is damaged
●When two or more tires have been punctured
●When more than 2 sharp objects such as nails or screws have passed
through the tread on a single tire
●When the sealant has expired
Before repairing the tire
Page 690 of 800
6908-2. Steps to take in an emergency
PRIUS_OM_OM47A29U_(U)
Emergency tire puncture repair kit components
Hose
Air release cap
St i ck erPower plug
Air pressure gauge
Compressor switch1
2
3
4
5
6
Page 696 of 800
6968-2. Steps to take in an emergency
PRIUS_OM_OM47A29U_(U)
Check the specified tire inflation
pressure.
Tire inflation pressure is specified
on the label on the driver’s side
pillar as shown. (P. 734)
Start the hybrid system. ( P. 225)
To inject the sealant and inflate
the tire, turn the compressor
switch on.
11
12
13
Page 697 of 800

6978-2. Steps to take in an emergency
PRIUS_OM_OM47A29U_(U)
8
When trouble arises
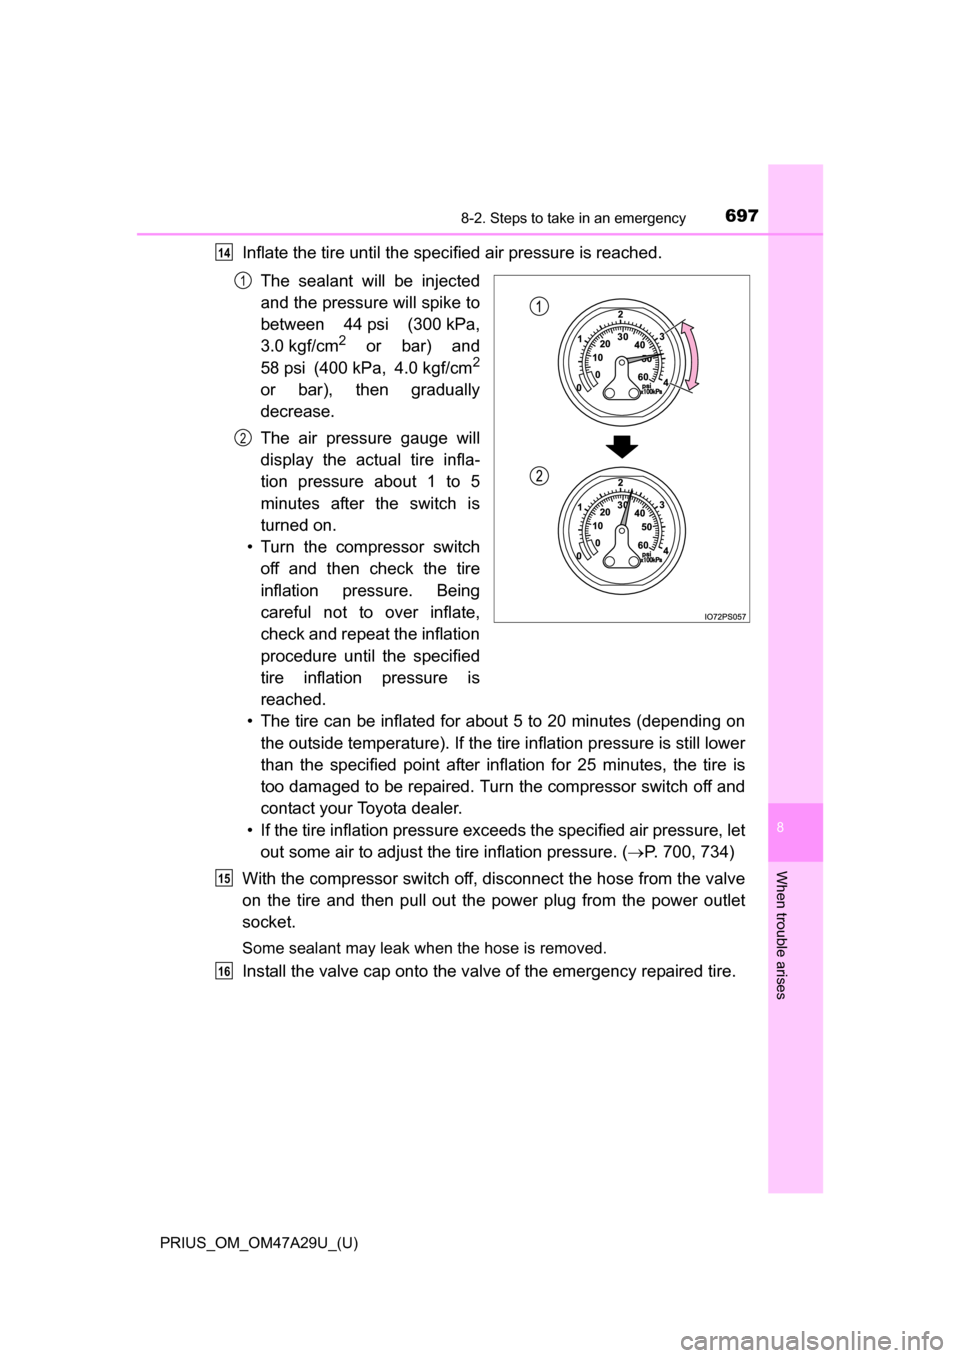
Inflate the tire until the specified air pressure is reached.The sealant will be injected
and the pressure will spike to
between 44 psi (300 kPa,
3.0 kgf/cm
2 or bar) and
58 psi (400 kPa, 4.0 kgf/cm2
or bar), then gradually
decrease.
The air pressure gauge will
display the actual tire infla-
tion pressure about 1 to 5
minutes after the switch is
turned on.
• Turn the compressor switch off and then check the tire
inflation pressure. Being
careful not to over inflate,
check and repeat the inflation
procedure until the specified
tire inflation pressure is
reached.
• The tire can be inflated for about 5 to 20 minutes (depending on the outside temperature). If the tire inflation pressure is still lower
than the specified point after inflation for 25 minutes, the tire is
too damaged to be repaired. Turn the compressor switch off and
contact your Toyota dealer.
• If the tire inflation pressure exce eds the specified air pressure, let
out some air to adjust the tire inflation pressure. ( P. 700, 734)
With the compressor switch off, disconnect the hose from the valve
on the tire and then pull out the power plug from the power outlet
socket.
Some sealant may leak when the hose is removed.
Install the valve cap onto the valve of the emergency repaired tire.
14
1
2
15
16
Page 698 of 800

6988-2. Steps to take in an emergency
PRIUS_OM_OM47A29U_(U)
Attach the air release cap to the
end of the hose.
If the air release cap is not
attached, the sealant may leak
and the vehicle may get dirty.
Temporarily store the bottle in the luggage compartment while it is
connected to the compressor.
To spread the liquid sealant evenly within the tire, immediately drive
safely for about 3 miles (5 km) below 50 mph (80 km/h).
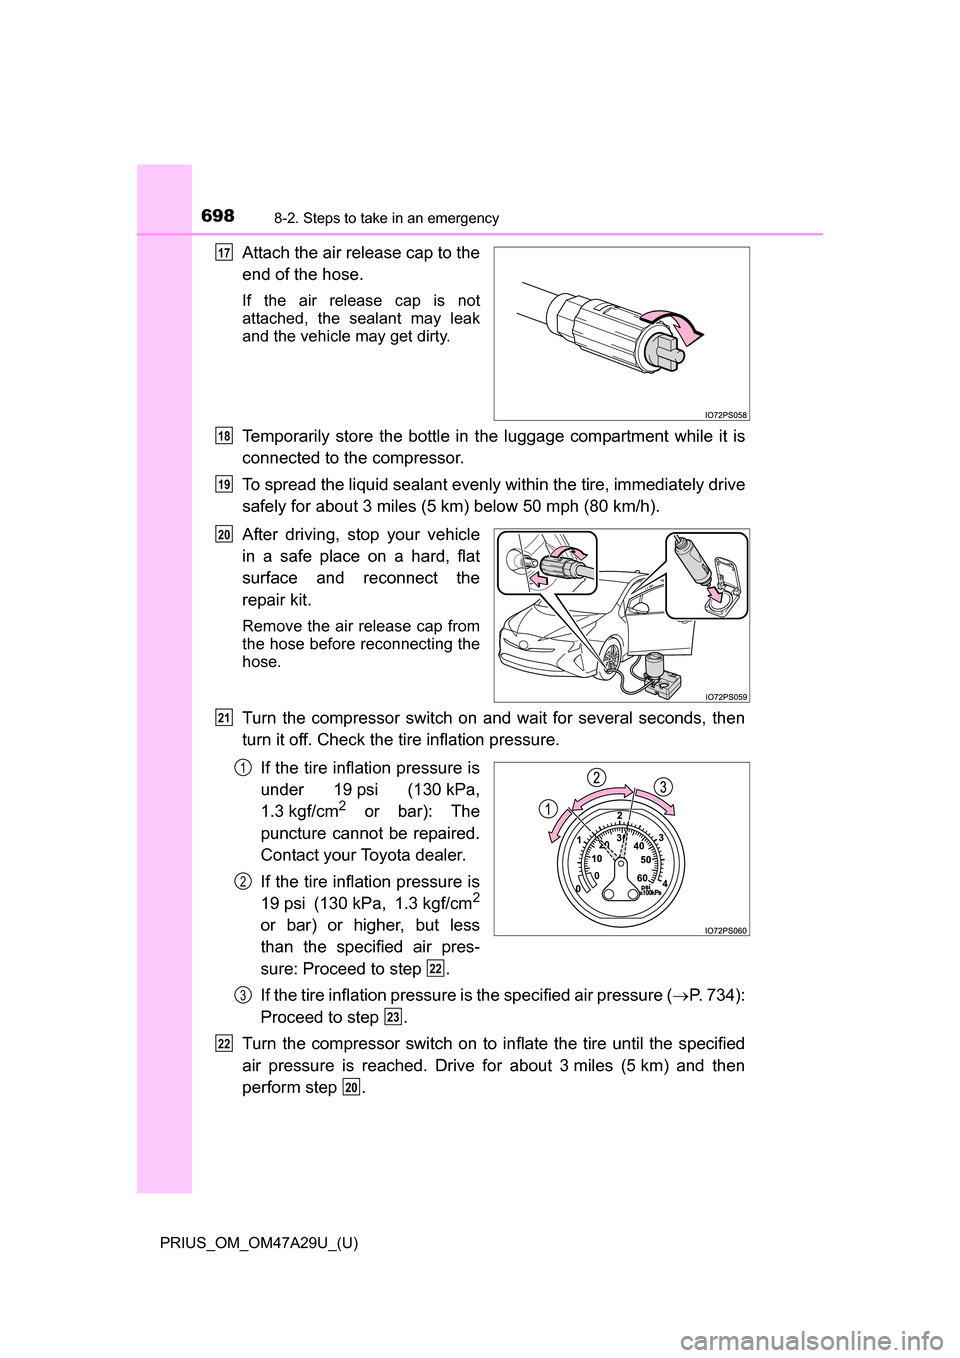
After driving, stop your vehicle
in a safe place on a hard, flat
surface and reconnect the
repair kit.
Remove the air release cap from
the hose before reconnecting the
hose.
Turn the compressor switch on and wait for several seconds, then
turn it off. Check the tire inflation pressure.If the tire inflation pressure is
under 19 psi (130 kPa,
1.3 kgf/cm
2 or bar): The
puncture cannot be repaired.
Contact your Toyota dealer.
If the tire inflation pressure is
19 psi (130 kPa, 1.3 kgf/cm
2
or bar) or higher, but less
than the specified air pres-
sure: Proceed to step .
If the tire inflation pressure is the specified air pressure ( P. 734):
Proceed to step .
Turn the compressor switch on to in flate the tire until the specified
air pressure is reached. Drive for about 3 miles (5 km) and then
perform step .
17
18
19
20
21
1
2
22
3
23
22
20