Page 665 of 800
665
PRIUS_OM_OM47A29U_(U)
8
When trouble arises
8-2. Steps to take in an emergency
If a war ning message is displayed
Master warning light
The master warning light also
comes on or flashes in order to
indicate that a message is cur-
rently being displayed on the multi-
information display.
*
Multi-information display
Handling method
Follow the instructions of the mes-
sage on the multi-information dis-
play.
If any of the warning messages are shown again after the following
actions have been performed, contact your Toyota dealer.
*: The master warning light may not come on or flash when a warning mes-
sage is displayed.
The multi-information display shows warnings of system mal-
functions, incorrectly performe d operations, and messages that
indicate a need for maintenance. When a message is shown,
perform the correction procedur e appropriate to the message.
1
2
3
Page 666 of 800
6668-2. Steps to take in an emergency
PRIUS_OM_OM47A29U_(U)
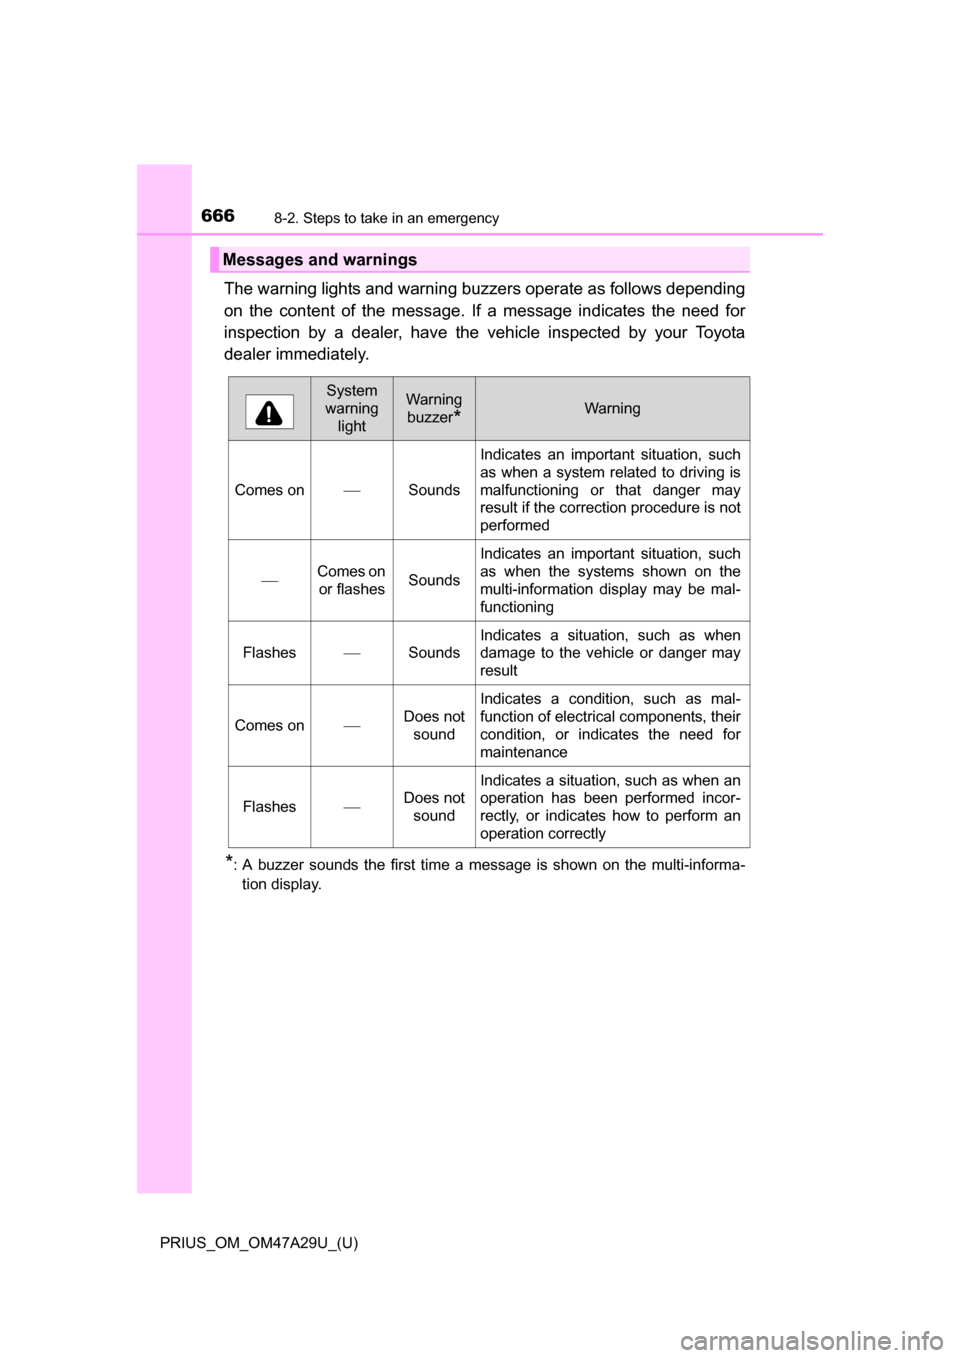
The warning lights and warning buzzers operate as follows depending
on the content of the message. If a message indicates the need for
inspection by a dealer, have the vehicle inspected by your Toyota
dealer immediately.
*: A buzzer sounds the first time a message is shown on the multi-informa-tion display.
Messages and warnings
System
warning lightWarning
buzzer
*Warning
Comes onSounds
Indicates an important situation, such
as when a system related to driving is
malfunctioning or that danger may
result if the correction procedure is not
performed
Comes on or flashesSounds
Indicates an important situation, such
as when the systems shown on the
multi-information display may be mal-
functioning
FlashesSounds
Indicates a situation, such as when
damage to the vehicle or danger may
result
Comes onDoes not sound
Indicates a condition, such as mal-
function of electrical components, their
condition, or indicates the need for
maintenance
FlashesDoes not
sound
Indicates a situation, such as when an
operation has been performed incor-
rectly, or indicates how to perform an
operation correctly
Page 667 of 800
6678-2. Steps to take in an emergency
PRIUS_OM_OM47A29U_(U)
8
When trouble arises
■Warning messages
The warning messages explained below may differ from the actual messages
according to operation conditions and vehicle specifications.
■ System warning lights
The master warning light does not come on or flash in the following cases.
Instead, a separate system warning light will come on along with a message
shown on the multi-information display.
●“Antilock Brake System Malfunction Visit Your Dealer”:
The ABS warning light comes on. ( P. 656)
● “Braking Power Low Visit Your Dealer”:
The brake system warning light (yellow) will come on. ( P. 655)
● Indicates that a door is not fully closed while the vehicle is stopped.:
The Open door warning light comes on. ( P. 657)
■ If “Visit Your Dealer” is shown
The system or part shown on the multi-information display is malfunctioning.
Have the vehicle inspected by your Toyota dealer.
■ If a message about an operation is shown
●If a message about an operation of the accelerator pedal or brake pedal is
shown
A warning message about an operation of the brake pedal may be shown
while the driving assist systems such as PCS (Pre-Collision System) (if
equipped) or the dynamic radar cruise control with full-speed range (if
equipped) is operating. If a warning message is shown, be sure to deceler-
ate the vehicle or follow an instruction shown on the multi-information dis-
play.
● A warning message is shown when Drive-Start Control, Brake Override Sys-
tem or Intelligent Clearance Sonar (if equipped) operates ( P. 209, 210,
352). Follow the instructions on the multi-information display.
● If a message about an operation of the power switch is shown
An instruction for operation of the power switch is shown when the incorrect
procedure for starting the hybrid system is performed or the power switch is
operated incorrectly. Follow the instructions shown on the multi-information
display to operate the power switch again.
● If a message about a shift operation is shown
To prevent the shift position from bei ng selected incorrectly or the vehicle
from moving unexpectedly, the shift position may be changed automatically
( P. 236) or operating the shift lever may be required. In this case, change
the shift position following the instructions on the multi-information display.
● If a message or image about an open/close state of a part or replenishment
of a consumable is shown
Confirm the part indicated by the multi-information display or a warning light,
and then perform the coping method such as closing the open door or
replenishing a consumable.
Page 671 of 800
6718-2. Steps to take in an emergency
PRIUS_OM_OM47A29U_(U)
8
When trouble arises
■If “Maintenance Required Soon” is displayed (U.S.A. only)
Indicates that all maintenance according to the driven distance on the mainte-
nance schedule
* should be performed soon.
Comes on approximately 4500 miles (7200 km) after the message has been
reset.
If necessary, perform maintenance. Please reset the message after the main-
tenance is performed. ( P. 579)
*: Refer to the separate “Scheduled Maintenance Guide” or “Owner’s Manual
Supplement” for the maintenance interval applicable to your vehicle.
■ If “Maintenance Required Visit Your Dealer” is displayed (U.S.A. only)
Indicates that all maintenance is required to correspond to the driven distance
on the maintenance schedule
*.
Comes on approximately 5000 miles (8000 km) after the message has been
reset. (The indicator will not work properly unless the message has been
reset.)
Perform the necessary maintenance. Please reset the message after the
maintenance is performed. ( P. 579)
*: Refer to the separate “Scheduled Maintenance Guide” or “Owner’s Manual
Supplement” for the maintenance interval applicable to your vehicle.
■ If the shift position cannot be change d or the power switch is turned to
ACCESSORY mode even if trying to turn the power switch off when a
warning message is shown
If the 12-volt battery is discharged or the shift control system is malfunction-
ing, the followings may occur.
● The shift position may not be changed to P.
When parking, stop the vehicle on level ground and apply the parking brake
firmly.
● The hybrid system may not start.
● The power switch may be turned to ACCESSORY mode even if trying to
turn the power switch off.
In this case, the power switch may be turned off after applying the parking
brake.
● The automatic P position selection function ( P. 237) may not operate.
Before turning the power switch off, be sure to press the P position switch
and check that the shift position is in P by the shift position indicator or P
position switch indicator.
■ Warning buzzer
P. 661
Page 673 of 800
673
PRIUS_OM_OM47A29U_(U)
8
When trouble arises
8-2. Steps to take in an emergency
If you have a flat tire (vehicles with spare
tire)
●Stop the vehicle in a safe place on a hard, flat surface.
● Set the parking brake.
● Shift the shift position to P.
● Stop the hybrid system.
● Turn on the emergency flashers. ( P. 646)
Your vehicle is equipped with a spare tire. The flat tire can be
replaced with the spare tire.
For details about tires: P. 6 0 5
WARNING
■If you have a flat tire
Do not continue driving with a flat tire.
Driving even a short distance with a fl at tire can damage the tire and the
wheel beyond repair, which could result in an accident.
Before jacking up the vehicle
Page 676 of 800
6768-2. Steps to take in an emergency
PRIUS_OM_OM47A29U_(U)
WARNING
■Using the tire jack
Observe the following precautions.
Improper use of the tire jack may cause the vehicle to suddenly fall off
the jack, leading to death or serious injury.
●Only use the tire jack that comes with this vehicle for replacing a flat
tire.
Do not use it on other vehicles, and do not use other tire jacks for
replacing tires on this vehicle.
●Do not raise the vehicle while someone is inside.
●Do not use the tire jack for any purpose other than replacing tires or
installing and removing tire chains.
●Do not put any part of your body und er the vehicle while it is supported
by the jack.
●Do not start the hybrid system or drive the vehicle while the vehicle is
supported by the jack.
●When raising the vehicle, do not put an object on or under the jack.
●Do not raise the vehicle to a height greater than that required to
replace the tire.
●Use a jack stand if it is necessary to get under the vehicle.
●When lowering the vehicle, make su re that there is no-one near the
vehicle. If there are people nearby, warn them vocally before lowering.
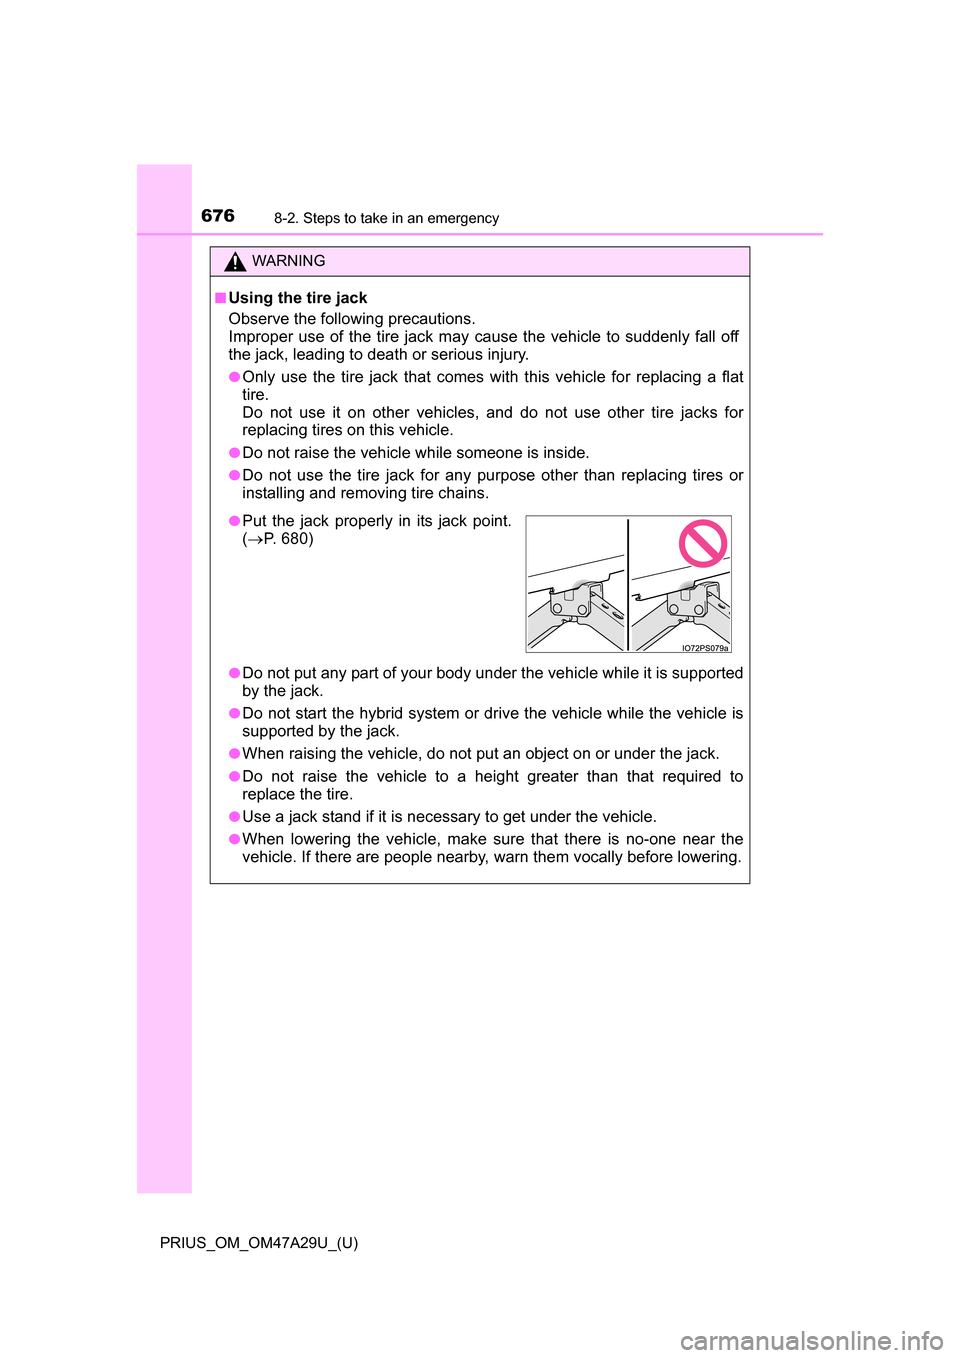
●Put the jack properly in its jack point.
( P. 680)
Page 678 of 800
6788-2. Steps to take in an emergency
PRIUS_OM_OM47A29U_(U)
Open and secure the deck board. (P. 677)
Remove the tray.
Vehicles with compact spare tire: If the luggage cover* is stowed,
remove both the tray and luggage cover.
*: Type A only ( P. 537)
Loosen the center fastener that
secures the spare tire.
Taking out the spare tire
1
2
Vehicles with compact spare
tireVehicles with full-size spare
tire
3
WARNING
■When storing the spare tire
Be careful not to catch fingers or other body parts between the spare
tire and the body of the vehicle.
Page 681 of 800
6818-2. Steps to take in an emergency
PRIUS_OM_OM47A29U_(U)
8
When trouble arises
WARNING
■Replacing a flat tire
●Do not touch the disc wheels or the area around the brakes immedi-
ately after the vehicle has been driven.
After the vehicle has been driven the disc wheels and the area around
the brakes will be extremely hot. Touc hing these areas with hands, feet
or other body parts while changing a tire, etc. may result in burns.
●Failure to follow these precautions could cause the wheel nuts to
loosen and the tire to fall off, resulting in death or serious injury.
• Have the wheel nuts tightened with a torque wrench to 76 ft•lbf (103 N•m, 10.5 kgf•m) as soon as possible after changing wheels.
• When installing a tire, only use wh eel nuts that have been specifi-
cally designed for that wheel.
• If there are any cracks or deforma tions in the bolt screws, nut
threads or bolt holes of the wheel, have the vehicle inspected by
your Toyota dealer.
• When installing the wheel nuts, be su re to install the wheel nuts with
the tapered ends facing inward. ( P. 619)