2016 TOYOTA HIGHLANDER warning
[x] Cancel search: warningPage 3 of 52

OVERVIEW
FEATURES/OPERATIONS
SAFETY AND EMERGENCY FEATURES
Engine maintenance 9
Fuel tank door release and cap 8
Hood release 8
Indicator symbols 5
Instrument cluster 4
Instrument panel 2-3
Keyless entry
1,2
6
Light control-Instrument cluster 9
Smart Key system
1,2
7
Air conditioning1,2/heating 29-30
Audio 28
Auto lock/unlock
1 11
Automatic High Beam (AHB) 18
Automatic transmission 10
Bluetooth
® Device Pairing Section 38-47
Clock 31
Cruise control 21
Door locks
1,2 10
Door-Power Liftgate (back door)1,2 13
Downhill assist control system (DAC) 32
Driver Easy Speak 27
Dynamic Radar Cruise Control
(DRCC) 19-21
Garage door opener (HomeLink
®)3
23
Lane Deparature Alert (LDA) 22-23
Lights
1,2 & turn signals1 17
Moon roof1 12
Multi-Information Display (MID)2 25
Panoramic moon roof 12
Parking brake 11
Power outlets-12V DC & 120V AC 16
Pre-Collision System (PCS) 24
Rear seat entertainment system 27
Seat adjustments-Front 14
Seat adjustments-Rear 15
Seat heaters/ventilators 31
Seats-Head restraints 15
Seats-Stowing & returning
third row seats 15
1
INDEX
OVERVIEW
SAFETY AND
EMERGENCY FEATURESFEATURES/OPERATIONS
FEATURES/OPERATIONS
1 Visit your Toyota dealer for information on customizing this feature.2 Programmable by customer. Refer to the Owner’s Manual for instructions and more information.3 HomeLink® is a registered trademark of Gentex Corporation.
Doors-Child safety locks 34
Floor mat installation 37
Seat belts
1 33
Seat belts-Shoulder belt anchor 34
Spare tire & tools 35
Star Safety System
TM 36-37
Third row center seat belt 34
Tire Pressure Monitoring
(warning) System 33
Steering lock release 11
Steering wheel switches and
telephone controls (Bluetooth
®) 26
Snow mode button 32
Tilt and telescopic steering wheel 14
USB/AUX port 27
Vehicle Stability Control (VSC)/
TRAC OFF switch 32
Windows-Power
1 26
Windshield wipers & washers1 16
Page 6 of 52

4
OVERVIEW
Indicator symbols Instrument cluster
2 If equipped1 If indicator does not turn off within a few seconds of starting engine, there may be a
malfunction. Have vehicle inspected by your Toyota dealer.
For details, refer to “Indicators and warning lights,” Section 2, 2016 Owner’s
Manual .Type 1
Type 2
Odometer
Shift position and shift range
Meter panel lights control button
Engine coolant temperature gauge
Service indicators and reminders
Tachometer
Multi-Information Display (MID)
Speedometer
Fuel gauge
Trip meter reset knob
Outside temperature
134236_QRG_Highlander_GUTS-R2.indd 412/17/15 2:54 PM
Page 7 of 52

OVERVIEW
FEATURES/OPERATIONS
SAFETY AND EMERGENCY FEATURES
5
Indicator symbols
Charging system warning1,2
Brake system warning1
2 If equipped
Anti-lock Brake System warning1
Headlight low/high beam indicator Turn signal indicator
Vehicle Stability Control
OFF indicator1
SNOW mode indicator
Cruise control/Cruise control “SET” indicator2
Tire Pressure Warning1
Open door warning2
Airbag SRS warning1
Master warning1
Driver seat belt reminder
(alarm will sound if speed is over 12 mph)
Low engine oil pressure warning1,2
Malfunction/Check Engine
indicator1
Pre-collison warning
system indicator1
Low fuel level warning
Electric power steering
system warning1
Arrow direction indicates fuel
tank door position Blind Spot Monitor (BSM) outside
rear view indicator
2
Front fog light indicator2
Downhill Assist Control indicator2
Slip indicator1
For details, refer to “Indicators and warning lights,” Section 2, 2016 Owner’s
Manual.
Automatic High Beam (AHB) indicator2
Lane Departure Alert (LDA) indicator2
Intuitive parking assist indicator2
All-wheel drive lock indicator1,2
Security indicator1
Eco driving indicator1
Air Bag ON/OFF indicator1
Page 22 of 52

20
FEATURES/OPERATIONS
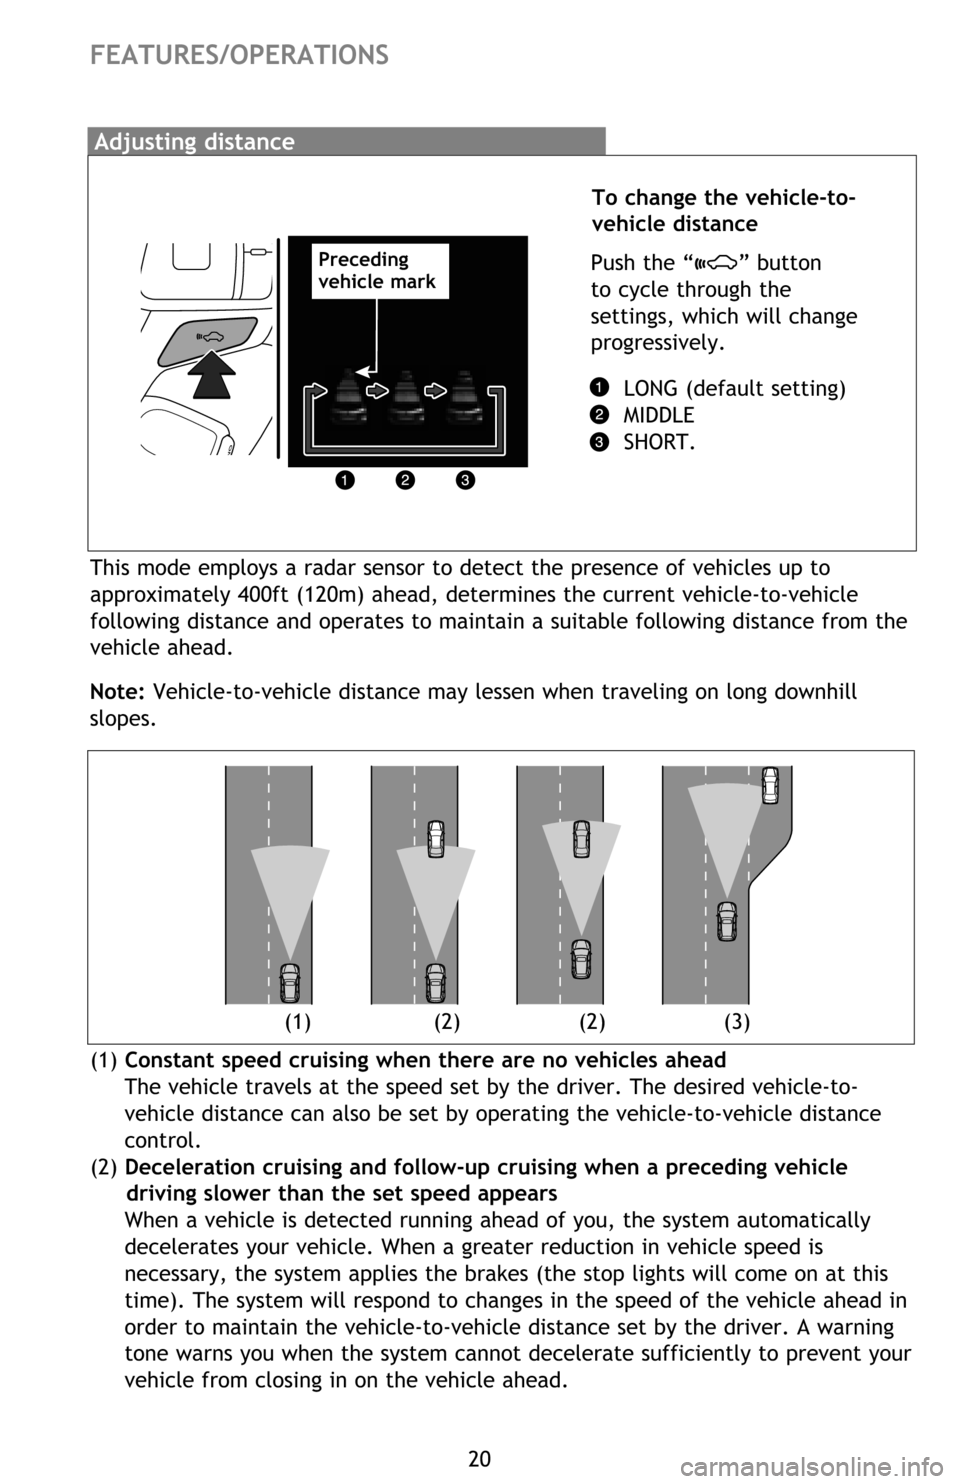
Adjusting distance
To change the vehicle-to-
vehicle distance
Push the “
” button
to cycle through the
settings, which will change
progressively.
LONG (default setting)
MIDDLE
SHORT.
This mode employs a radar sensor to detect the presence of vehicles up to
approximately 400ft (120m) ahead, determines the current vehicle-to-vehicle
following distance and operates to maintain a suitable following distance from the
vehicle ahead.
(1) Constant speed cruising when there are no vehicles ahead
The vehicle travels at the speed set by the driver. The desired vehicle-to-
vehicle distance can also be set by operating the vehicle-to-vehicle distance
control.
(2) Deceleration cruising and follow-up cruising when a preceding vehicle
driving slower than the set speed appears
When a vehicle is detected running ahead of you, the system automatically
decelerates your vehicle. When a greater reduction in vehicle speed is
necessary, the system applies the brakes (the stop lights will come on at this
time). The system will respond to changes in the speed of the vehicle ahead in
order to maintain the vehicle-to-vehicle distance set by the driver. A warning
tone warns you when the system cannot decelerate sufficiently to prevent your
vehicle from closing in on the vehicle ahead. Note: Vehicle-to-vehicle distance may lessen when traveling on long downhill
slopes.
(1) (2) (2) (3)
Preceding
vehicle mark
Page 24 of 52

22
FEATURES/OPERATIONS
Lane Departure Alert (LDA)
(if equipped)
The Lane Departure Alert system recognizes visible white or yellow lane markers
via a camera sensor. The system alerts the driver with a warning buzzer sound
and message in the Multi-Information Display (MID) when it detects the vehicle
deviating from or swaying multiple times within its lane.
Press the LDA switch to turn the LDA system on. Depress again to turn it off.
Note: The system will continue in the last state it was in (ON or OFF)
when the engine is started again.
Turning on the LDA system
MonochromeColor display
Functions
MonochromeColor display
LDA function display
Lane
Page 26 of 52

24
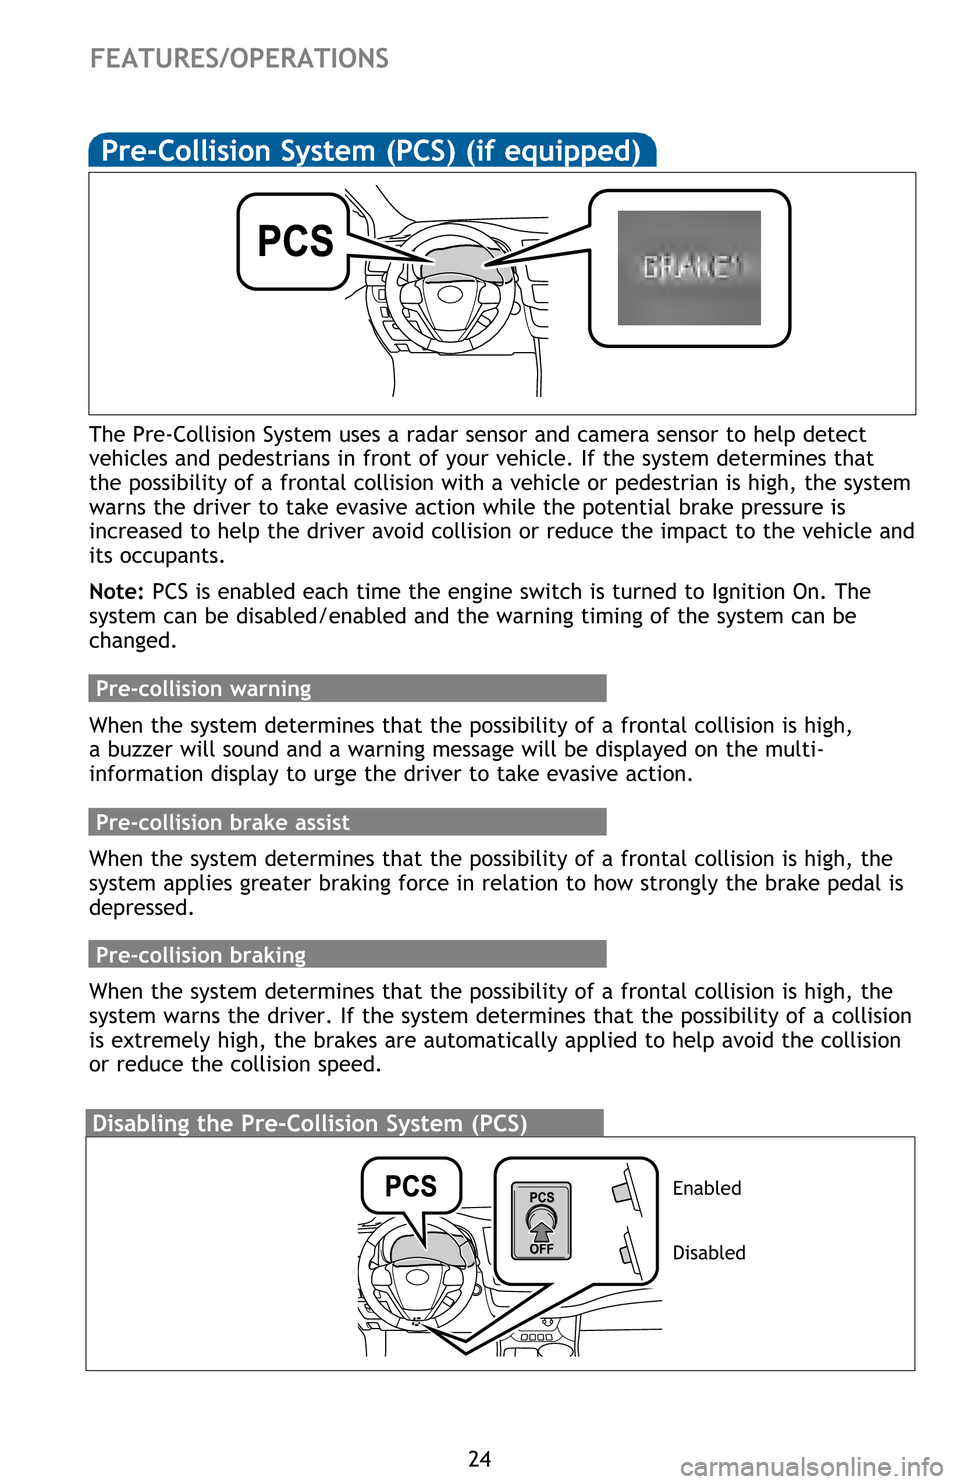
Pre-Collision System (PCS) (if equipped)
The Pre-Collision System uses a radar sensor and camera sensor to help detect
vehicles and pedestrians in front of your vehicle. If the system determines that
the possibility of a frontal collision with a vehicle or pedestrian is high, the system
warns the driver to take evasive action while the potential brake pressure is
increased to help the driver avoid collision or reduce the impact to the vehicle and
its occupants.
Note: PCS is enabled each time the engine switch is turned to Ignition On. The
system can be disabled/enabled and the warning timing of the system can be
changed.
Pre-collision warning
When the system determines that the possibility of a frontal collision is high,
a buzzer will sound and a warning message will be displayed on the multi-
information display to urge the driver to take evasive action.
Pre-collision brake assist
When the system determines that the possibility of a frontal collision is high, the
system applies greater braking force in relation to how strongly the brake pedal is
depressed.
Pre-collision braking
When the system determines that the possibility of a frontal collision is high, the
system warns the driver. If the system determines that the possibility of a collision
is extremely high, the brakes are automatically applied to help avoid the collision
or reduce the collision speed.
Disabling the Pre-Collision System (PCS)
Enabled
Disabled
FEATURES/OPERATIONS
Page 27 of 52

25
OVERVIEW
FEATURES/OPERATIONS
SAFETY AND EMERGENCY FEATURES
Multi-Information Display (MID)
Type 1 (3.5” monochrome display)
Push “DISP” to change information in the following:
(1) Current fuel consumption
(2) Driving range
(3) Average fuel economy after refill
(4) Distance driven since last reset
(6) Eco driving indicator
Type 2 (4.2” color display)
Push “meter control switches” to change information in the following:
(1) Drive information
(2) Navigation system linked display
(3) Audio system linked display
(4) Dynamic Radar Cruise Control (DRCC)
(5) Lane Departure Alert (LDA) status
(6) Warning messages
(7) Settings display
Page 35 of 52

33
OVERVIEW
FEATURES/OPERATIONS
SAFETY AND EMERGENCY FEATURES
SAFETY AND EMERGENCY FEATURES
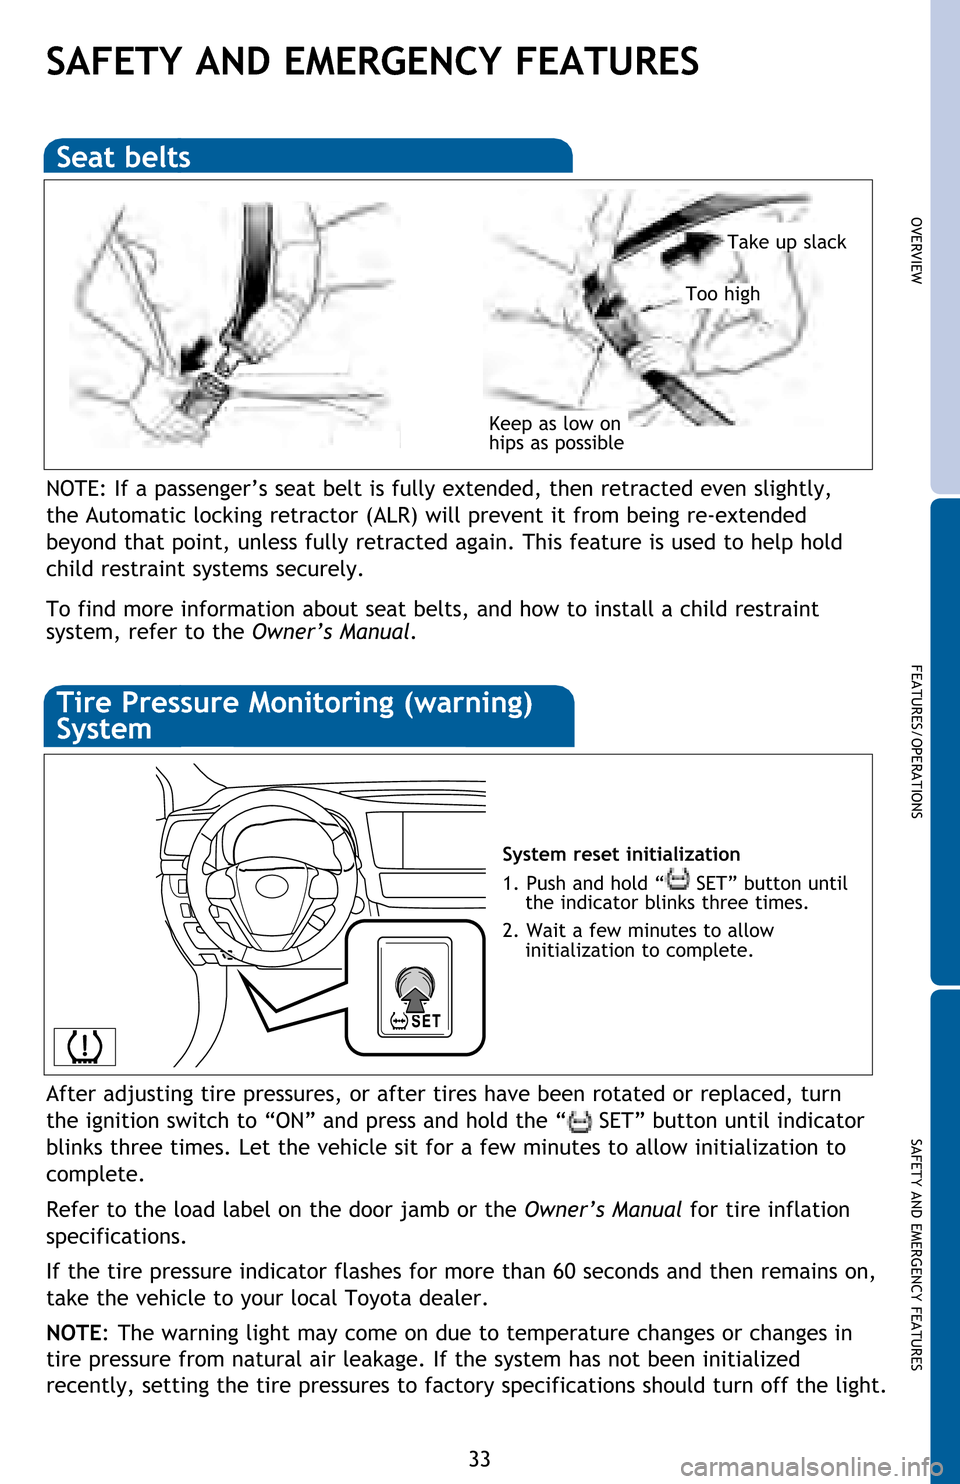
Keep as low on
hips as possible
Take up slack
Too high
Seat belts
System reset initialization
1. Push and hold “
SET” button until
the indicator blinks three times.
2. Wait a few minutes to allow
initialization to complete.
Tire Pressure Monitoring (warning)
System
After adjusting tire pressures, or after tires have been rotated or replaced, turn
the ignition switch to “ON” and press and hold the “
SET” button until indicator
blinks three times. Let the vehicle sit for a few minutes to allow initialization to
complete.
Refer to the load label on the door jamb or the Owner’s Manual for tire inflation
specifications.
If the tire pressure indicator flashes for more than 60 seconds and then remains on,
take the vehicle to your local Toyota dealer.
NOTE: The warning light may come on due to temperature changes or changes in
tire pressure from natural air leakage. If the system has not been initialized
recently, setting the tire pressures to factory specifications should turn off the light.
NOTE: If a passenger’s seat belt is fully extended, then retracted even slightly,
the Automatic locking retractor (ALR) will prevent it from being re-extended
beyond that point, unless fully retracted again. This feature is used to help hold
child restraint systems securely.
To find more information about seat belts, and how to install a child restraint
system, refer to the Owner’s Manual.