2016 TOYOTA COROLLA CD player
[x] Cancel search: CD playerPage 13 of 294

13
1. BASIC FUNCTION
QUICK GUIDE
COROLLA_14CY_Navi_U
1No.FunctionPage
By touching the screen with your finger, you can control the selected
functions.34
Insert a disc into this slot. The CD player turns on immediately.74
Press to access the Bluetooth® hands-free system.157, 263
Turn the tune/scroll knob to select a radio station or skip to the next or
previous track.95
Press the “ ” or “ ” button to seek up or down for a radio station or to
access a desired track or file.77, 88, 95,
98, 102, 107
Press to play/pause.
77, 88, 95, 98, 102,
107, 113
MAP card slot
Do not eject the SD card, as doing so may deactivate the navigation
system.
197
Press to display the home screen.16, 36
Press to display the “Apps” screen.14
Press to access the audio system. The audio system turns on in the
last mode used.70, 73, 73
Press the “PWR/VOL” knob to turn the system on and off, and turn it
to adjust the volume.73
Press to eject a disc.74
Page 31 of 294

2
31
COROLLA_14CY_Navi_U
3
4
5
6
7
8
9
1
2
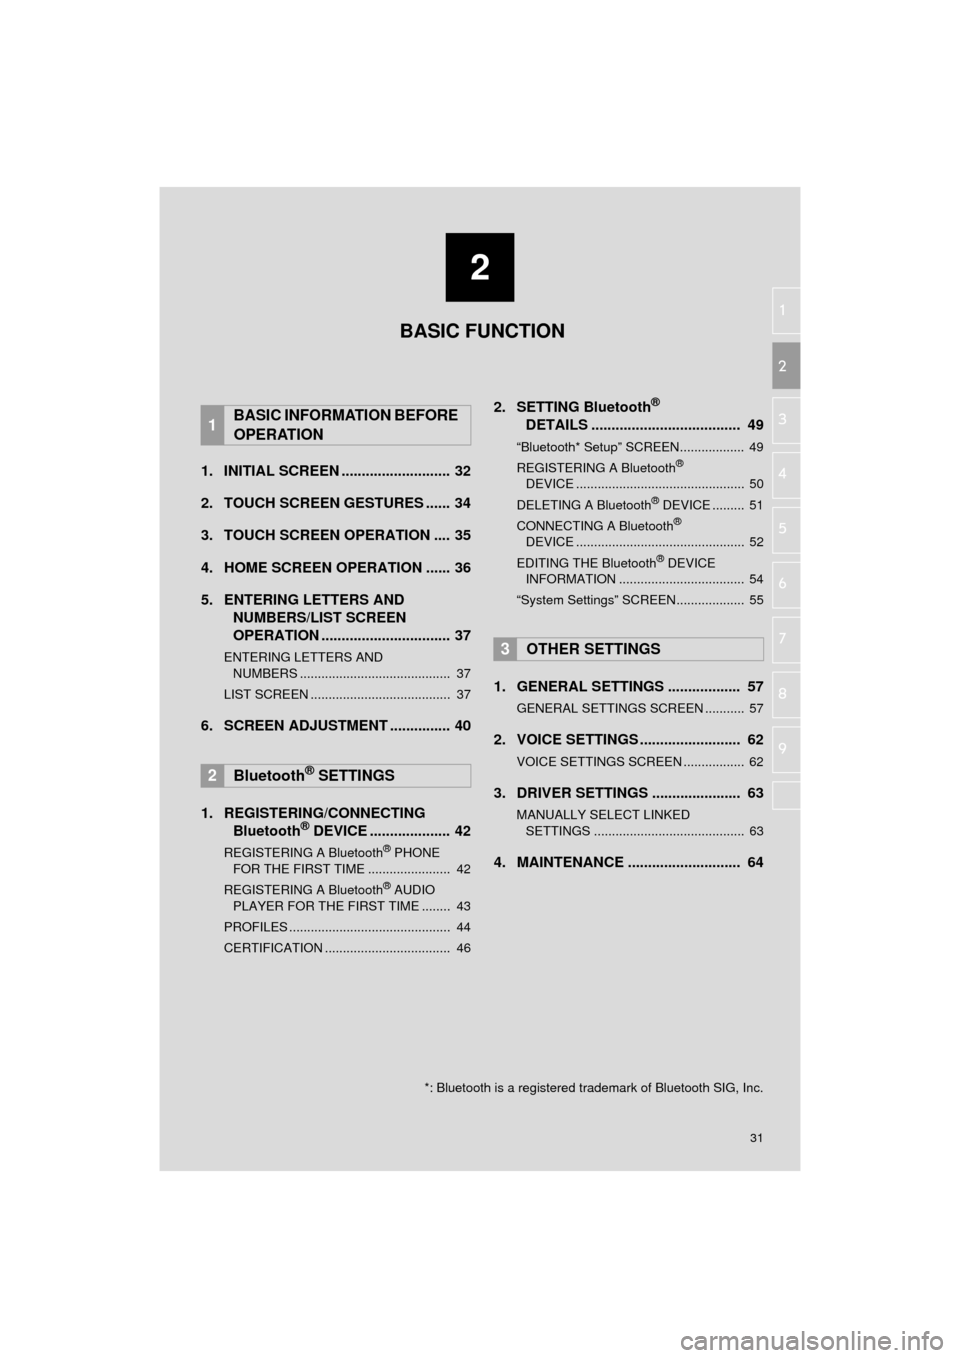
1. INITIAL SCREEN ........................... 32
2. TOUCH SCREEN GESTURES ...... 34
3. TOUCH SCREEN OPERATION .... 35
4. HOME SCREEN OPERATION ...... 36
5. ENTERING LETTERS AND NUMBERS/LIST SCREEN
OPERATION ................................ 37
ENTERING LETTERS AND
NUMBERS .......................................... 37
LIST SCREEN ....................................... 37
6. SCREEN ADJUSTMENT ............... 40
1. REGISTERING/CONNECTING Bluetooth
® DEVICE .................... 42
REGISTERING A Bluetooth® PHONE
FOR THE FIRST TIME ....................... 42
REGISTERING A Bluetooth
® AUDIO
PLAYER FOR THE FIRST TIME ........ 43
PROFILES ............................................. 44
CERTIFICATION ................................... 46
2. SETTING Bluetooth®
DETAILS ..................................... 49
“Bluetooth* Setup” SCREEN.................. 49
REGISTERING A Bluetooth®
DEVICE ............................................... 50
DELETING A Bluetooth
® DEVICE ......... 51
CONNECTING A Bluetooth®
DEVICE ............................................... 52
EDITING THE Bluetooth
® DEVICE
INFORMATION ................................... 54
“System Settings” SCREEN................... 55
1. GENERAL SETTINGS .................. 57
GENERAL SETTINGS SCREEN ........... 57
2. VOICE SETTINGS ......................... 62
VOICE SETTINGS SCREEN ................. 62
3. DRIVER SETTINGS ...................... 63
MANUALLY SELECT LINKED SETTINGS .......................................... 63
4. MAINTENANCE ............................ 64
1BASIC INFORMATION BEFORE
OPERATION
2Bluetooth® SETTINGS
3OTHER SETTINGS
BASIC FUNCTION
*: Bluetooth is a registered trademark of Bluetooth SIG, Inc.
Page 43 of 294

43
2. Bluetooth® SETTINGS
COROLLA_14CY_Navi_U
BASIC FUNCTION
2
7Check that the screen is displayed
when registration is complete.
The system waits for connection requests
coming from the registered device.
At this stage, the Bluetooth
® functions are
not yet available.
8Select “OK” when the connection sta-
tus changes from “Connecting...” to
“Connected”.
If an error message is displayed, follow
the guidance on the screen to try again.1Turn the Bluetooth® connection setting
of your audio player on.
This function is not available when the
Bluetooth® connection setting of your
audio player is set to off.
2Press the “AUDIO” button.
3Select “Source” on the audio screen
or press “AUDIO” button again.
4Select “ Audio” .
5Select “Yes” to register an audio play-
er.
6Follow the steps in “REGISTERING A
Bluetooth
® DEVICE” from “STEP 2”.
(P.50)
REGISTERING A Bluetooth®
AUDIO PLAYER FOR THE
FIRST TIME
To use the Bluetooth® Audio, it is nec-
essary to register an audio player with
the system.
Once the player has been registered, it
is possible to use the Bluetooth
® Au-
dio.
This operation cannot be performed
while driving.
For details about registering a
Bluetooth
® device: P.50
Page 44 of 294

44
2. Bluetooth® SETTINGS
COROLLA_14CY_Navi_U
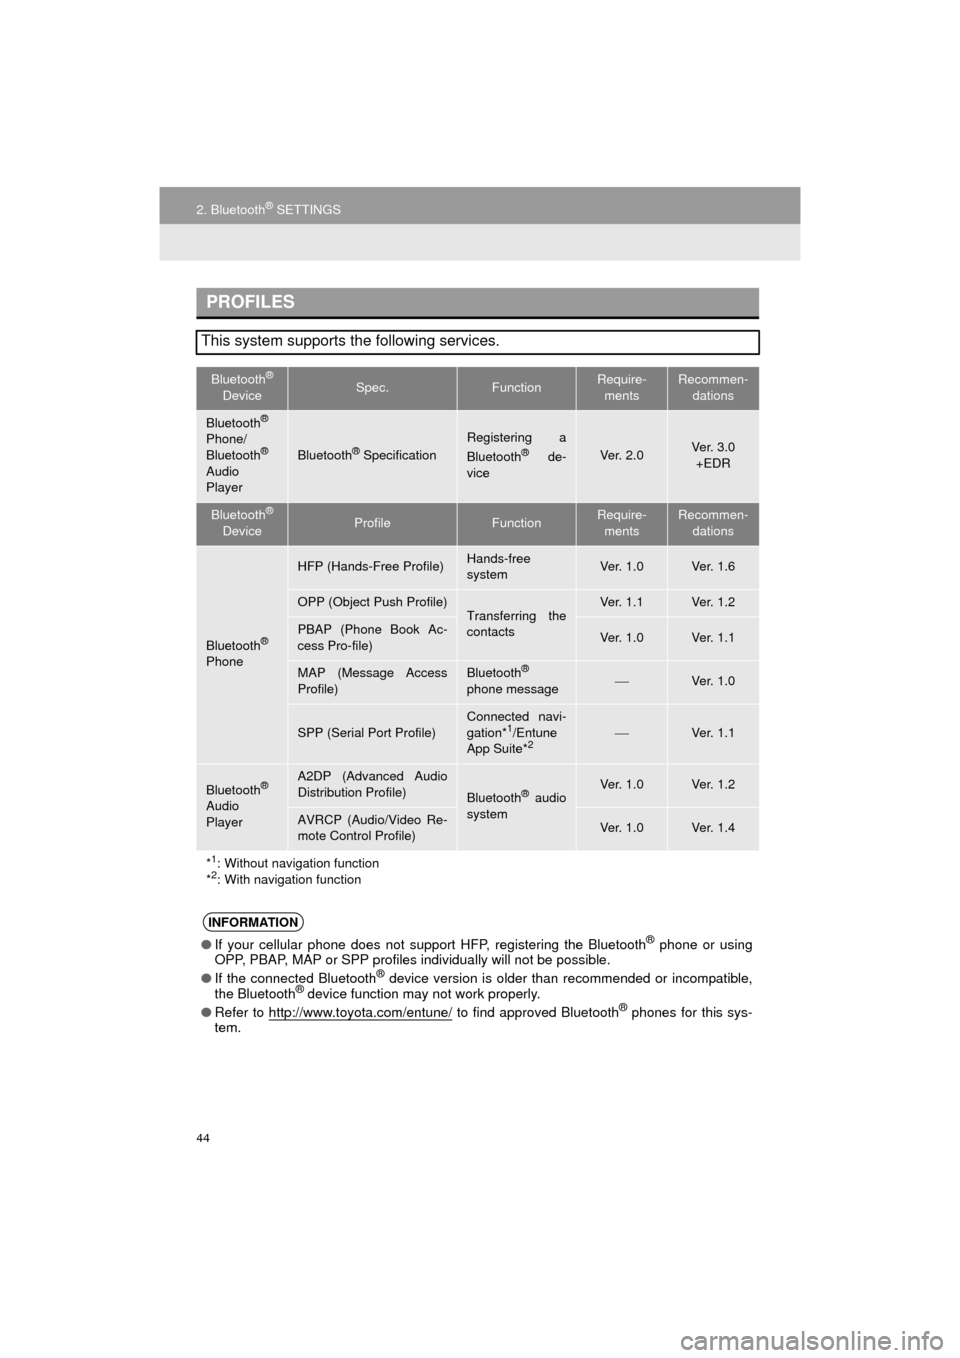
PROFILES
This system supports the following services.
Bluetooth®
DeviceSpec.FunctionRequire- mentsRecommen- dations
Bluetooth®
Phone/
Bluetooth®
Audio
Player
Bluetooth® Specification
Registering a
Bluetooth® de-
viceVe r. 2 . 0Ve r. 3 . 0 +EDR
Bluetooth®
DeviceProfileFunctionRequire- mentsRecommen- dations
Bluetooth®
Phone
HFP (Hands-Free Profile)Hands-free
systemVe r. 1 . 0Ve r. 1 . 6
OPP (Object Push Profile)Transferring the
contactsVe r. 1 . 1Ve r. 1 . 2
PBAP (Phone Book Ac-
cess Pro-file)Ve r. 1 . 0Ve r. 1 . 1
MAP (Message Access
Profile)Bluetooth®
phone messageVe r. 1 . 0
SPP (Serial Port Profile)
Connected navi-
gation*1/Entune
App Suite*2Ve r. 1 . 1
Bluetooth®
Audio
Player
A2DP (Advanced Audio
Distribution Profile)
Bluetooth® audio
systemVe r. 1 . 0Ve r. 1 . 2
AVRCP (Audio/Video Re-
mote Control Profile)Ve r. 1 . 0Ve r. 1 . 4
*
1: Without navigation function
*2: With navigation function
INFORMATION
● If your cellular phone does not support HFP, registering the Bluetooth® phone or using
OPP, PBAP, MAP or SPP profiles in dividually will not be possible.
● If the connected Bluetooth
® device version is older than recommended or incompatible,
the Bluetooth® device function may not work properly.
● Refer to http://www.toyota.com/entune/
to find approved Bluetooth® phones for this sys-
tem.
Page 50 of 294

50
2. Bluetooth® SETTINGS
COROLLA_14CY_Navi_U
From the phone/message settings
screen
1Press the “APPS” button.
2Select “Setup” .
3Select “Phone” .
4Select “Connect Phone” .
From the status display
1Select status display area on the
screen.
1Display the “Bluetooth* Setup” screen.
(P.49)
2Select “Add”.
When another Bluetooth
® device is con-
nected
To disconnect the Bluetooth® device,
select “Yes”.
When 5 Bluetooth® devices have al-
ready been registered
A registered device needs to be replaced.
Select “Yes”, and select the device to be
replaced.
3When this screen is displayed, search
for the device name displayed on this
screen on the screen of your
Bluetooth
® device.
*: Bluetooth is a registered trademark of Bluetooth SIG, Inc.
DISPLAYING THE “Bluetooth*
Setup” SCREEN IN A
DIFFERENT WAY REGISTERING A Bluetooth®
DEVICE
Up to 5 Bluetooth® devices can be reg-
istered.
Bluetooth
® compatible phones (HFP)
and audio players (AVP) can be regis-
tered simultaneously.
This operation cannot be performed
while driving.
Page 52 of 294

52
2. Bluetooth® SETTINGS
COROLLA_14CY_Navi_U
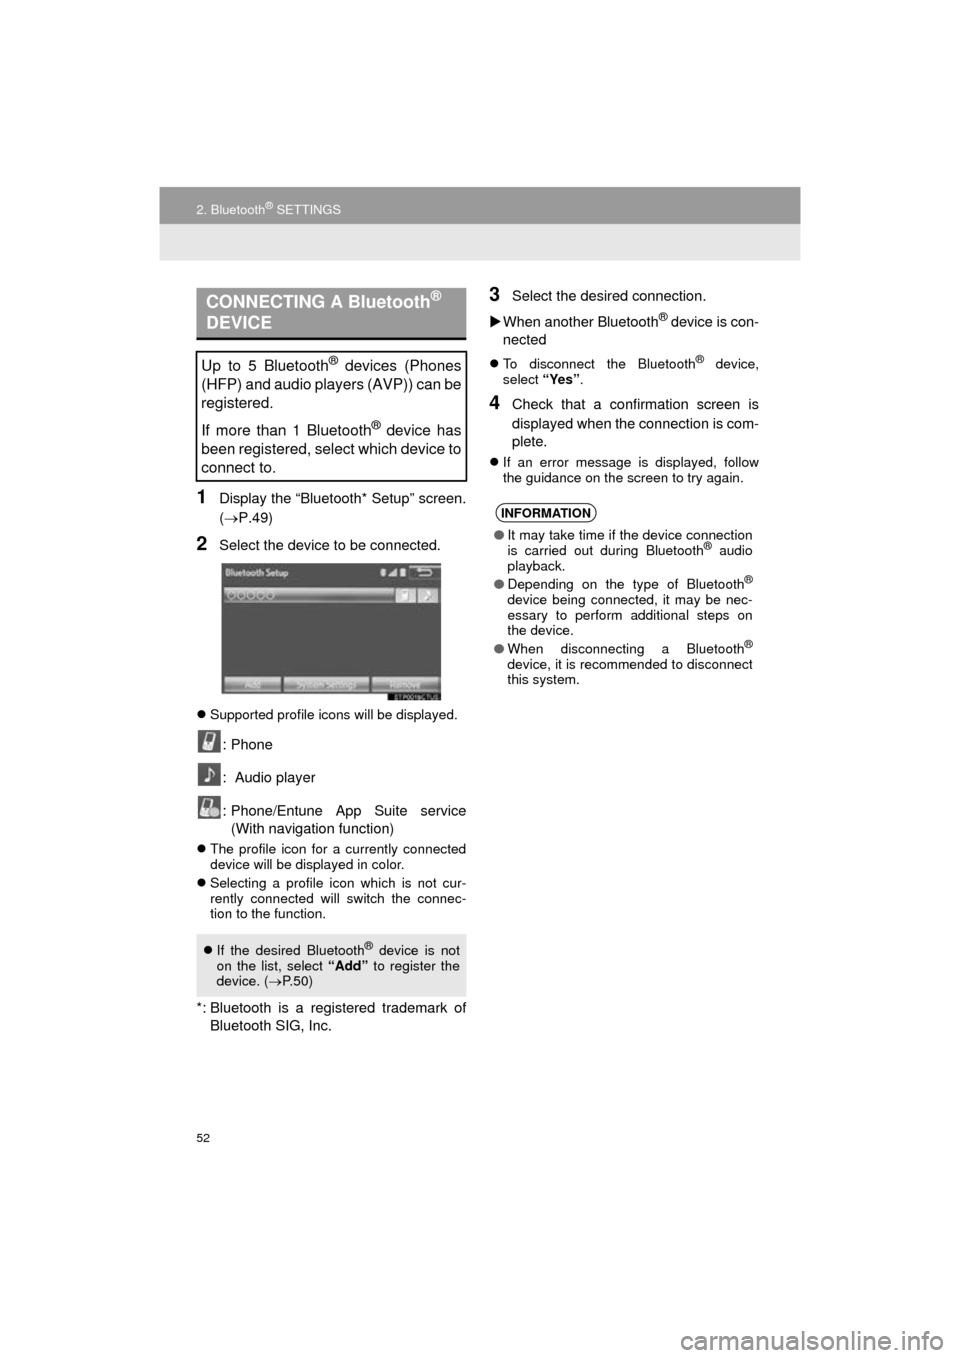
1Display the “Bluetooth* Setup” screen.
(P.49)
2Select the device to be connected.
Supported profile icons will be displayed.
: Phone
: Audio player
: Phone/Entune App Suite service
(With navigation function)
The profile icon for a currently connected
device will be displayed in color.
Selecting a profile icon which is not cur-
rently connected will switch the connec-
tion to the function.
*: Bluetooth is a regi stered trademark of
Bluetooth SIG, Inc.
3Select the desired connection.
When another Bluetooth
® device is con-
nected
To disconnect the Bluetooth® device,
select “Yes”.
4Check that a confirmation screen is
displayed when the connection is com-
plete.
If an error message is displayed, follow
the guidance on the screen to try again.
CONNECTING A Bluetooth®
DEVICE
Up to 5 Bluetooth® devices (Phones
(HFP) and audio players (AVP)) can be
registered.
If more than 1 Bluetooth
® device has
been registered, select which device to
connect to.
If the desired Bluetooth® device is not
on the list, select “Add” to register the
device. ( P. 5 0 )
INFORMATION
● It may take time if the device connection
is carried out during Bluetooth® audio
playback.
● Depending on the type of Bluetooth
®
device being connected, it may be nec-
essary to perform additional steps on
the device.
● When disconnecting a Bluetooth
®
device, it is recommended to disconnect
this system.
Page 54 of 294

54
2. Bluetooth® SETTINGS
COROLLA_14CY_Navi_U
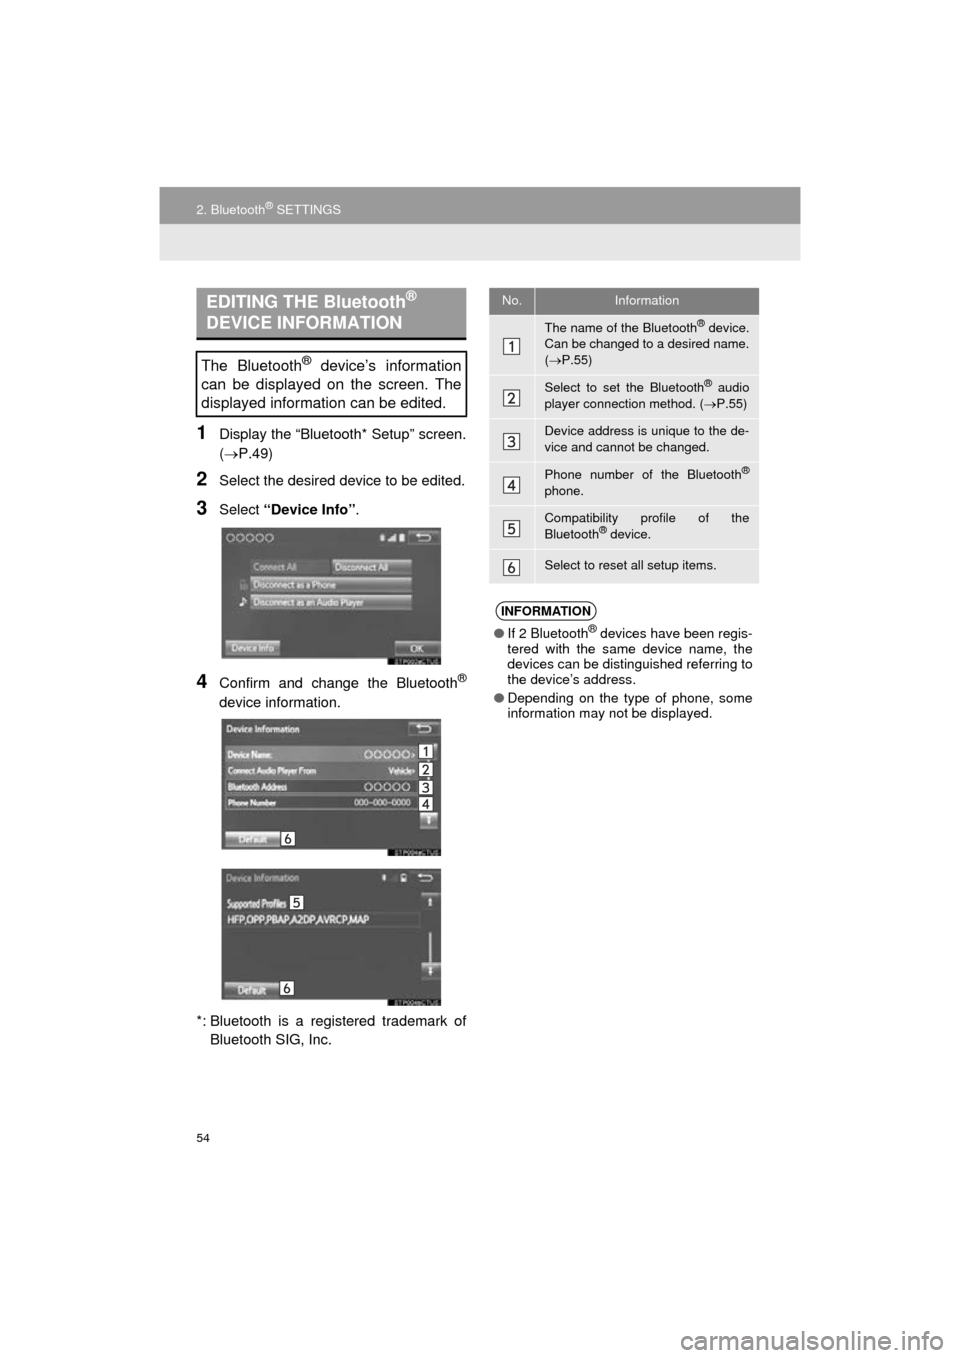
1Display the “Bluetooth* Setup” screen.
(P.49)
2Select the desired device to be edited.
3Select “Device Info” .
4Confirm and change the Bluetooth®
device information.
*: Bluetooth is a regi stered trademark of
Bluetooth SIG, Inc.
EDITING THE Bluetooth®
DEVICE INFORMATION
The Bluetooth® device’s information
can be displayed on the screen. The
displayed information can be edited.
No.Information
The name of the Bluetooth® device.
Can be changed to a desired name.
( P.55)
Select to set the Bluetooth® audio
player connection method. ( P.55)
Device address is unique to the de-
vice and cannot be changed.
Phone number of the Bluetooth®
phone.
Compatibility profile of the
Bluetooth® device.
Select to reset all setup items.
INFORMATION
● If 2 Bluetooth® devices have been regis-
tered with the same device name, the
devices can be distinguished referring to
the device’s address.
● Depending on the type of phone, some
information may not be displayed.
Page 55 of 294

55
2. Bluetooth® SETTINGS
COROLLA_14CY_Navi_U
BASIC FUNCTION
2
1Select “Device Name” .
2Enter the name and select “OK”.
1Select “Connect Audio Player from” .
2Select the desired connection method.
“Vehicle” : Select to connect the audio
system to the audio player.
“Device” : Select to connect the audio
player to the audio system.
Depending on the audio player, the “Vehi-
cle” or “Device” connection method may
be best. As such, refer to the manual that
comes with the audio player.
To reset the connection method, select
“Default” .
1Display the “Bluetooth* Setup” screen.
(P.49)
2Select “System Settings” .
3Select the desired item to be set.
*: Bluetooth is a regi stered trademark of
Bluetooth SIG, Inc.
CHANGING A DEVICE NAME
INFORMATION
● Even if the device name is changed, the
name registered in your Bluetooth®
device does not change.
SETTING AUDIO PLAYER
CONNECTION METHOD
“System Settings” SCREEN
The Bluetooth® settings can be con-
firmed and changed.