Page 366 of 492
3666-3. Do-it-yourself maintenance
AVALON (U)_(01999-07001)■
Headlight low beam (halogen bulb)
Unplug the connector while
pressing the lock release.
Turn the bulb base counter-
clockwise.
Set the new light bulb.
Align the 3 tabs on the light bulb
with the mounting, and insert.
Turn it clockwise to set.
Set the connector.
After installing the connector,
shake the bulb base gently to
check that it is not loose, turn
the headlights on once and visu-
ally confirm that no light is leak-
ing through the mounting.
Replacing light bulbs
1
2
3
4
Page 367 of 492
3676-3. Do-it-yourself maintenance
6
Maintenance and care
AVALON (U)_(01999-07001)■
Headlight high beam and daytim
e running light (vehicles with
halogen bulbs for low beams)/Headlight high beam (vehicles
with discharge bulbs for low beams)
Unplug the connector while
pressing the lock release.
Turn the bulb base counter-
clockwise.
Set the new light bulb.
Align the 3 tabs on the light bulb
with the mounting, and insert.
Turn it clockwise to set.
Set the connector.
After installing the connector,
shake the bulb base gently to
check that it is not loose, turn
the headlights on once and visu-
ally confirm that no light is leak-
ing through the mounting.
1
2
3
4
Page 368 of 492
3686-3. Do-it-yourself maintenance
AVALON (U)_(01999-07001)■
Front turn signal/parking light
To allow enough working
space, turn the steering
wheel to the opposite side of
the bulb to be replaced.
Remove the 3 fender liner
clips.
Turn the steering wheel to the
left when replacing the right side
light bulb, and turn the steering
wheel to the right when replac-
ing the left side light bulb.
Remove the fender liner bolt
and partly remove the fender
liner.
Unplug the connector while
pressing the lock release.
1
2
3
Page 369 of 492
3696-3. Do-it-yourself maintenance
6
Maintenance and care
AVALON (U)_(01999-07001)
Turn the bulb base counter-
clockwise.
Remove the light bulb.
When installing, reverse the steps listed.4
5
6
Page 371 of 492
3716-3. Do-it-yourself maintenance
6
Maintenance and care
AVALON (U)_(01999-07001)
Turn the bulb base counter-
clockwise.
Remove the light bulb.
When installing, reverse the steps listed.4
5
6
Page 372 of 492
3726-3. Do-it-yourself maintenance
AVALON (U)_(01999-07001)■
Back-up light
Open the trunk lid and
remove the clips. Then partly
remove the trunk panel
cover.
Turn the bulb base counter-
clockwise.
Remove the light bulb.
When installing, reverse the steps listed.
1
2
3
4
Page 376 of 492
3766-3. Do-it-yourself maintenance
AVALON (U)_(01999-07001)
WARNING
■Discharge headlights (if equipped)
●Contact your Toyota dealer before replacing the discharge headlights
(including light bulbs).
● Do not touch the discharge headlight’s high voltage socket when the head-
lights are turned on.
An extremely high voltage of 30000 V will be discharged and could result
in death or serious injury by electric shock.
● Do not attempt to take apart or repair the headlight bulbs, connectors,
power supply circuits, or related components.
Doing so could result in electric shock and death or serious injury.
■ To prevent damage or fire
●Make sure bulbs are fully seated and locked.
● Check the wattage of the bulb before installing to prevent heat damage.
Page 382 of 492

3827-2. Steps to take in an emergency
AVALON (U)_(01999-07001)
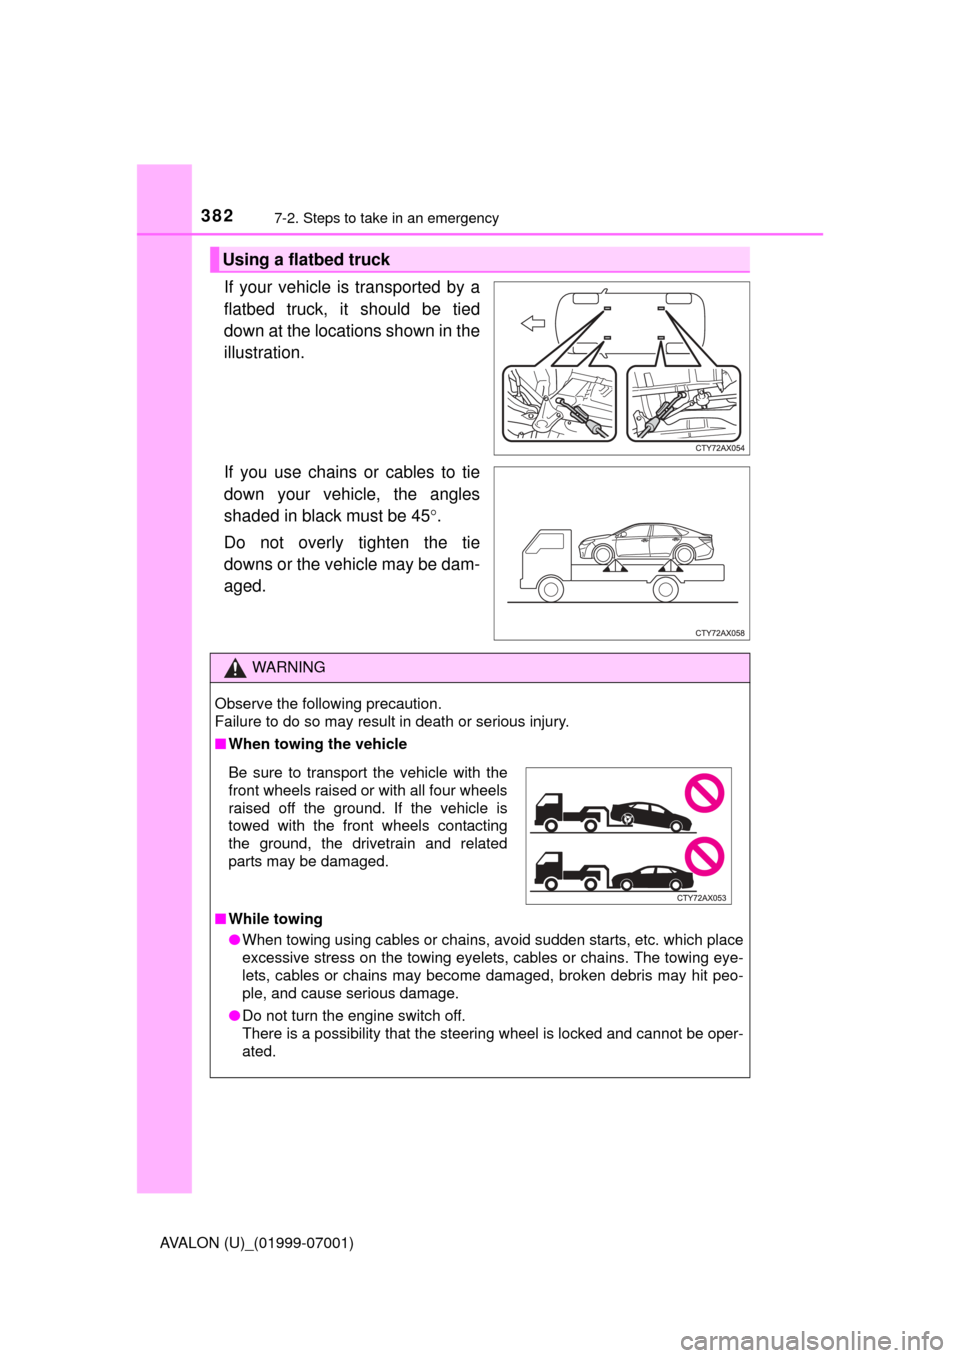
If your vehicle is transported by a
flatbed truck, it should be tied
down at the locations shown in the
illustration.
If you use chains or cables to tie
down your vehicle, the angles
shaded in black must be 45.
Do not overly tighten the tie
downs or the vehicle may be dam-
aged.
Using a flatbed truck
WARNING
Observe the following precaution.
Failure to do so may result in death or serious injury.
■ When towing the vehicle
■ While towing
●When towing using cables or chains, avoid sudden starts, etc. which place
excessive stress on the towing eyelets, cables or chains. The towing eye-
lets, cables or chains may become damaged, broken debris may hit peo-
ple, and cause serious damage.
● Do not turn the engine switch off.
There is a possibility that the steering wheel is locked and cannot be oper-
ated.
Be sure to transport the vehicle with the
front wheels raised or with all four wheels
raised off the ground. If the vehicle is
towed with the front wheels contacting
the ground, the drivetrain and related
parts may be damaged.