Page 76 of 304
76
1. BASIC OPERATION
AVA L O N _ N a v i _ U
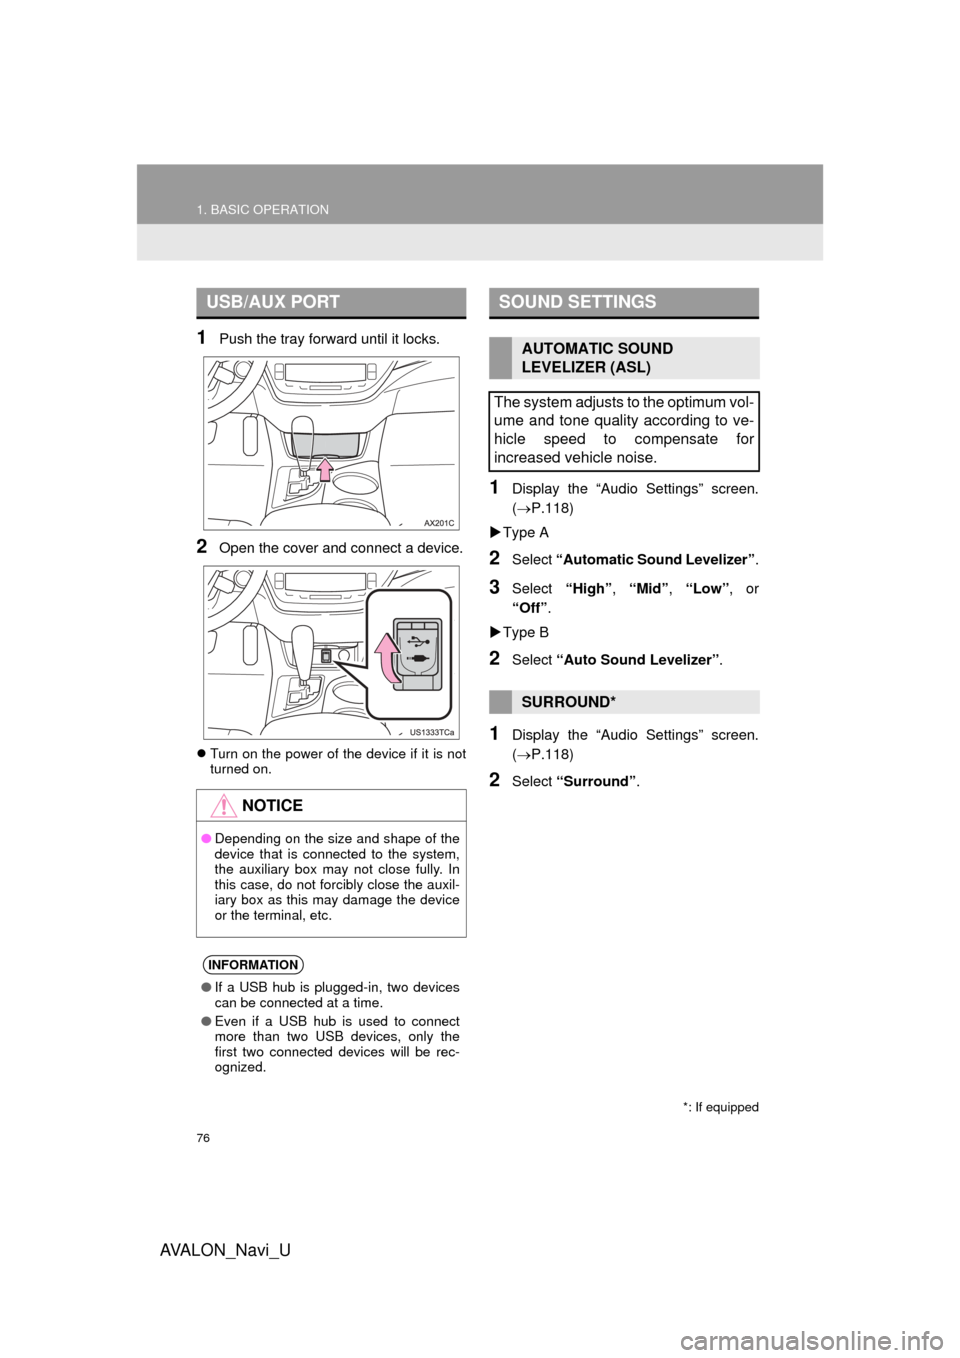
1Push the tray forward until it locks.
2Open the cover and connect a device.
Turn on the power of the device if it is not
turned on.
1Display the “Audio Settings” screen.
(P.118)
Type A
2Select “Automatic Sound Levelizer” .
3Select “High”, “Mid” , “Low” , or
“Off” .
Type B
2Select “Auto Sound Levelizer” .
1Display the “Audio Settings” screen.
(P.118)
2Select “Surround” .
USB/AUX PORT
NOTICE
●Depending on the size and shape of the
device that is connected to the system,
the auxiliary box may not close fully. In
this case, do not forcibly close the auxil-
iary box as this may damage the device
or the terminal, etc.
INFORMATION
●If a USB hub is plugged-in, two devices
can be connected at a time.
● Even if a USB hub is used to connect
more than two USB devices, only the
first two connected devices will be rec-
ognized.
SOUND SETTINGS
AUTOMATIC SOUND
LEVELIZER (ASL)
The system adjusts to the optimum vol-
ume and tone quality according to ve-
hicle speed to compensate for
increased vehicle noise.
SURROUND*
*: If equipped
Page 77 of 304
77
1. BASIC OPERATION
AVA L O N _ N a v i _ U
AUDIO SYSTEM
3
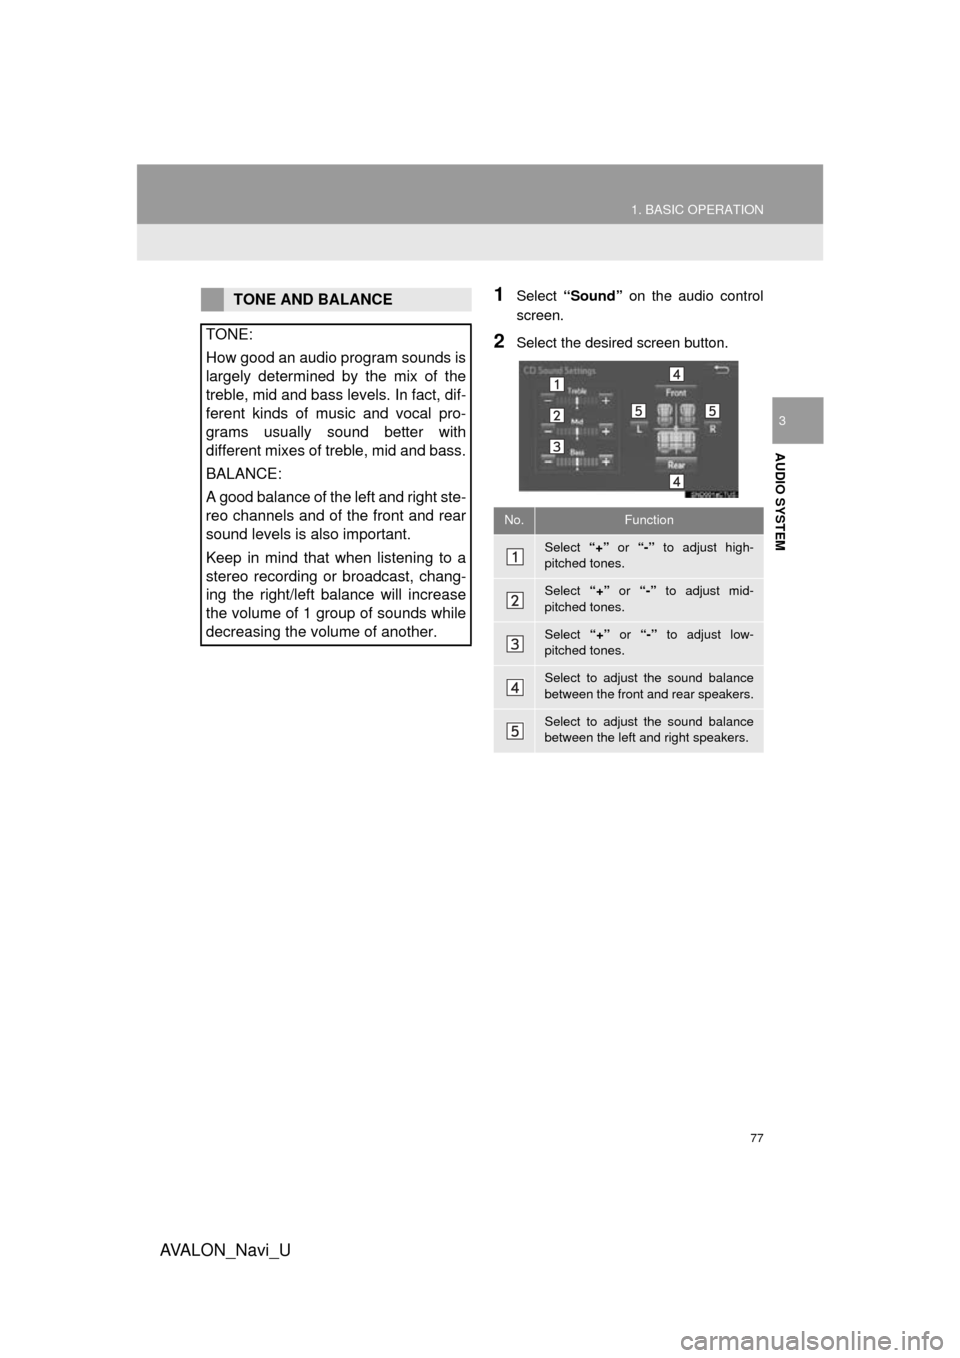
1Select “Sound” on the audio control
screen.
2Select the desired screen button.
TONE AND BALANCE
TONE:
How good an audio program sounds is
largely determined by the mix of the
treble, mid and bass levels. In fact, dif-
ferent kinds of music and vocal pro-
grams usually sound better with
different mixes of treble, mid and bass.
BALANCE:
A good balance of the left and right ste-
reo channels and of the front and rear
sound levels is also important.
Keep in mind that when listening to a
stereo recording or broadcast, chang-
ing the right/left balance will increase
the volume of 1 group of sounds while
decreasing the volume of another.
No.Function
Select “+” or “-” to adjust high-
pitched tones.
Select “+” or “-” to adjust mid-
pitched tones.
Select “+” or “-” to adjust low-
pitched tones.
Select to adjust the sound balance
between the front and rear speakers.
Select to adjust the sound balance
between the left and right speakers.
Page 79 of 304
79
AVA L O N _ N a v i _ U
AUDIO SYSTEM
3
2. RADIO OPERATION
1. AM/FM RADIO
■CONTROL SCREEN
Entune Audio Plus
OVERVIEW
The radio operation screen can be reached by the following methods:
Select “AM” or “FM” on the “Select Audio Source” screen. ( P.74)
Top screen
Option screen
Page 80 of 304
80
2. RADIO OPERATION
AVA L O N _ N a v i _ U
Entune Premium Audio
■CONTROL PANEL
Top screen
Option screen
Page 81 of 304
81
2. RADIO OPERATION
AVA L O N _ N a v i _ U
AUDIO SYSTEM
3
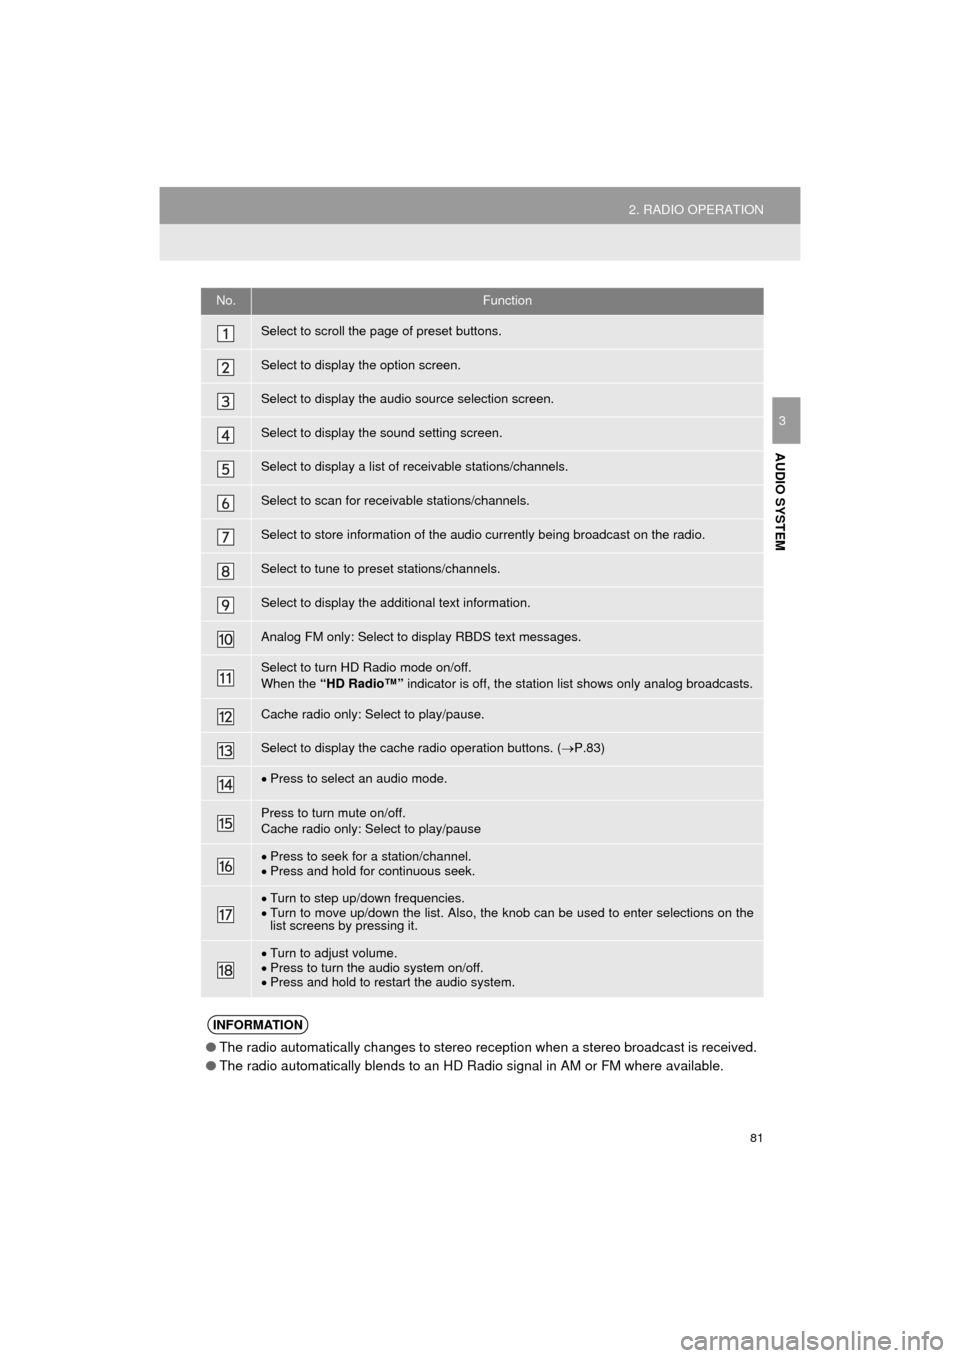
No.Function
Select to scroll the page of preset buttons.
Select to display the option screen.
Select to display the audio source selection screen.
Select to display the sound setting screen.
Select to display a list of receivable stations/channels.
Select to scan for receivable stations/channels.
Select to store information of the audio currently being broadcast on the radio.
Select to tune to preset stations/channels.
Select to display the additional text information.
Analog FM only: Select to display RBDS text messages.
Select to turn HD Radio mode on/off.
When the “HD Radio™” indicator is off, the station list shows only analog broadcasts.
Cache radio only: Select to play/pause.
Select to display the cache radio operation buttons. ( P.83)
Press to select an audio mode.
Press to turn mute on/off.
Cache radio only: Select to play/pause
Press to seek for a station/channel.
Press and hold for continuous seek.
Turn to step up/down frequencies.
Turn to move up/down the list. Also, the knob can be used to enter selections on the
list screens by pressing it.
Turn to adjust volume.
Press to turn the audio system on/off.
Press and hold to restart the audio system.
INFORMATION
● The radio automatically changes to stereo reception when a stereo broadcast is received.
● The radio automatically blends to an HD Radio signal in AM or FM where available.
Page 83 of 304
83
2. RADIO OPERATION
AVA L O N _ N a v i _ U
AUDIO SYSTEM
3
■REFRESHING THE STATION LIST
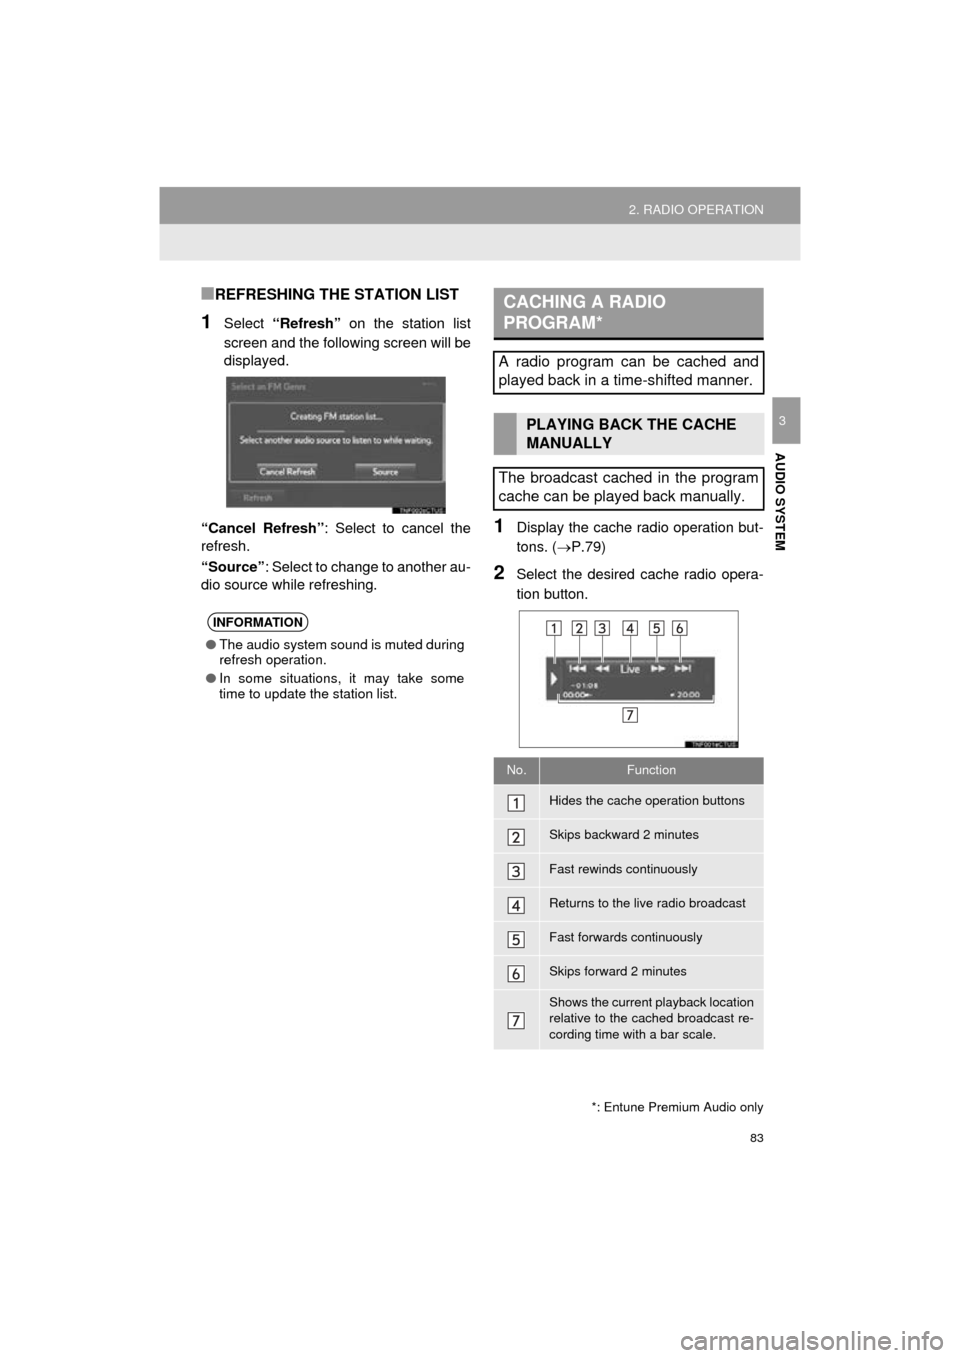
1Select “Refresh” on the station list
screen and the following screen will be
displayed.
“Cancel Refresh” : Select to cancel the
refresh.
“Source” : Select to change to another au-
dio source while refreshing.
1Display the cache radio operation but-
tons. ( P.79)
2Select the desired cache radio opera-
tion button.
INFORMATION
●The audio system sound is muted during
refresh operation.
● In some situations, it may take some
time to update the station list.
*: Entune Premium Audio only
CACHING A RADIO
PROGRAM*
A radio program can be cached and
played back in a time-shifted manner.
PLAYING BACK THE CACHE
MANUALLY
The broadcast cached in the program
cache can be played back manually.
No.Function
Hides the cache operation buttons
Skips backward 2 minutes
Fast rewinds continuously
Returns to the live radio broadcast
Fast forwards continuously
Skips forward 2 minutes
Shows the current playback location
relative to the cached broadcast re-
cording time with a bar scale.
Page 84 of 304
84
2. RADIO OPERATION
AVA L O N _ N a v i _ U
1Select “Station List” .
2FM radio only: Select a desired genre
of station and select a desired station.
The genre list is in the following order:
• Classical
• Country
• EasyLis (Easy Listening)
• Inform (Information)
•Jazz
•News
•Oldies
• Other
• Pop Music
• Religion
•Rock
• R&B (Rhythm and Blues)
• Sports
•Talk
• Traffic (Not available when “HD Radio™”
indicator is off.)
• Alert (Emergency Alert)
AUTOMATIC PLAYBACK OF
THE CACHE
If the radio broadcast is interrupted by
another audio output, such as an
incoming phone call, the system will
automatically cache the interrupted
portion and perform time-shift
playback when the interruption ends.
To manually operate the cache
operation: ( P.83)
INFORMATION
● The system can store up to 20 minutes.
Cached data will be erased when the
radio mode or station is changed or
when the audio system is turned off.
● If noise or silence occurs during the
caching process, cache writing will con-
tinue, with the noise or silence recorded
as is. In this case, the cached broadcast
will contain the noise or silence when
played back.
RADIO BROADCAST DATA
SYSTEM
This audio system is equipped with Ra-
dio Broadcast Data Systems (RBDS).
RBDS mode allows text messages to
be received from radio stations that uti-
lize RBDS transmitters.
When RBDS is on, the radio can
— only select stations of a particular
program type,
— display messages from radio sta-
tions.
RBDS features are available only
when listening to an FM station that
broadcasts RBDS information and the
“FM Info” indicator is on.
SELECTING A DESIRED
GENRE
Page 85 of 304
85
2. RADIO OPERATION
AVA L O N _ N a v i _ U
AUDIO SYSTEM
31Select “Station List” .
2Select the desired traffic program sta-
tion.
TRAFFIC ANNOUNCEMENT
(FM RADIO)
A station that regularly broadcasts traf-
fic information is automatically located.
INFORMATION
●If a traffic program station is found, the
name of the traffic program station will
be displayed for a while.
USING HD Radio ™
TECHNOLOGY
HD Radio ™
Technology is the digital
evolution of analog AM/FM radio. Your
radio product has a special receiver
which allows it to receive digital
broadcasts (where available) in
addition to the analog broadcasts it
already receives. Digital broadcasts
have better sound quality than analog
broadcasts as digital broadcasts
provide free, crystal clear audio with no
static or distortion. For more
information, and a guide to available
radio stations and programming, refer
to www.hdradio.com
.
HD Radio Technology manufactured
under license from iBiquity Digital
Corporation. U.S. and Foreign
Patents. HD Radio ™
and the HD, HD
Radio, and “Arc” logos are proprietary
trademarks of iBiquity Digital Corp.