Page 39 of 660

391-1. For safe use
1
For safety and security
AURIS Touring Sports_EE (12K53E)
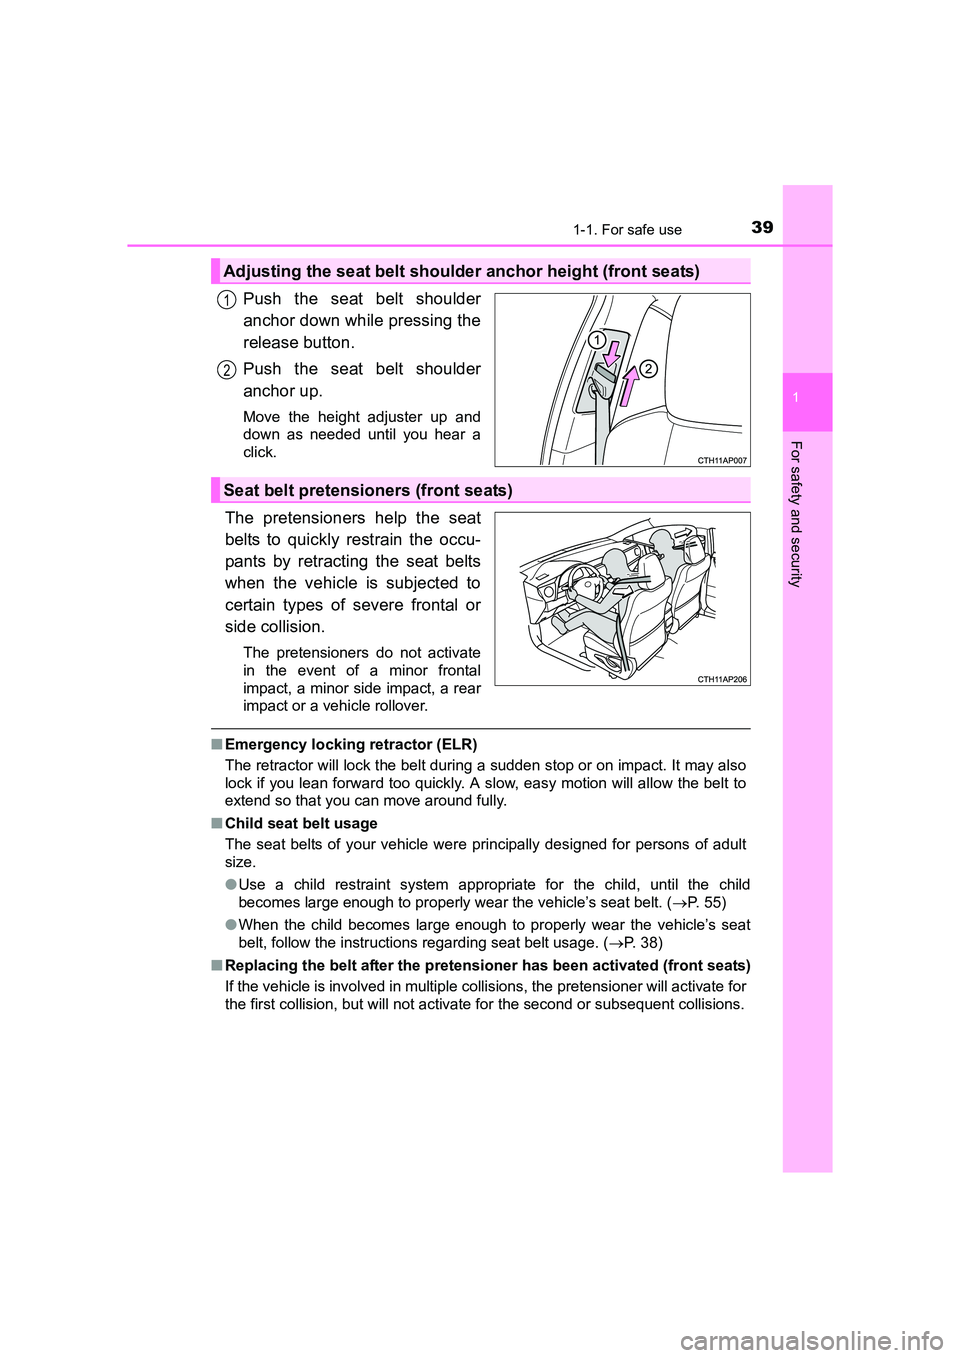
Push the seat belt shoulder
anchor down while pressing the
release button.
Push the seat belt shoulder
anchor up.
Move the height adjuster up and
down as needed until you hear a
click.
The pretensioners help the seat
belts to quickly restrain the occu-
pants by retracting the seat belts
when the vehicle is subjected to
certain types of severe frontal or
side collision.
The pretensioners do not activate
in the event of a minor frontal
impact, a minor side impact, a rear
impact or a vehicle rollover.
■Emergency locking retractor (ELR)
The retractor will lock the belt during a sudden stop or on impact. It may also
lock if you lean forward too quickly. A slow, easy motion will allow the belt to
extend so that you can move around fully.
■ Child seat belt usage
The seat belts of your vehicle were principally designed for persons of adult
size.
●Use a child restraint system appropriate for the child, until the child
becomes large enough to properly wear the vehicle’s seat belt. ( →P. 55)
● When the child becomes large enough to properly wear the vehicle’s seat
belt, follow the instructions regarding seat belt usage. ( →P. 38)
■ Replacing the belt after the pretensi oner has been activated (front seats)
If the vehicle is involved in multiple collisions, the pretensioner will activate for
the first collision, but will not activate for the second or subsequent collisions.
Adjusting the seat belt shoulder anchor height (front seats)
1
2
Seat belt pretensioners (front seats)
Page 58 of 660

581-1. For safe use
AURIS Touring Sports_EE (12K53E)
Key of letters inserted in the above table:
U: Suitable for “universal” category child restraint system approvedfor the use in this mass group.
UF: Suitable for forward-facing “universal” category child restraint system approved for the use in this mass group.
L1: Suitable for “TOYOTA G 0
+, BABY SAFE PLUS with SEAT BELT
FIXATION, BASE PLATFORM” (0 to 13 kg [0 to 28 lb.]) approved
for the use in this mass group.
L2: Suitable for “TOYOTA KIDFIX” (15 to 36 kg [34 to 79 lb.]) approved for the use in this mass group.
X: Not suitable seat position for children in this mass group.
*1: Adjust the front seatback to the most upright position. Move the front seat cushion to the fully rearward.
Remove the head restraint if it interferes with your child restraint system.
Vehicles with a vertical height adjustment lever: Adjust the seat cushion to
the highest position.
Follow these procedures
• For installing a baby seat with support base If the baby seat interferes with the seatback when latching the baby seat
into the support base, adjust the seatback rearward until there is no
interference.
• For installing a forward-facing child seat If the seat belt shoulder anchor is ahead of the child seat belt guide,
move the seat cushion forward.
• For installing a junior seat If the child in your child restraint system is in a very upright position,
adjust the seatback to the most comfortable position.
If the seat belt shoulder anchor is ahead of the child seat belt guide,
move the seat cushion forward.
*2: Remove the head restraint if it interferes with your child restraint system.
The child restraint system mentioned in the table may not be available
outside of the EU area.
Other child restraint system which is different from the system men-
tioned in the table can be used, but the suitability of the systems must
be carefully checked with the child restraint system manufacturer con-
cerned and the seller of those seats.
Page 61 of 660

611-1. For safe use
1
For safety and security
AURIS Touring Sports_EE (12K53E)
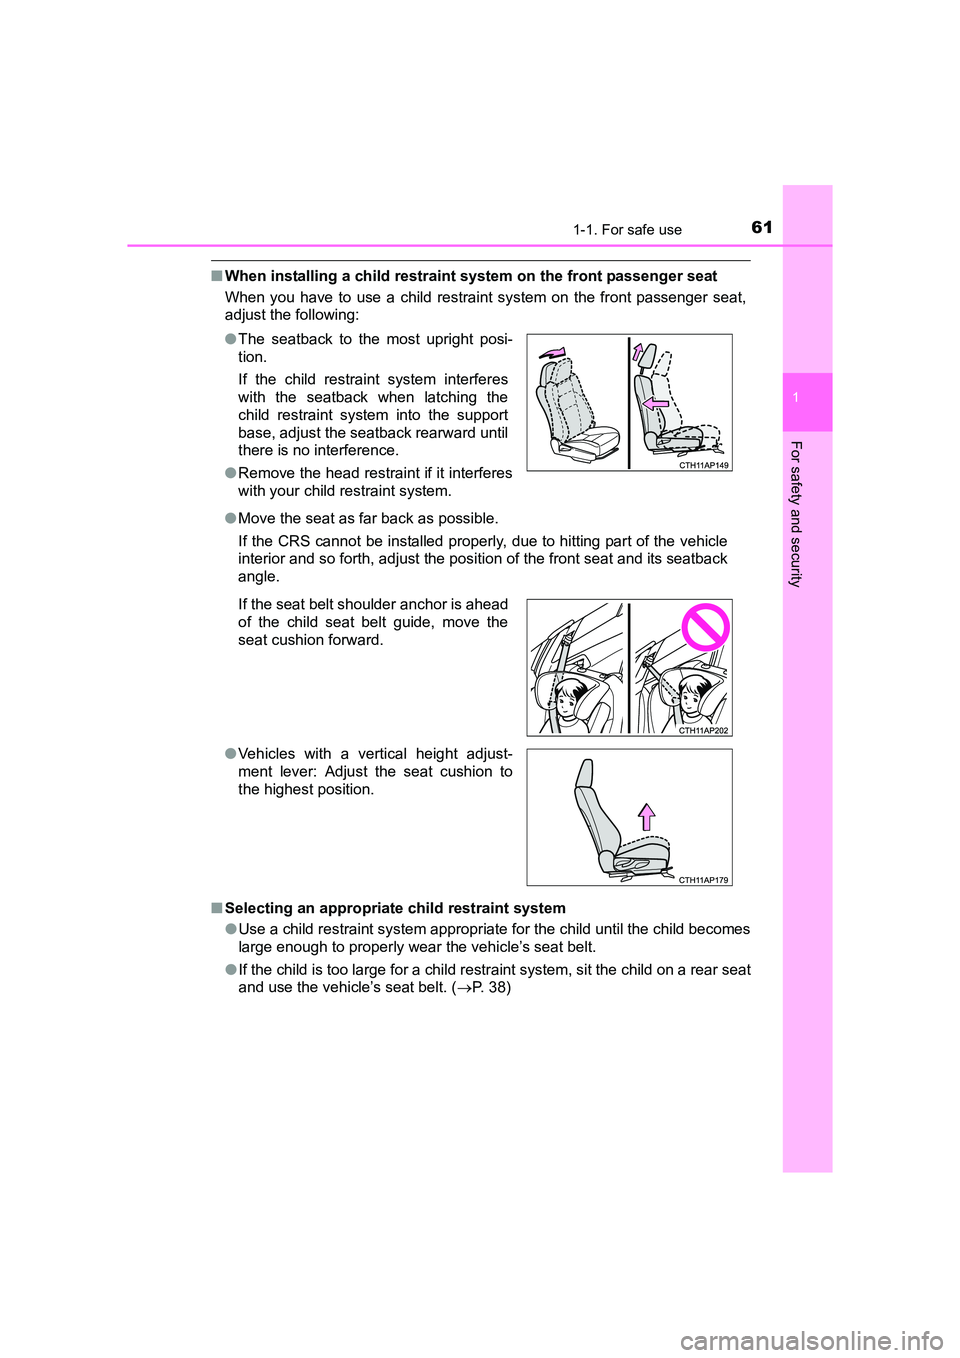
■When installing a child restraint system on the front passenger seat
When you have to use a child restraint system on the front passenger seat,
adjust the following:
■ Selecting an appropriat e child restraint system
● Use a child restraint system appropriate for the child until the child becomes
large enough to properly wear the vehicle’s seat belt.
● If the child is too large for a child restraint system, sit the child on a rear seat
and use the vehicle’s seat belt. ( →P. 38)
●
The seatback to the most upright posi-
tion.
If the child restraint system interferes
with the seatback when latching the
child restraint system into the support
base, adjust the seatback rearward until
there is no interference.
● Remove the head restraint if it interferes
with your child restraint system.
● Move the seat as far back as possible.
If the CRS cannot be installed properly, due to hitting part of the vehicle
interior and so forth, adjust the position of the front seat and its seatback
angle.
If the seat belt shoulder anchor is ahead
of the child seat belt guide, move the
seat cushion forward.
● Vehicles with a vertical height adjust-
ment lever: Adjust the seat cushion to
the highest position.
Page 167 of 660
167
AURIS Touring Sports_EE (12K53E)
3
Operation of each component
3-3. Adjusting the seats
Seat position adjustment lever
Seatback angle adjustment
lever
Vertical height adjustment lever
(if equipped)
Lumbar support adjustment
switch (if equipped)
Front seats
Adjustment procedure
1
2
3
4
Page 172 of 660
1723-3. Adjusting the seats
AURIS Touring Sports_EE (12K53E)
Vertical adjustmentUp
Pull the head restraints up.
Down
Push the head restraint down while
pressing the lock release button.
■Removing the head restraints
■ Adjusting the height of the head restraints
■ Adjusting the rear seat head restraint
Always raise the head restraint one level from the stowed position when
using.
Head restraints
Head restraints are provided for all seats.
Lock release button
1
2
Pull the head restraint up while pressing
the lock release button.
Make sure that the head restraints are
adjusted so that the center of the head
restraint is closest to the top of your ears.
Lock release button
Page 176 of 660
1763-4. Adjusting the steering wheel and mirrors
AURIS Touring Sports_EE (12K53E)
The height of the rear view mirror can be adjusted to suit your driving
posture.
Adjust the height of the rear view
mirror by moving it up and down.
�XManual anti-glare inside rear view mirror
Reflected light from the headlights of vehicles behind can be reduced
by operating the lever.
Normal position
Anti-glare position
Inside rear view mirror
The rear view mirror’s position can be adjusted to enable suffi-
cient confirmation of the rear view.
Adjusting the height of rear view mirror (auto anti-glare inside
rear view mirror only)
Anti-glare function
1
2
Page 263 of 660
2634-5. Toyota Safety Sense
AURIS Touring Sports_EE (12K53E)
4
Driving
• When the sensor is misaligned due toa strong impact being applied to the
sensor, etc.
• When the vehicle is being parked in a place where there is a low hanging
object at the height of the front sensor
• When the windshield is covered with raindrops, etc.
Page 434 of 660

4346-3. Using the storage features
AURIS Touring Sports_EE (12K53E)
WARNING
■ When installing the luggage cover
Make sure that the luggage cover is securely installed. Failure to do so may
result in serious injury in the event of sudden braking or a collision.
■ When using the luggage cover
Observe the following precautions. If the vehicle is driven with the luggage
cover lifted up, the driver's rear view will be obscured, possibly causing an
accident that may lead to death or serious injury.
● When closing the luggage cover, make sure that both left and right hooks
are securely engaged to the anchors. If the hooks are not engaged
securely, the hooks may be accidentally disengaged, causing the luggage
cover to lift up.
● When carrying cargo taller than the installation height of the luggage
cover, do not use the luggage cover. Otherwise, the hooks may be acci-
dentally disengaged, causing the luggage cover to lift up.
● Do not drive with the luggage cover lifted up.
■ Caution for the luggage cover
●Do not place anything on the luggage cover to avoid death or serious
injury.
● Do not allow children to climb on the luggage cover. Climbing on the lug-
gage cover could result in damage to the luggage cover, possibly causing
death or serious injury to the child.