2016 SUBARU OUTBACK key battery
[x] Cancel search: key batteryPage 369 of 572
event that a transmitter is lost, stolen,
damaged or additional transmitters are
desired (the system will accept up to eight
transmitters). New remote engine start
transmitters can be programmed accord-
ing to the following procedure.
1. Open the driver’s door (the driver’s
door must remain opened throughout the
entire process).
2. Depress and hold the brake pedal.
3. Turn the ignition switch to“ON”then
“LOCK”, back to“ON”then“LOCK”, back
to“ON”then“LOCK”, then back to“ON”
again and leave the ignition“ON”through-
out the programming process.
4. The system will flash the side marker
lights, tail lights and parking lights and
honk the horn three times, indicating that
the system has entered the transmitter
learn mode.
5. Press and release the“
”button on
the transmitter that you want to program.
6. The system will flash the side marker
lights, tail lights and parking lights and
honk the horn one time, indicating that the
system has learned the transmitter. Upon
successful programming, the remote start
confirmation transmitter button will flash
one time.
7. Repeat step 5 for any additional
transmitters (the system will accept up toeight transmitters).
8. The system will exit the transmitter
learn mode if the key is turned to the
“LOCK”position, the door is closed or
after 2 minutes.
&System maintenance
NOTE
For models without“keyless access
with push-button start system”:
In the event that the vehicle’s battery is
replaced, discharged or disconnected,
it will be necessary to start the vehicle
a minimum of one time using the key
prior to activating the remote engine
start system. This is required to allow
the vehicle electronic systems to re-
synchronize.
!Changing the batteries
CAUTION
.Do not let dust, oil or water get on
or in the remote engine start
transmitter when replacing the
battery.
.Be careful not to damage the
printed circuit board in the re-
mote engine start transmitter
when replacing the battery..Be careful not to allow children to
touch the battery and any re-
moved parts; children could
swallow them.
.There is a danger of explosion if
an incorrect replacement battery
is used. Replace only with the
same or equivalent type of bat-
tery.
.Batteries should not be exposed
to excessive heat such as sun-
shine, fire or the like.
For models with“keyless access with
push-button start system:
Perform the procedure described in“Re-
placing battery of access key”F11-50.
For models without“keyless access
with push-button start system”:
The 3-volt lithium battery (model CR-
2032) supplied in your remote engine start
transmitter should last approximately one
year, depending on usage. When the
battery begins to weaken, you will notice
a decrease in range (distance from the
vehicle that your remote control operates).
Follow the instructions below to change
the remote engine start transmitter battery.
Starting and operating/Remote engine start system (dealer option)
–CONTINUED–7-21
Page 456 of 572
In case of emergency/Access key–if access key does not operate properly
Access key–if access key
does not operate properly
CAUTION
Keep metallic objects, magnetic
sources and signal transmitters
away from the area between the
access key and the push-button
ignition switch. They may interfere
with the communication between
the access key and the push-button
ignition switch.
If the locking/unlocking procedures, power
switch procedures or engine start proce-
dures cannot be operated because of
strong radio signals in the surrounding
area or a low battery condition of the
access key, perform the following proce-
dure. When the battery of the access key
is discharged, replace it with a new one.
Refer to“Replacing battery of access key”
F11-50.
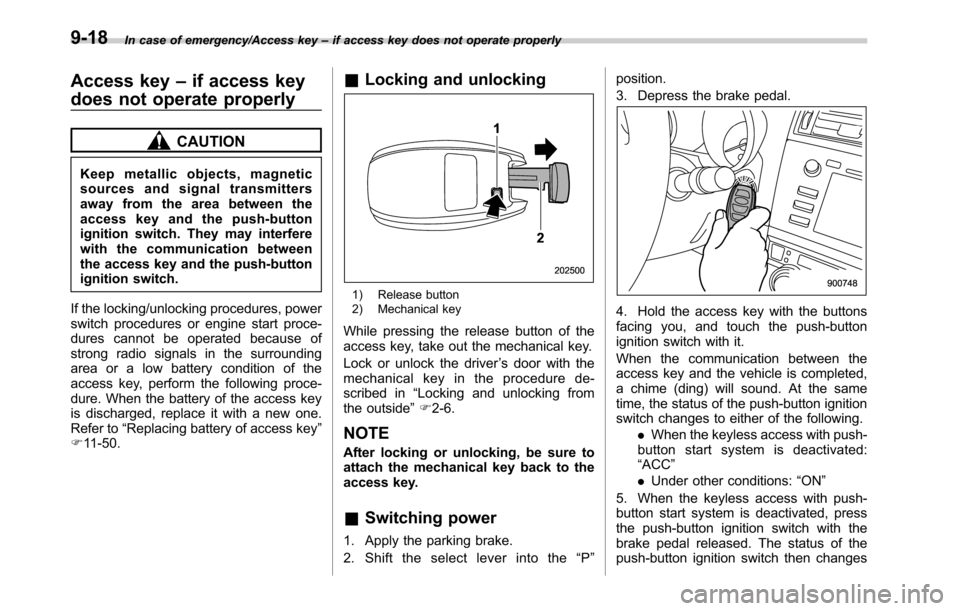
&Locking and unlocking
1) Release button
2) Mechanical key
While pressing the release button of the
access key, take out the mechanical key.
Lock or unlock the driver’s door with the
mechanical key in the procedure de-
scribed in“Locking and unlocking from
the outside”F2-6.
NOTE
After locking or unlocking, be sure to
attach the mechanical key back to the
access key.
&Switching power
1. Apply the parking brake.
2. Shift the select lever into the“P”position.
3. Depress the brake pedal.
4. Hold the access key with the buttons
facing you, and touch the push-button
ignition switch with it.
When the communication between the
access key and the vehicle is completed,
a chime (ding) will sound. At the same
time, the status of the push-button ignition
switch changes to either of the following.
.When the keyless access with push-
button start system is deactivated:
“ACC”
.Under other conditions:“ON”
5. When the keyless access with push-
button start system is deactivated, press
the push-button ignition switch with the
brake pedal released. The status of the
push-button ignition switch then changes
9-18
Page 460 of 572
In case of emergency/If your vehicle is involved in an accident
!When the rear gate is stuck at the
fully open position or does not fully
close
If the rear gate cannot be closed due to a
dead battery, etc., while the rear gate is
stopped midway, it can be closed by hand.
1. Gently close the rear gate by hand
until it reaches the half-shut position.
2. Operate the power rear gate to confirm
it is recovered.
&When the rear gate cannot be
opened
Perform the procedure described in“Rear
gate (Outback)–if the rear gate cannot be
opened”F9-20.
&When the rear gate cannot be
closed
CAUTION
.On areas which are not flat, such
as hills, do not conduct any of
the following actions. The rear
gate may close suddenly and hit
someone’s head, face or catch
fingers and body parts in it,
resulting in injury.
.Even while conducting the fol-
lowing actions on a flat surface,be careful not to be injured by
getting caught in or hit by the
rear gate.
.When operating the power rear
gate manually, do not use exces-
sive force. Doing so may cause a
malfunction.
.After closing the rear gate by the
following methods, we recom-
mend that you have the vehicle
checked at a SUBARU dealer.
If the rear gate cannot be closed due to a
dead battery, etc., while the rear gate is
stopped midway, it can be closed by hand.
1. Gently close the rear gate by hand
until it reaches the half-shut position.
2. Operate the power rear gate to confirm
it is recovered.
If your vehicle is involved in
an accident
CAUTION
If your vehicle is involved in an
accident, be sure to inspect the
ground under the vehicle before
restarting the engine. If you find that
fuel has leaked on the ground, do
not try to restart the engine. The fuel
system has been damaged and is in
need of repair. Immediately contact
the nearest automotive service facil-
ity. We recommend that you consult
your SUBARU dealer.
Your vehicle has a fuel pump shut off
system. To minimize the risk of fire due to
fuel leakage when the engine stalls or an
airbag inflates upon collision, the system
stops supplying fuel to the engine.
Perform the following procedures to re-
start the engine after the system is
activated.
Models without“keyless access with
push-button start system”:
1. Turn the ignition switch to the“LOCK”
or“ACC”position.
2. Restart the engine.
9-22
Page 470 of 572

Maintenance and service
Wheel replacement........................................... 11-31
Aluminum wheels............................................. 11-31
Windshield washer fluid.................................. 11-32
Replacement of wiper blades.......................... 11-33
Windshield wiper blade assembly..................... 11-34
Windshield wiper blade rubber......................... 11-34
Rear window wiper blade assembly
(Outback)....................................................... 11-35
Rear window wiper blade rubber (Outback) ....... 11-36
Battery............................................................... 11-37
Fuses................................................................ 11-38
Installation of accessories............................... 11-40
Replacing bulbs............................................... 11-40
HID headlights (if equipped)............................. 11-40
Halogen headlights.......................................... 11-40Front turn signal light...................................... 11-42
Front side marker light..................................... 11-42
Front fog light (if equipped).............................. 11-42
Rear combination lights................................... 11-43
Backup light.................................................... 11-45
License plate light........................................... 11-47
Dome light....................................................... 11-48
Map light......................................................... 11-48
Door step light................................................. 11-48
Cargo area light (Outback)............................... 11-49
Trunk light (Legacy)......................................... 11-49
Other bulbs..................................................... 11-49
Replacing battery............................................. 11-49Replacing battery of access key....................... 11-50
Replacing battery of transmitter....................... 11-51
Page 517 of 572

&Cargo area light (Outback)
1. Remove the lens by prying the edge of
the lens with a flat-head screwdriver.
2. Pull the bulb out of the socket.
3. Install a new bulb.4. Reinstall the lens.
&Trunk light (Legacy)
CAUTION
Replacing the bulb could cause
burns since the bulb may be very
hot. Have the bulb replaced by your
SUBARU dealer.
&Other bulbs
It may be difficult to replace the bulbs.
We recommend that you have the bulbs
replaced by your SUBARU dealer if
necessary.
Replacing battery
The access key / transmitter battery may
be discharged under the following condi-
tions.
.The operation of the keyless access
function is unstable
.The operating distance of the remote
keyless entry system is unstable
.The transmitter does not operate prop-
erly when used within the standard dis-
tance
Replace the battery with a new one.
CAUTION
.Do not let dust, oil or water get on
or in the access key/transmitter
when replacing battery.
.Be careful not to damage the
printed circuit board in the ac-
cess key/transmitter when repla-
cing the battery.
.Be careful not to allow children to
touch the battery and any re-
moved parts; children could
swallow them.
.There is a danger of an explosion
if the battery is incorrectly re-
placed. Replace only with the
Maintenance and service/Replacing battery
–CONTINUED–11-49
Page 518 of 572
Maintenance and service/Replacing battery
same or equivalent type of the
battery.
.Batteries shall not be exposed to
excessive heat such as bright
sunlight, fire or the like.
NOTE
.Replace only with the same or
equivalent type of battery recom-
mended by the manufacturer.
.Dispose of used batteries according
to the local laws.
.Mount the battery in the correct
orientation to prevent fluid leakage.
Be careful not to bend the terminals. It
may result in a malfunction.
.It is recommended that the battery
should be replaced by a SUBARU
dealer.
.Use a new battery.
.After replacing the battery, confirm
that the access key/transmitter func-
tions properly.
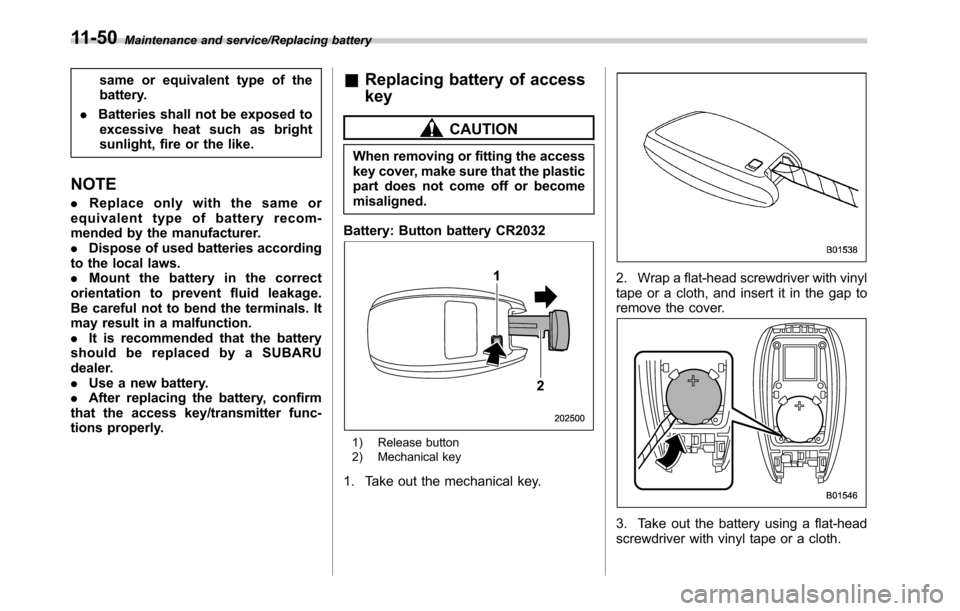
&Replacing battery of access
key
CAUTION
When removing or fitting the access
key cover, make sure that the plastic
part does not come off or become
misaligned.
Battery: Button battery CR2032
1) Release button
2) Mechanical key
1. Take out the mechanical key.
2. Wrap a flat-head screwdriver with vinyl
tape or a cloth, and insert it in the gap to
remove the cover.
3. Take out the battery using a flat-head
screwdriver with vinyl tape or a cloth.
11-50
Page 519 of 572
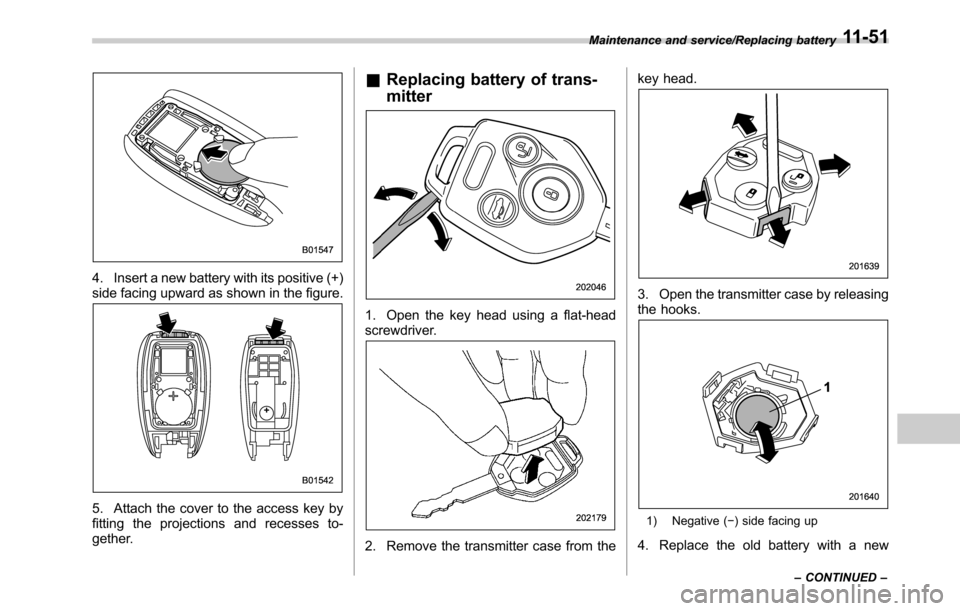
4. Insert a new battery with its positive (+)
side facing upward as shown in the figure.
5. Attach the cover to the access key by
fitting the projections and recesses to-
gether.
&Replacing battery of trans-
mitter
1. Open the key head using a flat-head
screwdriver.
2. Remove the transmitter case from thekey head.
3. Open the transmitter case by releasing
the hooks.
1) Negative (−) side facing up
4. Replace the old battery with a new
Maintenance and service/Replacing battery
–CONTINUED–11-51
Page 520 of 572

Maintenance and service/Replacing battery
battery (TypeCR1620or equivalent)
making sure to install the new battery with
the negative (−) side facing up.
5. Put together the transmitter case by
fitting the hooks on the case.
6. Reinstall the transmitter case in the
key head.
7. Refit the removed half of the key head.
After the battery is replaced, the trans-
mitter must be synchronized with the
remote keyless entry system’s control
unit. Press either the“
”or“”button
six times to synchronize the unit.
11-52