2016 SUBARU IMPREZA door lock
[x] Cancel search: door lockPage 61 of 594

Seat, seatbelt and SRS airbags/Child restraint systems
installed on thewindow-side seating
position or therear center seating
position of a 4-door model, remove
the rear seat head restraint. For de-
tails, refer to “Head restraint adjust-
ment ”F 1-8.
Store the head restraint in the trunk (4-
door models) or cargo area (5-door
models). Avoid placing the head re-
straint in the passenger compartment
to prevent it from being thrown around
in the passenger compartment in a
sudden stop or a sharp turn.
– When a child restraint system is
installed on the rear center seating
position of a 5-door model, raise the
rear seat head restraint to the ex-
tended position. Do not remove the
head restraint. For details, refer to
“ Rear center seating position” F1-9.
3. Place the child restraint system in the
rear seating position.
WARNING
When you intend to install a child
restraint system on the rear center
seating position, if the child restraint
system does not fit snugly against
the contours of the rear center seat
cushion, install the child restraint
system on the window-side seating position to be safe. For details, refer
to
“Where to place a child restraint
system” F1-26.
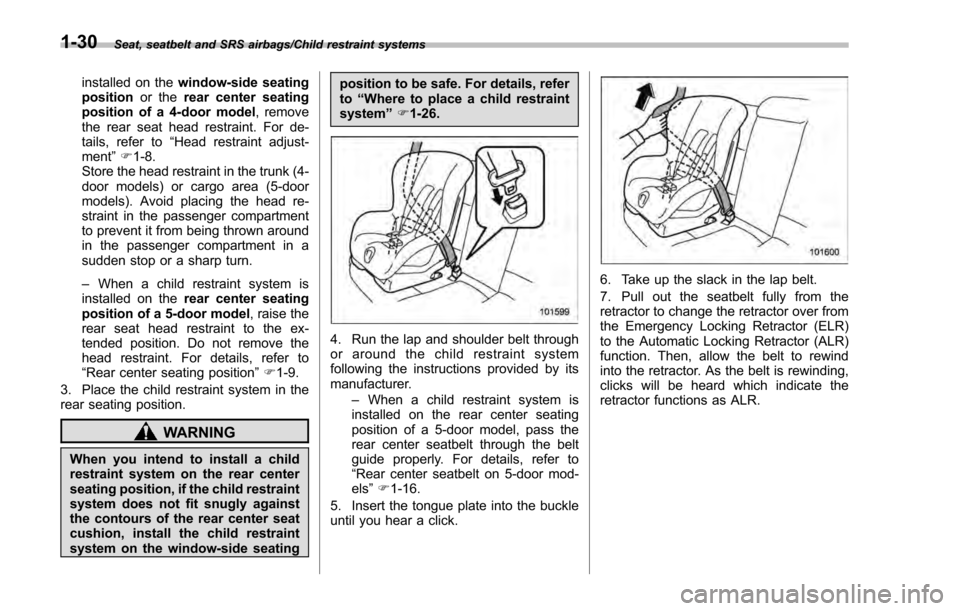
4. Run the lap and shoulder belt through
or around the child restraint system
following the instructions provided by its
manufacturer.
–When a child restraint system is
installed on the rear center seating
position of a 5-door model, pass the
rear center seatbelt through the belt
guide properly. For details, refer to
“Rear center seatbelt on 5-door mod-
els ”F 1-16.
5. Insert the tongue plate into the buckle
until you hear a click.
6. Take up the slack in the lap belt.
7. Pull out the seatbelt fully from the
retractor to change the retractor over from
the Emergency Locking Retractor (ELR)
to the Automatic Locking Retractor (ALR)
function. Then, allow the belt to rewind
into the retractor. As the belt is rewinding,
clicks will be heard which indicate the
retractor functions as ALR.
1-30
Page 102 of 594

Keys..................................................................... 2-3Key number plate ................................................ 2-3
Immobilizer.......................................................... 2-3Security indicator light ........................................ 2-4
Key replacement ................................................. 2-4
Certification for immobilizer system ..................... 2-4
Door locks........................................................... 2-5Locking and unlocking from the outside .. ............ 2-5
Locking and unlocking from the inside ................ 2-7
Battery drainage prevention function ................... 2-7
Power door locking switches............................. 2-8Key lock-in prevention function ........................... 2-9
Keyless access with push-button start
system (if equipped) ........................................ 2-9
Safety precautions............................................. 2-10
Locking and unlocking with “keyless access”
entry function. .................................................. 2-13
Selecting audible signal operation ...................... 2-18
Warning chimes and warning indicator ............... 2-18
Disabling keyless access function ...................... 2-18
When access key does not operate properly ....... 2-20
Replacing battery of access key ......................... 2-20
Replacing access key ......................................... 2-20
Certification for keyless access with push-button start system ..................................................... 2-20
PIN Code Access (models with “keyless
access with push-button start system ”)........ 2-21
Registering a PIN code ....................................... 2-22
Unlocking .......................................................... 2-23
Remote keyless entry system ........................... 2-23Locking the doors.............................................. 2-25 Unlocking the doors
.......................................... 2-25
Opening the trunk lid (4-door) .. .......................... 2-25
Unlocking the rear gate (5-door) ......................... 2-25
Vehicle finder function ....................................... 2-25
Sounding a panic alarm ..................................... 2-25
Selecting audible signal operation (models without “keyless access with push-button start
system ”).......................................................... 2-26
Replacing the battery ......................................... 2-26
Replacing lost transmitters ................................ 2-26
Certification for remote keyless entry system ..... 2-26
Alarm system..................................................... 2-27System operation ............................................... 2-28
Activating and deactivating the alarm system ..... 2-28
If you have accidentally triggered the alarm system ............................................................ 2-28
Arming the system ............................................ 2-29
Disarming the system ........................................ 2-32
Valet mode ........................................................ 2-32
Passive arming (models without “keyless access
with push-button start system ”) ....................... 2-32
Tripped sensor identification .............................. 2-34
Shock sensors (dealer option).. .......................... 2-34
Child safety locks.............................................. 2-35
Windows ............................................................. 2-35
Power window operation by driver ..................... 2-35
Power window operation by passengers ............. 2-37
Initialization of power window .. .......................... 2-38
Trunk lid (4-door)............................................... 2-38To open and close the trunk lid from outside . ..... 2-39
To open the trunk lid from inside. ....................... 2-39
Keys and doors
2
Page 103 of 594

Keys and doors
Internal trunk lid release handle.......................... 2-39
Rear gate (5-door).............................................. 2-41Lock/unlock....................................................... 2-41
Open/close ......................................................... 2-41
Moonroof (if equipped) ...................................... 2-42Moonroof switches............................................ 2-43
Sun shade ......................................................... 2-44
Page 104 of 594

Keys
NOTE
For models with“keyless access with
push-button start system ”, refer to
“Keyless access with push-button start
system ”F 2-9.
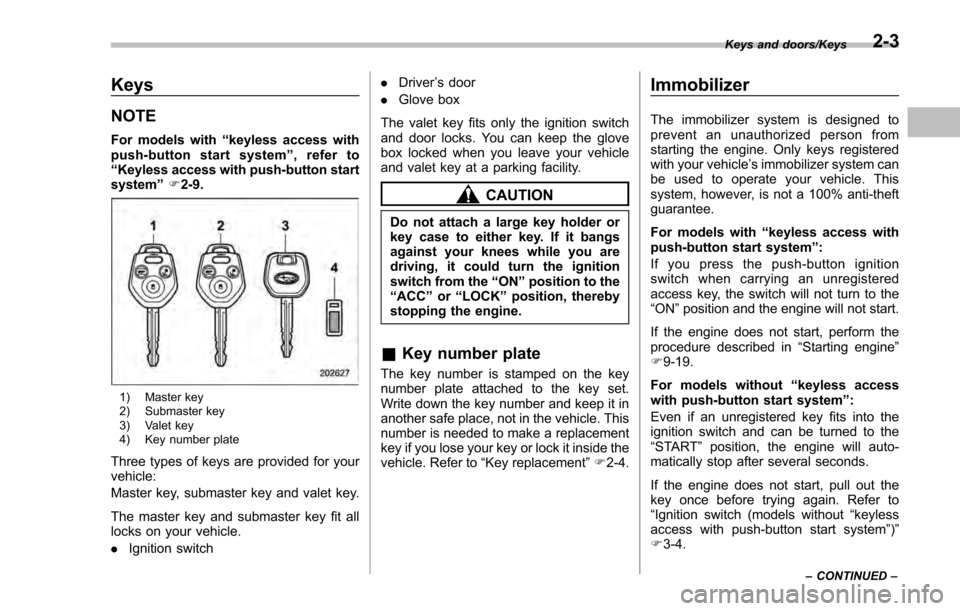
1) Master key
2) Submaster key
3) Valet key
4) Key number plate
Three types of keys are provided for your
vehicle:
Master key, submaster key and valet key.
The master key and submaster key fit all
locks on your vehicle.
. Ignition switch .
Driver ’s door
. Glove box
The valet key fits only the ignition switch
and door locks. You can keep the glove
box locked when you leave your vehicle
and valet key at a parking facility.
CAUTION
Do not attach a large key holder or
key case to either key. If it bangs
against your knees while you are
driving, it could turn the ignition
switch from the “ON”position to the
“ACC ”or “LOCK ”position, thereby
stopping the engine.
& Key number plate
The key number is stamped on the key
number plate attached to the key set.
Write down the key number and keep it in
another safe place, not in the vehicle. This
number is needed to make a replacement
key if you lose your key or lock it inside the
vehicle. Refer to “Key replacement ”F 2-4.
Immobilizer
The immobilizer system is designed to
prevent an unauthorized person from
starting the engine. Only keys registered
with your vehicle’ s immobilizer system can
be used to operate your vehicle. This
system, however, is not a 100% anti-theft
guarantee.
For models with “keyless access with
push-button start system ”:
If you press the push-button ignition
switch when carrying an unregistered
access key, the switch will not turn to the
“ ON ”position and the engine will not start.
If the engine does not start, perform the
procedure described in “Starting engine”
F 9-19.
For models without “keyless access
with push-button start system”:
Even if an unregistered key fits into the
ignition switch and can be turned to the
“ START ”position, the engine will auto-
matically stop after several seconds.
If the engine does not start, pull out the
key once before trying again. Refer to
“ Ignition switch (models without “keyless
access with push-button start system ”)”
F 3-4.
Keys and doors/Keys
–CONTINUED –2-3
Page 105 of 594

Keys and doors/Immobilizer
CAUTION
.Do not place the key under direct
sunlight or anywhere it may
become hot.
. Do not get the key wet. If the key
gets wet, wipe it dry with a cloth
immediately.
NOTE
. To protect your vehicle from theft,
please pay close attention to the fol-
lowing security precautions:
–Never leave your vehicle unat-
tended with its keys inside.
– Before leaving your vehicle,
close all windows and the moon-
roof, and lock the doors and rear
gate.
– Do not leave spare keys or any
record of your key number in the
vehicle.
. The vehicle has a maintenance-free
type immobilizer system.
& Security indicator light
Refer to “Security indicator light ”F 3-30.
& Key replacement
Your key number plate will be required if
you ever need a replacement key made.
Any new key must be registered for use
with your vehicle ’s immobilizer system
before it can be used. The maximum
number of keys that can be registered
for use with one vehicle is as follows.
. Four (models without “keyless access
with push-button start system ”)
. Seven (models with “keyless access
with push-button start system ”)
One key that has already been registered
is required in order to register a new key.
If you lose a key, the lost key ’s ID code still
remains in the memory of the vehicle’ s
immobilizer system. For security reasons,
the lost key ’s ID code should be erased
from the memory. To erase the lost key ’s
ID code, all keys that will be used are
required.
For details about new key registration and
erasing the lost key ’s ID code, contact
your SUBARU dealer.
& Certification for immobilizer
system
. For models with “keyless access
with push-button start system”:
Refer to “Certification for keyless access
with push-button start system ”F 2-20.
. For models without “keyless access
with push-button start system”:
–U.S.-spec. models
FCC ID: MOZRI-38BFH
CAUTION
FCC WARNING
Changes or modifications not ex-
pressly approved by the party re-
sponsible for compliance could void
the user ’s authority to operate the
equipment.
This device complies with part 15 of the
FCC Rules. Operation is subject to the
following two conditions: (1) This de-
vice may not cause harmful interfer-
ence, and (2) this device must accept
any interference received, including
interference that may cause undesired
operation.
2-4
Page 106 of 594

–Canada-spec. models–Mexico-spec. modelsDoor locks
& Locking and unlocking from
the outside
NOTE
If you unlock the driver ’s door with a
key (including a mechanical key) and
open the door while the alarm system
is armed, the alarm system is triggered
and the vehicle ’s horn sounds. In this
case, perform any of the following
operations:
Models with “keyless access with
push-button start system ”:
. Press any button on the access key
(except when the access key battery is
discharged).
. Press the push-button ignition
switch to “ACC”.
. Carry the access key and perform
either of the following procedures.
–Grip the front door handle
– Press the rear gate opener button
Models without “keyless access with
push-button start system ”:
. Press any button on the remote
transmitter (except when the transmit-
ter battery is discharged).
. Insert the key into the ignition
switch and turn the ignition switch to
Keys and doors/Door locks
–CONTINUED –2-5
Page 107 of 594

Keys and doors/Door locks
“ON”.
For details about the alarm system,
refer to “Alarm system” F2-27.
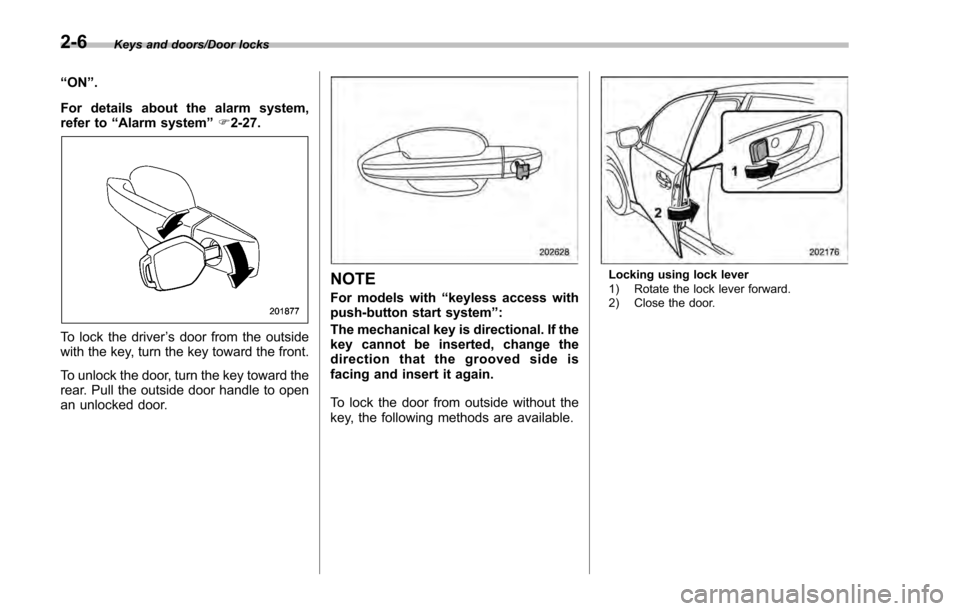
To lock the driver ’s door from the outside
with the key, turn the key toward the front.
To unlock the door, turn the key toward the
rear. Pull the outside door handle to open
an unlocked door.
NOTE
For models with “keyless access with
push-button start system ”:
The mechanical key is directional. If the
key cannot be inserted, change the
direction that the grooved side is
facing and insert it again.
To lock the door from outside without the
key, the following methods are available.
Locking using lock lever
1) Rotate the lock lever forward.
2) Close the door.
2-6
Page 108 of 594

Locking using power door locking switch
1) Press the front side (lock side) of thepower door locking switch.
2) Close the door.
In this case, all closed doors and the rear
gate (for 5-door) are locked at the same
time.
Always make sure that all doors and the
rear gate (for 5-door) are locked before
leaving your vehicle.
NOTE
Make sure that you do not leave the key
inside the vehicle when locking the
doors from the outside without the key.
& Locking and unlocking from
the inside
1) Unlock
2) Lock
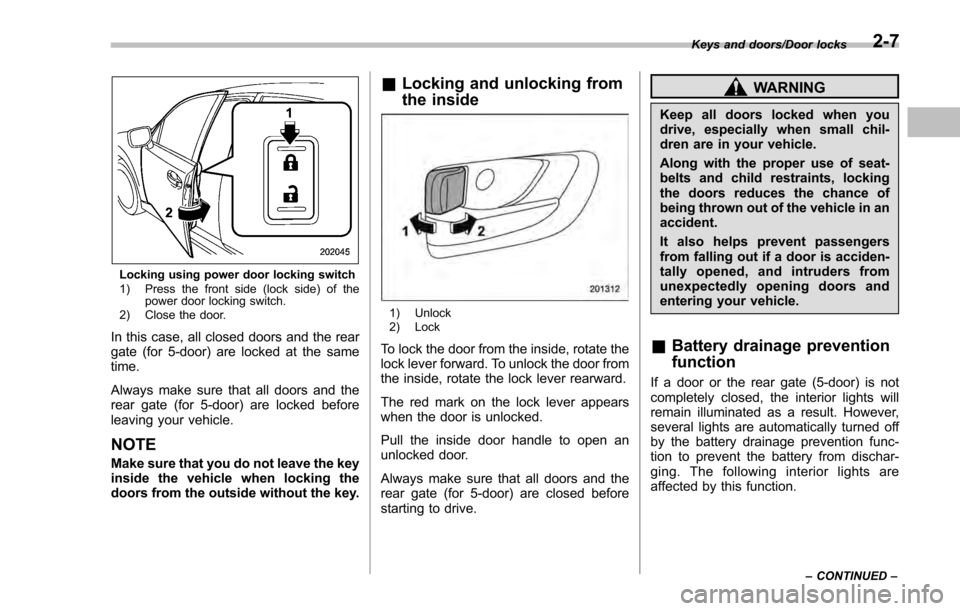
To lock the door from the inside, rotate the
lock lever forward. To unlock the door from
the inside, rotate the lock lever rearward.
The red mark on the lock lever appears
when the door is unlocked.
Pull the inside door handle to open an
unlocked door.
Always make sure that all doors and the
rear gate (for 5-door) are closed before
starting to drive.
WARNING
Keep all doors locked when you
drive, especially when small chil-
dren are in your vehicle.
Along with the proper use of seat-
belts and child restraints, locking
the doors reduces the chance of
being thrown out of the vehicle in an
accident.
It also helps prevent passengers
from falling out if a door is acciden-
tally opened, and intruders from
unexpectedly opening doors and
entering your vehicle.
&Battery drainage prevention
function
If a door or the rear gate (5-door) is not
completely closed, the interior lights will
remain illuminated as a result. However,
several lights are automatically turned off
by the battery drainage prevention func-
tion to prevent the battery from dischar-
ging. The following interior lights are
affected by this function.
Keys and doors/Door locks
–CONTINUED –2-7