2016 SKODA YETI sd card
[x] Cancel search: sd cardPage 4 of 100

Table of Contents
Important information about this Owner's
Manual3
Explanations and further information
4
Abbreviations
Introductory information
Important notes
6
Device overview
7
Device operation and settings
Device operation
12
Voice control
14
Device settings
16
Radio
Operation
21
Settings
23
Media
Operation
24
Audio sources
26
Pictures
Image viewer
31
Video DVD
Video player
32
TV tuner
TV function
34Media Command
Using the system36
Phone
Introductory information
39
Pair and connect
42
Use the SIM card in the external module
45
rSAP
46
Telephone functions
46
Text messages (SMS)
50
Hotspot (WLAN) and data connection
Hotspot (WLAN)
52
data connection
53
SmartLink
Introductory information
54
Android Auto ™
55
Apple CarPlay ™
56
MirrorLink®
56
Navigation
Introductory information
59
Search for destination and enter
60
Import my destinations
64
Map
65
Route guidance
68
Route
70
Waypoint mode
72Traffic reports74
Settings
76
Vehicle systems
CAR - vehicle setting
78
Adjustment of the heating and cooling system
82
Index
2Table of Contents
Page 10 of 100

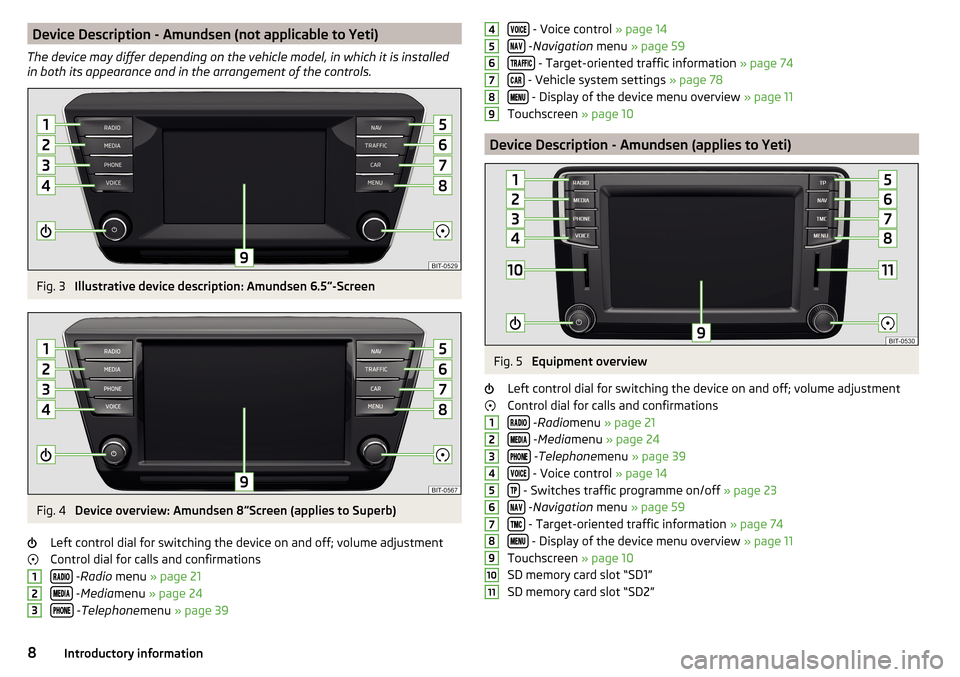
Device Description - Amundsen (not applicable to Yeti)
The device may differ depending on the vehicle model, in which it is installed
in both its appearance and in the arrangement of the controls.Fig. 3
Illustrative device description: Amundsen 6.5 -Screen
Fig. 4
Device overview: Amundsen 8
Screen (applies to Superb)
Left control dial for switching the device on and off; volume adjustment
Control dial for calls and confirmations
- Radio menu » page 21
- Media menu » page 24
- Telephone menu » page 39
123 - Voice control » page 14
- Navigation menu » page 59
- Target-oriented traffic information » page 74
- Vehicle system settings » page 78
- Display of the device menu overview » page 11
Touchscreen » page 10
Device Description - Amundsen (applies to Yeti)
Fig. 5
Equipment overview
Left control dial for switching the device on and off; volume adjustment
Control dial for calls and confirmations
- Radio menu » page 21
- Media menu » page 24
- Telephone menu » page 39
- Voice control » page 14
- Switches traffic programme on/off » page 23
- Navigation menu » page 59
- Target-oriented traffic information » page 74
- Display of the device menu overview » page 11
Touchscreen » page 10
SD memory card slot “SD1”
SD memory card slot “SD2”
45678912345678910118Introductory information
Page 11 of 100

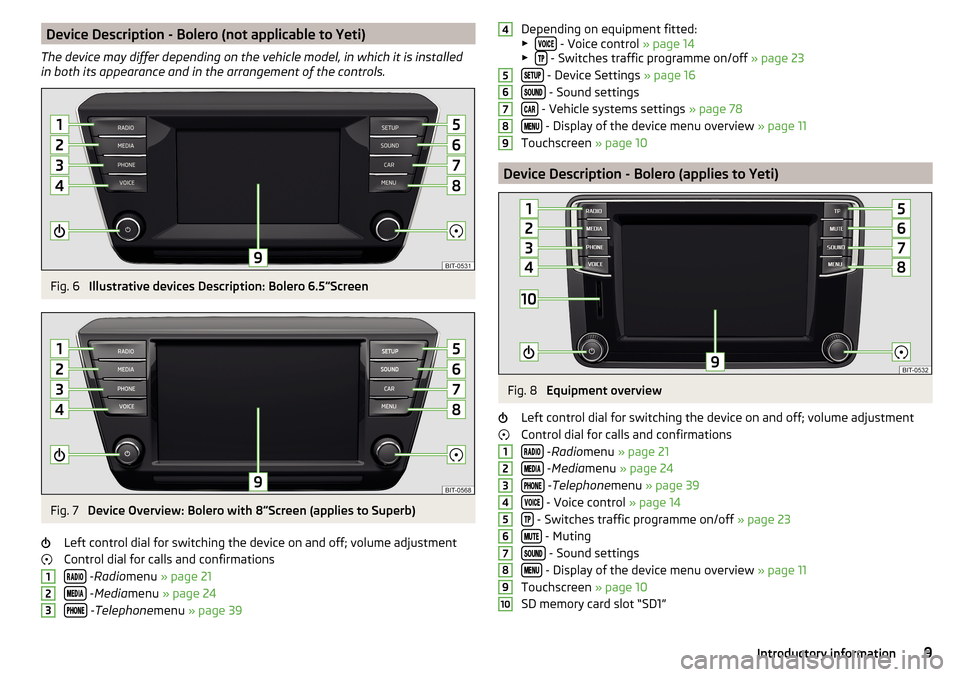
Device Description - Bolero (not applicable to Yeti)
The device may differ depending on the vehicle model, in which it is installed
in both its appearance and in the arrangement of the controls.Fig. 6
Illustrative devices Description: Bolero 6.5 Screen
Fig. 7
Device Overview: Bolero with 8
Screen (applies to Superb)
Left control dial for switching the device on and off; volume adjustment
Control dial for calls and confirmations
- Radio menu » page 21
- Media menu » page 24
- Telephone menu » page 39
123Depending on equipment fitted:
▶ - Voice control » page 14
▶ - Switches traffic programme on/off » page 23
- Device Settings » page 16
- Sound settings
- Vehicle systems settings » page 78
- Display of the device menu overview » page 11
Touchscreen » page 10
Device Description - Bolero (applies to Yeti)
Fig. 8
Equipment overview
Left control dial for switching the device on and off; volume adjustment
Control dial for calls and confirmations
- Radio menu » page 21
- Media menu » page 24
- Telephone menu » page 39
- Voice control » page 14
- Switches traffic programme on/off » page 23
- Muting
- Sound settings
- Display of the device menu overview » page 11
Touchscreen » page 10
SD memory card slot “SD1”
456789123456789109Introductory information
Page 12 of 100

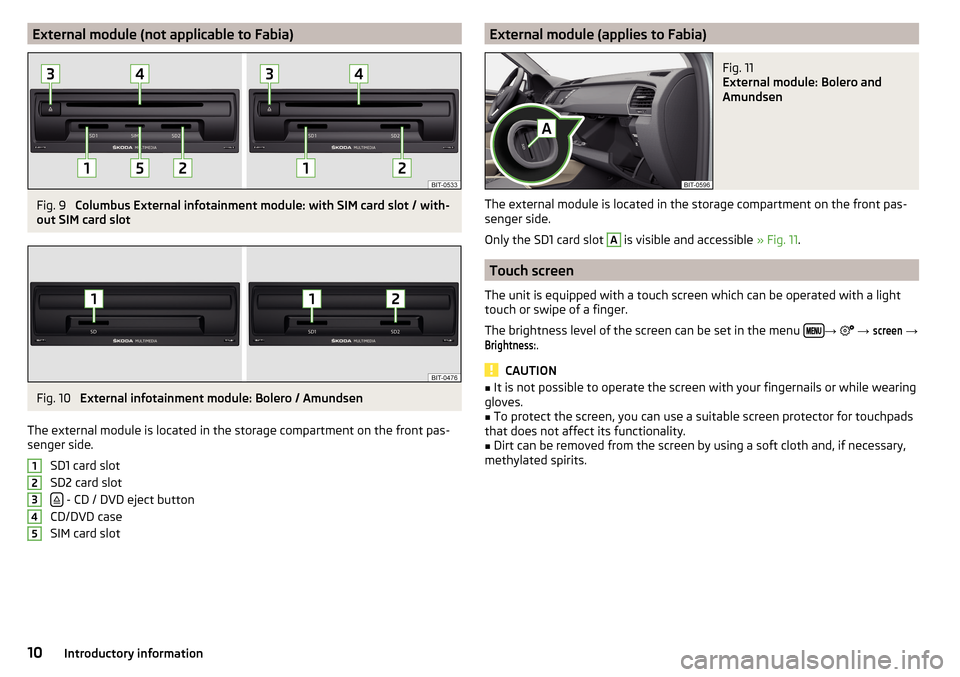
External module (not applicable to Fabia)Fig. 9
Columbus External infotainment module: with SIM card slot / with-
out SIM card slot
Fig. 10
External infotainment module: Bolero / Amundsen
The external module is located in the storage compartment on the front pas-
senger side.
SD1 card slot
SD2 card slot
- CD / DVD eject button
CD/DVD case
SIM card slot
12345External module (applies to Fabia)Fig. 11
External module: Bolero and
Amundsen
The external module is located in the storage compartment on the front pas-
senger side.
Only the SD1 card slot
A
is visible and accessible » Fig. 11.
Touch screen
The unit is equipped with a touch screen which can be operated with a light
touch or swipe of a finger.
The brightness level of the screen can be set in the menu
→
→
screen
→
Brightness:
.
CAUTION
■
It is not possible to operate the screen with your fingernails or while wearing
gloves.■
To protect the screen, you can use a suitable screen protector for touchpads
that does not affect its functionality.
■
Dirt can be removed from the screen by using a soft cloth and, if necessary,
methylated spirits.
10Introductory information
Page 21 of 100

Bluetooth®
Settings›
Press the button, then tap on the function surface
→ Tap
Bluetooth
.
■
Bluetooth
- Switch on/off Bluetooth ®
function
■
Visibility:
- switch on/off the visibility of the Bluetooth ®
device for other exter-
nal devices
■
Name:
- Changing the name of the Bluetooth ®
unit
■
Paired devices
- display the list of paired Bluetooth ®
devices
■
Find devices
- searches for available devices
■
Bluetooth audio (A2DP/AVRCP)
- Turn on/off the ability to connect an audio device
(e.g. MP3 player, tablet etc.)
Settings
›
Press the button, then tap on the function surface
→ Tap
network
.
■
Network settings
- Setting of the data connection according to the associated
telephone service provider (APN settings)
■
Access point name: ...
- Setting of the access point name
■
User name: …
- Setting of user name
■
Password: ...
- Password setting
■
Authentication
- Setting for the type of verification
■
Normal
- Without verification
■
Safe
- Verification required
■
Reset Access Point (APN)
- Delete the parameters for the network setting
■
Save
- Store the parameters for the network setting
■
Network provider: ...
- Selection of the data service provider (the menu item is
visible when the data services are active in the SIM card inserted in the ex-
ternal module)
■
Data roaming
- Enable / disable the use of data roaming connection
■
Current connection details
- Display of information on data downloaded (by press-
ing the function key
Reset
the data information is deleted)
■
Data connection:
- Data service settings for the SIM card inserted in the external
module
■
Off
- Data services are turned off
■
Inquire
- Data services are actively seeking confirmation
■
On
- Data services are turned on
Wireless settings
Applies to Columbus, Amundsen (not applicable to Yeti).›
Press the button, then tap on the function surface
Tap →
WLAN
.
■
WLAN
- List of available hotspots of external devices
■
WLAN
- Turn on / off the device wireless
■
WPS Quick Connect (WPS button)
- Establishing a secure connection to the hot-
spot of the external device via WPS (applies to Amundsen)
■
Manual settings
- Setting the parameters for search and connection to the
hotspot of the external device ■
Network name
- Enter the Hotspot name
■
Network key
- Setting the access password
■
Security level:
- Adjustment of the coverage
■
WPA2
- WPA2 security
■
WPA
- WPA security
■
No security level
- No coverage (without required entry of the access pass-
word)
■
Connect
- Connection establishment
■
Search
- Search / Restore the list of available hotspots
■
Mobile hotspot
- Setting device hotspots (in the functional surface the symbol
is displayed with the number of connected external devices)
■
Mobile hotspot
- Turn on / off device hotspots
■
WPS Quick Connect (WPS button)
- Establishing a secure connection to the de-
vice via WPS hotspot (applies to Amundsen)
■
Hotspot settings
- Setting the parameters for the connection to the device
hotspot
■
Security level:
- Setting the connection coverage
■
WPA2
- WPA2 security
■
WPA
- WPA security
■
No security level
- No coverage (without required entry of the access pass-
word)
■
Network key
- Entering the access password
■
SSID: ...
- Name of the device hotspot
■
Do not send network name (SSID)
-Switch WLAN hotspot security on/off
■
Storage
- Storage of the device hotspot parameters
System information
›
Press the button, then tap on the function surface
Tap
→
system infor-mation
.
19Device operation and settings
Page 24 of 100

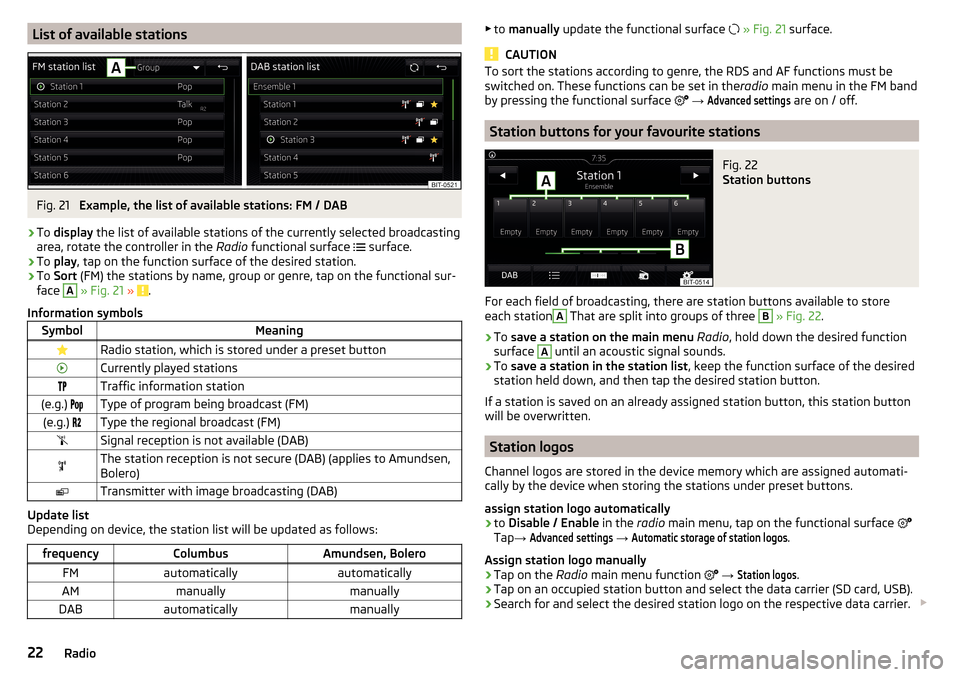
List of available stationsFig. 21
Example, the list of available stations: FM / DAB
›
To display the list of available stations of the currently selected broadcasting
area, rotate the controller in the Radio functional surface
surface.
›
To
play , tap on the function surface of the desired station.
›
To Sort (FM) the stations by name, group or genre, tap on the functional sur-
face
A
» Fig. 21 » .
Information symbols
SymbolMeaningRadio station, which is stored under a preset buttonCurrently played stationsTraffic information station(e.g.) Type of program being broadcast (FM)(e.g.) Type the regional broadcast (FM)Signal reception is not available (DAB)The station reception is not secure (DAB) (applies to Amundsen,
Bolero)Transmitter with image broadcasting (DAB)
Update list
Depending on device, the station list will be updated as follows:
frequencyColumbusAmundsen, BoleroFMautomaticallyautomaticallyAMmanuallymanuallyDABautomaticallymanually▶ to manually update the functional surface » Fig. 21 surface.
CAUTION
To sort the stations according to genre, the RDS and AF functions must be
switched on. These functions can be set in the radio main menu in the FM band
by pressing the functional surface
→ Advanced settings
are on / off.
Station buttons for your favourite stations
Fig. 22
Station buttons
For each field of broadcasting, there are station buttons available to store
each station
A
That are split into groups of three
B
» Fig. 22 .
›
To save a station on the main menu Radio , hold down the desired function
surface
A
until an acoustic signal sounds.
›
To save a station in the station list , keep the function surface of the desired
station held down, and then tap the desired station button.
If a station is saved on an already assigned station button, this station button
will be overwritten.
Station logos
Channel logos are stored in the device memory which are assigned automati-
cally by the device when storing the stations under preset buttons.
assign station logo automatically
›
to Disable / Enable in the radio main menu, tap on the functional surface
Tap →
Advanced settings
→
Automatic storage of station logos
.
Assign station logo manually
›
Tap on the Radio main menu function
→
Station logos
.
›
Tap on an occupied station button and select the data carrier (SD card, USB).
›
Search for and select the desired station logo on the respective data carrier.
22Radio
Page 30 of 100

■Do not affix anything to the CD/DVDs!■If the ambient temperature is too high or too low, the CD / DVD playback may
not work.■
Damp (condensation) may affect the device in cold weather or after showers.
This can cause the CD to jump or impair the play function. Once the moisture
has dissipated, playback is fully functional again.
Note
■ After pressing the symbol key it takes a few seconds for the CD / DVD to
be ejected.■
With uneven or unpaved roads playback jumps may occur.
■
If the CD/DVD is damaged, is not readable or is inserted incorrectly, the fol-
lowing message is displayed:
Error: CD/DVD
.
■
It is possible that CD/DVDs protected by copyright cannot be played back at
all or only in certain circumstances.
SD card
Fig. 28
Insert SD card: does not apply to Fabia / applies to Fabia
The SD card slot/s is/are located in an external module in the glove compart-
ment on the passenger side.
Insert SD card (Does not apply to Fabia)
›
“Insert” the SD card in the slot in the direction of arrow (with the cut end fac-
ing right), until this locks » Fig. 28-
.
Insert SD card (Does not apply to Fabia)
›
Insert The SD card in the direction of the arrow, with the trimmed edge
downwards (LHD) or upwards (RHD), into the bay until it “locks” » Fig. 28 -
.
Remove the SD card›Tap on the function surface in the Media main →
Remove safely:
Tap and
select the desired SD card.›
Press on the inserted SD memory card. The SD card “jumps” into the eject position.
CAUTION
■ Do not use an SD card with a broken write protection slide - there is a risk of
damage to the SD card reader!■
When using an SD card with an adapter, vehicle vibrations might cause the
card to fall out of the adapter.
USB input
The USB input (shown with the symbol ) is located in the front centre con-
sole. The exact installation location of the input » Owner's Manual .
The USB input audio source can be connected directly or via a connecting ca-
ble.
›
To connect , insert the USB audio source into the appropriate input.
›
To disconnect the USB audio source, tap on the Media main menu function
surface
→
Remove safely:
Tap and select the USB source.
›
Disconnect the audio source from the corresponding USB input.
Charge USB audio source
With the device on after connecting the USB audio source, the charging proc-
ess is automatically started (applies for audio sources where charging via the
USB connector is possible).
The charging efficiency can differ compared to the charging from the usual
mains power supply.
Some connected audio sources may not be recognised and cannot be charged.
CAUTION
USB extension cords, or reducers may impair the function of the connected au-
dio source.
Note
We recommend that you use extension cords from ŠKODA Original Accesso-
ries.28Media
Page 32 of 100

Supported audio sources and file formats
Supported audio sourcesSourceInterfaceTypeSpecificationFile sys- temSD cardSD readerStandard sizeSD, SDHC, SDXC
FAT16
FAT32
exFAT NTFSUSB-
devices
USB 1.x; 2.x and 3.x or
higher with support of USB 2.x
MSC
USB stick;
HDD (without any special software); The MSC mode
supports USB de- vices
MTP
Devices with theAndroid operat- ing system or
Windows mobile (mobile phone, tablet)
Apple
Devices with theiOS operating
system (iPhone, iPod, iPad)
CD/DVD
(Applies to Columbus)CD/DVD- Drive
Audio CD (Up to 80 min);
CD-R / RW (Up to 700 MB);
DVD±R/RW; DVD audio,DVD video
ISO9660;
Joliet (Level 1,2,3); UDF 1.x;UDF 2.x
-
Supported audio file formatsCodec type
(File formats)File suffixMax. bit rateMaximumsampling rateMulti
channels a)PlaylistsWindows Media
Audio
9 and 10wma384 kbit / s
96 kHz
no
m3upls
wpl
m3u8 asx
WAVwav
Defined bythe format (approx.
1.5 Mbit/s)MPEG-1; 2 and 2.5
Layer 3mp3320 kbit / s
48 kHz
MPEG-2 and 4aac; mp4;m4a
yes
FLAC;
OGG Vorbisflac; ogg
Defined by the format (approx.
5.5 Mbit/s)a)
Applies to the CANTON sound system.
The GPT standards (GUID partition table) method structured audio sources are
not supported by the device.
Files that are protected by Digital Rights Management (DRM) technology can-
not be played back by the device.
30Media