2016 SKODA RAPID SPACEBACK ESP
[x] Cancel search: ESPPage 5 of 100

Important information about this Owner's Manual
This manual is valid for all types of Columbus, Amundsen and Bolero infotain-
ment systems (hereafter only known as devices). The device may differ de-
pending on the vehicle model, in which it is installed in both its appearance
and in the arrangement of the controls.
This Owner's Manual describes all possible device functions without identify-
ing them as special equipment, model variants or market-dependent equip-
ment. Consequently, the device in your vehicle does not need to contain all of
the functions described in this Owner's Manual.
For example, if the vehicle is not factory equipped with the CANTON sound
system, the menu points
CANTON Optimisation
,
CANTON Surround
and
CANTON Equalis-er
are not shown.
The availability of some features described in this Owner's Manual depends
on the type of external devices (for example, telephone, music player, etc.).
The illustrations in this Owner's Manual are for illustrative purposes only. The
illustrations can differ in minor details from your vehicle; they are only inten-
ded to provide general information.
ŠKODA AUTO pursues a policy of ongoing product and model development
with all vehicles. Therefore, changes to the scope of delivery with regard to
design, equipment and technology are possible at any time. The information
provided in this Owner's Manual corresponds to the information available at
the time of publishing.
Therefore, legal claims cannot be made based on the technical data, illustra-
tions and information contained in this Owner's Manual.
We recommend that the web pages that are referred to in this Owner's Man-
ual are displayed using the classic view. Not all necessary information may be
displayed correctly if the mobile view is chosen.
Screen texts that appear in this Owner's Manual may differ slightly depending
on the texts show on the device screen.
Information and System Support
Information e.g. related to updating the device software, compatible external
devices etc., Please refer to the following websites.
http://go.skoda.eu/infotainment
Declaration of conformity
ŠKODA AUTO hereby declares that the ŠKODA Infotainment systems meet the
basic requirements and additional provisions of the 1999/5/EC Directive with
reference to radio equipment and telecommunications devices.3Important information about this Owner's Manual
Page 8 of 100

Introductory information
Important notes
Introduction to the subject
WARNING■Concentrate fully at all times on your driving! As the driver you are fully
responsible for the operation of your vehicle.■
Only use the device in such a way that you have control of the vehicle in
every traffic situation (e.g. Do not write text messages while driving, do not
couple or connect the telephone, do not work with the contact list, do not
enter any destinations, do not connect WLAN or SmartLink etc.)- Otherwise
there is a risk of an accident!
WARNING■ Adjust the volume to ensure that acoustic signals from outside the vehi-
cle, e.g. sirens from emerging vehicles instructing you to give way to, such
as the police, ambulance and fire brigade, can be heard at all times.■
High volumes can cause hearing damage.
WARNING■ Never leave a communication device, e.g. mobile phone, audio sources, in
the deployment area of an airbag, on a seat, on the dashboard or any an-
other area, from which it can be thrown during a sudden braking manoeu-
vre, an accident or a collision - There is a risk of injury!■
Never connect or disconnect an external device while driving - There is a
risk of accident!
■
Always route the connection cable of the external device such that is
does not restrict you when driving.
CAUTION
In some countries, some unit features can no longer be selected when the ve-
hicle is running faster than a certain speed. This is not a malfunction, but com-
plies with the national legal regulations.External devices and applicationsFig. 1
QR code with reference to the
ŠKODA websites
The availability of some of the functions described in this Owner's Manual
depends on the type of device to be connected and the applications installed
in it.
Mobile phones
On the ŠKODApages, check to see if the device is compatible with the selected
mobile phones. This verification is done by reading the QR code » Fig. 1 by the
associated application in the external device (e.g. phone, tablet) or after typing
the following address into the web browser.
http://go.skoda.eu/compatibility
Due to the large number of mobile phones as well as the ongoing develop-
ment of these devices, ŠKODA AUTO cannot always ensure compatibility with
the device unconditionally. It is always recommended to physically check the
function on the associated vehicle, including the ŠKODA Partners, beforehand.
Only those versions of the selected phones will be tested and supported which
originate from the official distribution network. The same also applies to their
firmware and software.
The functions of the mobile phone to be tested may differ from the same type
of mobile phone depending on the specification for the respective country or
the specific service.
Mobile phones with the operating system and in the version available at the
time of these tests will be tested. In this regard, it could be the case that the
functions of a mobile phone may differ with a different operating system ver-
sion compared to the one used with the tested phone.
ŠKODA AUTO can accept no responsibility for the continuous changes made by
the mobile phone manufacturers and application vendors.
6Introductory information
Page 13 of 100

Software updateFig. 12
QR code with reference to the
ŠKODA websites
Part of the device is the installed software.
The software update ensures optimum operation of the device (e.g.. Compati-
bility with new phones, updating the radio station logo).
Current information on the compatibility of external devices can be found on
the following ŠKODAInternet pages. This is done by reading the QR code
» Fig. 12 by the associated application in the external device (e.g. phone, tablet)
or after typing the following address into the web browser.
http://go.skoda.eu/updateportal
▶ To display the software information , press the
button, then tap on the
System information function surface Tap on
→
system information
.
▶ To start the software update , tap on the
Update software
function surface in
the displayed menu.
Device on / off
›
To power on/off the device, press .
Automatic Power On of the device
If the device was not turned off with the control switch
before the ignition
was turned off, it will automatically switch on after the ignition is switched on.
Automatic Power Off of the device
If the vehicle key is pulled out of the ignition lock while the unit is switched on,
the device will switch off automatically.
If the vehicle is fitted with the starter button, the device will switch off auto-
matically after the engine is switched off and the door is opened.
With the ignition off, the device will automatically turn off after about 30 mi-
nutes.
The device turns off automatically under certain circumstances. The device in-
forms of this via a text message on the device display.
Restart the device
If the device does not respond (if it “freezes”) This can be restarted by holing
for longer than 10 s.
Unit menus
Fig. 13
Overview of the device menu
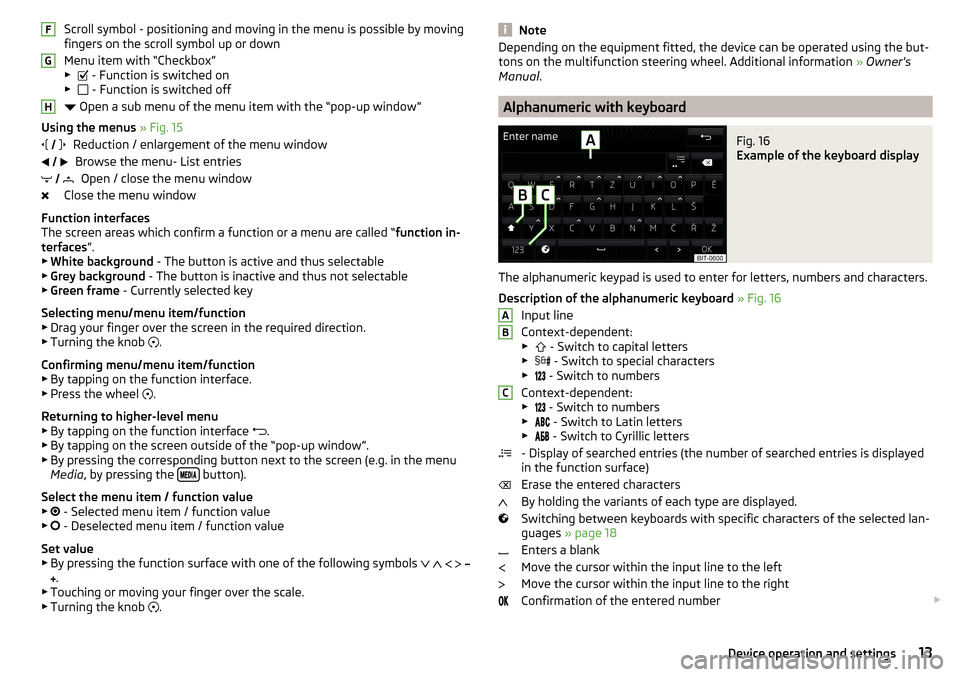
›
To
display the device menu overview, press the button.
Overview of the device menu » Fig. 13
Menu Radio » page 21
Menu Media » page 24
Menu Images » page 31
sound settings
Unit set-up » page 16
- Adjusting the vehicle systems (not applicable to Yeti) » page 78
Navigation menu » page 59 (Applies to Columbus, Amundsen)
Menu Telephone » page 39
TV tuner (Applies to Columbus) » page 34
Target-oriented traffic information (TMC) (applies to Columbus, Amundsen)
» page 74
Media Command menu » page 36
Menu SmartLink » page 54
When connecting a supported external device instead of the symbol
the actual connection is shown instead of a symbol
▶ -
Android Auto
» page 55
▶ -
Apple CarPlay
» page 56
▶ -
MirrorLink®
» page 56
11Introductory information
Page 15 of 100

Scroll symbol - positioning and moving in the menu is possible by moving
fingers on the scroll symbol up or down
Menu item with “Checkbox”
▶ - Function is switched on
▶ - Function is switched off
Open a sub menu of the menu item with the “pop-up window”
Using the menus » Fig. 15
Reduction / enlargement of the menu window Browse the menu- List entries Open / close the menu window
Close the menu window
Function interfaces
The screen areas which confirm a function or a menu are called “ function in-
terfaces ”.
▶ White background - The button is active and thus selectable
▶ Grey background - The button is inactive and thus not selectable
▶ Green frame - Currently selected key
Selecting menu/menu item/function ▶ Drag your finger over the screen in the required direction.
▶ Turning the knob .
Confirming menu/menu item/function
▶ By tapping on the function interface.
▶ Press the wheel .
Returning to higher-level menu ▶ By tapping on the function interface .
▶ By tapping on the screen outside of the “pop-up window”.
▶ By pressing the corresponding button next to the screen (e.g. in the menu
Media , by pressing the
button).
Select the menu item / function value ▶ - Selected menu item / function value
▶ - Deselected menu item / function value
Set value
▶ By pressing the function surface with one of the following symbols
.
▶ Touching or moving your finger over the scale.
▶ Turning the knob .
FGH
NoteDepending on the equipment fitted, the device can be operated using the but-
tons on the multifunction steering wheel. Additional information » Owner's
Manual .
Alphanumeric with keyboard
Fig. 16
Example of the keyboard display
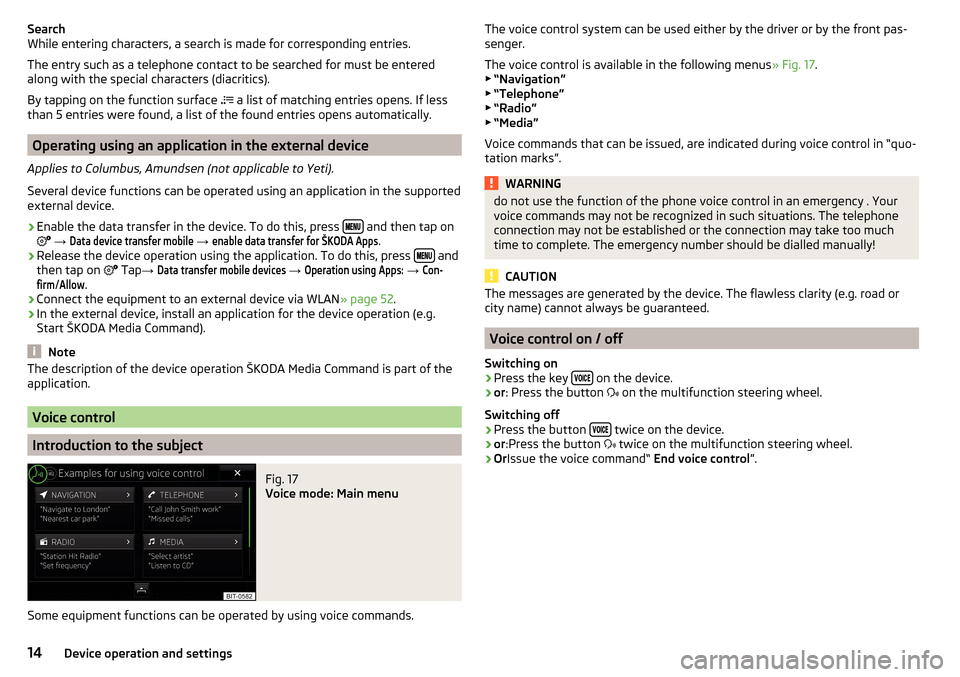
The alphanumeric keypad is used to enter for letters, numbers and characters.
Description of the alphanumeric keyboard » Fig. 16
Input line
Context-dependent: ▶ - Switch to capital letters
▶ - Switch to special characters
▶ - Switch to numbers
Context-dependent: ▶ - Switch to numbers
▶ - Switch to Latin letters
▶
- Switch to Cyrillic letters
- Display of searched entries (the number of searched entries is displayed
in the function surface)
Erase the entered characters
By holding the variants of each type are displayed.
Switching between keyboards with specific characters of the selected lan-
guages » page 18
Enters a blank
Move the cursor within the input line to the left
Move the cursor within the input line to the right
Confirmation of the entered number
ABC13Device operation and settings
Page 16 of 100

Search
While entering characters, a search is made for corresponding entries.
The entry such as a telephone contact to be searched for must be entered
along with the special characters (diacritics).
By tapping on the function surface
a list of matching entries opens. If less
than 5 entries were found, a list of the found entries opens automatically.
Operating using an application in the external device
Applies to Columbus, Amundsen (not applicable to Yeti).
Several device functions can be operated using an application in the supported
external device.
›
Enable the data transfer in the device. To do this, press and then tap on
→
Data device transfer mobile
→
enable data transfer for ŠKODA Apps
.
›
Release the device operation using the application. To do this, press and
then tap on Tap
→
Data transfer mobile devices
→
Operation using Apps:
→
Con-firm
/
Allow
.
›
Connect the equipment to an external device via WLAN » page 52.
›
In the external device, install an application for the device operation (e.g.
Start ŠKODA Media Command).
Note
The description of the device operation ŠKODA Media Command is part of the
application.
Voice control
Introduction to the subject
Fig. 17
Voice mode: Main menu
Some equipment functions can be operated by using voice commands.
The voice control system can be used either by the driver or by the front pas-
senger.
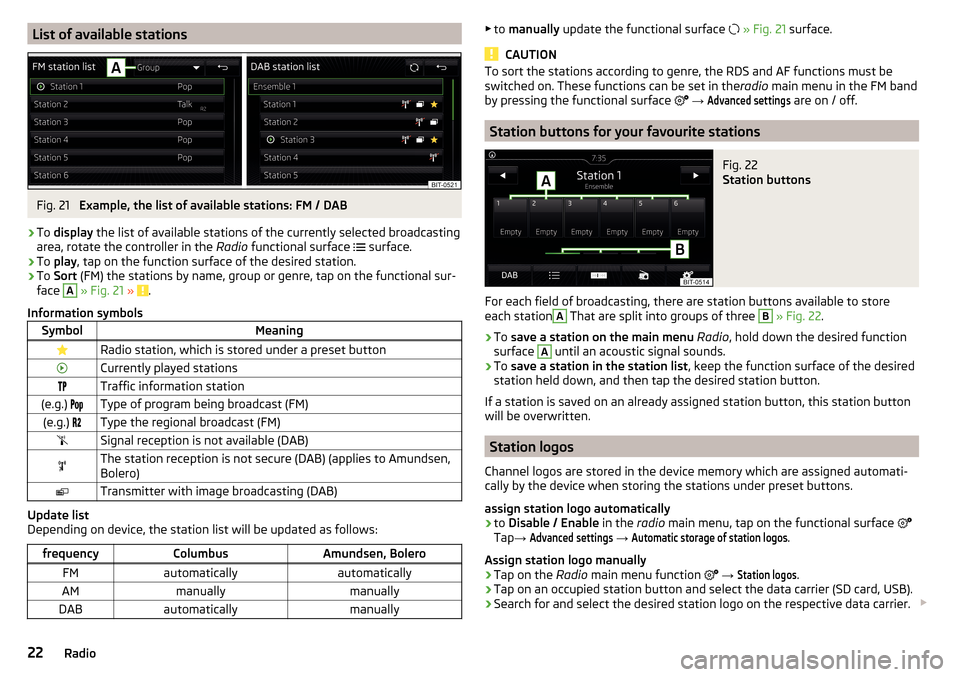
The voice control is available in the following menus » Fig. 17.
▶ “Navigation”
▶ “Telephone”
▶ “Radio”
▶ “Media”
Voice commands that can be issued, are indicated during voice control in “quo-
tation marks”.WARNINGdo not use the function of the phone voice control in an emergency . Your
voice commands may not be recognized in such situations. The telephone
connection may not be established or the connection may take too much
time to complete. The emergency number should be dialled manually!
CAUTION
The messages are generated by the device. The flawless clarity (e.g. road or
city name) cannot always be guaranteed.
Voice control on / off
Switching on
›
Press the key on the device.
›
or
: Press the button
on the multifunction steering wheel.
Switching off
›
Press the button twice on the device.
›
or
:Press the button
twice on the multifunction steering wheel.
›
Or Issue the voice command“ End voice control”.
14Device operation and settings
Page 19 of 100

The selected menu item is with the symbol provided.
Menu items which can be set by tapping on the respective function surface in
the A
» Fig. 19 area.
Sound settings
The scope of the following menu is dependent on the vehicle equipment with the sound system.
›
Press the button, then tap on the function surface
Tap.
■
Volume
- Volume settings
■
Announcements
- Adjustment of traffic announcements volume (TP)
■
Navigation announcements
- sets the volume for the navigation announce-
ments
■
Voice control
- volume setting for voice output
■
Maximum switch-on volume
- Sets the maximum volume after switching on the
device
■
Speed-dependent vol. adjustment
- increases the volume as speed increases
■
AUX volume:
- Sets the volume for the device connected through AUX exter-
nal devices
■
Quiet
- low volume
■
Medium
- Medium volume
■
Loud
- High volume
■
Bluetooth audio:
- Volume setting of the external device connected via Blue-
tooth ®
audio profile
■
Entertainment fading while parking
- Lowers the audio volume (e.g. radio volume)
with activated parking aid
■
Entertainment fading (nav. announcements)
- Lowers the audio volume (e.g. radio
volume) in the event of a nav. announcements
■
Bass - Mid - Treble
- setting the equalizer
■
Balance - Fader
- Sets the balance between left and right, front and rear
■
CANTON Equaliser
- Setting the equalizer
■
Individual
- Adjustment of treble, mid and bass
■
Profile
- Setting of the profile (e.g.
Rock
.
Classical
and so on).
■
CANTON optimisation
- Setting the optimum room sound perception
■
All
- Optimising the sound for the entire vehicle interior
■
Front
- Optimising the surround sound for the front seats
■
Driver
- Optimising the sound for the driver
■
CANTON surround
- Setting the surround sound levels in the area (“-9 ”Stereo /
“+9”full surround)
■
Subwoofer
- Subwoofer volume settings
■ŠKODA Surround - Turn surround sound on/off (Cannot be used in Radio mode)
■Virtual Subwoofer
-Turn virtual subwoofer on/off (Cannot be used in Radio
mode)
■
Sound Character
- Select the sound character (applies to Yeti)
■
Surround
- Optimising the sound for the room (applies to Yeti)
■
Sound focus
-Setting the optimum room sound perception
■
All
- Optimising the sound for the entire vehicle interior
■
Driver
- Optimising the sound for the driver
■
Touchscreen tone
- Switch on/off audible tone when touching the screen
■
No navigation announcements during call
- Switches on or off the navigation
prompts during a telephone conversation
Screen settings
›
Press the button, then tap on the function surface
→ Tap
screen
.
■
Switch off screen (in 10 seconds)
- Enable / disable the automatic power off func-
tion
■
Brightness:
- Adjusts the brightness of the screen
■
Touchscreen tone
- Switch on/off audible tone when touching the screen
■
Proximity sensor
- Turn the proximity sensors on/off (When the function is on,
e.g. Navigation will be shown in the main menu when moving a finger to-
wards the bottom bar with the functional surfaces on the screen)
■
Show clock in standby mode
- Time and date displayed on the screen when the
ignition is switched on and the unit is switched off
Time and date settings
›
Press the button, then tap on the function surface
Tap
→
Time and date
.
■
Clock time source:
- Setting the time source: manual,GPS (applies to Columbus,
Amundsen)
■
Time:
- Time settings
■
Summertime
- Activate / deactivate summer time (applies to Columbus,
Amundsen)
■
automatically adjust DST
- Turn on / off the automatic switch to daylight saving
time
■
Time zone:
- Select the time zone
■
Time format:
- Set the time format
■
Date:
- Date settings
■
Date format:
- Set the date format
17Device operation and settings
Page 24 of 100

List of available stationsFig. 21
Example, the list of available stations: FM / DAB
›
To display the list of available stations of the currently selected broadcasting
area, rotate the controller in the Radio functional surface
surface.
›
To
play , tap on the function surface of the desired station.
›
To Sort (FM) the stations by name, group or genre, tap on the functional sur-
face
A
» Fig. 21 » .
Information symbols
SymbolMeaningRadio station, which is stored under a preset buttonCurrently played stationsTraffic information station(e.g.) Type of program being broadcast (FM)(e.g.) Type the regional broadcast (FM)Signal reception is not available (DAB)The station reception is not secure (DAB) (applies to Amundsen,
Bolero)Transmitter with image broadcasting (DAB)
Update list
Depending on device, the station list will be updated as follows:
frequencyColumbusAmundsen, BoleroFMautomaticallyautomaticallyAMmanuallymanuallyDABautomaticallymanually▶ to manually update the functional surface » Fig. 21 surface.
CAUTION
To sort the stations according to genre, the RDS and AF functions must be
switched on. These functions can be set in the radio main menu in the FM band
by pressing the functional surface
→ Advanced settings
are on / off.
Station buttons for your favourite stations
Fig. 22
Station buttons
For each field of broadcasting, there are station buttons available to store
each station
A
That are split into groups of three
B
» Fig. 22 .
›
To save a station on the main menu Radio , hold down the desired function
surface
A
until an acoustic signal sounds.
›
To save a station in the station list , keep the function surface of the desired
station held down, and then tap the desired station button.
If a station is saved on an already assigned station button, this station button
will be overwritten.
Station logos
Channel logos are stored in the device memory which are assigned automati-
cally by the device when storing the stations under preset buttons.
assign station logo automatically
›
to Disable / Enable in the radio main menu, tap on the functional surface
Tap →
Advanced settings
→
Automatic storage of station logos
.
Assign station logo manually
›
Tap on the Radio main menu function
→
Station logos
.
›
Tap on an occupied station button and select the data carrier (SD card, USB).
›
Search for and select the desired station logo on the respective data carrier.
22Radio
Page 27 of 100

Note■Information concerning the given title appears on the screen, if they are stor-
ed as so-called ID3 Tags on the audio source. If no ID3 tag is available, only the
title name is displayed.■
The remaining playback time indicated does not correspond to the actual re-
maining playback time for titles with variable bit rates (VBR).
Select audio source
Fig. 24
Display examples of audio source
selection
›
In the Media main menu, tap on the function surface
A
» Fig. 24 and select
the desired audio source.
›
Or In the folder/track list and in the multimedia database press the function
surface
» Fig. 25 on page 25 and select the desired audio source.
By selecting an audio source, playback of titles available starts (not for AUX).
Use play
FunctionActionPlay / PauseTap
Plays the current track from the start
Tap (after about 3 seconds after
the start of the track playback)Finger movement to the right of the screen area A
» Fig. 23 on page 24
(After 3 seconds from the start of the track playback)Fast-reverse within the titlePress and hold Fast-forward within the trackPress and hold FunctionAction
Play the previous title
Tap (within 3 seconds after the
start of the track playback)Finger movement to the right of the screen area A
» Fig. 23 on page 24
(Within 3 seconds after the start of the track playback)Play the next title
Tap Finger movement to the left of the
screen area A
» Fig. 23 on page 24Switch on/off the random playback
from the current album or folderTap Switch on/off the repeat playback
from the current album or folderTap Switch on/off repeat playback of spe-
cific trackTap Search (applies to sources with a dis-
playable multimedia database) (ap- plies to Columbus)Tap Turn on/ off similar track playback
with information from the ID3Tag (ap- plies to Columbus)Tap
The movement within the track is possible by finger touching the timeline
B
» Fig. 23
on page 24 .
Folder / track list
Fig. 25
Folder / Title list
›
To display the folder / track list on the Media main menu, tap on the function
Tap (if this display is supported by the currently selected source).
25Media