2016 SKODA KODIAQ third row of seats
[x] Cancel search: third row of seatsPage 18 of 344

WARNING (Continued)■No two persons (also not children) should ever use a single seat belt to-
gether.■
The lock tongue should only be inserted into the lock which is the correct
one for your seat. Wrong use of the safety belt will reduce its capacity to
protect and the risk of injury increases.
■
Many layers of clothing and loose clothing (e. g. a winter coat over a jack-
et) do not allow you to be correctly seated and impairs proper operation of
the seat belts.
■
Do not use clamps or other objects to adjust seat belts (e.g. for shorten-
ing the belts for smaller persons).
■
The seat belts for second and third row of seats can only fulfil their func-
tion reliably if the rear seat backrests are correctly locked into position
» page 80 .
WARNINGInformation on the care and maintenance of safety belts■The belt webbing must always be kept clean. Soiled belt webbing may im-
pair the proper operation of the inertia reel » page 273.■
The seat belts must not be removed or changed in any way. Do not at-
tempt to repair the seat belts yourself.
■
Check the condition of all the seat belts on a regular basis. If parts of the
belt system become damaged (e.g. the belt webbing, the belt connections,
the inertia reel, the locking part etc.), the respective seat belt must be re-
placed by a specialist garage immediately.
■
Seat belts which have been subjected to stress in an accident must be re-
placed by a specialist garage. The anchorage points for the belts should al-
so be checked.
Correct routing of seat beltFig. 5
Routing of belt webbing over the shoulders and the lap belt/Rout-
ing of belt webbing for an expectant mother
Fig. 6
Seat belt height adjusters for front seats
Read and observe
on page 15 first.
It is important that the belt is properly routed to ensure seat belts offer the
maximum protection.
The shoulder part of the belt must run approximately over the middle of your
shoulder (never across your neck) and fit well against your upper body » Fig. 5
-
.
The lap part of the belt must run lap part of the belt must run in front of the
pelvis (must never run across your stomach) and must always fit snugly » Fig. 5
-
.
In the case of pregnant women , the lap part of the belt must be positioned as
low as possible on the pelvis to avoid exerting any pressure on the lower ab-
domen » Fig. 5 -
.
16Safety
Page 19 of 344

Seat belt height adjusters for front seats›Push the seat belt guide loop upwards in the direction of arrow » Fig. 6 - .›
Or : push together the mechanism in the direction of arrows
1
and push the
return pulley downwards in the direction of arrow
2
» Fig. 6 -
.
›
Then pull firmly on the belt to ensure that the seat belt height adjuster has
correctly locked in place.
WARNING■ Always ensure that the webbing of the seat belts is properly routed. Seat
belts which are not correctly adjusted can themselves cause injuries even
in minor accidents.■
A seat belt which is hanging too loose can result in injuries as your body is
moved forward by the kinetic energy produced in an accident and is then
suddenly held firm by the belt.
■
The belt webbing must not run across solid or fragile objects (e.g. specta-
cles, ball-point pens, keys, etc.). Such objects can cause injury.
Fastening and unfastening seat belts
Fig. 7
Fastening/unfastening the seat belt
Fig. 8
Fasten/unfasten seat belt in the third row
Read and observe
on page 15 first.
Before fastening
›
Adjust the headrest properly (does not apply to seats with integrated headr-
ests).
›
Adjust the seat (applies for the front seats and the second row).
›
Adjust the belt height (applies to the front seats).
Fasten - in front and in the second row
›
Use the lock tongue to slowly pull the webbing over your chest and pelvis.
›
Insert the lock tongue into the belt buckle for the seat » Fig. 7 -
until it
audibly clicks into place.
›
Pull on the belt to check that it has engaged correctly in the lock.
Unfasten - in front and in the second row
›
Hold the lock tongue and press the red button in the belt buckle » Fig. 7 -
.
The lock tongue pops out.
›
Feed the belt back manually so that the seat belt is not twisted and the belt
webbing rolls up completely.
Fasten - in the third row of seats
›
Slowly pull down the belt on the lock tongue
A
» Fig. 8 in the arrow direc-
tion
1
.
›
Insert the lock tongue
A
into the lock in the direction of arrow
2
until it
clicks.
›
Pull the belt on the lock tongue
B
slowly across the chest and pelvis in the
direction of arrow
3
.
›
Insert the lock tongue
B
in the other lock in the direction of arrow
4
stuck,
until it clicks.
›
Pull on the belt to check that it has engaged correctly in the lock.
17Seat belts
Page 20 of 344
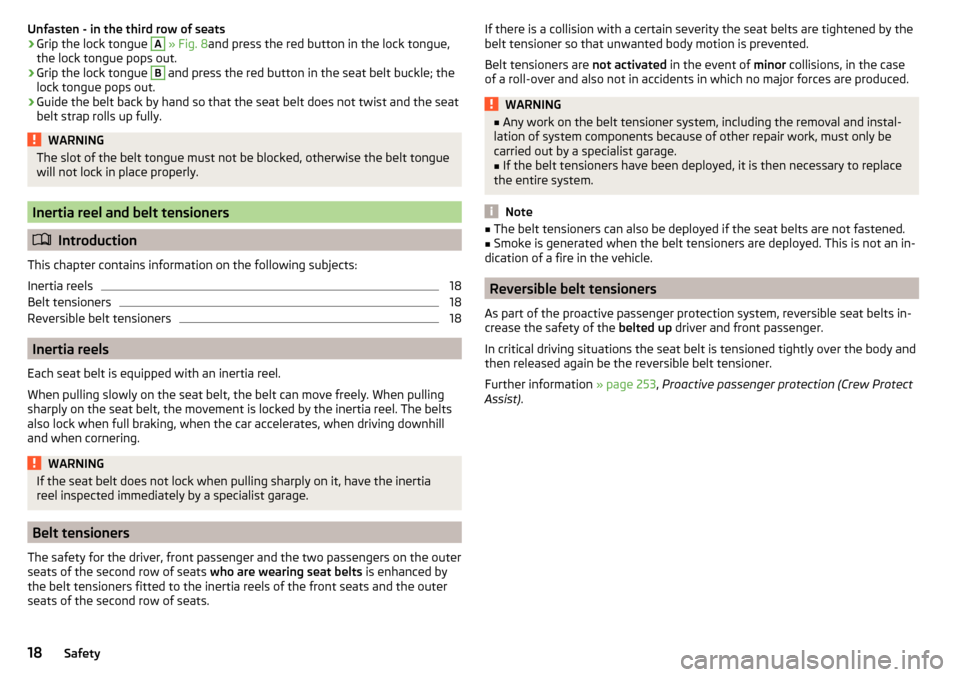
Unfasten - in the third row of seats›Grip the lock tongue A » Fig. 8 and press the red button in the lock tongue,
the lock tongue pops out.›
Grip the lock tongue
B
and press the red button in the seat belt buckle; the
lock tongue pops out.
›
Guide the belt back by hand so that the seat belt does not twist and the seat
belt strap rolls up fully.
WARNINGThe slot of the belt tongue must not be blocked, otherwise the belt tongue will not lock in place properly.
Inertia reel and belt tensioners
Introduction
This chapter contains information on the following subjects:
Inertia reels
18
Belt tensioners
18
Reversible belt tensioners
18
Inertia reels
Each seat belt is equipped with an inertia reel.
When pulling slowly on the seat belt, the belt can move freely. When pulling
sharply on the seat belt, the movement is locked by the inertia reel. The belts
also lock when full braking, when the car accelerates, when driving downhill
and when cornering.
WARNINGIf the seat belt does not lock when pulling sharply on it, have the inertia
reel inspected immediately by a specialist garage.
Belt tensioners
The safety for the driver, front passenger and the two passengers on the outer
seats of the second row of seats who are wearing seat belts is enhanced by
the belt tensioners fitted to the inertia reels of the front seats and the outer
seats of the second row of seats.
If there is a collision with a certain severity the seat belts are tightened by the
belt tensioner so that unwanted body motion is prevented.
Belt tensioners are not activated in the event of minor collisions, in the case
of a roll-over and also not in accidents in which no major forces are produced.WARNING■ Any work on the belt tensioner system, including the removal and instal-
lation of system components because of other repair work, must only be
carried out by a specialist garage.■
If the belt tensioners have been deployed, it is then necessary to replace
the entire system.
Note
■ The belt tensioners can also be deployed if the seat belts are not fastened.■Smoke is generated when the belt tensioners are deployed. This is not an in-
dication of a fire in the vehicle.
Reversible belt tensioners
As part of the proactive passenger protection system, reversible seat belts in-
crease the safety of the belted up driver and front passenger.
In critical driving situations the seat belt is tensioned tightly over the body and
then released again be the reversible belt tensioner.
Further information » page 253, Proactive passenger protection (Crew Protect
Assist) .
18Safety
Page 26 of 344

WARNING (Continued)■Children are exposed to an increased risk of injury in the event of an acci-
dent if they lean forward or adopt an incorrect seated position when the
vehicle is moving. This particularly applies to children who are transported
on the front passenger seat as they can suffer severe, or even fatal injuries
if the airbag system is deployed!■
Pay particular attention to the information provided by the manufacturer
of the child safety seat regarding the correct routing of the belt. Seat belts
which are not correctly adjusted can themselves cause injuries even in mi-
nor accidents.
■
Safety belts must be checked to ensure that they are running properly.
One should also ensure that the belt is not damaged by sharp-edged fit-
tings.
■
When installing the child seat on a seat in the second or third row of
seats, the corresponding front seat must be adjusted so that there is no
contact between the front seat and the child seat or the child being trans-
ported in a child seat.
■
When installing a child seat in which the child faces forward, adjust the
head restraints so that they are as high as possible.
■
If the head restraints still prevent the child seat from being installed,
even in the lowest position, you will need to remove them » page 83. Af-
ter removing the child seat, refit the head restraints.
■
When using a separate child seat cushion, set the headrest so that the
child's head is flush to the height of the headrest upper edge, but does not
protrude above this » Fig. 2 on page 13
C
.
Note
We recommend that you use child seats from ŠKODA Original Accessories.
These child seats were developed and also tested for use in ŠKODA vehicles.
They meet the ECE-R 44 standard.Use of a child seat on the front passenger seat (variant 1)
Does not apply to TaiwanFig. 13
Warning labels
Read and observe
on page 23 first.
Never use a rearward-facing child restraint system on a seat which is protec-
ted by an active airbag. This could cause serious injury to the child, or even
death.
This is indicated also on stickers that are located at the following positions. ▶ On the front passenger's sun visor » Fig. 13 -
.
▶ On the B-pillar on the front passenger side » Fig. 13 –
.
The following instructions must be followed when using a child seat on the front passenger seat.
▶ The front passenger airbag must be deactivated if using a rear-facing child
seat »
.
▶ If possible, adjust the front passenger seat backrest so that it is as vertical,
so as to ensure secure contact between the passenger seat backrest and the
back of the child seat.
▶ If possible, move the front passenger seat backwards so that there is no con-
tact between the front passenger seat and the child seat behind it.
▶ Set the height-adjustable front passenger seat as high up as possible.
▶ Set the front passenger seat belt as high up as possible.
▶ With child safety seats in groups 2 and 3, make sure that the loop-around fit-
tings attached to the child seat headrest is positioned in front of or at the
same height as the loop-around fittings on the B pillar on the passenger side.
24Safety
Page 28 of 344

Classification of child seatsRead and observe
on page 23 first.
Classification of child seats according to the ECE-R 44 standard.
GroupWeight of the child0up to 10 kg0+up to 13 kgGroupWeight of the child19-18 kg215-25 kg322-36 kgUse of child safety seats which are secured using a seat belt
Never use a rear-facing child seat on the front passenger seat if the passenger airbag is activated. This child safety seat is positioned in the deployment area of the front passenger airbag. The airbag may cause the child severe, or even fatal injuries, in the event of it being deployed.
Read and observe
on page 23 first.
Overview of the usability of child seats secured with a seat belt on seats in accordance with the ECE-R 16 standard.GroupPassenger seat with activa- ted front airbagPassenger seat with de-activated front airbagSecond row of seats - outer seatsSecond row of seats -center seat a)Third row of seats
a)
b)0
up to 10 kgXU c)UUL0+
up to 13 kgXU c)UUL1
9-18 kgUFUUUL2
15-25 kgUFUUUL3
22-36 kgUFUUULa)
It is prohibited to attach a child seat with support leg in the middle of the second row and in the third row.
b)
Adjust the longitudinally adjustable seat in the second row of seats as far forward as possible.
c)
Set the height-adjustable front passenger seat as high up as possible.
UThe “Universal” category is suitable for the use of child seats approved in this weight group.UFThe “Universal” category is suitable for the use of forward-facing child seats approved in this weight group.LOnly suitable for recommended child seats of Category 2-3» page 29, Recommended child seats .XThe seat is not suitable for children in this weight group.26Safety
Page 29 of 344

Fastening systems
Introduction
This chapter contains information on the following subjects:
attachment points of the
system
27
Use of child safety seats with the
system
27
Using child seats with the
system
28
Attachment points of the
system
28
Recommended child seats
29
attachment points of the system
Fig. 17
Labels of the system
is a system for securing child seats quickly and safely.
Two locking eyes for fixing a child seat with the
system are located be-
tween the seat backrest and the seat cushion of the outer rear seats of the
second seat row and front passenger seat.
First, remove the caps A
in order to access the locking eyes » Fig. 17. After re-
moving the child seat, replace he caps.
WARNING■ Always refer to the instructions of the manufacturer of the child seat
when installing and removing a child seat with the system.■
Never attach other child seats, belts or objects to the attachment points
intended for the installation of a child seat with the
system – risk of
death!
Note
■ A child seat fitted with the system can only be mounted in a vehicle fit-
ted with a system if the child seat has been approved for this type of ve-
hicle. Further information is available from a ŠKODA Partner.■
Child seats with the
system can be purchased from ŠKODA Original Ac-
cessories.
Use of child safety seats with the system
Never use a rear-facing child seat on the front passenger seat if the passenger airbag is activated. This child safety seat is positioned in the deployment area of
the front passenger airbag. The airbag may cause the child severe, or even fatal injuries, in the event of it being deployed.Overview of the usability of child seats fastened with the system on each of the seats in accordance with the ECE-R 16 standard.GroupSize class of
the child seat a)Front passenger seat
with activated front air bagb)Front passenger seat
with front airbag switched offb)Second row of seats
-
outer seats c)Second row of seats
-
center seatThird row of seats0
up to 10 kgEXXILXX0+
up to 13 kgE
XXILXX
DC 27Transporting children safely
Page 30 of 344

GroupSize class of
the child seat a)Front passenger seat
with activated front air bagb)Front passenger seat
with front airbag switched offb)Second row of seats
-
outer seats c)Second row of seats
-
center seatThird row of seats
1
9-18 kg
D
XXIL
IUFXX
CBB1A2
15-25 kg-XXILXX3
22-36 kg-XXILXXa)
The size category is shown on the label attached to the child seat.
b)
If the front passenger seat is fitted with system attachment points, it is suitable for the installation of an
child seat with “Semi-Universal” approval.
c)
The seat is suitable for the
fixing system.
ILThe seat is suitable for installation of a
child seat with the “Semi-Universal” approval. The “Semi-Universal” category means that the child seat
with the
system is approved for your vehicle. Observe the list of vehicles that comes with the child seat.IUFThe seat is suitable for the use of forward-facing child seats approved in this weight group.XThe seat is not fitted with system attachment points.
Using child seats with the
system
Front passenger seat
with activated front air bagFront passenger seat
with front airbag switched offSecond row of seats - outer seatsSecond row of seats - center seatThird row ofseatsXXi-UXXThe seat is suitable for forward and backward facing child seats of
the category “Universal”.
The seat is not suitable for the
child seat of the category “Universal”.i-UXAttachment points of the systemFig. 18
Attachment points of the
-system
28Safety
Page 31 of 344

is an attachment system that restricts the movement of the upper
part of the child seat.
The attachment points A
for attaching the attachment belt of a child seat
with the
system are located on the rear of the seat backrests of the
second row of seats » Fig. 18.
WARNING■
Always refer to the instructions from the manufacturer of the child seat
when installing and removing a child seat with the system.■
Only use child seats with the
system on the seats with the at-
tachment points.
■
Only ever attach one belt from the child seat to a locking eye.
Recommended child seatsGroupManufacturerTypeAttachmentOrder numberApproval number (E1 ...)0+
up to 13 kgBritax RömerBaby Safe PlusIsofix base frame1ST01990704 3011461
9-18 kgBritax RömerDuo Plus TTIsofix and Top TetherDDA0000064 3011332-3
15-36 kgBritax RömerKidfix XP BR a)Isofix000019906K4 301198Britax RömerKidfix II XPIsofix000019906L4 301323a)
For optimum protection, especially in the case of a side collision, it is recommended to use this child seat together with back part. For the third row only, this child seat can be used in addition to the back part (the use of
a separate child seat cushion is not possible).
29Transporting children safely