2016 SKODA KODIAQ change wheel
[x] Cancel search: change wheelPage 276 of 344

CAUTION■Natural leather /Faux leather / Alcantara ®
/ material
■ In lengthy periods in bright sunlight, it might be sensible to cover these
materials in order to avoid bleaching. ■ Fresh stains (e.g. from pens, lipstick, shoe polish etc.) should be removed as
soon as possible.
■ Ensure that no part of the leather is soaked through during cleaning and
that no water gets into the seams.
■ Do not clean the roof panelling with a brush – risk of damage to the surface
of the panelling.
■ Do not use solvents, floor wax, shoe cream, stain remover or similar agents
on Alcantara ®
seat upholstery.
■ Some clothing fabrics (e.g. dark denim) do not have sufficient colour fast-
ness - this may leave evident marks on upholstery. This is not a defect in the
fabric.
■ Sharp objects on garments (e.g. zips, rivets, sharp- edged belts) can dam-
age the upholstery fabrics in the vehicle. Such damage cannot be subse-
quently recognised as a justified complaint.■
Plastic parts ■ Do not attach scents or air fresheners to the dashboard – there is a risk of
damage to the dashboard.
■
Windows
■ Do not attach any stickers to the filaments or glass antenna - there is risk
of damage.
■
Covers of electrically heated seats
■ Do not clean with water or other liquids - there is a risk of damage to the
heating system.
■ Do not dry by switching on the heating.
■
Seat belts
■ Allow to dry before rolling up the seat belts.
Note
During vehicle use, the leather and Alcantara ®
parts may show minor changes
(e.g. folds, discolouration).Inspecting and replenishing
Fuel
Introduction
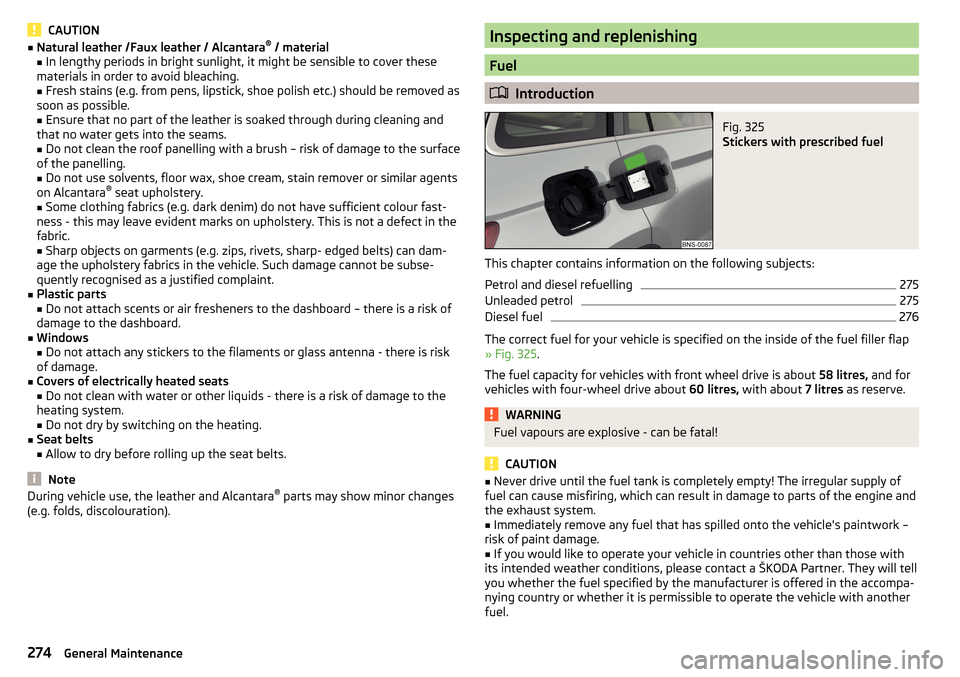
Fig. 325
Stickers with prescribed fuel
This chapter contains information on the following subjects:
Petrol and diesel refuelling
275
Unleaded petrol
275
Diesel fuel
276
The correct fuel for your vehicle is specified on the inside of the fuel filler flap
» Fig. 325 .
The fuel capacity for vehicles with front wheel drive is about 58 litres, and for
vehicles with four-wheel drive about 60 litres, with about 7 litres as reserve.
WARNINGFuel vapours are explosive - can be fatal!
CAUTION
■
Never drive until the fuel tank is completely empty! The irregular supply of
fuel can cause misfiring, which can result in damage to parts of the engine and
the exhaust system.■
Immediately remove any fuel that has spilled onto the vehicle's paintwork –
risk of paint damage.
■
If you would like to operate your vehicle in countries other than those with
its intended weather conditions, please contact a ŠKODA Partner. They will tell
you whether the fuel specified by the manufacturer is offered in the accompa-
nying country or whether it is permissible to operate the vehicle with another
fuel.
274General Maintenance
Page 287 of 344

Disconnect/reconnect and changeRead and observe
and on page 283 first.
The new vehicle battery must have the same capacity, voltage, current and the
same size as the original Battery.
We recommend you have the battery replaced by a specialist garage.
›
To disconnect the battery, switch off the ignition and disconnect first the
negative terminal
, and only after this the positive
.
›
To connect the battery, first connect the positive terminal
, and only after
this the negative terminal
.
After disconnecting and re-connecting the vehicle battery, the following func-
tions or devices are partially or completely inoperative.
Function / deviceOperating measurePower windows» page 63Panorama sliding/tilting roof» page 64Sun screen» page 65Time setting» page 44
CAUTION
■ Disconnect the vehicle battery only with the ignition turned off - there is a
risk of damaging the electrical system of the vehicle.■
Before disconnecting the battery, close the electric tailgate, all the windows,
the sliding / tilting roof and the electric sunshade - otherwise malfunctions of
equipment elements may occur.
■
Under no circumstances must the connection cables be connected incorrect-
ly – risk of fire.
Note
After disconnecting and re-connecting the vehicle battery, we recommend
having the vehicle checked by a specialist to ensure that the full functionality
of all electrical systems is guaranteed.Wheels
Wheels and tyres
Introduction
This chapter contains information on the following subjects:
Advice on tyre/wheel usage
285
Tyre pressure
286
Tyre wear and wheel change
287
Spare wheel
287
Spare wheel
287
Tyre marking
288
Advice on tyre/wheel usage
New tyres , during the first 500 km, new tyres do not offer optimum grip and
appropriate care should therefore be taken when driving.
Always fit tyres with a greater profile depth on the front wheels.
Wheels and bolts are matched to each other in terms of design. We recom-
mend that you use wheel rims and wheel bolts from ŠKODA Original Accesso-
ries.
Always store wheels or tyres in a cool, dry and, where possible, dark place. The
tyres themselves should be stored standing.
Tyre life
Tyres age and lose their original characteristics, even if they are not being
used. Therefore, we recommend not using tyres that are more than 6 years
old.
The manufacturing date is indicated on the tyre sidewall (possibly on the in-
side ). For example, DOT ... 10 16... means, for example, that the tyre was manu-
factured in the 10th week of 2016.
Tyre damage
We recommend checking your tyres and wheel rims for damage (punctures,
cuts, splits and bulges, etc.) on a regular basis.
Remove any foreign objects in the tyre tread immediately (e.g. small stones).
Foreign bodies which have penetrated into the tyre (e.g. screws or nails)
should not be removed. Seek help from a specialist garage.
285Wheels
Page 288 of 344

Installation of new tyres
Only fit radial tyres of the same type, size (rolling circumference) and the same
tread pattern on one axle on all 4 wheels.
When mounting new tires the tires have to be replaced axle by axle.
Unidirectional tyres
Some tires may be directional. The direction of rotation of the tyres is marked by arrows on the wall of the tyre .
The specified running direction must be strictly adhered to, otherwise the fol-
lowing tyre characteristics may be degraded. ▶ Driving stability.
▶ Traction.
▶ Tyre noise and tyre wear.
Tires with increased resistance to air loss when punctured
Some vehicles may be fitted with tyres at the factory that have increased
puncture resistance (so-called “SEAL” tyres). For some countries, vehicles are
equipped with “SEAL” tyres delivered without a spare wheel and appropriate
tools.
If “SEAL”tyres are replaced with standard tyres, the vehicle must be retrofitted
with a puncture repair kit or spare wheel and appropriate hand tools.WARNING■ Never use tyres if you do not know anything about the condition and age.■Never drive with damaged tyres – risk of accident.
CAUTION
■The tyres must be protected from contact with substances such as oil,
grease and fuel, which could damage them. If the tyres come into contact with
these substances, then we recommend you have this checked out in a special-
ist workshop.■
Do not use rims with ground or polished surface in winter conditions - there
is a risk of wheel damage (e.g. from the road grit).
Note
■ We recommend that any work on the wheels or tyres is carried out by a spe-
cialist garage.■
We recommend that you use wheel rims, tyres, full wheel trims and snow
chains from ŠKODA Original Accessories.
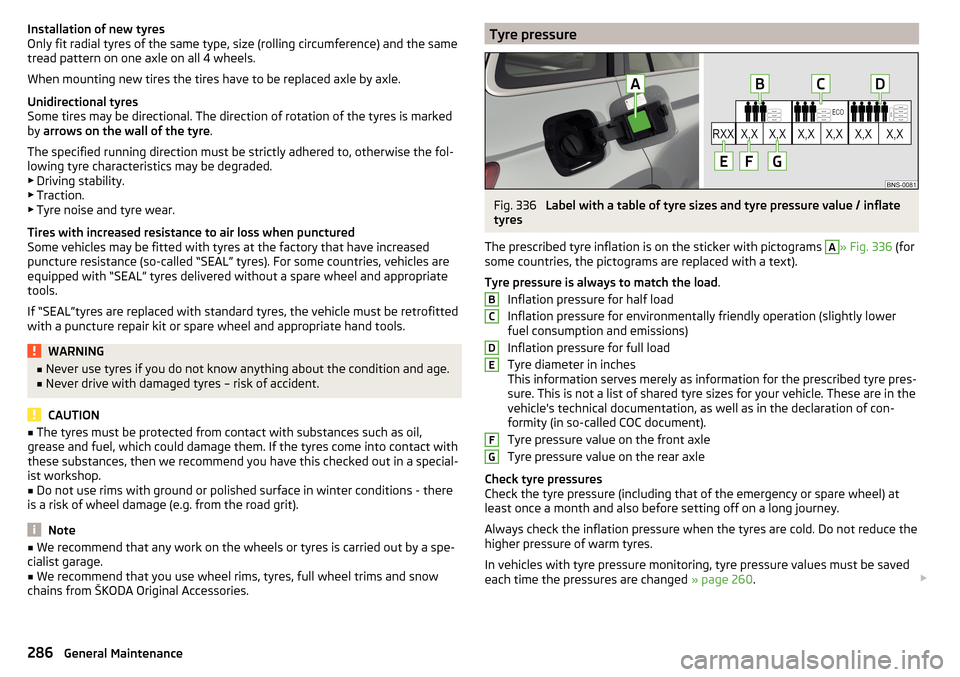
Tyre pressureFig. 336
Label with a table of tyre sizes and tyre pressure value / inflate
tyres
The prescribed tyre inflation is on the sticker with pictograms
A
» Fig. 336 (for
some countries, the pictograms are replaced with a text).
Tyre pressure is always to match the load .
Inflation pressure for half load
Inflation pressure for environmentally friendly operation (slightly lower
fuel consumption and emissions)
Inflation pressure for full load
Tyre diameter in inches
This information serves merely as information for the prescribed tyre pres-
sure. This is not a list of shared tyre sizes for your vehicle. These are in the
vehicle's technical documentation, as well as in the declaration of con-
formity (in so-called COC document).
Tyre pressure value on the front axle
Tyre pressure value on the rear axle
Check tyre pressures
Check the tyre pressure (including that of the emergency or spare wheel) at
least once a month and also before setting off on a long journey.
Always check the inflation pressure when the tyres are cold. Do not reduce the
higher pressure of warm tyres.
In vehicles with tyre pressure monitoring, tyre pressure values must be saved
each time the pressures are changed » page 260.
BCDEFG286General Maintenance
Page 289 of 344

WARNING■Do not drive with an incorrect tyre pressure - risk of accident.■In the event of very fast pressure loss, e.g. in the event of sudden tyre
damage, an attempt should be made to bring the vehicle carefully to a stop
without sudden steering movements and without any hard braking.
Note
The declaration of conformity (COC document), can be obtained from a ŠKODA 1)
partner.
Tyre wear and wheel change
Fig. 337
Tyre wear indicator / wheel change
The tyre wear increases in the following circumstances.
▶ Incorrect tyre pressure.
▶ Driving style (e.g. fast cornering, rapid acceleration / deceleration).
▶ Incorrect balancing of wheels (have the wheels balanced after changing
tyres / repair or with “restlessness” on the steering).
▶ Wheel alignment error.
Wear indicators are located in the profile of the tyres which display the per-
missible minimum tread depth » Fig. 337 -
. A tyre is to be regarded as worn
out when this indicator is flush with the tread. Markings on the walls of the
tyres with the letters “TWI”, triangular symbols or other symbols identify the
position of the wear indicators.
For uniform wear on all tyres, we recommend that you change the wheels ev-
ery 10 000 km according to the schedule » Fig. 337 -
.
WARNING■
Change when they are worn down to the wear indicators at the latest -
risk of accident.■
Improper wheel alignment affects the driving behaviour - there is an acci-
dent.
■
Unusual vibrations or “pulling” of the vehicle to one side could be a sign
of tyre damage. Reduce speed and stop! If no tyre damage is evident, seek
the assistance of a specialist garage.
Spare wheel
The size of the spare wheel is identical to that of the vehicle factory installed
wheels.
After changing the spare wheel, the tyre pressure must be adjusted.
In vehicles with tyre pressure monitoring, save the tyre pressure values in the
system » page 260 .
WARNING■
If, you get a puncture and a spare tyre has to be mounted with opposite
direction of rotation, then drive carefully. The tyre no longer retains its opti-
mal characteristics in this situation.■
If the dimensions or design of the spare wheel differ from the tyres fitted
to the vehicle (e.g. winter tyres or low-profile tyres), it must only be used
briefly in the event of a puncture and if an appropriately cautious style of
driving is adopted.
Spare wheel
Use the emergency spare wheel only to reach the nearest specialist garage, as
it is not intended for permanent use .
A warning label is displayed on the rim of the temporary spare wheel.
1)
Only valid for some countries and some models.
287Wheels
Page 293 of 344

›To
remove the fire extinguisher, release the safety catches on the two belts
in the direction of arrow » Fig. 340 and remove the fire extinguisher.›
To secure , place the fire extinguisher back in the mount and secure with the
belts.
The Owner´s Manual is fitted next to the fire extinguisher.
Pay attention to the expiration date of the fire extinguisher. After this date,
the correct function of the device is not guaranteed.
WARNINGAlways properly secure the fire extinguisher, there is a risk of injury in the
event of sudden braking or a vehicle collision.
Vehicle tool kit
Fig. 341
Vehicle tool kit
The box containing the vehicle tool kit is located in the storage compartment
for the spare wheel, and can be secured with a tape depending on the equip-
ment fitted.
Depending on the vehicle configuration, it may not contain all the compo-
nents listed in the on-board tool kit.
Adapter for anti-theft wheel bolts
Towing eye
Clamps for removing the wheel trims
Jack with sign
Crank for the jack
12345Wheel wrench
Extraction pliers for the wheel bolt caps
Breakdown kitWARNING■ The factory-supplied lifting jack is only intended for your model of vehicle.
Under no circumstances attempt to lift other vehicles or loads with this –
there is a risk of injury.■
Always securely stow the tool in the respective box and make sure that it
is secured to the spare wheel using the tape - there is a risk of injury in the
event of sudden braking or a vehicle collision.
CAUTION
Screw the jack back to its starting position prior to putting it back in its box -
Otherwise, there is a risk of damage to the box.
Note
The declaration of conformity is included with the jack or the log folder.
Changing a wheel
Preliminary work
For safety's sake, the following instructions must be observed before
changing a wheel on the road.
›
As far as possible, park the vehicle far away from the traffic flow - find a
place with a flat and firm surface.
›
Switch off the engine.
›
For vehicles with manual transmission , select 1st gear.
›
For vehicles with
automatic transmission , place the selector lever in the P
position.
›
Switch on the parking brake.
›
Position the hazard warning system and the warning triangle at the prescri-
bed distance.
›
All the occupants should get out of the vehicle. The passengers should not
stand on the road (instead they should remain behind a crash barrier, for in-
stance) while the wheel is being changed.
›
Uncouple any trailers.
678291Emergency equipment and self-help
Page 296 of 344

NoteWe recommend that you use hub caps from ŠKODA Original Accessories.
Wheel bolts
Fig. 344
Remove the cap
›
To remove the cap , insert the extraction pliers up to the stop on the cap and
pull this in the direction of the arrow » Fig. 344.
›
To install , insert the cap up to the stop on the wheel bolt.
Anti-theft wheel bolts
Fig. 345
Anti-theft wheel bolt and upper
section
The anti-theft wheel bolts protect the wheels from theft. The upper section
B
» Fig. 345 must be used to loosen/tighten these.
›
Insert the upper section
B
» Fig. 345 on the anti-theft wheel bolt
A
until it
stops.
›
Insert the wrench on the attachment
B
until it stops and loose/tighten the
wheel bolt.
›
Removing the upper section.
The attachment for the anti-theft wheel bolts must always be kept in the ve-
hicle in case of a possible wheel change!
For wheel trims supplied ex-factory or from ŠKODA Original Accessories, the
anti-theft wheel bolt should be installed in the position marked on the back of
the wheel trim.
Note
We recommend that you retain the label with the code number. A replacement
upper section can be acquired from ŠKODA original parts based on this.
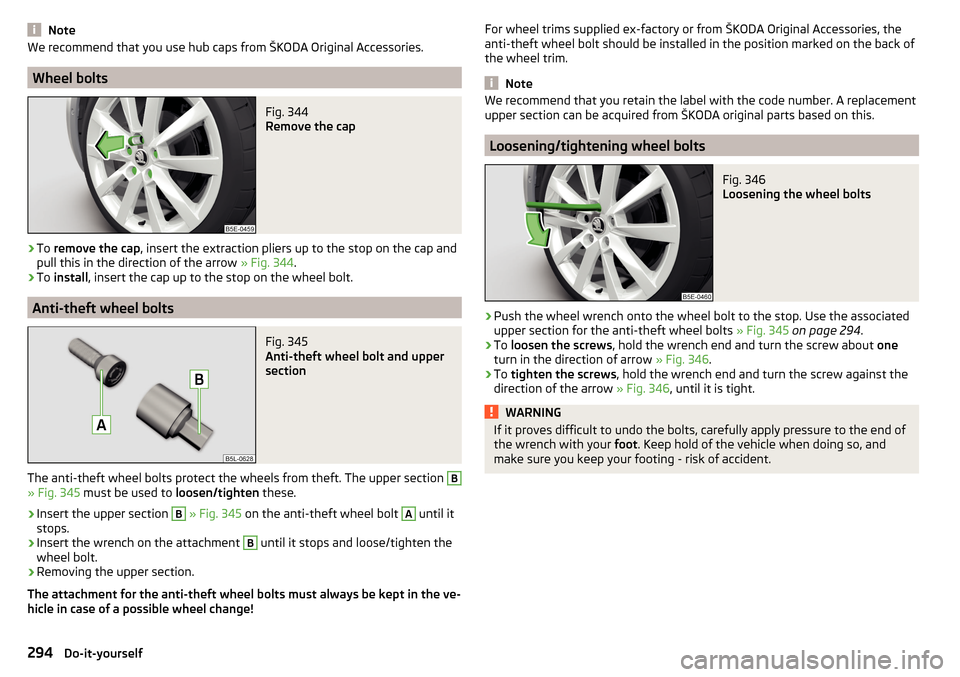
Loosening/tightening wheel bolts
Fig. 346
Loosening the wheel bolts
›
Push the wheel wrench onto the wheel bolt to the stop. Use the associated
upper section for the anti-theft wheel bolts » Fig. 345 on page 294 .
›
To loosen the screws , hold the wrench end and turn the screw about one
turn in the direction of arrow » Fig. 346.
›
To tighten the screws , hold the wrench end and turn the screw against the
direction of the arrow » Fig. 346, until it is tight.
WARNINGIf it proves difficult to undo the bolts, carefully apply pressure to the end of
the wrench with your foot. Keep hold of the vehicle when doing so, and
make sure you keep your footing - risk of accident.294Do-it-yourself
Page 323 of 344

Index
A
A2DP/AVRCP
160
Abort route guidance194
ABS36, 216
ACC
42
see Automatic Distance Control243
Acceptance and recycling of used vehicles268
Accessories266
Activation of online services117
Active steering assist (DSR)217
Adaptive Chassis Control (DCC)42, 251
Adaptive cruise control Set/change desired speed
246
Warning light35
Adaptive Cruise Control42
automatic stopping and starting245
Malfunctions248
Operation244
Operation overview245
Overtaking247
Radar sensor215
Set the clearance level246
Special driving conditions247
Start control246
Stop/resume control246
Trailer towing247
AdBlue277
Check level277
refill277
Warning light40
Additional keyboard languages131, 139
additional window181
Additional windows Manoeuvre
193
Adjusting Steering wheel
13
Adjusting seats manually78
Adjusting the seats12
Advice on tyre/wheel usage285
aim Favourite
185
Flagged destination185
Online goals185
own goal187
saved destination185
search182
Telephone contact185
vCard185
Air-conditioning system Air outlet vents
113
Airbag19
Adjustments and impairments on the airbag system
267
Deactivation22
Deployment20
Warning light37
Airbag system19
Air conditioning109
Air distribution control113
Climatronic110
Manual air conditioning110
Air conditioning system120
Air distribution control113
Air outlet vents113
Alarm57
Trailer265
All season tyres288
Alphanumeric keyboard125
Alternative routes136
Ambient lighting72
Amundsen external module
123
infotainment Description121
Android Auto173
Anti-blocking system (ABS)216
Anti-theft alarm system57
Trailer265
Anti-theft wheel bolts294
APN132
Apple CarPlay174
applications Disclaimer
120
Application ŠKODA One App176
Area view230
Operating principle231
View of the front camera233
View of the rear camera back233
View of the side cameras233
Views and functional surfaces232
AreaView230
Armrest Front
80
Second seat row83
Ashtray98
ASR36 , 217
Assistant for emergencies257
Assist systems215
AT THE141, 142
Audio source146
Auto Check Control Vehicle condition
45
Auto Hold39, 207
Auto Hold function39, 207
Automatic consumer shutdown283
Automatic Distance Control243
Settings in Infotainment244
Automatic drive Selector lever
210
Automatic driving light control67
Automatic gearbox Disengage selector lever
210
Kickdown211
Launch control212
Malfunction39
321Index
Page 325 of 344

ChangingBatteries for the removable light302
Battery300, 301
Wheels291
Windscreen wiper blades304
Changing a wheel291
Changing gear Selector lever
210
Tiptronic211
Charging a vehicle battery284
Check Brake fluid
282
Engine oil281
Oil level281
Checking Battery status
284
Coolant282
Checks Statutory checks
266
Children and safety23
Child safety lock56
Child seat23
Classification26
I-Size28
Installation location26, 27, 28
ISOFIX27
on the front passenger seat24, 25
TOP TETHER28
Cigarette lighter99
Cleaning the vehicle Interior
273
Outside271
Washing270
Climatronic109
air distribution control113
Automatic operation112
Operate in Infotainment112
Operating elements110
Clock change display
125
Clothes hook94
Cockpit31
Lighting71
Columbus external module
123
infotainment Description121
Comfort flashing67
COMING HOME69
Compartments87
Compatible sources DVD video
154
Pictures152
Component protection267
Computer see multifunction display
46
Conditions for pairing160
Conference call167
Configuration wizard126
Connection with the infotainment Hotspot170
Connect to the hotspot of the external device170
Coolant281
Checking282
Refilling282
Temperature display32
Warning light39
CORNER See Fog lights with CORNER function
69
Correct routing of seat belt
16
Correct seated position12
Correct seating position14
Crew Protect Assist253
Cruise control240
Cruise Control System239
Cup holders90
D
DAB
141, 142
additional information141
Radio Text and images presentation141
set to134, 140
DAB Slideshow141
Data Connection Carstick
171
connection171
Internet171
rSAP171
SIM card171
WIRELESS INTERNET ACCESS171
Data roaming132
Data transfer of external devices127
Date131, 138
DAY LIGHT See Daytime running lights
66
Daytime running lights66
Dazzle73
DCC42, 251
De-icing the windscreen and rear window72
Deactivation Airbag
22
default settings201
Delayed locking of the boot lid See boot lid
59
Delete destination192
Demo mode138, 193
Descent Control System42
Destination Enter destination using the address
183
Favourite192
final destinations184
Home address185
Image with GPS189
Memory192
Destination details192
323Index