2016 SKODA KODIAQ weight
[x] Cancel search: weightPage 110 of 344

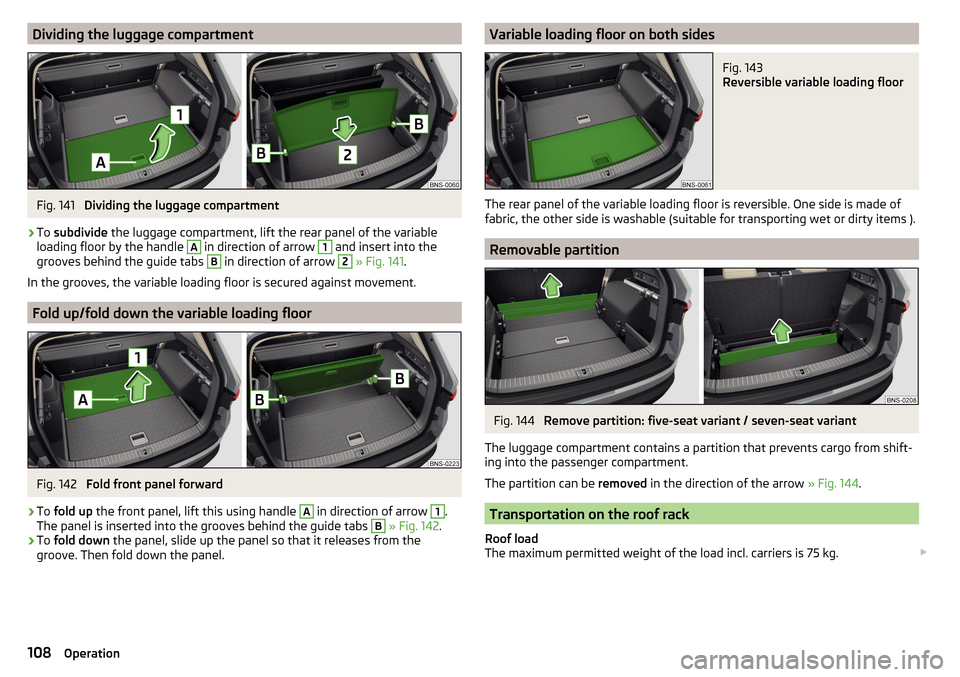
Dividing the luggage compartmentFig. 141
Dividing the luggage compartment
›
To subdivide the luggage compartment, lift the rear panel of the variable
loading floor by the handle
A
in direction of arrow
1
and insert into the
grooves behind the guide tabs
B
in direction of arrow
2
» Fig. 141 .
In the grooves, the variable loading floor is secured against movement.
Fold up/fold down the variable loading floor
Fig. 142
Fold front panel forward
›
To fold up the front panel, lift this using handle
A
in direction of arrow
1
.
The panel is inserted into the grooves behind the guide tabs
B
» Fig. 142 .
›
To fold down the panel, slide up the panel so that it releases from the
groove. Then fold down the panel.
Variable loading floor on both sidesFig. 143
Reversible variable loading floor
The rear panel of the variable loading floor is reversible. One side is made of
fabric, the other side is washable (suitable for transporting wet or dirty items ).
Removable partition
Fig. 144
Remove partition: five-seat variant / seven-seat variant
The luggage compartment contains a partition that prevents cargo from shift-
ing into the passenger compartment.
The partition can be removed in the direction of the arrow » Fig. 144.
Transportation on the roof rack
Roof load
The maximum permitted weight of the load incl. carriers is 75 kg.
108Operation
Page 111 of 344

WARNINGFor road safety when transporting cargo on the roof rack, observe the fol-
lowing instructions.■
Always distribute the load on the roof rack evenly and secure properly us-
ing suitable lashing straps or tensioning straps.
■
When transporting heavy objects or objects which take up a large area on
the roof rack system, the handling of the car may change as a result of the
displacement of the centre of gravity. The style of driving and speed must
therefore be adapted to the current circumstances.
■
The permissible roof load, permissible axle loads and permissible total ve-
hicle weight must not be exceeded under any circumstances – risk of acci-
dent!
CAUTION
■ Make sure that the sliding / tilting roof or the boot lid does not collide with
the roof load when opened.■
Ensure the roof aerial is not impaired by the load being transported.
Note
We recommend that you use a roof rack from ŠKODA Original Accessories.Heating and ventilation
Heating, manual air conditioning system, Climatronic
Introduction
This chapter contains information on the following subjects:
Heating and manual air conditioning
110
Climatronic (automatic air conditioning)
110
Operate Climatronic in Infotainment
112
Climatronic - automatic operation
112
Air distribution control
113
Air outlet vents
113
The heating heats and ventilates the vehicle interior. The air conditioning sys-
tem also cools and dehumidifies the vehicle interior.
The heating effect is dependent upon the coolant temperature, thus full heat
output only occurs when the engine has reached its operating temperature.
The cooling system works under the following conditions. The cooling system is switched on.
The engine is running.
The outside temperature is below 2 ° C.
The blower is switched on.
Fogging is prevented when the cooling system is switched on.
To increase the efficiency of the cooling system, recirculation mode can be
swtiched on briefly » page 113.
Health protection
To reduce health risks (e.g. common colds), the following instructions for the
use of the cooling system are to be observed. ▶ The difference between the indoor temperature and the outdoor air temper-
ature should not be greater than about 5 ° C.
▶ The cooling system should be turned off about 10 minutes before the end of
the journey.
▶ Once a year, the air conditioning should be disinfected by a specialist garage.
109Heating and ventilation
Page 263 of 344

NoteWhen a warning light in the instrument cluster appears, the affected tyre
can be displayed on the infotainment » Fig. 318.Towing device and trailer
Hitch
Introduction
This chapter contains information on the following subjects:
Swinging in and out the tow bar
262
Vertical load with mounted accessories
262
The maximum trailer nose weight when towing a trailer depends on the en-
gine and the vehicle version in the following table. Other data (e.g. shown on
the nameplate of the hitch) on provides information about the test values of
the device .
EngineTransmissionFive-seat versionSeven-seat version1.4 ltr./92 kW TSIMG75 kg66 kg1.4 l/110 kW TSI ACTMG 4x4100 kg80 kgDSG75 kg72 kg1.4 ltr./110 kW TSIDSG 4x4100 kg80 kg2.0 ltr./132 kW TSIDSG 4x4 (EU6)100 kg80 kg
2.0 ltr./110 kW TDI CR
MG 4x4100 kg-DSG80 kg80 kgDSG 4x4 (EU6)100 kg80 kg2.0 ltr./140 kW TDI CRDSG 4x4100 kg80 kgWARNINGDo not use the towing device if it is damaged or if there are parts missing.261Towing device and trailer
Page 264 of 344

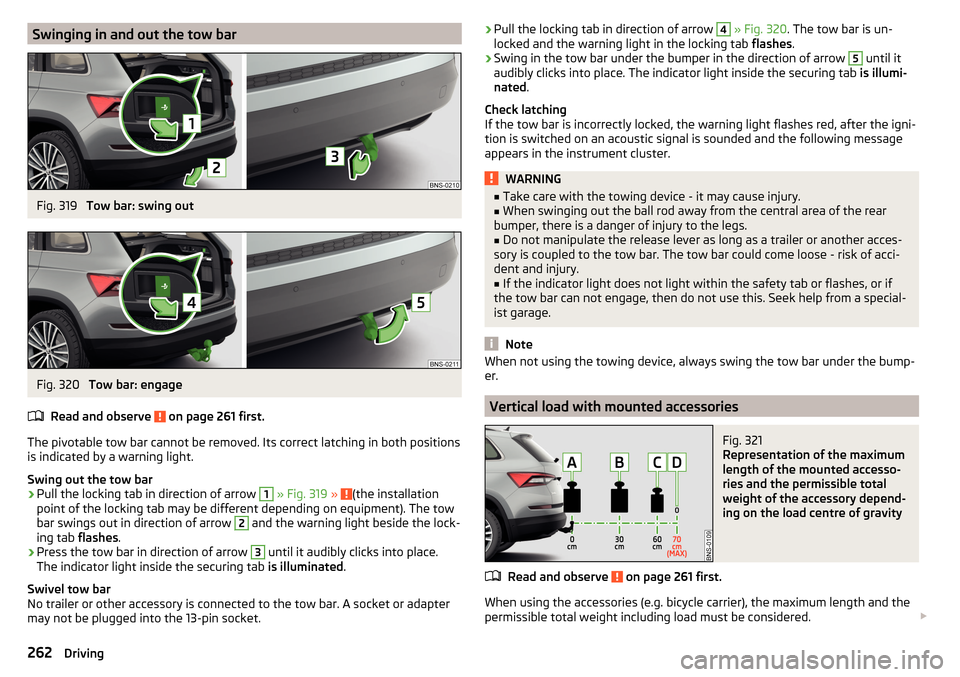
Swinging in and out the tow barFig. 319
Tow bar: swing out
Fig. 320
Tow bar: engage
Read and observe
on page 261 first.
The pivotable tow bar cannot be removed. Its correct latching in both positions is indicated by a warning light.
Swing out the tow bar
›
Pull the locking tab in direction of arrow
1
» Fig. 319 » (the installation
point of the locking tab may be different depending on equipment). The tow
bar swings out in direction of arrow
2
and the warning light beside the lock-
ing tab flashes.
›
Press the tow bar in direction of arrow
3
until it audibly clicks into place.
The indicator light inside the securing tab is illuminated.
Swivel tow bar
No trailer or other accessory is connected to the tow bar. A socket or adapter
may not be plugged into the 13-pin socket.
› Pull the locking tab in direction of arrow 4
» Fig. 320 . The tow bar is un-
locked and the warning light in the locking tab flashes.›
Swing in the tow bar under the bumper in the direction of arrow
5
until it
audibly clicks into place. The indicator light inside the securing tab is illumi-
nated .
Check latching
If the tow bar is incorrectly locked, the warning light flashes red, after the igni-
tion is switched on an acoustic signal is sounded and the following message
appears in the instrument cluster.
WARNING■ Take care with the towing device - it may cause injury.■When swinging out the ball rod away from the central area of the rear
bumper, there is a danger of injury to the legs.■
Do not manipulate the release lever as long as a trailer or another acces-
sory is coupled to the tow bar. The tow bar could come loose - risk of acci-
dent and injury.
■
If the indicator light does not light within the safety tab or flashes, or if
the tow bar can not engage, then do not use this. Seek help from a special-
ist garage.
Note
When not using the towing device, always swing the tow bar under the bump-
er.
Vertical load with mounted accessories
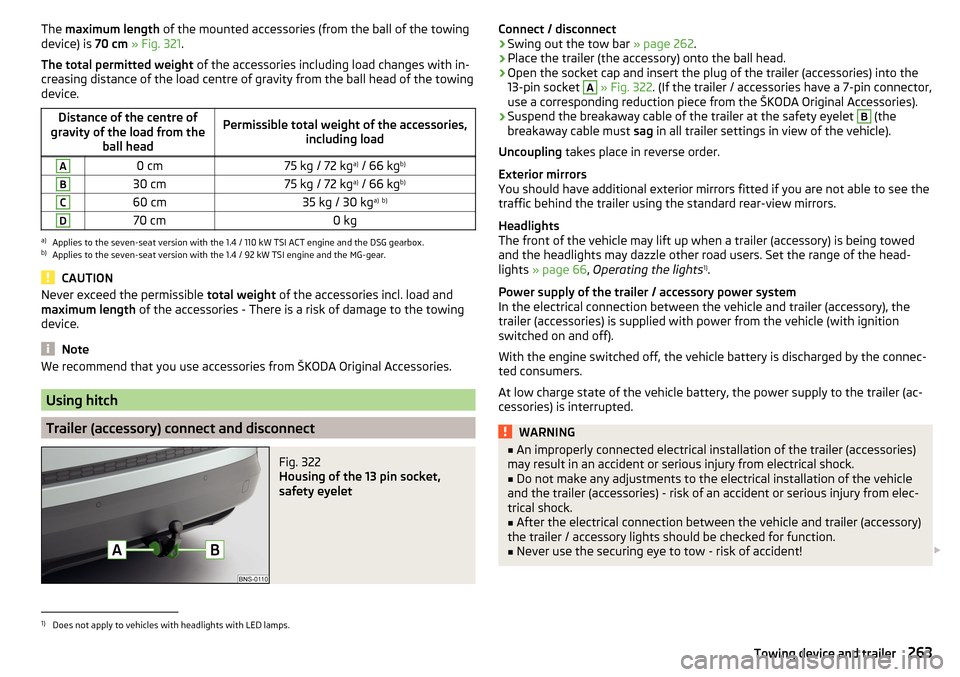
Fig. 321
Representation of the maximum
length of the mounted accesso-
ries and the permissible total
weight of the accessory depend-
ing on the load centre of gravity
Read and observe on page 261 first.
When using the accessories (e.g. bicycle carrier), the maximum length and the
permissible total weight including load must be considered.
262Driving
Page 265 of 344

The maximum length of the mounted accessories (from the ball of the towing
device) is 70 cm » Fig. 321 .
The total permitted weight of the accessories including load changes with in-
creasing distance of the load centre of gravity from the ball head of the towing
device.Distance of the centre of
gravity of the load from the ball headPermissible total weight of the accessories, including loadA0 cm75 kg / 72 kga)
/ 66 kg b)B30 cm75 kg / 72 kg a)
/ 66 kg b)C60 cm35 kg / 30 kg a)
b)D70 cm0 kga)
Applies to the seven-seat version with the 1.4 / 110 kW TSI ACT engine and the DSG gearbox.
b)
Applies to the seven-seat version with the 1.4 / 92 kW TSI engine and the MG-gear.
CAUTION
Never exceed the permissible
total weight of the accessories incl. load and
maximum length of the accessories - There is a risk of damage to the towing
device.
Note
We recommend that you use accessories from ŠKODA Original Accessories.
Using hitch
Trailer (accessory) connect and disconnect
Fig. 322
Housing of the 13 pin socket,
safety eyelet
Connect / disconnect›Swing out the tow bar » page 262.›
Place the trailer (the accessory) onto the ball head.
›
Open the socket cap and insert the plug of the trailer (accessories) into the
13-pin socket
A
» Fig. 322 . (If the trailer / accessories have a 7-pin connector,
use a corresponding reduction piece from the ŠKODA Original Accessories).
›
Suspend the breakaway cable of the trailer at the safety eyelet
B
(the
breakaway cable must sag in all trailer settings in view of the vehicle).
Uncoupling takes place in reverse order.
Exterior mirrors
You should have additional exterior mirrors fitted if you are not able to see the
traffic behind the trailer using the standard rear-view mirrors.
Headlights
The front of the vehicle may lift up when a trailer (accessory) is being towed
and the headlights may dazzle other road users. Set the range of the head-
lights » page 66 , Operating the lights 1)
.
Power supply of the trailer / accessory power system
In the electrical connection between the vehicle and trailer (accessory), the
trailer (accessories) is supplied with power from the vehicle (with ignition
switched on and off).
With the engine switched off, the vehicle battery is discharged by the connec-
ted consumers.
At low charge state of the vehicle battery, the power supply to the trailer (ac-
cessories) is interrupted.
WARNING■ An improperly connected electrical installation of the trailer (accessories)
may result in an accident or serious injury from electrical shock.■
Do not make any adjustments to the electrical installation of the vehicle
and the trailer (accessories) - risk of an accident or serious injury from elec-
trical shock.
■
After the electrical connection between the vehicle and trailer (accessory)
the trailer / accessory lights should be checked for function.
■
Never use the securing eye to tow - risk of accident!
1)
Does not apply to vehicles with headlights with LED lamps.
263Towing device and trailer
Page 266 of 344

CAUTION■An improperly connected electrical installation of the trailer (accessories) can
lead to the inoperability of the vehicle electronics.■
The total power consumption of all the connected loads to the trailer power
supply must not exceed 350 watts, otherwise there is a risk of damage to the
electrical system of the vehicle.
Loading a trailer
Correct the tyre inflation pressure on the vehicle for “full load” » page 286.
Distribution of the cargo
Distribute the cargo in the trailer in such a way that heavy items are located as
close to the trailer axle as possible. Secure the load from slipping.
The distribution of the weight is very poor if your vehicle is unladen and the
trailer is laden. Nevertheless, maintain a particularly low speed if you cannot
avoid driving with this combination.WARNINGSliding cargo can significantly adversely affect stability and driving safety -
risk of accident!
Trailer
The permissible trailer load must not be exceeded under any circumstances.Permissible trailer weight - five-seat versionEngineTransmissionPermissible trailer weight, braked (kg) with gradients up to 12%.Permissible trailer weight, unbraked (kg)1.4 ltr./92 kW TSIMG16007501.4 l/110 kW TSI ACTMG 4x42000750DSG18007501.4 ltr./110 kW TSIDSG 4x420007502.0 ltr./132 kW TSIDSG 4x4 (EU6)2200750
2.0 ltr./110 kW TDI CR
MG 4x42000750DSG2000750DSG 4x4 (EU6)2300 / 2500 a)7502.0 ltr./140 kW TDI CRDSG 4x42300 / 2500a)750a)
Applies to vehicles of category M1G.
264Driving
Page 267 of 344

Permissible trailer weight - seven-seat versionEngineTransmissionPermissible trailer weight, braked (kg)with gradients up to 12%.Permissible trailer weight, unbraked (kg)1.4 ltr./92 kW TSIMG16007501.4 l/110 kW TSI ACTMG 4x42000750DSG18007501.4 ltr./110 kW TSIDSG 4x420007502.0 ltr./132 kW TSIDSG 4x4 (EU6)2000750
2.0 ltr./110 kW TDI CR
MG 4x4--DSG2000750DSG 4x4 (EU6)20007502.0 ltr./140 kW TDI CRDSG 4x42000750WARNINGThe maximum vertical load and the maximum trailer load must not be ex-
ceeded - there is risk of accident!
Towing a trailer
Driving speed
For safety reasons, do not drive faster than 100 km/h when hitching a trailer.
Immediately reduce your speed as soon as even the slightest swaying of the
trailer is detected. Never attempt to stop the trailer from “swaying” by acceler-
ating.
Brakes
Apply the brakes in good time! If the trailer is fitted with a trailer brake, apply
the brakes gently at first, then brake firmly. This will avoid brake jolts resulting
from the trailer wheels locking.
On downhill sections shift down a gear in good time to also use the engine as
a brake.
WARNINGAlways drive particularly carefully with the trailer.CAUTIONWith frequent towing, the vehicle is excessively loaded so this must also be
checked between service intervals.
Anti-theft alarm system
The alarm is triggered if, with a vehicle with activated anti-theft alarm (herein-
after only warning system), the electrical connection to the trailer (accessory)
is interrupted.
Always switch off the anti-theft alarm system before a trailer (accessory) is
coupled or uncoupled » page 57.
Conditions for including a trailer (accessory) in the anti-theft alarm system. The vehicle is factory-fitted with an anti-theft alarm system and a towing
device.
The trailer (accessory) is electrically connected to the towing vehicle by
means of the trailer socket.
The electrical system of the vehicle and trailer (accessory) is functional.
The vehicle is locked and the anti-theft alarm system is activated.
The trailer (accessory) is not equipped with LED taillights.
265Towing device and trailer
Page 315 of 344

Technical data
Technical data
Basic vehicle data
Introduction
This chapter contains information on the following subjects:
Vehicle data
313
Operating weight
314
Payload
314
Measurement of fuel consumption and CO 2 emissions according to ECE
Regulations and EU Directives
315
Dimensions
316
Overhang angle
317
The details given in the vehicle's technical documentation always take prece-
dence over the details in the Owner's Manual.
The listed performance values were determined without performance-reduc- ing equipment, e.g. air conditioning system.
The values given have been determined in accordance with the rules and con-
ditions specified in statutory or technical regulations for determining opera-
tional and technical data for motor vehicles.
The values listed are for the basic model without any optional equipment.
Vehicle dataFig. 382
Vehicle data sticker
Fig. 383
Rating plate
Vehicle data sticker
The vehicle data carrier » Fig. 382 is bonded into the Owner's Manual under
the floor covering in the luggage compartment (with vehicles with spare or
emergency wheel, the vehicle data carrier is located below the respective
wheel).
The vehicle data sticker contains the following data. Vehicle identification number (VIN)
Vehicle type
Gearbox code/paint number/interior equipment/engine output/engine code
Partial vehicle description
Approved tyre diameter in inches 1)
123451)
Only valid for some countries.
313Technical data