2016 SKODA KODIAQ CD player
[x] Cancel search: CD playerPage 162 of 344

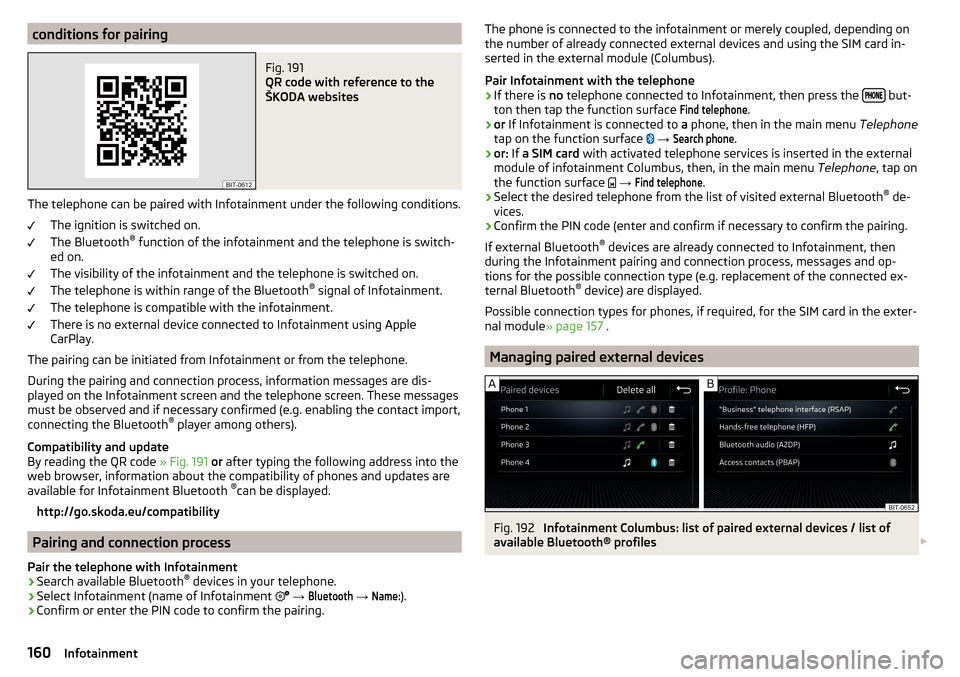
conditions for pairingFig. 191
QR code with reference to the
ŠKODA websites
The telephone can be paired with Infotainment under the following conditions.
The ignition is switched on.
The Bluetooth ®
function of the infotainment and the telephone is switch-
ed on.
The visibility of the infotainment and the telephone is switched on.
The telephone is within range of the Bluetooth ®
signal of Infotainment.
The telephone is compatible with the infotainment.
There is no external device connected to Infotainment using Apple
CarPlay.
The pairing can be initiated from Infotainment or from the telephone.
During the pairing and connection process, information messages are dis-
played on the Infotainment screen and the telephone screen. These messages
must be observed and if necessary confirmed (e.g. enabling the contact import,
connecting the Bluetooth ®
player among others).
Compatibility and update
By reading the QR code » Fig. 191 or after typing the following address into the
web browser, information about the compatibility of phones and updates are
available for Infotainment Bluetooth ®
can be displayed.
http://go.skoda.eu/compatibility
Pairing and connection process
Pair the telephone with Infotainment
›
Search available Bluetooth ®
devices in your telephone.
›
Select Infotainment (name of Infotainment
→
Bluetooth
→
Name:
).
›
Confirm or enter the PIN code to confirm the pairing.
The phone is connected to the infotainment or merely coupled, depending on
the number of already connected external devices and using the SIM card in-
serted in the external module (Columbus).
Pair Infotainment with the telephone›
If there is no telephone connected to Infotainment, then press the but-
ton then tap the function surface
Find telephone
.
›
or If Infotainment is connected to a phone, then in the main menu Telephone
tap on the function surface
→
Search phone
.
›
or: If a SIM card with activated telephone services is inserted in the external
module of infotainment Columbus, then, in the main menu Telephone, tap on
the function surface
→
Find telephone
.
›
Select the desired telephone from the list of visited external Bluetooth ®
de-
vices.
›
Confirm the PIN code (enter and confirm if necessary to confirm the pairing.
If external Bluetooth ®
devices are already connected to Infotainment, then
during the Infotainment pairing and connection process, messages and op-
tions for the possible connection type (e.g. replacement of the connected ex-
ternal Bluetooth ®
device) are displayed.
Possible connection types for phones, if required, for the SIM card in the exter- nal module » page 157 .
Managing paired external devices
Fig. 192
Infotainment Columbus: list of paired external devices / list of
available Bluetooth® profiles
160Infotainment
Page 163 of 344

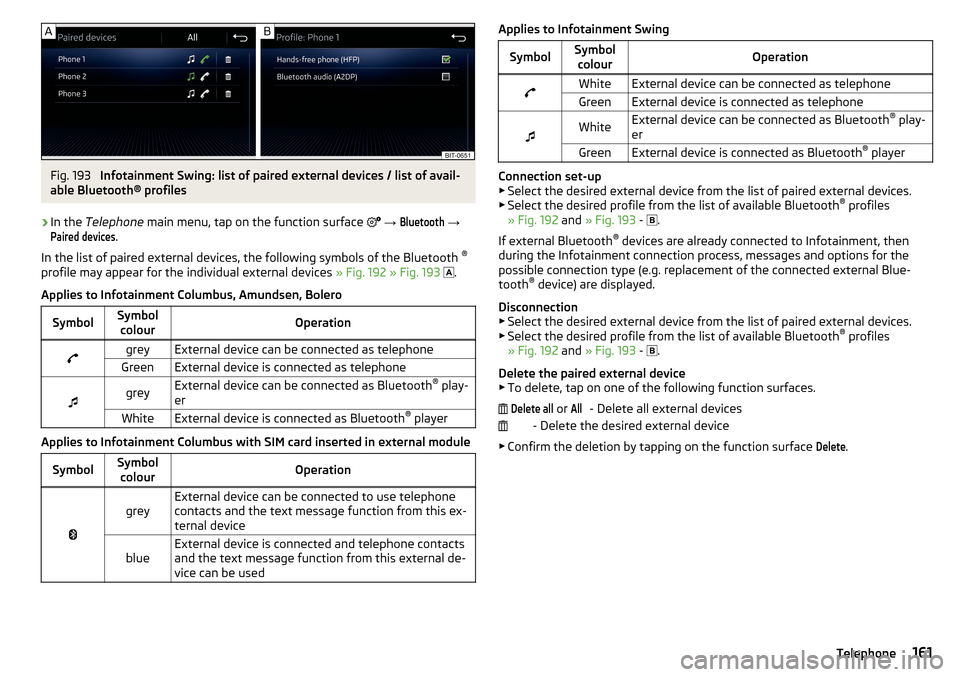
Fig. 193
Infotainment Swing: list of paired external devices / list of avail-
able Bluetooth® profiles
›
In the Telephone main menu, tap on the function surface
→
Bluetooth
→
Paired devices
.
In the list of paired external devices, the following symbols of the Bluetooth ®
profile may appear for the individual external devices » Fig. 192 » Fig. 193
.
Applies to Infotainment Columbus, Amundsen, Bolero
SymbolSymbol colourOperationgreyExternal device can be connected as telephoneGreenExternal device is connected as telephone
greyExternal device can be connected as Bluetooth ®
play-
erWhiteExternal device is connected as Bluetooth ®
player
Applies to Infotainment Columbus with SIM card inserted in external module
SymbolSymbol
colourOperation
greyExternal device can be connected to use telephone
contacts and the text message function from this ex-
ternal deviceblueExternal device is connected and telephone contacts
and the text message function from this external de-
vice can be usedApplies to Infotainment SwingSymbolSymbol colourOperationWhiteExternal device can be connected as telephoneGreenExternal device is connected as telephone
WhiteExternal device can be connected as Bluetooth ®
play-
erGreenExternal device is connected as Bluetooth ®
player
Connection set-up
▶ Select the desired external device from the list of paired external devices.
▶ Select the desired profile from the list of available Bluetooth ®
profiles
» Fig. 192 and » Fig. 193 -
.
If external Bluetooth ®
devices are already connected to Infotainment, then
during the Infotainment connection process, messages and options for the
possible connection type (e.g. replacement of the connected external Blue-
tooth ®
device) are displayed.
Disconnection
▶ Select the desired external device from the list of paired external devices.
▶ Select the desired profile from the list of available Bluetooth ®
profiles
» Fig. 192 and » Fig. 193 -
.
Delete the paired external device ▶ To delete, tap on one of the following function surfaces.
- Delete all external devices
- Delete the desired external device
▶ Confirm the deletion by tapping on the function surface
Delete
.
Delete all or All161Telephone
Page 175 of 344

CAUTIONTo establish the connection, it is necessary that the date and time in Infotain-
ment are set correctly. If the date and time setting is based on the GPS signal,
then problems may arise with establishing a connection with a poor GPS signal
reception.
Note
■ During the connection process, information messages may be displayed on
the Infotainment screen, and in the phone display. These messages must be
observed and confirmed if necessary (e.g. Release of data transfer, enabling
the contact import, release of text messages).■
We recommend that you use extension cords from ŠKODA Original Accesso-
ries.
■
With some connected devices, it is necessary that the connected external
device is unlocked over the entire duration of the connection for trouble-free
functioning of the SmartLink function“”.
Main menu
Fig. 210
no connection / example of an active connection
›
to display of the main menu SmartLink the key or.
to press.
Main menu - Functional surfaces Active connection
Display of information about SmartLink
Disconnection
Settings for the SmartLink » page 136 menu or » page 141
AConnection set-up
▶ Connect the external device via a connecting cable to the USB input
» page 90 .
▶ In the main menu SmartLink Choose the connected external device and the
type of communication system if necessary » Fig. 210 -
.
Return to the main menu of the active connection from another Infotainment
menu
(E.g. From the Radio menu)
▶ Press the button
and select the active connection.
Disconnection ▶ To end the connection, tap on the function surface in the main menu
SmartLink
» Fig. 210 -
.
▶ or Disconnect the device from the USB input.
If the connection was ended by tapping on the function surface from the
main menu SmartLink, the connection needs to be re-established when the
external device is connected again.
If the connection was terminated by disconnecting the cable from the USB
port, then the last active connection is shown in the main menu when the ex-
ternal device is reconnected.
Android Auto
Introduction to the subject
The Android Auto- connection can be set up under the following conditions. The ignition is switched on.
Infotainment is switched on.
The external device to be connected is switched on.
Some applications require the data connection in the connected external de-
vice to be switched on.
If Infotainment is connected to an external device via Android Auto then all the
phones currently connected, as well as the Bluetooth ®
players are disconnec-
ted.
The external device to be connected will automatically establish a telephone
connection via Bluetooth ®
as a main phone. Connecting an additional tele-
phone and using telephone services of the SIM card in the external module are
173SmartLink
Page 324 of 344

Manual shifting on the multifunction steeringwheel211
Selector lever lock210
Start and drive211
Tiptronic211
Warning light39
Automatic switch-off of Infotainment125
Automatic transmission209
Selector lever emergency release303
AUX90, 148
Settings134
Auxiliary heating (auxiliary heating and ventila- tion)
114
In infotainment115
set to115
Auxiliary heating (heating and ventilation) Radio remote control
116
Avoiding damage to your vehicle213
B
Basstöner
130
Battery Changing batteries for the removable light
302
Changing in key300, 301
Replace the battery in the remote control in the auxiliary heating
301
Belts15
Belt tensioners18
reversible18
Blanket96
Bluetooth A2DP / AVRCP
132
Name132
on / off132
Paired external devices132
Profile160
rSAP163
Set139
set to132, 134
Set to132
Switch on/off139
Update129, 133
Updates139
Visibility132, 139
Bluetooth Player149
Bluetooth® update160
bolero external module
123
infotainment Description122
Bonnet279
Boot Class N1 vehicles
106
Boot lid59
Automatic locking59
Contactless open/close61
Open/close58, 60
See boot lid58
Boot lid contactless open/close61
Brake Assist (HBA)217
Brake booster206
Brake fluid282
Check282
specification282
Brake linings Warning light
38
Brake pads new
206
Brake pedal (automatic gearbox) Warning light
38
Brakes Brake booster
206
Brake fluid282
Braking and stabilisation systems215
Information on braking206
Parking brake206
Run in212
Warning light35
Brake system215
breakdown call118
Breakdown call164
Broadcasting141, 142
Bulbs Replacing
308
Buttons on the driver door Electric windows
62
C
Call list Call list
166
CAR201
Car battery Automatic consumer shutdown
283
Check condition284
Cover284
Disconnecting and reconnecting285
Replacing285
Winter operation284
Car care Exterior
273
Interior273
Car cleaning Exterior
273
Windscreens273
Car computer see multifunction display
46
Care and maintenance266
Care Connect118
breakdown call118
emergency call118
information call118
Cargo element105
Carrier108
Carstick171
CD147
cellphone Disclaimer
120
Central locking52
Problems57
Central locking button54
322Index
Page 337 of 344

Tyre Pressure MonitoringStoring the tyre pressure values and Infotain- ment display
260
Tyre repair295
Tyres285
damage285
Explanation of the label288
new285
Tyre pressure286
Tyre size288
U
Umbrella Tray
94
Units131, 139
Unlatch KESSY
53
Unlock Individual settings
54
Unlocking Central locking button
54
In case of emergency302
Remote control52
Unlocking and locking52
Unlock steering lock202
Update navigation data179
Update the navigation data137
USB90, 148
Safe removal139
Used vehicles Acceptance and recycling
268
Useful equipment Clothes hook
94
Cup holders90
Glasses compartment92
Removable through-loading bag95
User account Configuration wizard
126
User profile134, 140
V
Variable loading floor
106
vCard185, 187
Vehicle - Settings201
Vehicle battery charging
284
Safety instructions283
Warning light39
Vehicle care270
Outside271
Vehicle cleaning270
Vehicle condition Auto Check Control
45
Vehicle data carrier269
Vehicle data sticker313
Vehicle data sticker and type plate Vehicle data sticker and type plate
313
Vehicle dimensions316
Vehicle height316
Vehicle identification number (VIN)313
Vehicle length316
vehicle systems201
Vehicle tool kit291
Vehicle width316
Ventilation Seats
85
Verwaltung gekoppelter Geräte160
Vest290
Video DVD Playback
153
Set to134
video player153
VIN Vehicle identification number
313
Virtual pedal61
Visibility72
Visors73
Voice control127
Commands128
Correction of a voice command input128
Help128
Not recognising a voice command128
on / off128
Operation principle128
Settings132
Stop / restore command128
Voicemail164
Volume125
Volume setting125
W
Waiter Voice control
128
Warning lights33
Warning symbols see Warning lights
33
Warning triangle290
Warning when speeding47
Warranty5
Washing the vehicle270
Waste container91
Water in the fuel filter42
Waypoint mode196
Main menu197
Record waypoints197
Set waypoint manually197
Waypoint tour memory198
Waypoint tour memory198
Weather conditions266
Weights313, 314
Wheel bolts Anti-theft wheel bolts
294
Caps294
Loosening and tightening294
335Index