2016 SKODA FABIA fuel pressure
[x] Cancel search: fuel pressurePage 135 of 196
Protection of cavities
All the cavities of your vehicle which are at risk from corrosion are protected by
a layer of long-lasting protective wax applied in the factory.
If any small amount of wax flow out of the cavities at high temperatures, these
must be removed with a plastic scraper and the stains cleaned using a petrole-
um cleaner.
Underbody
The underside of your vehicle is already permanently protected by the factory
against chemical and mechanical influences.
We recommend having the protective coating — preferably before the begin-
ning of winter and at the end of winter.
Product life of the films
Environmental influences (e.g. sunlight, humidity, air pollution, rockfall) affect
the life of the films. The films age and become brittle, which is normal; this
shall not be considered a fault.
The sunlight may also affect the depth of the film colour.
When transporting a load on the roof rack (e.g. roof box, etc.), there is an in- creased risk of film damage (e.g. due to rockfall from the secured load).
CAUTION
■ Vehicle paint
■ Repair damaged areas as soon as possible.
■ Matt-painted parts should not be treated with polishes or hard waxes.
■ Do not polish in a dusty environment - risk of paint scratches.
■ Do not apply polish to door seals or window guides.■
Plastic parts
■ Do not use paint polish.
■
Chromed and anodised parts
■ Do not polish in a dusty environment - risk of surface scratches.
■
Films
The following instructions must be observed, otherwise there is a risk of film
damage.
■ Do not use dirty cloths or sponges for cleaning.
■ Do not use a scraper or other means to remove ice and snow.
■ Do not polish the films
■ Do not use a high pressure cleaner on the films.
■
Rubber seals
■ Do not treat the door seals and window guides deal with anything - the
protective varnish coating could be damaged.
■ Windows and door mirrors
■ Do not clean the insides of the windows/mirrors with sharp objects - risk of
damage to the filaments or the antenna. ■ Do not use a cloth which has been used to polish the body - this could dirty
the window and impair visibility.■
Head / tail lights
■ Do not wipe head/tail lamps dry, do not use any sharp objects - risk of dam-
age to the protective coating and cracks forming on the headlamp glass cov-
ers.
■
Reversing camera
The following instructions must be observed, otherwise there is a risk of
camera damage.
■ Do not remove snow / ice with warm / hot water.
■ To wash, never use a pressure washer or steam jet.
■ For cleaning, do not use abrasive cleaners.
■
Door lock cylinders
■ Make sure that as little water as possible gets into the locking cylinder
when washing the vehicle - there is a risk of freezing the lock cylinder!
■
Wheels
■ Heavy soiling of the wheels can affect the balance of the wheels - the re-
sult can be a vibration, which can cause premature wear of the steering.
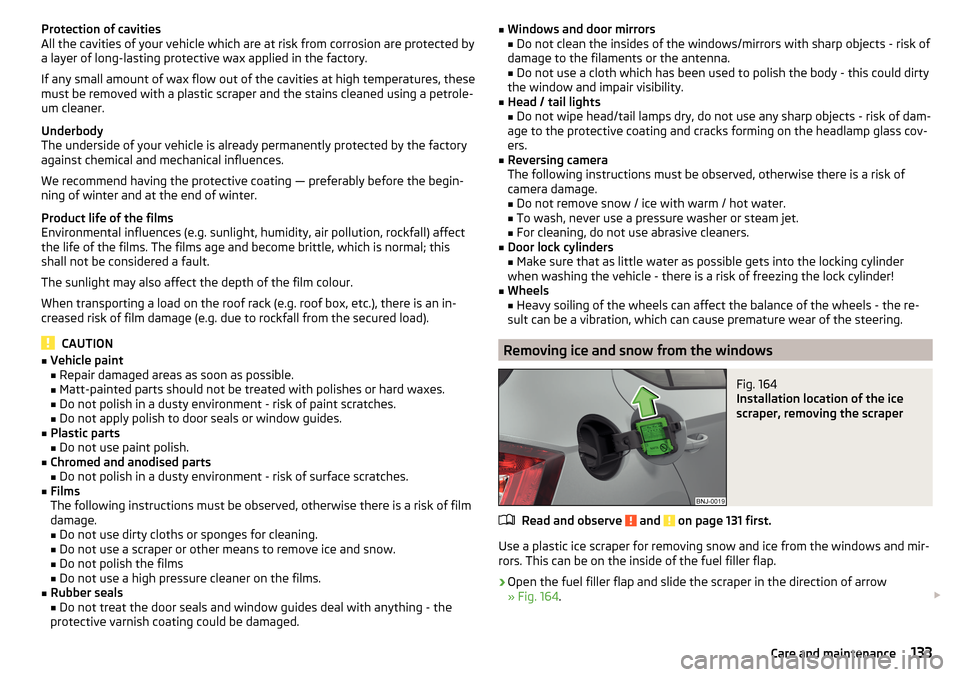
Removing ice and snow from the windows
Fig. 164
Installation location of the ice
scraper, removing the scraper
Read and observe and on page 131 first.
Use a plastic ice scraper for removing snow and ice from the windows and mir-
rors. This can be on the inside of the fuel filler flap.
›
Open the fuel filler flap and slide the scraper in the direction of arrow
» Fig. 164 .
133Care and maintenance
Page 147 of 196

Wheels
Wheels and tyres
Introduction
This chapter contains information on the following subjects:
Advice on tyre/wheel usage
145
Tyre pressure
146
Tyre wear and wheel change
146
Spare wheel
147
Spare wheel
147
Tyre marking
147
Advice on tyre/wheel usage
During the first 500 km, new tyres do not offer optimum grip; appropriate care
should therefore be taken when driving.
Tyres with the deeper profiles should always be fitted to the front wheels.
Rims and wheel bolts are matched to each other in terms of design. We rec-
ommend that you use rims and wheel bolts from ŠKODA Original Accessories.
Wheels and tyres should always be stored in a cool, dry and dark place. The
tyres themselves should be stored vertically.
Tyre life
Tyres age losing their original characteristics, even if they are not used. We
recommend that you do not use tyres that are more than 6 years old.
The manufacturing date is indicated on the tyre sidewall (possibly on the in-
side ). For example, DOT ... 10 16... means, for example, that the tyre was manu-
factured in the 10. week of 2016.
Tyre damage
We recommend checking your tyres and wheel rims for damage (punctures,
cuts, splits and bulges etc.) on a regular basis.
Remove any foreign objects in the tyre’s profile immediately (e.g. small stones).
Foreign bodies which have penetrated into the tyre (e.g. screws or nails)
should not be removed and help should be sought from a specialist garage.
Fitting new tyres
Only fit approved radial tyres of the same type, size (rolling circumference) and
the same tread pattern on one axle on all four wheels.
When mounting new tyres the tyres have to be replaced axle by axle.
Unidirectional tyres
The direction of rotation of the tyres is marked by arrows on the wall of the
tyre .
The specified running direction must be strictly adhered to, otherwise the fol-
lowing tyre characteristics may be degraded. ▶ Driving stability.
▶ Traction.
▶ Tyre noise and tyre wear.WARNING■Never use tyres if you do not know anything about their condition and
age - risk of accidents.■
Never drive with damaged tyres – there is the risk of an accident.
CAUTION
■ The tyres must be protected from contact with substances (e.g. oil, grease
and fuel) which could damage them. If the tyres with these substances come
into contact, then we recommend that you check this in a specialist workshop.■
Do not use rims with ground or polished surfaces in winter conditions - there
is a risk of rim damage (e.g through salt spreading).
Note
■ We recommend that any work on the wheels or tyres be carried out by a spe-
cialist garage.■
We recommend that you use tyres, snow chains and full wheel trims from
ŠKODA Original Accessories.
145Wheels
Page 148 of 196

Tyre pressureFig. 174
Label with a table of tyre sizes and tyre pressure value / inflate
tyres
The prescribed tyre inflation is on the sticker with pictograms
A
» Fig. 174 (for
some countries, the pictograms are replaced with a text).
Tyre pressure is always to match the load .
Inflation pressure for half load
Inflation pressure for environmentally friendly operation (slightly lower
fuel consumption and emissions)
Inflation pressure for full load
Tyre diameter in inches
This information serves merely as information for the prescribed tyre pres-
sure. This is not a list of shared tyre sizes for your vehicle. These are in the
vehicle's technical documentation, in the declaration of conformity (in so-
called COC document) and listed on the vehicle data » page 173.
Tyre pressure value on the front axle
Tyre pressure value on the rear axle
Check tyre pressures
Check the tyre pressure (including that of the emergency or spare wheel) at
least once a month and also before setting off on a long journey.
Always check the inflation pressure when the tyres are cold. Do not reduce the
higher pressure of warm tyres.
In vehicles with tyre pressure monitoring, tyre pressure values must be saved
each time the pressures are changed » page 117.
BCDEFGWARNING■
Do not drive with incorrect tyre pressure - risk of accident.■In the event of very rapid pressure loss (e.g. in the event of tyre damage)
an attempt should be made to bring the vehicle carefully to a stop without
sudden steering movements and without any hard braking - risk of acci-
dent.
Note
The declaration of conformity (the COC document) can be obtained from a
ŠKODA partner 1)
.
Tyre wear and wheel change
Fig. 175
Tyre wear indicator / wheel change
Tyre wear increases in the following circumstances.
▶ Incorrect tyre pressures.
▶ Driving style (e.g. fast cornering, rapid acceleration / braking).
▶ Incorrect wheel balancing (you should have the wheels balanced after
changing/repair tyres or if the steering “is drifting”).
▶ Wheel alignment errors.
There are wear indicator markers in the tyre profiles, indicating whether the
minimum permissible tread depth has been reached » Fig. 175 -
. A tyre
should be regarded as worn out when this indicator is flush with the tread.
Markings on the walls of the tyres through the letters “TWI” and/or other sym- bols (e.g. ), identify the position of the wear indicators.
To ensure uniform wear on all tyres, we recommend that you change the
wheels every 10 000 km, in line with the schedule » Fig. 175 -
.
1)
Only valid for some countries and some models.
146General Maintenance
Page 167 of 196

Fuse arrangement in the engine compartmentFig. 204
Fuses
Read and observe and on page 162 first.
No.Power consumer1Radiator fan2Glow plug system3ABS or ESC4Electrical auxiliary heating system5Electrical auxiliary heating system6Automatic gearbox7Engine control system8Windscreen wipers9Battery data module10ABS or ESC11Not assigned12Injectors, valve for fuel metering, control valve for oil pressure, valve
for exhaust gas recirculation cooler13Brake pedal switch14Fuel pump, coolant pump15Engine control system16Starter17Engine control system18Additional electrical heating, radiator fan, wastegate, oil temperature
sensor, valve for activated charcoal filter, valve for intake manifoldNo.Power consumer19Lambda probe20Preheating unit, crankcase ventilation heating, ignition coils
Bulbs
Introduction
This chapter contains information on the following subjects:
Bulb arrangement in the front headlights
166
Cover the front wheel Removing / replacing
166
Remove/replace the mounting for the mopping water container nozzle
167
Changing bulbs for low and main beam (Halogen headlights)
167
Replacing the bulb for the side light (Halogen headlights)
168
Replacing the bulb for the side light (Halogen headlights)
168
Replacing the bulb for the daytime running lights light (Halogen
headlights)
168
Replacing the bulb for the low beam (Halogen headlights)
169
Replacing the bulb for the main beam (Halogen headlights)
169
Replacing the bulb for the turn signal light (Halogen headlights)
170
Changing light bulbs for fog lights
170
Changing the bulb for the licence plate light
171
Removing/installing tail light
171
Replacing the bulbs in the tail lamp assembly
172
We recommend having bulbs replaced by a specialist garage or seeking other
expert help in the event of any uncertainties.
▶ Switch off the ignition and all of the lights before replacing a bulb.
▶ Faulty bulbs must only be replaced with the same type of bulbs. The designa-
tion is located on the light socket or the glass bulb.
We recommend having the headlight settings checked by a specialist garage after replacing a bulb in the low, high or fog beam.
Visit a specialist garage if an LED diode is faulty.
165Fuses and light bulbs
Page 192 of 196

VINVehicle Identification Number173
Visibility58
Visors59
Voice control See Owner´s Manual -Infotainment
6
W
Warning at when speeding
39
Warning display low temperature35
Warning lights28
Warning symbols see Warning lights
28
Warning triangle149
Warranty4
Waste container68
Weather conditions127
Weights173, 174, 175
Wheel bolts Anti-theft wheel bolts
153
Caps152
Loosening and tightening153
Wheels145
Full trim152
Load Index147
Snow chains148
Speed symbol147
Tyre age145
Tyre damage145
Tyre pressure146
Tyre storage145
Unidirectional tyres145
Winter tyres148
Wi-Fi42
See Owner´s Manual -Infotainment6
Wi-Fi direct43
window operation
50
Windscreen washer fluidRefilling139
Warning light35
Windscreen washer system59
Windscreen wipers and washers59
Activation60
Add fluid139
Replacing the windscreen wiper blade162
Replacing the windscreen wiper blades161
Service position of the windscreen wiper arms 161
winter operation
148
Winter operation All-year tyres
148
Car battery143
Diesel fuel136
Snow chains148
Winter tyres148
Winter tyres148
Wiper and washer activation
60
Wipers and washer Warning light for windscreen washer fluid level 35
Wiping interval
60
X
XDS
102
190Index