2016 Seat Leon 5D buttons
[x] Cancel search: buttonsPage 19 of 52
RadioFunction button: function
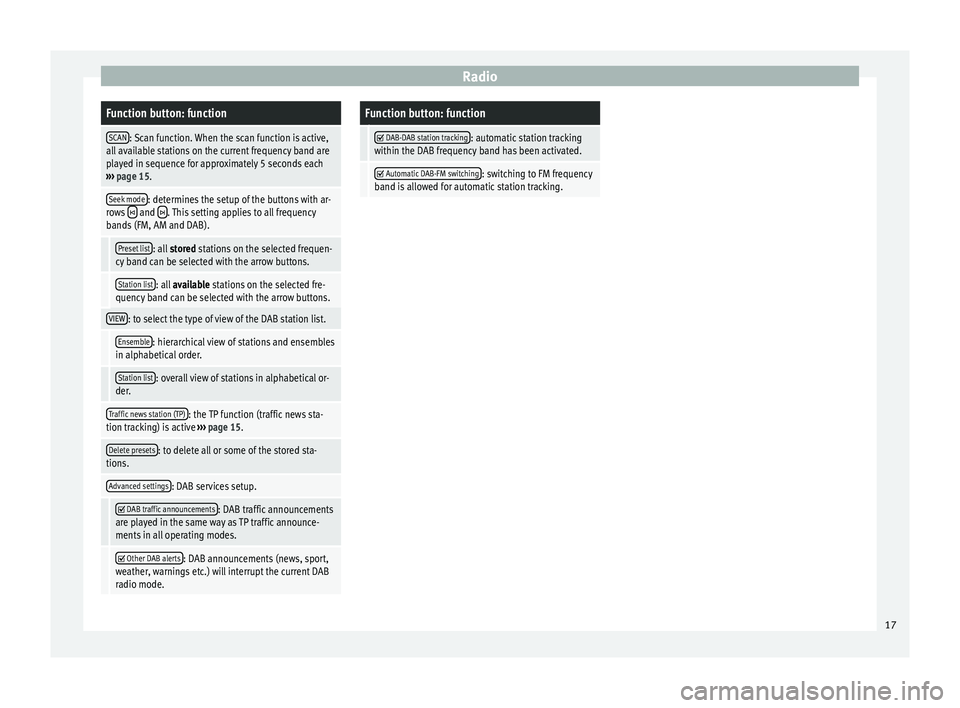
SCAN: Scan function. When the scan function is active,
all available stations on the current frequency band are
played in sequence for approximately 5 seconds each
››› page 15.
Seek mode: determines the setup of the buttons with ar-
rows and . This setting applies to all frequency
bands (FM, AM and DAB).
Preset list: all stored stations on the selected frequen-
cy band can be selected with the arrow buttons.
Station list: all available stations on the selected fre-
quency band can be selected with the arrow buttons.
VIEW: to select the type of view of the DAB station list.
Ensemble: hierarchical view of stations and ensembles
in alphabetical order.
Station list: overall view of stations in alphabetical or-
der.
Traffic news station (TP): the TP function (traffic news sta-
tion tracking) is active ››› page 15.
Delete presets: to delete all or some of the stored sta-
tions.
Advanced settings: DAB services setup.
DAB traffic announcements: DAB traffic announcements
are played in the same way as TP traffic announce-
ments in all operating modes.
Other DAB alerts: DAB announcements (news, sport,
weather, warnings etc.) will interrupt the current DAB
radio mode.
Function button: function
DAB-DAB station tracking: automatic station tracking
within the DAB frequency band has been activated.
Automatic DAB-FM switching: switching to FM frequency
band is allowed for automatic station tracking. 17
Page 22 of 52
Media
Function buttons of the main menu MediaFunction button: Function
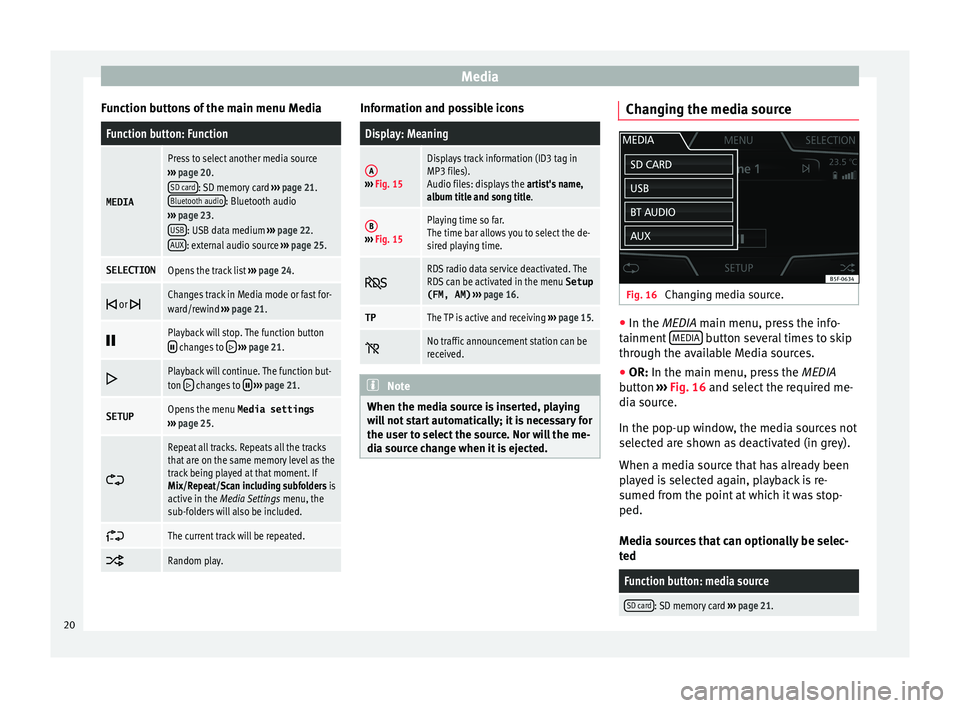
MEDIA
Press to select another media source
››› page 20.
SD card
: SD memory card ››› page 21.
Bluetooth audio: Bluetooth audio
››› page 23.
USB
: USB data medium ››› page 22.
AUX: external audio source ››› page 25.
SELECTIONOpens the track list ››› page 24.
or Changes track in Media mode or fast for-
ward/rewind
››› page 21.
Playback will stop. The function button changes to
››› page 21.
Playback will continue. The function but-
ton changes to
››› page 21.
SETUPOpens the menu Media settings
››› page 25.
Repeat all tracks. Repeats all the tracks
that are on the same memory level as the
track being played at that moment. If
Mix/Repeat/Scan including subfolders is
active in the Media Settings menu, the
sub-folders will also be included.
The current track will be repeated.
Random play. Information and possible icons
Display: Meaning
A›››
Fig. 15
Displays track information (ID3 tag in
MP3 files).
Audio files: displays the artist's name,
album title and song title.
B››› Fig. 15
Playing time so far.
The time bar allows you to select the de-
sired playing time.
RDS radio data service deactivated. The
RDS can be activated in the menu
Setup
(FM, AM) ››› page 16.
TPThe TP is active and receiving ››› page 15.
No traffic announcement station can be
received.
Note
When the media source is inserted, playing
w i
ll not start automatically; it is necessary for
the user to select the source. Nor will the me-
dia source change when it is ejected. Changing the media source
Fig. 16
Changing media source. ●
In the MEDIA m ain menu, pr
ess the info-
tainment MEDIA button several times to skip
thr ough the av
ailable Media sources.
● OR: In the main menu, pr
ess the MEDIA
button ››› Fig. 16 and select the required me-
dia source.
In the pop-up window, the media sources not
selected are shown as deactivated (in grey).
When a media source that has already been
played is selected again, playback is re-
sumed from the point at which it was stop-
ped.
Media sources that can optionally be selec-
ted
Function button: media source
SD card: SD memory card ››› page 21. 20
Page 23 of 52
MediaFunction button: media source
USB: USB data medium
››› page 22.
BT audio: playing audio files via Bluetooth ®
››› page 23.
AUX: external audio source connected to the AUX-IN
multimedia socket ››› page 25. Change the track in the MEDIA main
menu
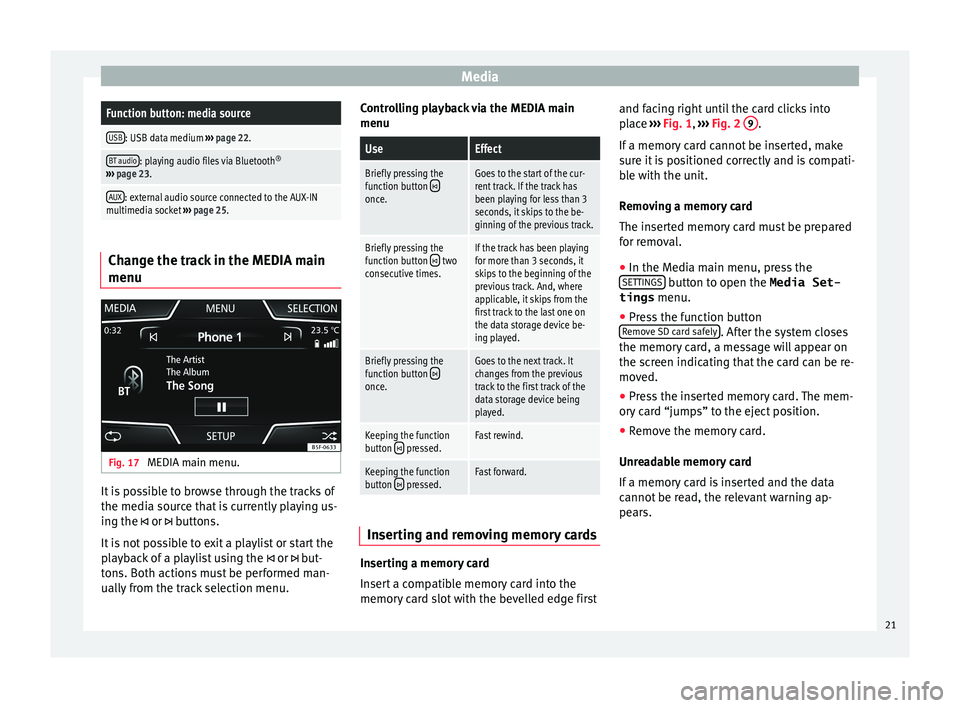
Fig. 17
MEDIA main menu. It is possible to browse through the tracks of
the medi
a sour
ce that is currently playing us-
ing the or buttons.
It is not possible to exit a playlist or start the
playback of a playlist using the or but-
tons. Both actions must be performed man-
ually from the track selection menu. Controlling playback via the MEDIA main
menu
UseEffect
Briefly pressing the
function button once.
Goes to the start of the cur-
rent track. If the track has
been playing for less than 3
seconds, it skips to the be-
ginning of the previous track.
Briefly pressing the
function button two
consecutive times.If the track has been playing
for more than 3 seconds, it
skips to the beginning of the
previous track. And, where
applicable, it skips from the
first track to the last one on
the data storage device be-
ing played.
Briefly pressing the
function button once.
Goes to the next track. It
changes from the previous
track to the first track of the
data storage device being
played.
Keeping the function
button pressed.Fast rewind.
Keeping the function
button pressed.Fast forward. Inserting and removing memory cards
Inserting a memory card
In
ser
t a compatible memory card into the
memory card slot with the bevelled edge first and facing right until the card clicks into
pl
ace ››› Fig. 1, ››› Fig. 2 9 .
If a memor
y card cannot be inserted, make
sure it is positioned correctly and is compati-
ble with the unit.
Removing a memory card
The inserted memory card must be prepared
for removal.
● In the Media main menu, press the
SET
TINGS button to open the Media Set-
tings menu.
● Press the function button
R emo
ve SD card safely . After the system closes
the memor y
card, a message will appear on
the screen indicating that the card can be re-
moved.
● Press the inserted memory card. The mem-
ory
card “jumps” to the eject position.
● Remove the memory card.
Unre
adable memory card
If a memory card is inserted and the data
cannot be read, the relevant warning ap-
pears.
21
Page 31 of 52
Telephone management system (PHONE)*
amount of data stored on the mobile tele-
phone. Af t
er loading, the data will be availa-
ble on the Infotainment system.
Pairing and connection of mobile telephones
You can pair up to 20 mobile telephones to
the Infotainment system, but only one mobile
telephone can be connected as hands-free,
and this or another device as a Bluetooth au-
dio profile.
When the Infotainment system is switched
on, it automatically connects to the last con-
nected mobile telephone. If it is not possible
to connect to this mobile telephone, the tele-
phone management system will try to auto-
matically connect to the next mobile tele-
phone on the list of paired devices.
The maximum range of the Bluetooth ®
con-
nection is approx. 10 metres. The active
Bluetooth ®
connection disconnects if this
distance is exceeded. The connection is auto-
matically re-established as soon as the de-
vice is once again within Bluetooth ®
range.
If the maximum number of paired devices is
reached and you wish to pair another one to
the system, it will automatically replace the
one least used recently. If you wish to replace
it with another one, the user must erase it be-
forehand. To do so:
● Press the Setup button on the device while
in tel
ephone mode. ●
Pre
ss the Bluetooth function button.
● Activate the P
air
ed devices function button.
● In the list of paired devices, press the function button next to the mobile telephone
t
o be del
eted and then press Delete to con-
firm the process. Note
● It m
ay be necessary to confirm the phone-
book data transfer request on the mobile tel-
ephone.
● Check that there are no requests pending
acc
eptance in your mobile phone. If there are,
this could block some of the functions in the
PHONE menu. Description of the telephone
m
an
agement system
Introduction Some functions and setup can only be per-
f
ormed when the
vehicle is stopped and are
not available on all mobile telephones.
With the help of the telephone manager, up
to 2 mobile telephones can be connected to
the Infotainment system via the Bluetooth
profiles (for example, one used as a Blue-
tooth-audio player and/or another as a
hands-free telephone). Note
● Us
ing a mobile telephone inside the vehicle
may provoke noise in the speakers.
● Some networks may not recognise all lan-
guage c
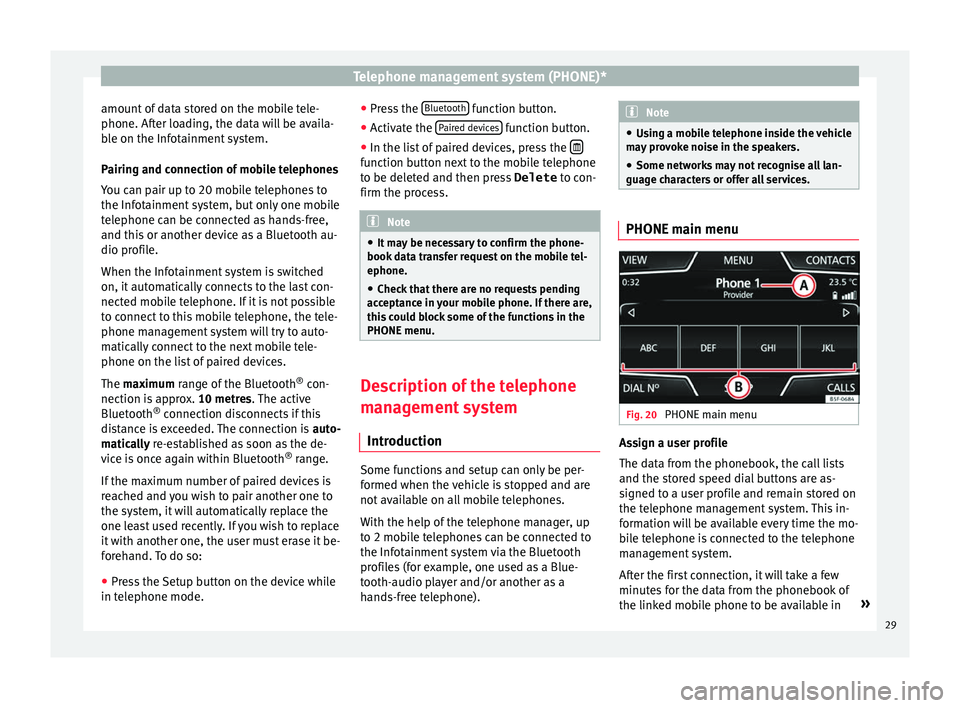
haracters or offer all services. PHONE main menu
Fig. 20
PHONE main menu Assign a user profile
The d
at
a from the phonebook, the call lists
and the stored speed dial buttons are as-
signed to a user profile and remain stored on
the telephone management system. This in-
formation will be available every time the mo-
bile telephone is connected to the telephone
management system.
After the first connection, it will take a few
minutes for the data from the phonebook of
the linked mobile phone to be available in »
29
Page 32 of 52
Telephone management system (PHONE)*
the Infotainment system. The next time that
the mo b
ile telephone is connected (e.g. on
the next journey) the phonebook is updated
automatically.
If any entries in the mobile phonebook have
been modified while connected, a manual
update of the phonebook data can be initi-
ated from the User profile settings
menu ››› page 35.
Telephone management can store a maxi-
mum of 4 user profiles for mobile tele-
phones. If you wish to link/connect another
mobile phone, the oldest user profile will au-
tomatically be replaced.
Telephone management system function but-
tons ● Press the PHONE button on the Infotain-
ment sy
stem to open the PHONE main menu.
Function button: function ››› Fig. 20
AName of connected mobile telephone.
Press on the name to access the Select
telephone menu.
BSpeed dial buttons, to which telephone
numbers from the phonebook may be as-
signed respectively ››› page 33.
and Shortcut keys scroll arrows. Allows you to
move between the various speed di-
al/phonebook shortcut banks.
Function button: function
››› Fig. 20
DIAL NO.To open the number pad and enter a tele-
phone number ››› page 31.
CONTACTSTo open the phonebook of the connected
mobile telephone ››› page 32.
VIEWAllows you to choose between the dis-
play of speed dial and phonebook short-
cut keys ››› page 33.
CALLSTo open call lists of the connected mobile
telephone ››› page 33.
SETUPTo open the Telephone settings
menu ››› page 34. WARNING
Remember that the driver must not operate
the mo b
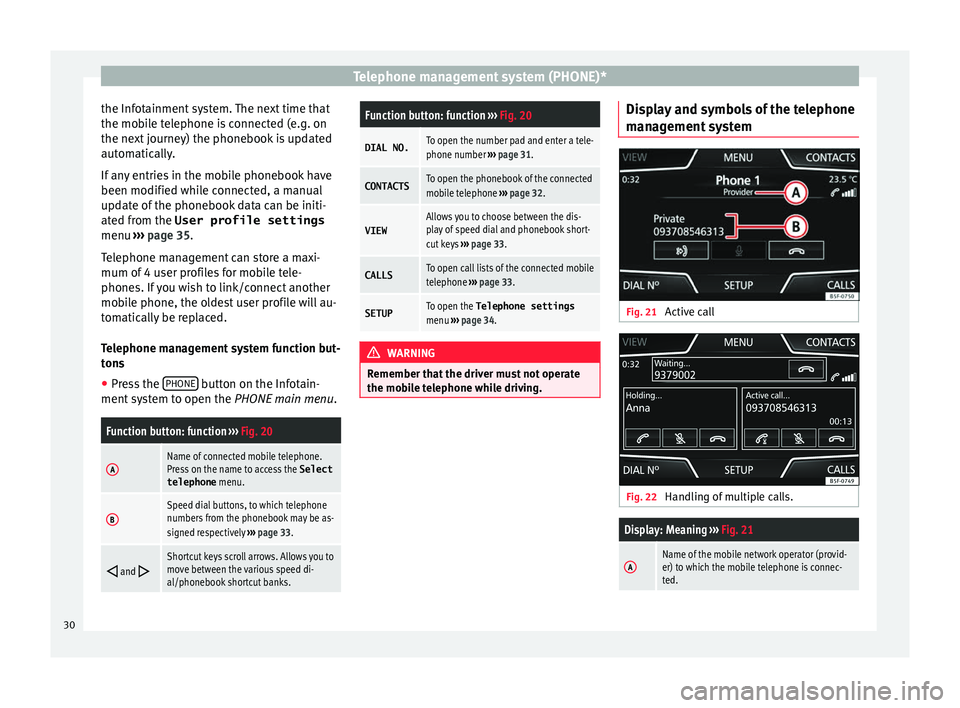
ile telephone while driving. Display and symbols of the telephone
m
an
agement system Fig. 21
Active call Fig. 22
Handling of multiple calls.
Display: Meaning ››› Fig. 21
AName of the mobile network operator (provid-
er) to which the mobile telephone is connec-
ted.30
Page 35 of 52

Telephone management system (PHONE)*
Call Menu (call lists) Fig. 26
Call lists menu. ●
In the PHONE m ain menu, pr
ess the Call list function button.
● Press the FIL
TER function button.
● Select the desired call list: A
l
l ,
Mi
s sed ,
Di al
led or
R
ec eived .
If a phone number h
as been stored in the
phonebook, the call list will display the name
stored instead of the number.
Possible displays in the Calls menu
Display: Meaning
Missed calls
: Displays the numbers of missed
and unanswered calls.
Dialled numbers
: Indicates the numbers dial-
led on the mobile telephone and on the Infotain-
ment system telephone management system.
Display: Meaning
Received calls
: Indicates the numbers of the
calls received on the mobile telephone and on
the Infotainment system telephone management
system. Note
The availability of the call lists will depend on
the mo b
ile phone used. Direct access menus
Fig. 27
Phonebook shortcut keys Fig. 28
Shortcut buttons This dropdown menu allows you to select the
f
u
nction of the buttons on the home page,
from among ››› Fig. 27:
● A-Z : Phone book
shortcut keys
● FAVOURITES : S
peed dial keys.
Phonebook shortcut keys
You can directly access the contacts in the
phonebooks that start with the character se-
lected via these keys.
If there are no contacts that coincide with the
chosen character, the entry that immediately
follows is displayed.
Pressing multiple times in quick succession
will search for the characters shown on the
button.
Press and hold the and direction arrows
to change the letters of the buttons. »
33
Page 36 of 52

Telephone management system (PHONE)*
Speed dial keys
The s peed di
al buttons ››› Fig. 28 A may
e ac
h be used to store a telephone number
from the phonebook.
All the speed dial buttons must be manually
edited and will be assigned to a user profile.
Up to 12 favourites can be added to the quick
dial buttons.
Possible functions
Assigning speed
dial buttons
Press a free speed dial button from
the PHONE main menu.
Select the desired contact from the
list. If the selected contact has
several telephone numbers, select
the desired number.
Editing assigned
speed dial but-
tons
Press and hold a used speed dial
button in the PHONE main menu
until the Contacts menu opens.
Select the desired contact from the
list. If the selected contact has
several telephone numbers, select
the desired number.
To close the Contacts menu with-
out applying the changes, press
the BACK
function button.
Deleting assigned
speed dial but-
tonsThe telephone numbers stored in
the speed dial buttons can be de-
leted in the menu User profile
settings
> Manage favour-
ites ››› table on page 34.
Possible functions
Dialling with
speed dial but-
tonsBriefly press an assigned speed di-
al button from the PHONE main
menu to call the telephone number
that has been stored on it. Note
The contacts stored on the speed dial buttons
DO NO T upd
ate automatically. If a contact
stored on a speed dial button is modified on
the mobile telephone, the speed dial button
will need to be reassigned. Telephone settings
Press the
S
ETUP function button from the
PHONE m ain menu.
Function button: function
Select phone: From the list, select the mobile telephone
to be connected to the hands-free profile with the Info-
tainment system.
OR: Press Find to connect a new mobile telephone.
Bluetooth: Open the Bluetooth settings
menu
››› page 34.
User profile: Open the User profile settings menu
››› page 35. Bluetooth
®
settin g
s In the PHONE m
ain menu, pr
ess the SETUP function button and then the
Bluet
ooth func-
tion b utt
on.
Function button: function
Bluetooth: Press to deactivate Bluetooth
®
. Disconnects
all active connections.
Visibility: Activation and deactivation of Bluetooth ®
visi-
bility.
Visible: Bluetooth ®
visibility is active.
Hidden: Bluetooth ®
visibility is deactivated. Blue-
tooth ®
visibility must be active for the external
pairing of a Bluetooth ®
device with the Infotain-
ment system. If you have a Bluetooth audio device
active and playing, the visibility is automatically
set to Hidden .
Name: Viewing and changing the name of the Blue-
tooth ®
Infotainment system. This will be the name dis-
played to other Bluetooth ®
devices.
Paired devices: Displays paired devices. To disconnect
and connect Bluetooth ®
devices and profiles.
Find devices: Search for visible Bluetooth ®
devices within
the range of the Infotainment system. The maximum
range is approx. 10 metres.
Bluetooth audio (A2DP/AVRCP): This function must be ac-
tive if it is necessary to connect an external audio source
via Bluetooth ®
to the Infotainment system. ››› page 23. 34
Page 37 of 52

Telephone management system (PHONE)*
User profile settings In the PHONE m
ain menu, pr ess the SETUP function button and then the
U
ser pr ofile func-
tion b utt
on.
Function button: function
Manage favourites: Editing speed dial buttons.
Speed dial button in use : Press to delete the stored
number.
Speed dial button free : Press to assign a number
from the phonebook to the speed dial button in
question.
Mailbox number: To enter or edit the voicemail number.
Sort by: To set the order of appearance of the entries in
the phonebook ( Forename and surname or vice-versa).
Import contacts: Press to import the phonebook of the
connected telephone, or to update the imported phone-
book.
Select ringtonea) : To select a ringtone from a list of prede-
fined melodies (tones). The selected ringtone is played
and set up when exiting the submenu.
Remember your mobile telephone: If there is already an ac-
tive Bluetooth ®
connection with another mobile tele-
phone when turning off the ignition, the following mes-
sage appears: “Remember your mobile phone ”.
a)
Depending on the mobile telephone used, the selected ring
tone, or the one set up on the mobile telephone, is played. This
function will not be displayed if not supported by the mobile tel-
ephone. Note
Some telephones need to be restarted to re-
do wn
load the most recent contacts added. 35