Page 17 of 96

Audio and Media Mode
Audio and Media Mode
R a
dio Mode
RADIO m
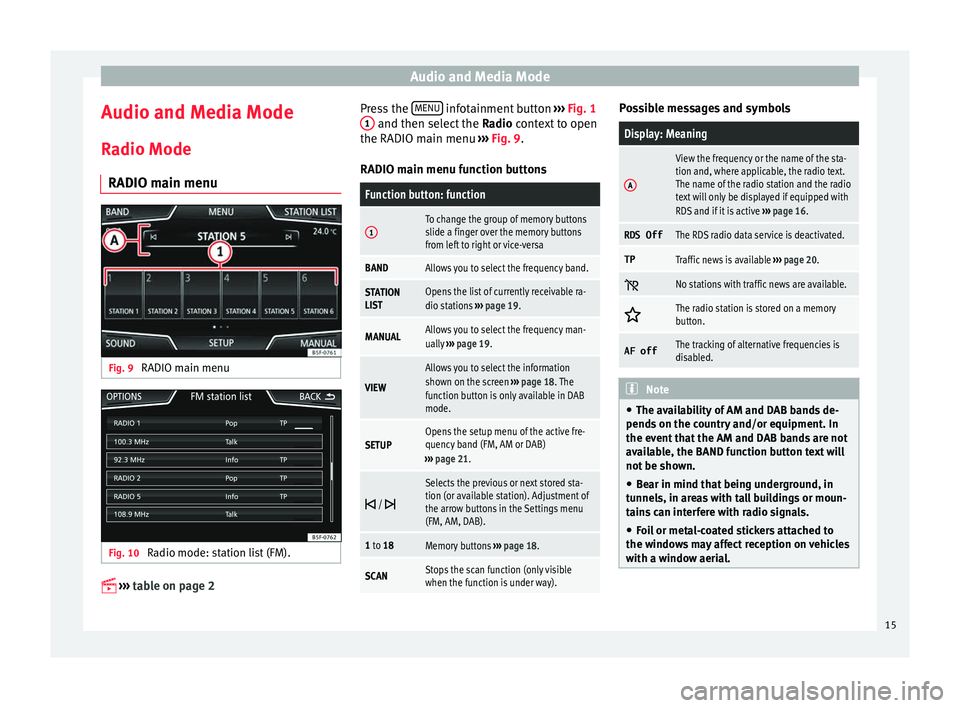
ain menuFig. 9
RADIO main menu Fig. 10
Radio mode: station list (FM).
›› ›
table on page 2 Press the
MENU infotainment button
››
›
Fig. 1
1 and then select the
Ra
dio context to open
the RADIO main menu ››› Fig. 9.
RADIO main menu function buttons
Function button: function
1To change the group of memory buttons
slide a finger over the memory buttons
from left to right or vice-versa
BANDAllows you to select the frequency band.
STATION
LISTOpens the list of currently receivable ra-
dio stations ››› page 19.
MANUALAllows you to select the frequency man-
ually ››› page 19.
VIEW
Allows you to select the information
shown on the screen ››› page 18. The
function button is only available in DAB
mode.
SETUPOpens the setup menu of the active fre-
quency band (FM, AM or DAB)
››› page 21.
/
Selects the previous or next stored sta-
tion (or available station). Adjustment of
the arrow buttons in the Settings menu
(FM, AM, DAB).
1 to 18Memory buttons
››› page 18.
SCANStops the scan function (only visible
when the function is under way). Possible messages and symbols
Display: Meaning
A
View the frequency or the name of the sta-
tion and, where applicable, the radio text.
The name of the radio station and the radio
text will only be displayed if equipped with
RDS and if it is active
››› page 16.
RDS OffThe RDS radio data service is deactivated.
TPTraffic news is available ››› page 20.
No stations with traffic news are available.
The radio station is stored on a memory
button.
AF offThe tracking of alternative frequencies is
disabled.
Note
● The avai l
ability of AM and DAB bands de-
pends on the country and/or equipment. In
the event that the AM and DAB bands are not
available, the BAND function button text will
not be shown.
● Bear in mind that being underground, in
tunnel
s, in areas with tall buildings or moun-
tains can interfere with radio signals.
● Foil or metal-coated stickers attached to
the window
s may affect reception on vehicles
with a window aerial. 15
Page 59 of 96

CAR menu
CAR menu Intr oduction t
o m
anaging the
CAR menu
CAR menu Press the
MENU infotainment button
›››
Fig. 1
1 and then select
Vehicl e to access the
main menu with the following options:
● VIEW
● MINIPLAYER, in the top right corner (Radio
or Medi a f
unction if the HDC descent control*
is not active).
● PREVIOUS-NEXT (to change screen)
● SETUP ›››
Booklet Instruction Manual,
chapter System setup (CAR)
With the function button View you can access
the f o
l
lowing information:
● SPORT*
● OFFROAD*
● CONSUMERS
● DRIVING DATA
● ECOTRAINER* ●
VEHICLE S
TATUS
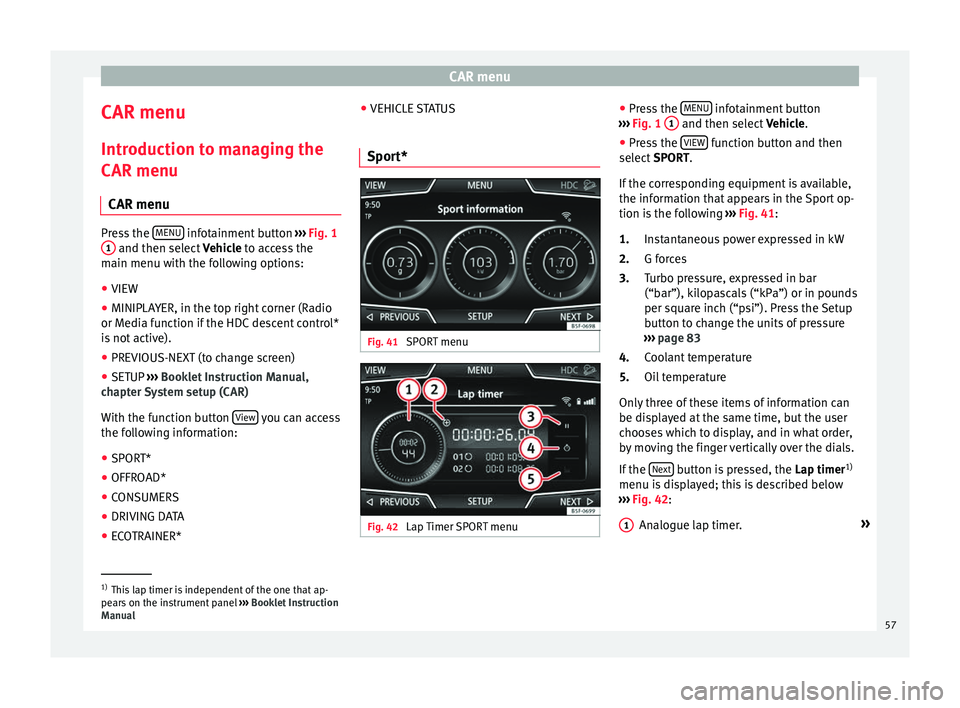
Sport* Fig. 41
SPORT menu Fig. 42
Lap Timer SPORT menu ●
Pr e
s
s the MENU infotainment button
› ›
›
Fig. 1 1 and then select
Vehic
l e.
● Press the VIEW function button and then
sel ect
S
PORT.
If the corresponding equipment is available,
the information that appears in the Sport op-
tion is the following ››› Fig. 41:
Instantaneous power expressed in kW
G forces
Turbo pressure, expressed in bar
(“bar”), kilopascals (“kPa”) or in pounds
per square inch (“psi”). Press the Setup
button to change the units of pressure
››› page 83
Coolant temperature
Oil temperature
Only three of these items of information can
be displayed at the same time, but the user
chooses which to display, and in what order,
by moving the finger vertically over the dials.
If the Next button is pressed, the
Lap timer1)
menu i s
di
splayed; this is described below
››› Fig. 42:
Analogue lap timer. »
1.
2.
3.
4.
5.
1 1)
This lap timer is independent of the one that ap-
pear s
on the instrument panel ››› Booklet Instruction
Manual 57
Page 60 of 96

CAR menu
A new lap timer recording is started by
pr e
s
sing on the surface of the digital lap
timer + .
Stop lap timer/Partial time.
The analogue lap timer stops for 5 sec-
onds. After 5 seconds, the analogue lap
timer goes back to showing the real time.
Statistics/delete last lap timer recording.
Offroad* Fig. 43
CAR Menu Offroad. ●
Press the MENU infotainment button
› ›
›
Fig. 1 1 and then select
Vehic
l e.
● Press the VIEW function button and then
sel ect
OFFROAD .
2 3
4
5 If the corresponding equipment is available,
the inf
orm
ation th
at appears is the following:
Compass.
Altimeter: altitude above sea level.
Turning angle of steered wheels.
Coolant temperature.
Lubricating oil temperature
Only the altimeter and 2 more of these items
of information can be displayed at the same
time, but the user chooses which to display,
and in what order, by moving their finger ver-
tically over the dials.
Consumers Fig. 44
Convenience consumers. 1.
2.
3.
4.
5.
By pressing the
C
on
s umers button, informa-
tion on the s t
at
us of the vehicle's main con-
sumption devices is obtained. It is shown via
a consumption indicator bar in l/h (gal/h) 1)
.
Driving data Fig. 45
Driving data. The onboard computer is equipped with 3
memorie
s
th
at work automatically. In these
memories you can see the distance travelled,
average speed, time passed, average con-
sumption and autonomy of the vehicle.
1. Since start
Indicates and stores the values of the journey
completed and the consumption from when 1)
In the case of Gas (CNG) vehicles, the units are in
kg/h.
58