2016 Seat Ibiza SC gearbox
[x] Cancel search: gearboxPage 166 of 248
Operation
Stop the vehicle in a safe place well away
fr om mo
v
ing traffic. Seek specialist assis-
tance.
Gearbox: too hot. Adapt your
driving accordingly
Continue driving at moderate speeds. When
the warning lamp switches off, you can con-
tinue driving in a normal manner. Gearbox: press the brake and
engage a gear again.
If the fault was caused by a gearbox with a
high temperature, this driver message will be
displayed when the gearbox has cooled
again.
Run-in and economical driving Runnin
g in a new engine The engine needs to be run in over the first
1,500 km (900 mi
l
e
s).
Up to 1000 kilometres (600 miles) – Do not drive at speeds of more than 2/3
the maximum s
peed.
– Do not accelerate hard.
– Avoid high engine revolutions.
– Do not tow a trailer. From 1000 to 1500 kilometres (600 to 900
mile
s)
– Speeds can be gradual
ly increased to the
maximum road speed or maximum permis-
sible engine speed (rpm).
During its first few hours of running, the in-
ternal friction in the engine is greater than
later on, when all the moving parts have bed-
ded in. For the sake of the environment
If the engine is run in gently, its life will be in-
cr e
ased and its oil consumption reduced. Tyre and brake pad run-in
New tyres should be run-in carefully for the
fir
s
t
500 km (300 miles). New brake pads
should be run-in carefully for the first 200 km
(125 miles).
During the first 200 km (125 miles), you can
compensate for the reduced braking effect by
applying more pressure to the brake pedal. In
case of a sharp braking, the braking distance
will be longer with new brake pads than with
brake pads which have been run-in. WARNING
● At fir s
t, new tyres do not give maximum
grip, and require running-in. This may cause an accident. Drive particularly carefully in the
firs
t
500 km (300 miles).
● New brake pads must be “run in” and do
not hav
e the correct friction properties during
the first 200 km (125 miles). However, the re-
duced braking capacity may be compensated
by pressing on the brake pedal a little harder. Environmental compatibility
Environmental protection is a top priority in
the des
ign, c
hoice of materials and manufac-
ture of your new SEAT.
Constructive measures to encourage recy-
cling
● Joints and connections designed for easy
dism antlin
g.
● Modular construction to facilitate disman-
tling.
● Incr
eased use of single-grade materials.
● Plastic parts and elastomers are marked in
accor
dance with ISO 1043, ISO 11469 and
ISO 1629.
Choice of materials
● Use of recycled materials.
● Use of compatible plastics in the same part
if its c
omponents are not easily separated.
● Use of recycled materials and/or materials
originating fr
om renewable sources.
164
Page 167 of 248
Driving
● Reduction of
volatile components, includ-
ing odour, in plastic materials.
● Use of CFC-free coolants.
Ban on heavy
metals, with the exceptions
dictated by law (Annex II of ELV Directive
2000/53/EC): cadmium, lead, mercury, hexa-
valent chromium.
Manufacturing methods
● Reduction of the quantity of thinner in the
protectiv
e wax for cavities.
● Use of plastic film as protection during ve-
hicle tr
ansport.
● Use of solvent-free adhesives.
● Use of CFC-free coolants in cooling sys-
tems.
● Recy
cling and energy recovery from resi-
dues (RDF).
● Impr
ovement in the quality of waste water.
● Use of systems for the recovery of residual
heat (therm
al recovery, enthalpy wheels,
etc.).
● The use of water-soluble paints.
Economical and environmentally-
friendly drivin
gFuel consumption, environmental pollution
and w
e
ar t
o the engine, brakes and tyres de- pends in large part on your driving style. By
adopting an ec
onomical driving style and an-
ticipating the traffic situation ahead, you can
easily reduce fuel consumption by 10-15%.
Some tips on how to help you reduce pollu-
tion while saving money are listed below.
Active cylinder management (ACT ®
)
Depending on the equipment, the vehicle
may have active cylinder management
(ACT ®
).
The active cylinder management (ACT ®
) may
automatically deactivate some of the engine
cylinders if the driving situation does not re-
quire too much power. When it is switched
off, no fuel is injected into these cylinders,
hence total fuel consumption may be re-
duced. The number of active cylinders can be
seen on the instrument panel display
››› page 30.
Drive anticipating the traffic situation
A vehicle uses most fuel when accelerating.
When you anticipate situations, you have to
brake less often and, thus, accelerate less. If
it is possible, let the vehicle roll with a gear
engaged, for example, if you see a red light
ahead. The braking effect achieved in this
way helps to reduce the wear of brakes and
tyres; emissions and fuel consumption are
reduced to zero (disconnection due to iner-
tia). Change gear early to save energy
An effective w
ay of saving fuel is to change
up quickly through the gears. Running the
engine at high rpm in the lower gears uses
an unnecessary amount of fuel.
Manual gearbox: shift up from first to second
gear as soon as possible. We recommend
that, whenever possible, you change to a
higher gear upon reaching 2000 rpm. Follow
the “recommended gear” indication that ap-
pears on the instrument panel ››› page 158.
Avoid driving at high speed
We advise you not to drive at the top speed
permitted by the vehicle. Fuel consumption,
exhaust emissions and noise levels all in-
crease very rapidly at higher speeds. Driving
at moderate speeds will help to save fuel.
Avoid idling
It is worthwhile switching off the engine
when waiting in a traffic jam, at level cross-
ings or at traffic lights with a long red phase.
The fuel saved after only 30 - 40 seconds is
greater than the amount of fuel needed to re-
start the engine.
The engine takes a long time to warm up
when it is idling. Mechanical wear and pollu-
tant emissions are also especially high dur-
ing this initial warm-up phase. It is therefore
best to drive off immediately after starting »
165
Technical data
Advice
Operation
Emergencies
Safety
Page 170 of 248
Operation
Accumulation of soot in the diesel engine
p ar
tic
ulate filter*
If the control lamp lights up you should
help the filter clean itself by driving in the ap-
propriate manner.
To do this, drive about 15 minutes in fourth
or fifth gear (automatic gearbox: S gear
range) at a minimum speed of 60 km/h
(37 mph), with the engine running at approxi-
mately 2,000 rpm. In this way, the soot build
up in the filter is burned. When cleaning is
successful, the control lamp turns off.
If the lamp does not turn off, or the three
lamps turn on (particulate filter , fault in
the emission control system and glow
plugs ), drive the vehicle to a specialised
workshop and have the fault repaired at the
earliest opportunity. WARNING
Always drive according to the road weather
condition s, the t
errain and traffic. Driving rec-
ommendations should never lead to illegal
manoeuvres in surrounding traffic. CAUTION
● Your v
ehicle is not designed to use biodie-
sel fuel. Never, under any circumstances re-
fuel with biodiesel. The use of biodiesel fuel
could damage the engine and the fuel sys-
tem. The addition of biodiesel to diesel by
the diesel producer in accordance with stand- ard EN 590 is authorised and will not cause
dam
ag
e to the engine or the fuel system.
● Using diesel fuel with a high sulphur con-
tent m
ay significantly reduce the useful life of
the diesel particulate filter. Your Technical
Service will be able to tell you which coun-
tries have diesel with a high sulphur content. Engine management*
This warning lamp monitors the engine man-
agement
sy
stem for petrol engines.
The warning lamp (Electronic Power Con-
trol) lights up when the ignition is switched
on while system operation is being verified. It
should go out once the engine is started.
If there is a fault in the electronic engine
management system while you are driving,
this warning lamp will light up. Take the vehi-
cle to a specialised workshop as soon as
possible and have the engine checked.
Emission control system* Control lamp
fla
she
s:
When there is misfiring that can damage the
catalytic converter. Reduce speed and drive
carefully to the nearest specialised workshop
to have the engine checked. The control lamp
lights up:
If
a fault has developed during driving which
has reduced the quality of the exhaust gas
(e.g. lambda probe fault). Reduce speed and
drive carefully to the nearest specialised
workshop to have the engine checked.
Engine pre-heating/fault system* The warning lamp lights up to show that the
glow p
lug
s are preheating the diesel engine.
The control lamp lights up
If the control lamp lights up when the en-
gine is started it means that the glow plugs
are preheating. The engine can be started
straight away when the lamp switches off.
Control lamp flashes
If a fault develops in the engine management
system while you are driving, the glow plug
system lamp will flash . Take the vehicle to
a specialised workshop as soon as possible
and have the engine checked.
168
Page 172 of 248
Operation
Driver assistance systems
St ar
t
-Stop System*
Description and operation The Start-Stop function stops the engine
when the v
ehic
le is stopped and starts it au-
tomatically when required.
Vehicles with a manual gearbox
– When the vehicle is stopped, put it into
neutral and r
elease the clutch pedal. The
engine will switch off. The warning lamp
will appear on the instrument panel dis-
play.
– When the clutch pedal is pressed the en-
gine wil
l start up again. The warning lamp
will switch off.
Vehicles with an automatic gearbox
– Use the foot brake to bring the vehicle to a
stop and k
eep the brake pedal pressed
down with your foot. The engine will switch
off. The warning lamp will appear in the
display.
– When you take your foot off the brake pedal
the engine wi
ll start up again. The warning
lamp will switch off. Start-Stop function conditions
● The driver seat belt must be buckled.
● The bonnet must be closed.
● The engine must be at operating tempera-
ture.
● The s
teering wheel must be straight.
● The vehicle must be on flat ground.
● The vehicle must not be in reverse.
● A trailer must not be connected.
● The temperature of the interior must be
within the comf
ort limits (A/C button should
be sel ect
ed).
● The w
indscreen de-mist function must be
off.
● If in an inc
rease in airflow is not reques
ted.
● The temperature must not be set to HI or
LO .
● The driver door must be closed.
● The diesel particulate filter must not be in
reg
eneration mode, for diesel engines.
● The battery charge must not be low for the
next s
tart.
● Battery temperature must be between -1°C
(+30°F) and +55°C (+131°F).
Star
t-Stop function interruption
In the following situations, the Start-Stop
function will be interrupted and the engine
will automatically start: ●
The vehic
le starts moving.
● The brake pedal is pressed several times in
a row
.
● The battery has been discharged excessive-
ly.
● The St
art-Stop System is manually deacti-
vated.
● The w
indscreen de-mist function is turned
on.
● The temperature of the interior exceeds the
comfor
t limits ( A/C button).
● If the airflow is increased by more than 3
pr e
s
ses.
● Temperature setting HI or LO is sel
ected.
● The engine coolant temperature is insuffi-
cient.
● The alt
ernator is faulty, for example the V-
belt ha
s ruptured.
● If any of the conditions described in the
previou
s section are not fulfilled.
When the engine is turned off by the Start-
Stop function, this is displayed on the instru-
ment panel.
If the Start-Stop system is not switched on,
the warning lamp will appear on the instru-
ment panel.
170
Page 173 of 248
Driver assistance systems
WARNING
Never allow the vehicle to move with the en-
gine off f or an
y reason. You could lose control
of your vehicle. This could cause an accident
and serious injury.
● The brake servo does not work with the en-
gine off. Y
ou need more force to stop the vehi-
cle.
● Power steering does not work when the en-
gine is not
running. That is why it is much
more difficult to turn the steering wheel.
● Turn off the Start-Stop system when driving
through wat
er (fording streams, etc.). Note
● For v
ehicles with the Start-Stop function
and a manual gearbox, when the engine is
started, the clutch must be pressed.
● When the conditions for the Start-Stop
function ar
e not fulfilled, the instrument pan-
el displays the Start-Stop indicator dimmed.
● If the steering wheel is turned more than
270°, it wi
ll not be possible to start the vehi-
cle again. To start the vehicle, straighten the
steering wheel so that it is turned less than
270°.
● There are different versions of the dash
panel; the dis
play of indications on the
screen may differ. Activating and deactivating the Start-
St
op f
u
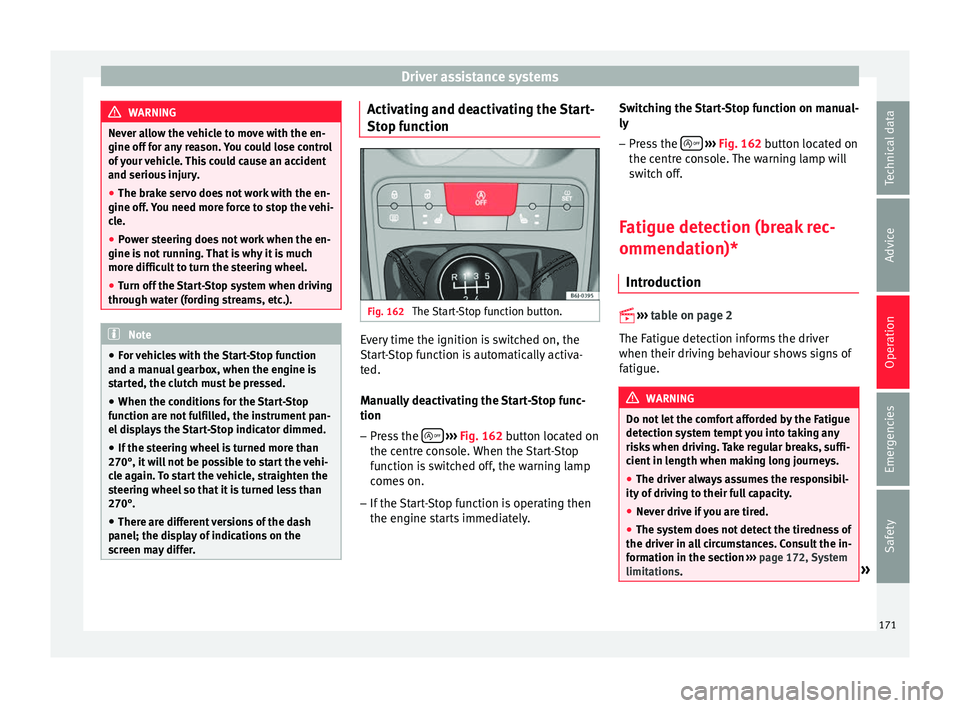
nction Fig. 162
The Start-Stop function button. Every time the ignition is switched on, the
St
ar
t
-Stop function is automatically activa-
ted.
Manually deactivating the Start-Stop func-
tion
– Press the
› ›
› Fig. 162
button located on
the centre console. When the Start-Stop
function is switched off, the warning lamp
comes on.
– If the Start-Stop function is operating then
the engine st
arts immediately. Switching the Start-Stop function on manual-
ly
– Press the
› ››
Fig. 162
b
utton located on
the centre console. The warning lamp will
switch off.
Fatigue detection (break rec-
ommendation)* Introduction
›› ›
table on page 2
The Fatigue detection informs the driver
when their driving behaviour shows signs of
fatigue. WARNING
Do not let the comfort afforded by the Fatigue
detection sy s
tem tempt you into taking any
risks when driving. Take regular breaks, suffi-
cient in length when making long journeys.
● The driver always assumes the responsibil-
ity of driv
ing to their full capacity.
● Never drive if you are tired.
● The system does not detect the tiredness of
the driver in al
l circumstances. Consult the in-
formation in the section ››› page 172, System
limitations. » 171
Technical data
Advice
Operation
Emergencies
Safety
Page 181 of 248
Driver assistance systems
● Ap p
ly
the parking brake.
● Switch the ignition on.
● If necessary, switch on the Infotainment
syst
em.
● Engage reverse gear or turn the selector
lever t
o position R.
● Press the function b
utton displayed on
the right of the image.
● Make the desired adjustments on the menu
by pr
essing the –/+ function buttons or by
moving the corresponding scroll button.
Necessary conditions for parking and ma-
noeuvring with the rear assist
The system should not be used in the follow-
ing cases:
● If the image displayed is not very reliable or
is di
storted, for example low visibility or dirty
lens.
● If the area behind the vehicle is not dis-
pla
yed very clearly or is incomplete.
● If the vehicle is heavily loaded at the rear.
● If the position and installation angle of the
camera h
ave been changed, e.g. after a rear-
end collision. Have the system checked by a
specialised workshop.
Familiarising yourself with the system
To familiarise yourself with the system, the
orientation lines and their function, SEAT rec- ommends practising parking and manoeu-
vring with the r
ear assist in a place without
too much traffic or in a car park when there
are good weather and visibility conditions.
Cleaning the camera lens
Keep the camera lens clean and clear of snow
and ice:
● Moisten the lens using a normal alcohol-
based gl
ass cleaning product and clean the
lens with a dry cloth.
● Remove snow using a small brush.
● Use de-icing spray to remove any ice. CAUTION
● Never u se abr
asive cleaning products to
clean the camera lens.
● Do not use hot or warm water to remove ice
or snow fr
om the camera lens. Doing so could
damage the camera. Parking and manoeuvring with the
r
e
ar a
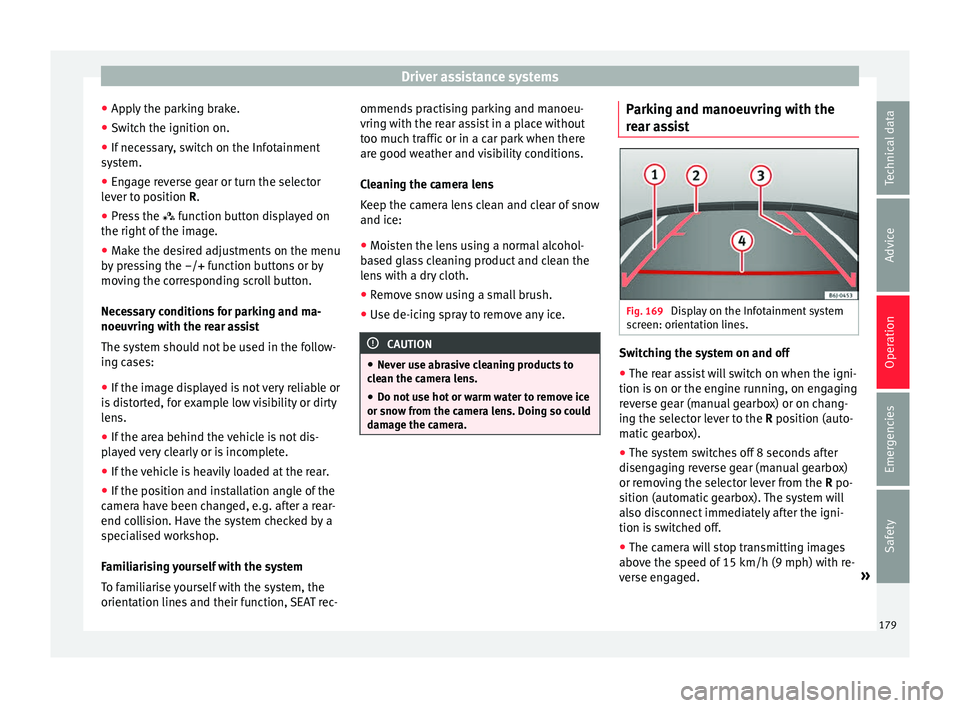
ssist Fig. 169
Display on the Infotainment system
s c
r
een: orientation lines. Switching the system on and off
●
The rear assist will switch on when the igni-
tion i s
on or the en
gine running, on engaging
reverse gear (manual gearbox) or on chang-
ing the selector lever to the R position (auto-
matic gearbox).
● The system switches off 8 seconds after
diseng
aging reverse gear (manual gearbox)
or removing the selector lever from the R po-
sition (automatic gearbox). The system will
also disconnect immediately after the igni-
tion is switched off.
● The camera will stop transmitting images
above the s
peed of 15 km/h (9 mph) with re-
verse engaged. »
179
Technical data
Advice
Operation
Emergencies
Safety
Page 182 of 248
Operation
In combination with the Parking System Plus
› ›
›
page 173, the camera image will cease to
be transmitted immediately when reverse
gear is disengaged or when the selector lever
is moved from the R position, and the optical
information provided by the Parking Aid sys-
tem will be displayed.
Also in combination with the system, the rear
assist image can also be concealed:
● By pressing one of the Infotainment system
button
s on the display.
● OR: By pressing the miniature vehicle that
appe
ars on the left of the screen (which
switches to the full-screen mode of the Park-
ing System Plus's optical system).
If you wish to display the rear assist image
again:
● Disengage reverse, or change the selector
lever's
position, engage reverse again or
move the selector lever to position R.
● OR: Press the RVC fu
nction button1)
Meaning of the orientation lines
››› Fig. 169 Side lines: exten
sion of the vehicle (the
approximate width of the vehicle plus the
rear view mirrors) on the road surface.
End of the side lines: the area marked in
green ends approximately 2 m behind
the vehicle on the road surface.
Intermediate line: indicates a distance of
approximately 1 m behind the vehicle on
the road surface.
Red horizontal line: indicates a safe dis-
tance of approximately 40 cm at the rear
of the vehicle on the road surface.
Parking manoeuvre
● Place the vehicle in front of the parking
spac
e and engage reverse gear (manual
gearbox) or move the selector to the R posi-
tion (automatic gearbox).
● Reverse slowly, and turn the steering wheel
so that the s
ide orientation lines lead to-
wards the parking space.
● Guide the vehicle into the parking space so
that the s
ide orientation lines run parallel to
it. 1 2
3
4 Cruise speed* (cruise control -
GRA)
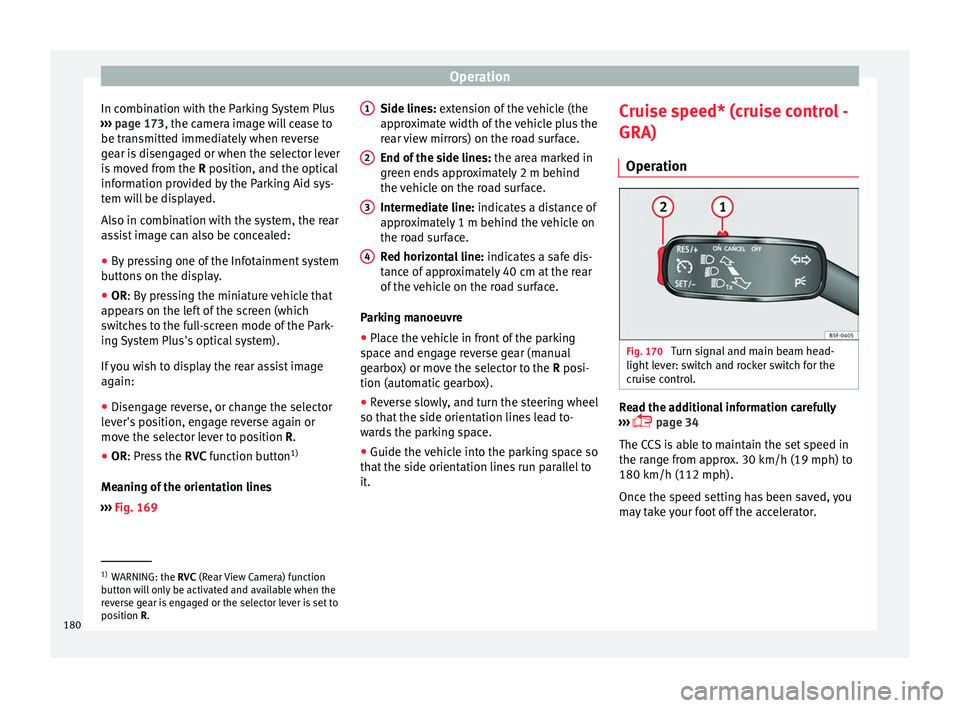
Oper ation Fig. 170
Turn signal and main beam head-
light l
ev
er: switch and rocker switch for the
cruise control. Read the additional information carefully
› ›
›
page 34
The CCS is able to maintain the set speed in
the range from approx. 30 km/h (19 mph) to
180 km/h (112 mph).
Once the speed setting has been saved, you
may take your foot off the accelerator. 1)
WARNING: the RVC (Rear
View Camera) function
button will only be activated and available when the
reverse gear is engaged or the selector lever is set to
position R.
180
Page 184 of 248
Operation
To resume cruise control, release the brake or
c lut
c
h pedal or reduce the vehicle speed to
less than 180 km/h (112 mph) and press
once on the upper part of the rocker switch RES+ ››› Fig. 170 2 .
Complete system deactivation Vehicles with a manual gearbox
The sys
t
em is completely turned off by mov-
ing the control ››› Fig. 170 1 all the way to
the right h and s
ide (set into the OFF posi-
tion), or when the vehicle is stationary,
switching off the ignition.
Vehicles with an automatic gearbox
To completely disengage the system, the se-
lector lever must be placed in one of the fol-
lowing positions: P, N, R or 1 or with the vehi-
cle stopped and the ignition turned off. “SEAT Drive Profile” system
Fu nction and oper
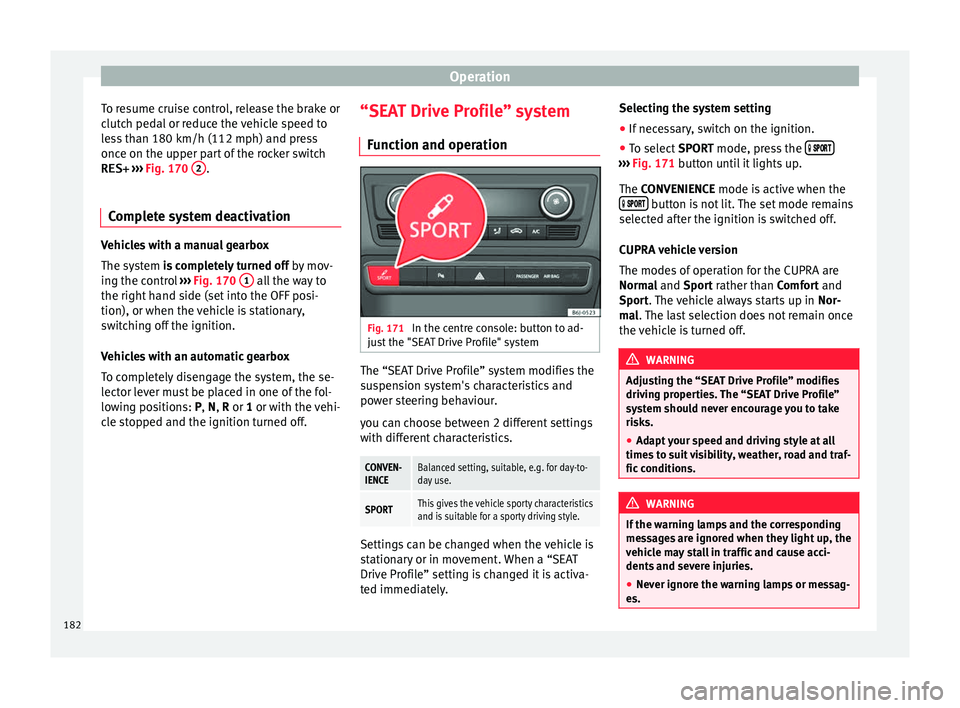
ation Fig. 171
In the centre console: button to ad-
ju s
t
the "SEAT Drive Profile" system The “SEAT Drive Profile” system modifies the
s
u
s
pension system's characteristics and
power steering behaviour.
you can choose between 2 different settings
with different characteristics.
CONVEN-
IENCEBalanced setting, suitable, e.g. for day-to-
day use.
SPORTThis gives the vehicle sporty characteristics
and is suitable for a sporty driving style. Settings can be changed when the vehicle is
s
t
ation
ary or in movement. When a “SEAT
Drive Profile” setting is changed it is activa-
ted immediately. Selecting the system setting
● If necessary, switch on the ignition.
● To select SPORT mode, press the
›››
Fig. 171 b utt
on u
ntil it lights up.
The CONVENIENCE mode is active when the button is not lit. The set mode remains
sel ect
ed af
ter the ignition is switched off.
CUPRA vehicle version
The modes of operation for the CUPRA are
Normal and Sport rather than Comfort and
Sport. The vehicle always starts up in Nor-
mal. The last selection does not remain once
the vehicle is turned off. WARNING
Adjusting the “SEAT Drive Profile” modifies
drivin g pr
operties. The “SEAT Drive Profile”
system should never encourage you to take
risks.
● Adapt your speed and driving style at all
times t
o suit visibility, weather, road and traf-
fic conditions. WARNING
If the warning lamps and the corresponding
mes s
ages are ignored when they light up, the
vehicle may stall in traffic and cause acci-
dents and severe injuries.
● Never ignore the warning lamps or messag-
es. 182