2016 Seat Ibiza SC tyre pressure
[x] Cancel search: tyre pressurePage 80 of 248
Emergencies
Air bleed screw (in its place, the compres-
sor m a
y
have a button).
ON/OFF switch
12 volt connector
Bottle of sealant
Spare tyre valve
The valve insert remover 1 has a gap at the
lo w
er end f
or a valve insert. The valve insert
can only be screwed or unscrewed in this
way. This also applies to its replacement part 11 .
WARNING
When inflating the wheel, the air compressor
and the inflat or t
ube may become hot.
● Protect hands and skin from hot parts.
● Do not place the hot flexible inflator tube or
hot air compr
essor on flammable material.
● Allow them to cool before storing the de-
vice.
● If
it is not possible to inflate the tyre to at
lea
st 2.0 bars (29 psi / 200 kPa), the tyre is
too badly damaged. The sealant is not in a
good condition to seal the tyre. Do not con-
tinue driving. Seek specialist assistance. CAUTION
Switch off the air compressor after a maxi-
mum of 8 oper ation
al minutes to avoid over-
heating! Before switching on the air compres-
sor again, let it cool for several minutes. 7
8
9
10
11 Check after 10 minutes of driving
Screw in the inflator tube
›››
Fig. 86 5 again
and chec k
the pressure on the gauge 6 .
1.3 bar (19 p s
i / 130 kPa) and lower:
● Stop the vehicle! The tyre c
annot be sealed
sufficiently with the tyre mobility set.
● You should obtain professional assistance
›››
.
1.4 bar (20 p s
i / 140 kPa) and higher:
● Set the tyre pressure to the correct value
again.
● Car
efully resume your journey, without ex-
ceeding 80 km/h (50 mph), u
ntil you reach
the nearest specialised workshop and re-
place the tyre. WARNING
Driving with an unsealed tyre is dangerous
and can c au
se accidents and serious injury.
● Do not continue driving if the tyre pressure
is 1.3
bar (19 psi / 130 kPa) and lower.
● Seek specialist assistance. Changing the windscreen wiper
b
l
a
des
Changing the windscreen and rear
window wiper blades Read the additional information carefully
›› ›
page 54.
Perfect wiper blade condition is essential for
clear vision. Damaged wiper blades should
be replaced immediately.
The windscreen wiper blades are supplied as
standard with a layer of graphite. This layer is
responsible for ensuring that the wipe is si-
lent. If the graphite layer is damaged, the
noise of the water as it is wiped across the
windscreen will be louder.
Check the condition of the wiper blades regu-
larly. If the wipers scrape across the glass ,
they should be changed if they are damaged,
or cleaned if they are dirty ››› .
If thi
s
does not produce the desired results,
the setting angle of the windscreen wiper
arms might be incorrect. They should be
checked by a specialised workshop and cor-
rected if necessary. WARNING
Do not drive unless you have good visibility
through a l
l windows!78
Page 136 of 248
Operation
vehicle may change, leading to accidents,
injuries
and d
amage to the vehicle.
● Please note that the centre of gravity may
shift when tr
ansporting heavy objects; this
may affect vehicle handling and lead to an ac-
cident. Therefore, it is essential to adjust
your speed and driving style accordingly, to
avoid accidents.
● Never leave your vehicle unattended, espe-
cia
lly when the rear lid is open. Children
could climb into the luggage compartment,
closing the door behind them; they will be
trapped and run the risk of death.
● Never allow children to play in or around
the vehic
le. Close and lock all the doors and
rear lid when you leave the vehicle. Before
you lock the vehicle, make sure that there are
no adults or children in the vehicle.
● Please observe the notes on the ›››
page 56. CAUTION
Hard objects on the rear shelf could chafe
again s
t the wires of the heating element in
the heated rear window and cause damage. Note
● The tyr e pr
essure must be adjusted accord-
ing to the load. When necessary check the
tyre pressures on the label located on the in-
side fuel tank flap ››› page 210.
● Air circulation in the vehicle helps reduce
foggin
g of the windows. Used air escapes through ventilation slits in the side trim of
the lugg
ag
e compartment. Ensure that the
ventilation slots are never covered.
● Straps for securing the load to the fasten-
ing ring
s* are commercially available from ac-
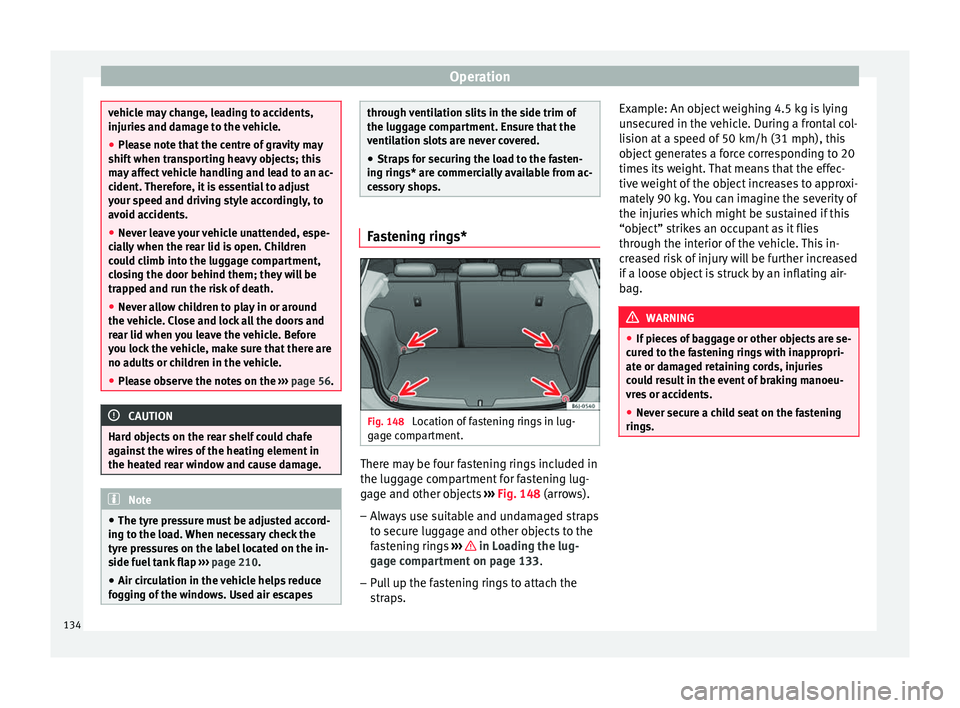
cessory shops. Fastening rings*
Fig. 148
Location of fastening rings in lug-
g ag
e c
ompartment. There may be four fastening rings included in
the lug
g
ag
e compartment for fastening lug-
gage and other objects ››› Fig. 148 (arrows).
– Always use suitable and undamaged straps
to secur
e luggage and other objects to the
fastening rings ››› in Loading the lug-
g ag
e c
ompartment on page 133.
– Pull up the fastening rings to attach the
strap
s. Example: An object weighing 4.5 kg is lying
unsec
ured in the vehicle. During a frontal col-
lision at a speed of 50 km/h (31 mph), this
object generates a force corresponding to 20
times its weight. That means that the effec-
tive weight of the object increases to approxi-
mately 90 kg. You can imagine the severity of
the injuries which might be sustained if this
“object” strikes an occupant as it flies
through the interior of the vehicle. This in-
creased risk of injury will be further increased
if a loose object is struck by an inflating air-
bag. WARNING
● If piec e
s of baggage or other objects are se-
cured to the fastening rings with inappropri-
ate or damaged retaining cords, injuries
could result in the event of braking manoeu-
vres or accidents.
● Never secure a child seat on the fastening
rings. 134
Page 157 of 248

Driving
At speeds of up to approximately 80 km/h
(50 mph), it i
s
able to balance out differences
in the speed of the driven wheels of approxi-
mately 100 rpm/min caused by a partially
slippery road surface. It does this by braking
the wheel which has lost traction and distrib-
uting more driving force to the other driven
wheel via the differential.
To prevent the disc brake of the braking
wheel from overheating, the EDL cuts out au-
tomatically if subjected to excessive loads.
The vehicle will continue to function normally
without EDL. For this reason, the driver is not
informed that the EDL has been switched off.
The EDL will switch on again automatically
when the brake has cooled down.
Control lamp
A malfunction in the EDL is indicated by the
ABS control lamp ››› page 155. Take the
vehicle to a specialised workshop as soon as
possible. WARNING
● When acc el
erating on a slippery surface,
for example on ice and snow, press the accel-
erator carefully. Despite EDL, the driven
wheels may start to spin. This could impair
the vehicle's stability.
● Always adapt your driving style to suit road
conditions
and the traffic situation. Do not let
the extra safety afforded by EDL tempt you in- to taking any risks when driving, this can
cau
se ac
cidents. CAUTION
Modifications to the vehicle (e.g. to the en-
gine, the br ake sy
stem, running gear or any
components affecting the wheels and tyres)
could affect the efficiency of the EDL
››› page 187. Hydraulic Brake Assist (HBA)*
The function (Hydraulic Brake Assist HBA) is
on
ly
inc
luded in vehicles with ESC.
In an emergency, most drivers brake in time,
but not with maximum force. This results in
unnecessarily long braking distances.
This is when the brake assist system comes
into action. When pressing the brake pedal
rapidly, the assistant interprets it as an emer-
gency. It very quickly builds up the full brake
pressure so that the ABS can be activated
more quickly and efficiently, thus reducing
braking distance.
Do not reduce the pressure on the brake ped-
al, since the brake assist system switches off
automatically as soon as you release the
brake. Automatic hazard warning lights activation
The brake lights
flash automatically to indi-
cate that the vehicle is braking suddenly or in
an emergency situation. If the emergency
braking continues until the vehicle comes to
a standstill, the hazard warning lights will
then come on and the brake lights will re-
main on permanently from that moment. The
warning lights will automatically switch off
when the vehicle begins to move again or
when the "warning" light button is pressed. WARNING
● The risk of
accident is higher if you drive
too fast, if you do not keep your distance from
the vehicle in front, and when the road sur-
face is slippery or wet. The increased acci-
dent risk cannot be reduced by the brake as-
sist system.
● The brake assist system cannot defy the
law
s of physics. Slippery and wet roads are
dangerous even with the brake assist system!
Therefore, it is essential that you adjust your
speed to suit the road and traffic conditions.
Do not let the extra safety features tempt you
into taking any risks when driving. Anti-lock brake system (ABS)
The anti-lock brake (ABS) system prevents
the wheel
s
fr
om locking during braking and
is an important part of the vehicle's active
safety system. »
155
Technical data
Advice
Operation
Emergencies
Safety
Page 158 of 248
Operation
How the ABS works
If one of
the wheel
s turns too slowly in rela-
tion to the vehicle's speed, and is close to
locking, the system will reduce the braking
pressure to this wheel. The driver is made
aware of this control process by a pulsating
of the brake pedal and audible noise. This is
a deliberate warning to the driver that one or
more of the wheels is tending to lock and the
ABS control function has intervened. In this
situation it is important to keep the brake
pedal fully depressed so the ABS can regu-
late the brake application. Do not “pump”.
If you brake hard on a slippery road surface,
the best possible control is retained as the
wheels do not lock.
However, ABS will not necessarily guarantee
shorter braking distances in all conditions.
Braking distance could even be further if you
brake on gravel or on fresh snow on a slip-
pery surface.
Control lamp
The control lamp lights up for a few sec-
onds when the ignition is switched on. It
goes out again after the system has run
through an automatic test sequence.
There is a fault in the ABS if:
● The control lamp does not
light up when
the ignition is switched on. ●
The contro
l lamp does not go out again af-
ter a few seconds.
● The control lamp lights up when the vehicle
is mo
ving.
The vehicle can still be braked in the normal
way, without the ABS function. Take the vehi-
cle to a specialised workshop as soon as
possible.
If there is a fault in the ABS, the ESC* and the
tyre pressure control lamp will also light up.
Brake system fault
If the ABS warning lamp lights up together
with the brake warning lamp , there is a
fault in the ABS function and in the brake
system ››› .
WARNING
● The anti-lock br
ake system cannot defy the
laws of physics. Slippery and wet roads are
dangerous even with ABS! If you notice that
the ABS is working (to counteract locked
wheels under braking), you should reduce
speed immediately to suit the road and traffic
conditions. Do not let the extra safety fea-
tures tempt you into taking any risks when
driving.
● The effectiveness of ABS is also determined
by the ty
res fitted ››› page 210.
● If the running gear or brake system is modi-
fied, the effectivene
ss of the ABS could be se-
verely limited. WARNING
● Bef or
e opening the bonnet, read and ob-
serve the warnings ››› page 198, Working in
the engine compartment.
● If the brake system warning lamp should
light
up together with the ABS warning lamp
, stop the vehicle immediately and check
the brake fluid level in the reservoir
››› page 206, Brake fluid. If the brake fluid
level has dropped below the “MIN” mark you
must not drive on. Risk of accident. Obtain
technical assistance.
● If the brake fluid level is correct, the fault in
the brake sy
stem may have been caused by a
failure of the ABS system. This could cause
the rear wheels to lock quickly when you
brake. This could cause the rear to break
away. Risk of skidding. Stop the vehicle and
seek technical assistance. Electronic differential lock (XDS)*
When taking a curve, the driveshaft differen-
ti
al
mec
hanism allows the outer wheel to turn
at a higher speed than the inner wheel. In
this way, the wheel that is turning faster (out-
er wheel) receives less drive torque than the
inner wheel. This may mean that in certain
situations the torque delivered to the inner
wheel is too high, causing the wheels to
spin. On the other hand, the outer wheel is
receiving a lower drive torque than it could
transmit. This causes an overall loss of lateral
156
Page 166 of 248
Operation
Stop the vehicle in a safe place well away
fr om mo
v
ing traffic. Seek specialist assis-
tance.
Gearbox: too hot. Adapt your
driving accordingly
Continue driving at moderate speeds. When
the warning lamp switches off, you can con-
tinue driving in a normal manner. Gearbox: press the brake and
engage a gear again.
If the fault was caused by a gearbox with a
high temperature, this driver message will be
displayed when the gearbox has cooled
again.
Run-in and economical driving Runnin
g in a new engine The engine needs to be run in over the first
1,500 km (900 mi
l
e
s).
Up to 1000 kilometres (600 miles) – Do not drive at speeds of more than 2/3
the maximum s
peed.
– Do not accelerate hard.
– Avoid high engine revolutions.
– Do not tow a trailer. From 1000 to 1500 kilometres (600 to 900
mile
s)
– Speeds can be gradual
ly increased to the
maximum road speed or maximum permis-
sible engine speed (rpm).
During its first few hours of running, the in-
ternal friction in the engine is greater than
later on, when all the moving parts have bed-
ded in. For the sake of the environment
If the engine is run in gently, its life will be in-
cr e
ased and its oil consumption reduced. Tyre and brake pad run-in
New tyres should be run-in carefully for the
fir
s
t
500 km (300 miles). New brake pads
should be run-in carefully for the first 200 km
(125 miles).
During the first 200 km (125 miles), you can
compensate for the reduced braking effect by
applying more pressure to the brake pedal. In
case of a sharp braking, the braking distance
will be longer with new brake pads than with
brake pads which have been run-in. WARNING
● At fir s
t, new tyres do not give maximum
grip, and require running-in. This may cause an accident. Drive particularly carefully in the
firs
t
500 km (300 miles).
● New brake pads must be “run in” and do
not hav
e the correct friction properties during
the first 200 km (125 miles). However, the re-
duced braking capacity may be compensated
by pressing on the brake pedal a little harder. Environmental compatibility
Environmental protection is a top priority in
the des
ign, c
hoice of materials and manufac-
ture of your new SEAT.
Constructive measures to encourage recy-
cling
● Joints and connections designed for easy
dism antlin
g.
● Modular construction to facilitate disman-
tling.
● Incr
eased use of single-grade materials.
● Plastic parts and elastomers are marked in
accor
dance with ISO 1043, ISO 11469 and
ISO 1629.
Choice of materials
● Use of recycled materials.
● Use of compatible plastics in the same part
if its c
omponents are not easily separated.
● Use of recycled materials and/or materials
originating fr
om renewable sources.
164
Page 168 of 248
Operation
the engine. Avoid running the engine at high
s peed.
P eriodic
maintenance
Periodic maintenance work guarantees that,
before beginning a journey, you will not con-
sume more than the required amount of fuel.
A well-serviced engine gives you the benefit
of improved fuel efficiency as well as maxi-
mum reliability and an enhanced resale val-
ue.
A badly serviced engine can consume up to
10% more fuel than necessary.
Avoid short journeys
To reduce the consumption and emission of
polluting exhaust gases, the engine and the
exhaust gas filtration systems should reach
the optimum operating temperature.
With the engine cold, fuel consumption is
proportionally higher. The engine does not
warm up and fuel consumption does not nor-
malise until having driven approximately four
kilometres (2.5 miles). This is why we recom-
mend avoiding short trips whenever possi-
ble.
Maintain the correct tyre pressures
Bear in mind that keeping the tyres at an ad-
equate pressure saves fuel. If the tyre pres-
sure is just one bar (14.5 psi/100 kPa) too
low, fuel consumption can increase by as much as 5%. Due to the greater rolling resist-
ance, under
-inflation also increases tyre wear
wear and impairs handling.
The tyre pressures should always be checked
when the tyres are cold.
Do not use winter tyres all year round as they
increase fuel consumption by up to 10%.
Avoid unnecessary weight
Given that every kilo of extra weight will in-
crease the fuel consumption, it is advisable
to always check the luggage compartment to
make sure that no unnecessary loads are be-
ing transported.
A roof rack is often left in place for the sake
of convenience, even when it is no longer
needed. At a speed of 100 km/h (62 mph)
and 120 km/h (75 mph) your vehicle will use
about 12% more fuel as a result of the extra
wind resistance caused by the roof rack even
when it is not in use.
Save electricity
The engine activates the alternator, which
produces electricity. With the need for elec-
tricity, fuel consumption also increases. Be-
cause of this, always turn off electrical devi-
ces when you do not need them. Examples of
devices that use a lot of electricity are: the
blower at high speeds, the rear window heat-
ing or the seat heaters*. Note
● If y
our vehicle has Start-Stop, it is not rec-
ommended that you switch this function off.
● It is recommended that you close
the win-
dows when driving at more than 60 km/h
(37 mph).
● Do not drive with your foot resting on the
clutc
h pedal,, as the pressure can make the
plate spin, more fuel will be used and it can
burn the clutch plate lining, causing a serious
fault.
● Do not hold the car on a hill with the clutch,
use the foot
brake or hand brake, using the
latter to start. The fuel consumption will be
lower and you will prevent the clutch plate
from being damaged.
● On descents, use the engine brake, chang-
ing to the g
ear that is more suitable for the
slope. Fuel consumption will be “zero” and
the brakes will not suffer. Engine management and ex-
h
au
s
t gas purification system
Introduction WARNING
● Bec au
se of the high temperatures which
can occur in the exhaust purification system
(catalytic converter or diesel particulate fil-
ter), do not park the vehicle where the 166
Page 186 of 248
Operation
The maximum trailer weights listed are only
ap p
lic
able for altitudes up to 1000 m above
sea level. With increasing altitude the engine
power and therefore the vehicle climbing
ability are impaired because of the reduced
air density. The maximum trailer weight has
to be reduced accordingly. The weight of the
vehicle and trailer combination must be re-
duced by 10% for every further 1000 m (or
part thereof). The gross combination weight
is the actual weight of the laden vehicle plus
the actual weight of the laden trailer. When
possible, operate the trailer with the maxi-
mum permitted drawbar load on the ball joint
of the towing bracket, but do not exceed the
specified limit.
The figures for trailer weights and drawbar
loads that are given on the data plate of the
towing bracket are for certification purposes
only. The correct figures for your specific
model, which may be lower than these fig-
ures for the towing bracket, are given in the
vehicle documentation or in ››› chapter Tech-
nical Data .
Distributing the load
Distribute loads in the trailer so that heavy
objects are as near to the axle as possible.
Loads carried in the trailer must be secured
to prevent them moving. Tyre pressure
Set tyr
e pressure to the maximum permissi-
ble pressure shown on the sticker on the in-
side of the fuel tank flap. Set the tyre pres-
sure of the trailer tyres in accordance with the
trailer manufacturer's recommendations.
Exterior mirrors
Check whether you can see enough of the
road behind the trailer with the standard rear
vision mirrors. If this is not the case, you
should have additional exterior mirrors fitted.
Both exterior mirrors should be mounted on
hinged extension brackets. Adjust the mirrors
to give sufficient vision to the rear. WARNING
Never transport people in a trailer. This could
re s
ult in fatal accidents. Note
● To w
ing a trailer places additional demands
on the vehicle. We recommend additional
services between the normal inspection inter-
vals if the vehicle is used frequently for tow-
ing a trailer.
● Find out whether special regulations apply
to to
wing a trailer in your country. Ball coupling of towing bracket*
The ball coupling is provided with instruc-
tions
on fittin
g and removing the ball cou-
pling of the towing bracket. WARNING
The towing bracket ball coupling must be
st or
ed securely in the luggage compartment
to prevent them being flung through the vehi-
cle and causing injury. Note
● By l
aw, the ball coupling must be removed
if a trailer is not being towed if it obscures
the number plate. Driving tips
Driving with a trailer always requires extra
c
ar
e.
W
eight distribution
The weight distribution of a loaded trailer
with an unladen vehicle is very unfavourable.
However, if this cannot be avoided, drive ex-
tra slowly to allow for the unbalanced weight
distribution.
184
Page 192 of 248
Advice
– Rin se the
v
ehicle thoroughly with water.
– Dry the vehicle surface gently with a cha-
mois l
eather.
– In cold temperature, dry the rubber seals
and their sur
faces to prevent them from
freezing. Apply silicone spray to the rubber
seals.
After washing the vehicle – After washing, avoid sudden and sharp
brakin
g. “Dry” the brakes by braking sever-
al times. WARNING
● Wa sh
your vehicle with the ignition switch-
ed off.
● Protect your hands and arms from cuts on
sharp meta
l edges when cleaning the under-
body, the inside of the wheel housings etc.
Risk of injury.
● Water, ice and salt on the brake system can
reduce br
aking effectiveness. Risk of acci-
dent. CAUTION
● Never r emo
ve dirt, mud or dust if the vehi-
cle surface is dry. Never use a dry cloth or
sponge for cleaning purposes. This could
scratch the paintwork or glass on your vehi-
cle. ●
Wa shin
g the vehicle in low temperatures:
when washing the vehicle with a hose, do not
direct water into the lock cylinders or the
gaps around the doors, rear lid, or sunroof.
Risk of freezing. For the sake of the environment
To protect the environment, the vehicle
shou ld be w
ashed only in specially provided
wash bays, to prevent toxic, oil-laden waste
water from entering the sewer system. In
some places, washing vehicles outside wash
bays is prohibited. Note
Do not wash the vehicle in direct sunlight. Washing the vehicle with a high pres-
s
ur
e c
leaner Be particularly careful when using a high
pr
e
s
sure cleaner!
– Always observe the instructions for the
high-pres
sure cleaner, particularly those
concerning the pressure and the spraying
distance.
– Increase the spraying distance for soft ma-
terial
s and painted bumpers. –
Do not use a high pr
essure cleaner to re-
move ice or snow from windows
››› page 192.
– Never use concentrated jet nozzles (“rotat-
ing jets”) ›
›› .
– After washing, avoid sudden and sharp
br ak
in
g. “Dry” the brakes by braking sever-
al times ››› page 149. WARNING
● Never w a
sh tyres with a concentrated jet
(“rotating nozzle”). Even at large spraying
distances and short cleaning times, damage
can occur to the tyres. This may cause an ac-
cident.
● Water, ice and salt on the brake system can
reduce br
aking effectiveness. Risk of acci-
dent. CAUTION
● Do not u se w
ater hotter than +60°C
(+140°F). This could damage the vehicle.
● To avoid damage to the vehicle, keep a suf-
ficient di
stance from sensitive materials such
as flexible hoses, plastic, soundproofing ma-
terial, etc. This also applies to bumpers pain-
ted in the colour of the bodywork. The closer
the nozzle is to the surface, the greater the
wear on the material. 190