2016 Seat Ibiza SC radio
[x] Cancel search: radioPage 99 of 248

Instruments and warning/control lamps
●
Dependin g on the equipment, some set
-
tings and instructions can also be carried out
in the Easy Connect system.
● When several warnings are active at the
same time, the symbol
s are shown succes-
sively for a few seconds and will stay on until
the fault is rectified. Odometer
Fig. 114
Instrument panel: odometer and re-
set b
utt
on. The distance covered is displayed in “kilome-
tr
e
s” or mi
les “m”. It is possible to change
the measurement units (kilometres
“km”/miles “m”) in the radio/Easy Connect*.
Please refer to the Easy Connect* Instructions
Manual for more details. Odometer/trip recorder
The odometer show
s the total distance cov-
ered by the vehicle.
The trip recorder shows the distance that has
been travelled since it was last reset. It is
used to measure short trips. The last digit of
the trip recorder indicates distances of 100
metres or tenths of a mile.
The trip recorder can be set to zero by press-
ing 0.0/SET
› ››
Fig. 114
.
F
ault display
If there is a fault in the instrument panel, the
letters DEF will appear in the trip recorder
display. Have the fault repaired immediately,
as far as is possible.
Coolant temperature gauge For vehicles with no coolant temperature
g
aug
e, a c
ontrol lamp appears for high
coolant temperatures ›››
page 204. Please
note ››› .
The c oo
l
ant temperature gauge 2 ›››
Fig. 113 only w
orks when the ignition is
switched on. In order to avoid engine dam-
age, please read the following notes for the
different temperature ranges. Engine cold
If on
ly
the diodes in the lower part of the
scale light up, this indicates that the engine
has not yet reached operating temperature.
Avoid high revs and heavy acceleration and
do not make the engine work hard.
Normal temperature
If in normal operations, the diodes light up
until the central zone, it means that the en-
gine has reached operating temperature. At
high outside temperatures and when making
the engine work hard, the diodes may contin-
ue lighting up and reach the upper zone. This
is no cause for concern, provided the control
lamp does not light up on the instrument
panel digital display.
Heat range
When the diodes light up in the upper area of
the display and the control lamp appears
on the instrument panel display, the coolant
temperature is excessive ››› page 204. CAUTION
● To en s
ure a long useful life for the engine,
avoid high revs, driving at high speed and
making the engine work hard for approxi-
mately the first 15 minutes when the engine
is cold. The phase until the engine is warm al-
so depends on the outside temperature. If
necessary, use the engine oil temperature*
››› page 31 as a guide. » 97
Technical data
Advice
Operation
Emergencies
Safety
Page 103 of 248

Communications and multimedia
Communications and multi-
medi a
St eerin
g wheel controls*
General information The steering wheel includes a multifunction
modul
e fr
om where it is possible to control
the audio, telephone and radio/navigation
functions without needing to distract the
driver.
There are two versions of the multifunction
module:
● Audio system + telephone without voice
contr o
l version (MID) : for controlling the au-
dio functions available (radio, audio CD,
MP3, iPod ®1)
, USB 1)
, SD 1)
) and Bluetooth sys-
tem from the steering wheel.
● Audio system + telephone with voice con-
trol
version (HIGH) : for controlling the audio
functions available (radio, audio CD, MP3,
iPod ®1)
, USB 1)
, SD 1)
) and Bluetooth system
from the steering wheel. 1)
Depending on the vehicle equipment.
101
Technical data
Advice
Operation
Emergencies
Safety
Page 104 of 248

Operation
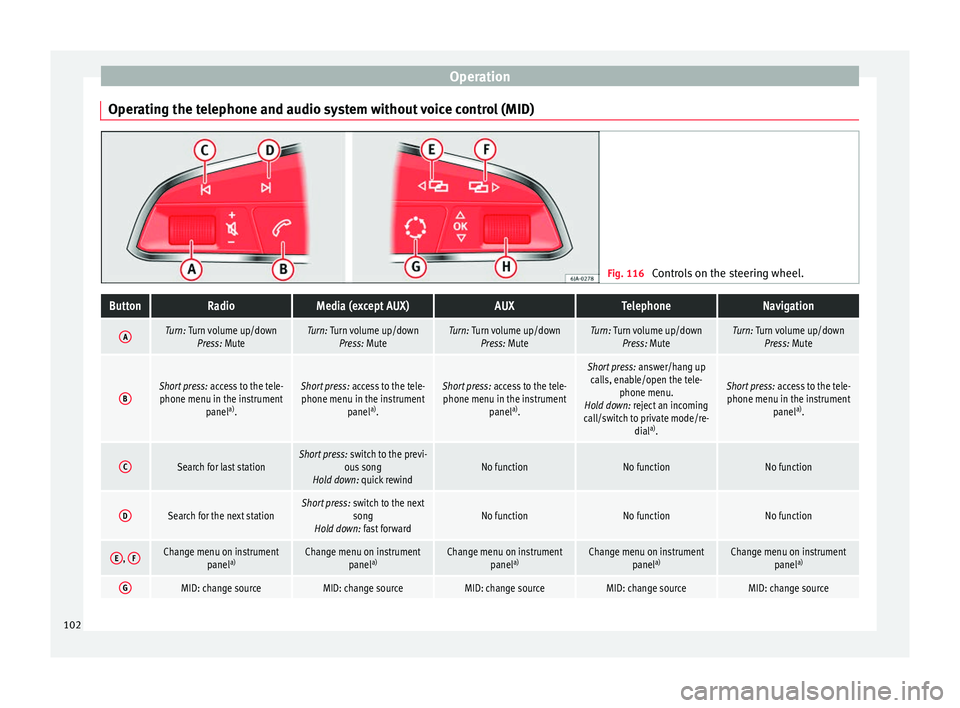
Operating the telephone and audio system without voice control (MID) Fig. 116
Controls on the steering wheel.ButtonRadioMedia (except AUX)AUXTelephoneNavigation
ATurn: Turn volume up/down
Press: MuteTurn: Turn volume up/downPress: MuteTurn: Turn volume up/downPress: MuteTurn: Turn volume up/downPress: MuteTurn: Turn volume up/downPress: Mute
BShort press: access to the tele-
phone menu in the instrument panela)
.Short press: access to the tele-
phone menu in the instrument panela)
.Short press: access to the tele-
phone menu in the instrument panela)
.
Short press: answer/hang up
calls, enable/open the tele- phone menu.
Hold down: reject an incoming
call/switch to private mode/re- diala)
.
Short press: access to the tele-
phone menu in the instrument panela)
.
CSearch for last stationShort press: switch to the previ-
ous song
Hold down: quick rewindNo functionNo functionNo function
DSearch for the next stationShort press: switch to the next
song
Hold down: fast forwardNo functionNo functionNo function
E, FChange menu on instrument
panela)Change menu on instrument
panela)Change menu on instrument
panela)Change menu on instrument
panela)Change menu on instrument
panela)
GMID: change sourceMID: change sourceMID: change sourceMID: change sourceMID: change source102
Page 105 of 248

Communications and multimediaButtonRadioMedia (except AUX)AUXTelephoneNavigation
HTurn: Next/previous preset
b)
Press: Acts on the MFDTurn: Next/previous song b)
Press: Acts on the MFDTurn: No function
Press: Acts on the MFDTurn: Acts on the MFD Press: ConfirmTurn: Changes menu or memory on instrument panel
Press: Operates on instrument panel
a)According to the vehicle's equipment package.
b) Only if the dash panel is in audio menu.
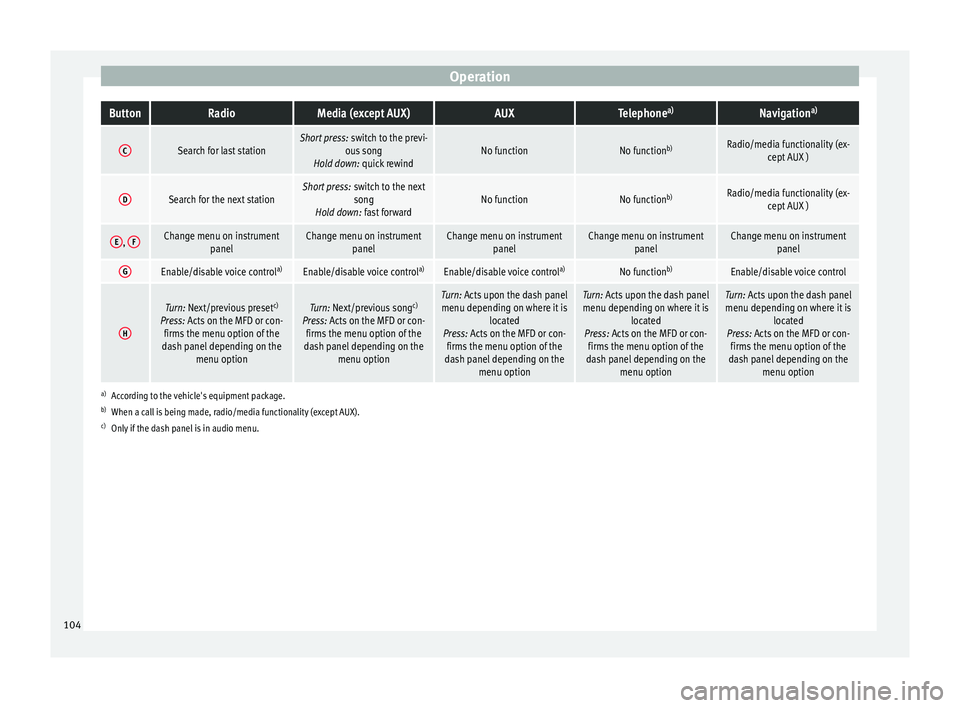
Operating the telephone and audio system with voice control (HIGH) Fig. 117
Controls on the steering wheel.
ButtonRadioMedia (except AUX)AUXTelephone a)Navigation a)
ATurn: Turn volume up/down
Press: MuteTurn: Turn volume up/downPress: MuteTurn: Turn volume up/downPress: MuteTurn: Turn volume up/downPress: MuteTurn: Turn volume up/downPress: Mute
B
Short press: access to the tele-
phone menu on the dash pan- ela)
.
Hold down: redial a)Short press:
access to the tele-
phone menu on the dash pan- ela)
.
Hold down: redial a)Short press:
access to the tele-
phone menu on the dash pan- ela)
.
Hold down: redial a)Short press:
answer/hang up
calls, enable/open the tele- phone menu.
Hold down: reject an incoming call/switch to private/redial modeShort press: access to the tele-
phone menu on the dash pan- ela)
.
Hold down: redial a)
» 103
Technical data
Advice
Operation
Emergencies
Safety
Page 106 of 248

OperationButtonRadioMedia (except AUX)AUXTelephone
a)Navigation a)
CSearch for last stationShort press:
switch to the previ-
ous song
Hold down: quick rewindNo functionNo function b)Radio/media functionality (ex-
cept AUX )
DSearch for the next stationShort press: switch to the next
song
Hold down: fast forwardNo functionNo function b)Radio/media functionality (ex-
cept AUX )
E, FChange menu on instrument
panelChange menu on instrumentpanelChange menu on instrumentpanelChange menu on instrumentpanelChange menu on instrumentpanel
GEnable/disable voice control a)Enable/disable voice controla)Enable/disable voice controla)No functionb)Enable/disable voice control
H
Turn: Next/previous preset c)
Press: Acts on the MFD or con- firms the menu option of the
dash panel depending on the menu optionTurn: Next/previous song c)
Press: Acts on the MFD or con- firms the menu option of the
dash panel depending on the menu optionTurn: Acts upon the dash panelmenu depending on where it is located
Press: Acts on the MFD or con- firms the menu option of the
dash panel depending on the menu optionTurn: Acts upon the dash panelmenu depending on where it is located
Press: Acts on the MFD or con- firms the menu option of the
dash panel depending on the menu optionTurn: Acts upon the dash panelmenu depending on where it is located
Press: Acts on the MFD or con- firms the menu option of the
dash panel depending on the menu option
a)According to the vehicle's equipment package.
b) When a call is being made, radio/media functionality (except AUX).
c) Only if the dash panel is in audio menu.
104
Page 108 of 248

Operation
Opening and closing C entr
a
l locking system
Description Read the additional information carefully
›› ›
page 9.
The central locking system enables you to
lock and unlock all doors and the rear lid by
just pushing the button.
Central locking can be activated by using any
of the following options:
● the key, by inserting it into the driver door
cylinder and r ot
ating it in the opening direc-
tion. Depending on the vehicle version, ei-
ther all doors will be unlocked or only the
driver door will be unlocked. All doors will be
locked on locking the vehicle using the key.
● the interior central lock button
›››
page 108.
● the radio frequency remote control , usin
g
the buttons on the key ›››
page 110.
Various functions are available to improve
the vehicle safety: Locking system “Safe*”
Selective* unlocking system
Self-locking system to prevent involunta-
ry unlocking
–
–
– Automatic speed dependent locking and
unloc
king system*
Emergency unlocking system
Unlocking the vehicle* Press button
› ››
Fig. 122
on r
emote
control to unlock all the doors and rear
lid.
Locking the vehicle* Press button
› ››
Fig. 122
on the r
e-
mote control to lock all doors and the
rear lid or turn the key in the door to lock
all doors and the rear lid. WARNING
● Loc k
ing from the outside carelessly or with-
out good visibility may lead to bruising, par-
ticularly in the case of children.
● When locking a vehicle, never leave chil-
dren un
accompanied inside, as from the out-
side it will be difficult to provide assistance if
required.
● Having the doors locked prevents intruders
from gettin
g in, for example when stopped at
a traffic light. Note
For anti-theft security, only the driver door is
fitted w ith a loc
k cylinder. –
–
–
–
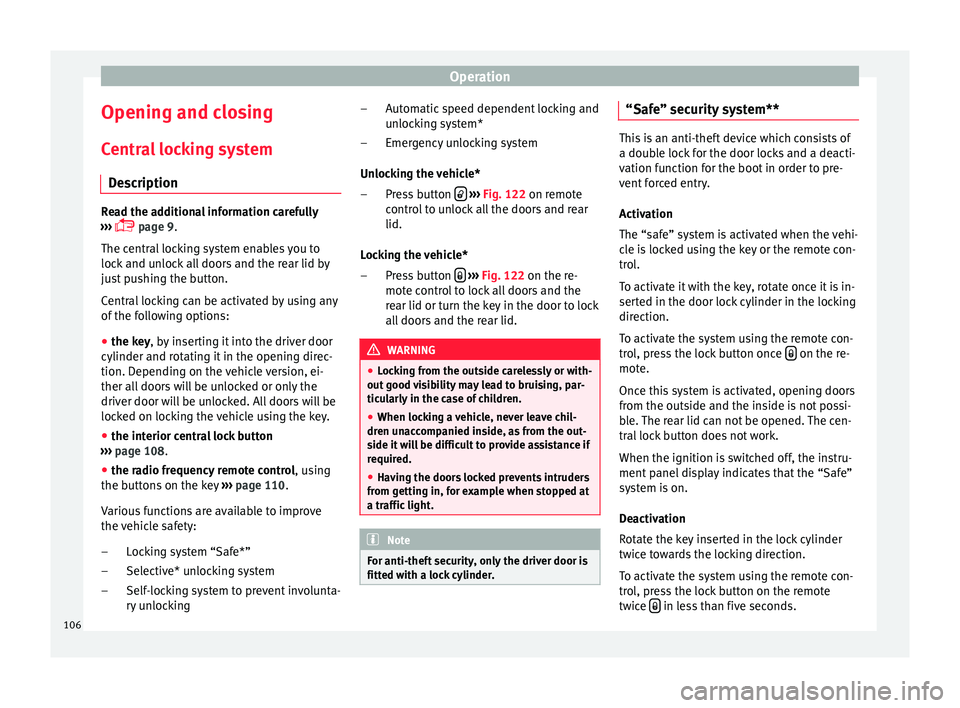
“Safe” security system** This is an anti-theft device which consists of
a doubl
e loc
k for the door locks and a deacti-
vation function for the boot in order to pre-
vent forced entry.
Activation
The “safe” system is activated when the vehi-
cle is locked using the key or the remote con-
trol.
To activate it with the key, rotate once it is in-
serted in the door lock cylinder in the locking
direction.
To activate the system using the remote con-
trol, press the lock button once on the re-
mot e.
Onc e thi
s system is activated, opening doors
from the outside and the inside is not possi-
ble. The rear lid can not be opened. The cen-
tral lock button does not work.
When the ignition is switched off, the instru-
ment panel display indicates that the “Safe”
system is on.
Deactivation
Rotate the key inserted in the lock cylinder
twice towards the locking direction.
To activate the system using the remote con-
trol, press the lock button on the remote
twice in less than five seconds.
106
Page 112 of 248

Operation
Keys Set of
k
eys Fig. 121
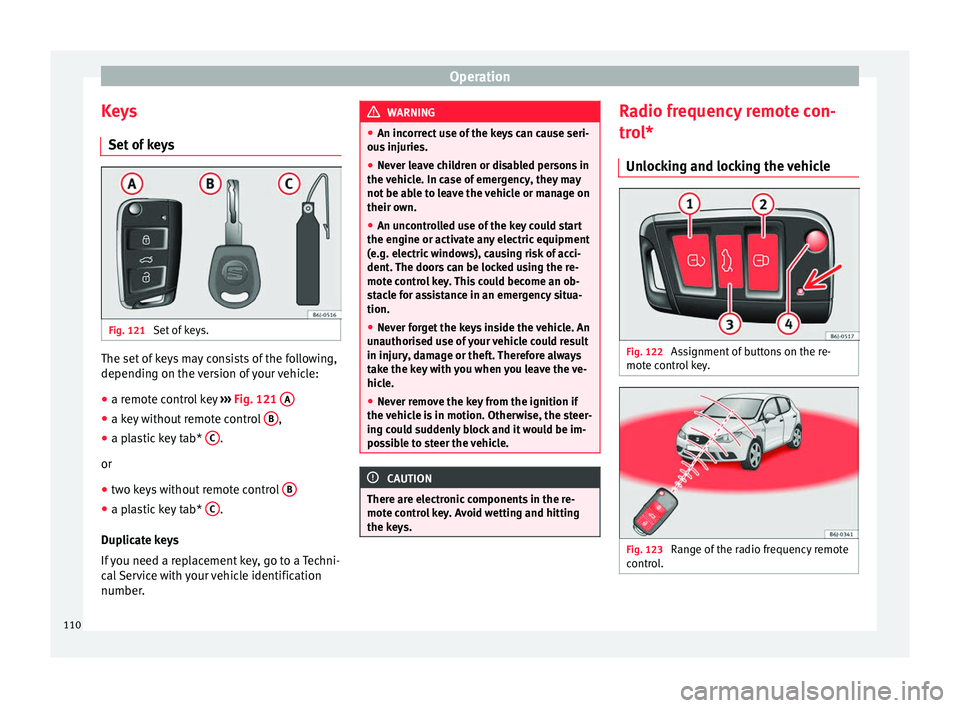
Set of keys. The set of keys may consists of the following,
dependin
g on the
v
ersion of your vehicle:
● a remote control key ›››
Fig. 121 A ●
a key without remote control B ,
● a plastic key tab* C .
or
● two keys without remote control B●
a plastic key tab* C .
D up
lic
ate keys
If you need a replacement key, go to a Techni-
cal Service with your vehicle identification
number. WARNING
● An incorr ect
use of the keys can cause seri-
ous injuries.
● Never leave children or disabled persons in
the vehic
le. In case of emergency, they may
not be able to leave the vehicle or manage on
their own.
● An uncontrolled use of the key could start
the engine or activat
e any electric equipment
(e.g. electric windows), causing risk of acci-
dent. The doors can be locked using the re-
mote control key. This could become an ob-
stacle for assistance in an emergency situa-
tion.
● Never forget the keys inside the vehicle. An
unauthori
sed use of your vehicle could result
in injury, damage or theft. Therefore always
take the key with you when you leave the ve-
hicle.
● Never remove the key from the ignition if
the vehic
le is in motion. Otherwise, the steer-
ing could suddenly block and it would be im-
possible to steer the vehicle. CAUTION
There are electronic components in the re-
mote c ontr
ol key. Avoid wetting and hitting
the keys. Radio frequency remote con-
tr
o
l*
Un
locking and locking the vehicle Fig. 122
Assignment of buttons on the re-
mot e c
ontr
ol key. Fig. 123
Range of the radio frequency remote
c ontr
o
l. 110
Page 113 of 248

Opening and closing
The radio frequency remote control key is
u sed t
o loc
k and unlock the vehicle from a
distance.
By using button 4
› ››
Fig. 122
on the c
ontrol,
the key shaft is released.
Unlocking the vehicle
› ››
Fig. 122
1 .
L oc
k
ing the vehicle
› ››
Fig. 122
2 .
Un loc
k
ing the rear lid. Press button ›››
Fig. 122 3 until all the turn signals on the
v ehic
l
e flash briefly. When the unlocking but-
ton
3 is pressed, you have 2 minutes to
open the door . Onc
e thi
s time has passed, it
will lock again.
Moreover, the battery indicator on the key
››› Fig. 122 (arrow), will flash.
The remote control transmitter and the bat-
teries are integrated in the key. The receiver
is inside the vehicle. The maximum range de-
pends on different factors. The range is re-
duced as the batteries start to lose power. WARNING
Read and observe the relevant warnings ›››
in Set of keys on page 110.
Note
● The ra dio fr
equency remote control key
functions only when you are within range
››› Fig. 123. ●
If the v
ehicle cannot be unlocked or locked
by using the radio frequency remote control,
the remote control key will have to be re-
synchronised. For this, go to your technical
services. Replacing the battery
If the battery indicator does not flash when
the butt
on
s are pushed, the battery must be
replaced. CAUTION
The use of inappropriate batteries may dam-
age the r a
dio frequency remote control. For
this reason, always replace the dead battery
with another of the same size and power. For the sake of the environment
Used batteries must be disposed of at an ap-
propri at
e waste facility or through an author-
ised service, given that their components can
affect the environment. Synchronising the remote control key
If it is not possible to unlock or lock the door
w
ith the r
emot
e control, it should be re-
synchronised. While the vehicle is open:
– Press the button
2
› ››
Fig. 122
on the
r
emote control.
– Then close the vehicle using the key shaft
within one minute.
Whi
le the vehicle is closed:
– Press the button
1
› ››
Fig. 122
on the
r
emote control.
– Then close the vehicle using the key shaft
within one minute.
It
is possible that the vehicle could no longer
be opened and closed with the remote con-
trol if the button is repeatedly pressed
outs ide of
the eff
ective range of the radio fre-
quency remote control. The remote control
key will have to be resynchronised.
Spare remote control keys are available at
your Technical Service, where they must be
matched to the locking system.
Up to five remote control keys can be used.
Anti-theft alarm* Des
cription of anti-theft alarm sys-
tem* The anti-theft alarm makes it more difficult to
br
e
ak
into the vehicle or steal it. The system »
111
Technical data
Advice
Operation
Emergencies
Safety