2016 Seat Ibiza SC instrument panel
[x] Cancel search: instrument panelPage 35 of 248
The essentials
instrument panel. The warning lamp
sw it
c
hes off when reducing speed below the
stored maximum limit.
Speed warning programming is recommen-
ded if you wish to be reminded of a maxi-
mum speed, such as when travelling in a
country with different speed limits or for a
maximum speed for winter tyres.
Setting speed limit warning
You can use the radio or the Easy Connect* to
set, alter or cancel the speed limit warning.
● Vehicles with radio : pres
s the button SETUP> control button Driver Assistant
>
Speed warning .
● Vehicles with Easy Connect : pre
s
s the but-
ton Systems or else Vehicle systems >
Driver assistant > Speed warning.
The warning limit can be set from 30 to
240 km/h (20 to 149 mph). The adjustment
is made at 10 km/h (5 mph) intervals. Note
● Ple a
se bear in mind that, even with the
speed warning function, it is still important
to keep an eye on the vehicle speed with the
speedometer and to observe the legal speed
limits.
● The speed limit warning function in the ver-
sion for some c
ountries warns you at a speed of 120 km/h (75 mph). This is a factory-set
speed limit
. Service intervals
The service interval indication appears on the
ins
trument
panel display ›››
Fig. 113
3 .
SEA T di
stinguishes between services with en-
gine oil change (e.g. Oil change service) and
services without engine oil change (e.g. In-
spection).
In vehicles with Services established by time
or mileage, the service intervals are already
pre-defined.
In vehicles with LongLife Service , the inter-
vals are determined individually. Thanks to
technological progress, maintenance work
has been greatly reduced. Because of the
technology used by SEAT, with this service
you only need to change the oil when the ve-
hicle so requires. To calculate this change
(max. 2 years), the vehicle's conditions of
use and individual driving styles are consid-
ered. The advance warning first appears 20
days before the date established for the cor-
responding service. The kilometres (miles)
remaining until the next service are always
rounded up to the nearest 100 km (miles)
and the time is given in complete days. The
current service message cannot be viewed until 500 km after the last service. Prior to
this, on
ly
lines are visible on the display.
Inspection reminder
When the Service date is approaching, when
the ignition is switched on a Service remind-
er is displayed.
Vehicles without text messages : a span-
ner will be displayed on the instrument
panel plus an indication in km.
The kilometres indicated are the maximum
number of kilometres that can be travelled
until the next service. After a few seconds,
the display mode changes. A clock symbol
appears and the number of days until the
next service is due.
Vehicles with text messages : Service in
--- km or --- days will be shown on the
instrument panel display.
Service due
When the service date is due , an audible
warning is given when the ignition is switch-
ed on and the spanner displayed on the
screen flashes for a few seconds .
Vehicles with text messages : Service now
will be shown on the instrument panel dis-
play. » 33
Page 37 of 248
The essentials
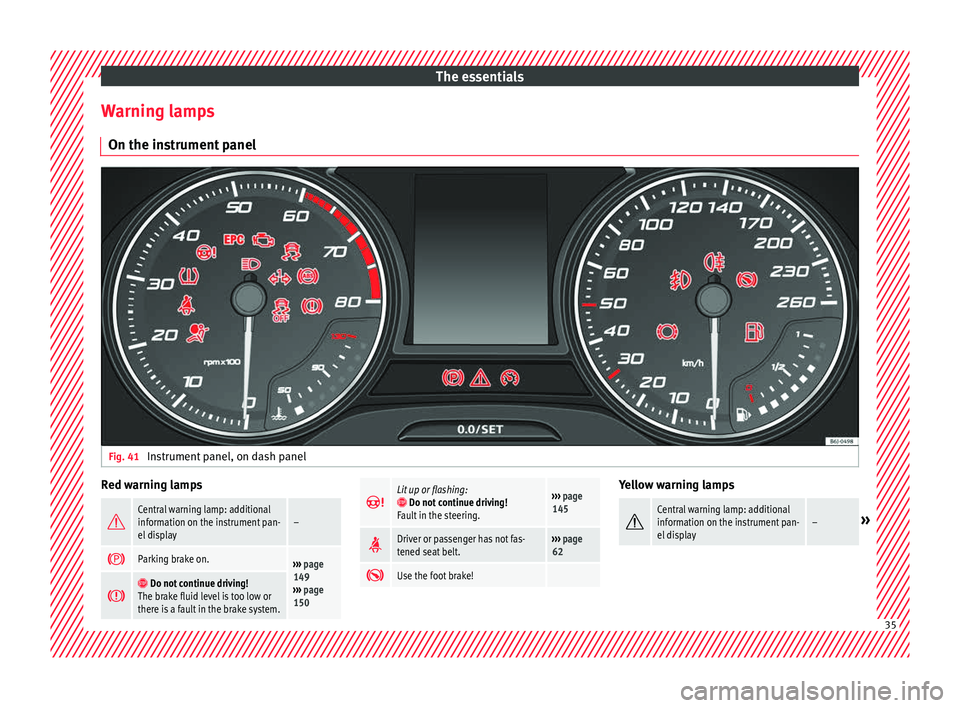
Warning lamps On the in s
trument
panelFig. 41
Instrument panel, on dash panel Red warning lamps
Central warning lamp: additional
information on the instrument pan-
el display–
Parking brake on.›››
page
149
››› page
150
Do not continue driving!
The brake fluid level is too low or
there is a fault in the brake system.
Lit up or flashing: Do not continue driving!
Fault in the steering.››› page
145
Driver or passenger has not fas-
tened seat belt.›››
page
62
Use the foot brake! Yellow warning lamps
Central warning lamp: additional
information on the instrument pan-
el display–»
35
Page 38 of 248
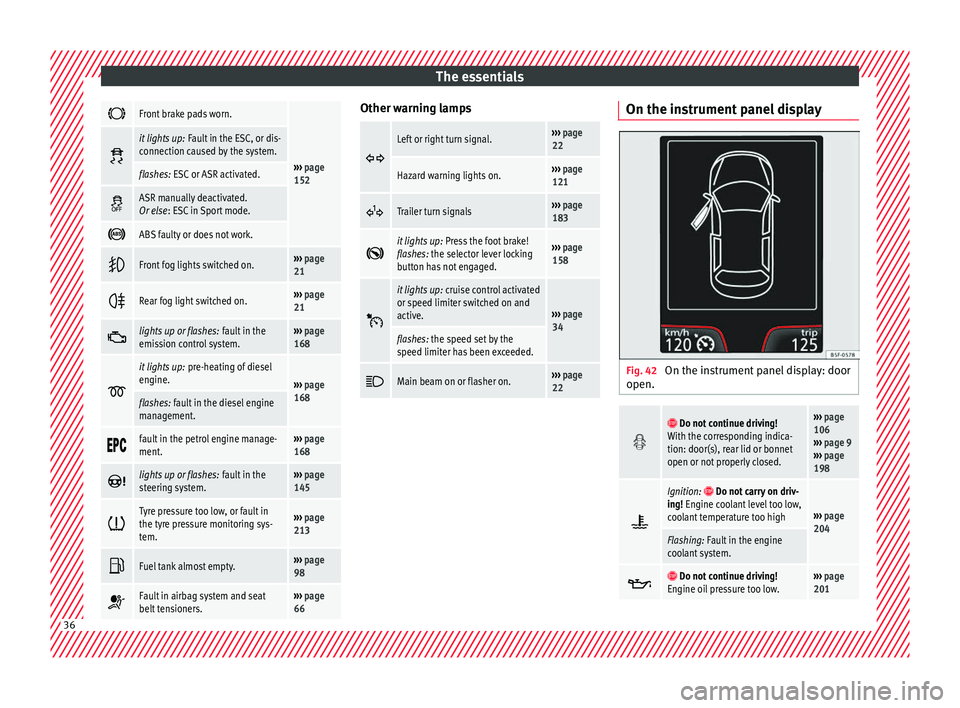
The essentials
Front brake pads worn.
›››
page
152
it lights up:
Fault in the ESC, or dis-
connection caused by the system.
flashes: ESC or ASR activated.
ASR manually deactivated.
Or else
: ESC in Sport mode.
ABS faulty or does not work.
Front fog lights switched on.›››
page
21
Rear fog light switched on.›››
page
21
lights up or flashes:
fault in the
emission control system.››› page
168
it lights up:
pre-heating of diesel
engine.
››› page
168
flashes: fault in the diesel engine
management.
fault in the petrol engine manage-
ment.›››
page
168
lights up or flashes:
fault in the
steering system.››› page
145
Tyre pressure too low, or fault in
the tyre pressure monitoring sys-
tem.›››
page
213
Fuel tank almost empty.›››
page
98
Fault in airbag system and seat
belt tensioners.›››
page
66 Other warning lamps
Left or right turn signal.›››
page
22
Hazard warning lights on.››› page
121
Trailer turn signals›››
page
183
it lights up:
Press the foot brake!
flashes: the selector lever locking
button has not engaged.››› page
158
it lights up:
cruise control activated
or speed limiter switched on and
active.
››› page
34
flashes: the speed set by the
speed limiter has been exceeded.
Main beam on or flasher on.›››
page
22 On the instrument panel display
Fig. 42
On the instrument panel display: door
open.
Do not continue driving!
With the corresponding indica-
tion: door(s), rear lid or bonnet
open or not properly closed.››› page
106
››› page 9
››› page
198
Ignition: Do not carry on driv-
ing! Engine coolant level too low,
coolant temperature too high
››› page
204
Flashing: Fault in the engine
coolant system.
Do not continue driving!
Engine oil pressure too low.››› page
201 36
Page 39 of 248
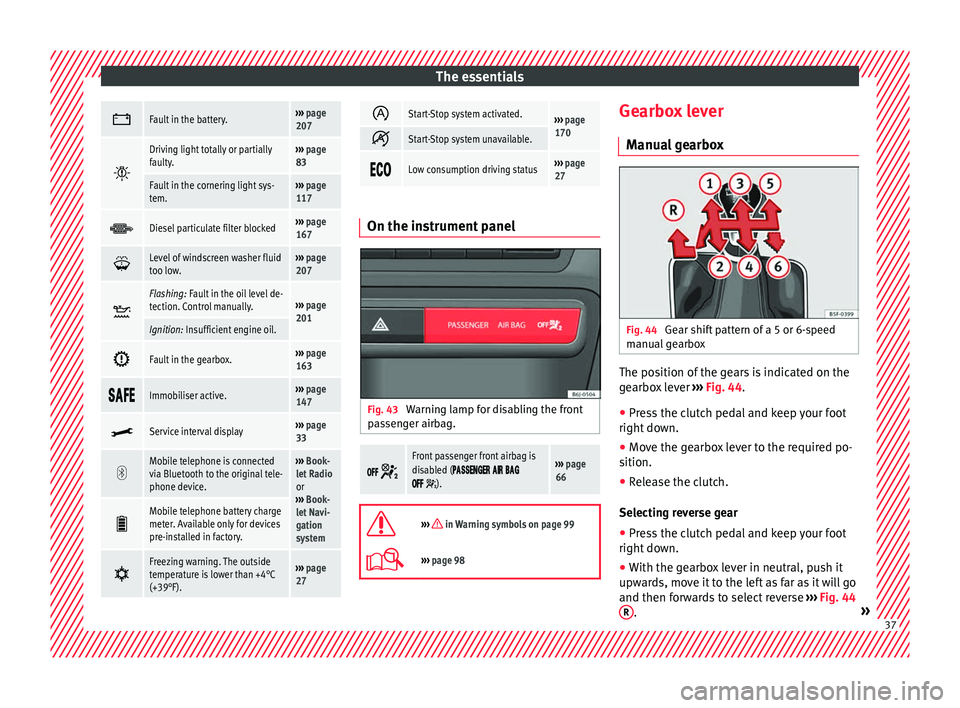
The essentials
Fault in the battery.›››
page
207
Driving light totally or partially
faulty.›››
page
83
Fault in the cornering light sys-
tem.››› page
117
Diesel particulate filter blocked›››
page
167
Level of windscreen washer fluid
too low.›››
page
207
Flashing: Fault in the oil level de-
tection. Control manually.›››
page
201
Ignition: Insufficient engine oil.
Fault in the gearbox.›››
page
163
Immobiliser active.›››
page
147
Service interval display›››
page
33
Mobile telephone is connected
via Bluetooth to the original tele-
phone device.›››
Book-
let Radio
or
››› Book-
let Navi-
gation
system
Mobile telephone battery charge
meter. Available only for devices
pre-installed in factory.
Freezing warning. The outside
temperature is lower than +4°C
(+39°F).›››
page
27
Start-Stop system activated.›››
page
170
Start-Stop system unavailable.
Low consumption driving status›››
page
27 On the instrument panel
Fig. 43
Warning lamp for disabling the front
p a
s
senger airbag.
Front passenger front airbag is
disabled (
).
››› page
66
››› in Warning symbols on page 99
›››
page 98 Gearbox lever
M anua
l
gearbox Fig. 44
Gear shift pattern of a 5 or 6-speed
m anual
g
earbox The position of the gears is indicated on the
g
e
arbo
x lever ››› Fig. 44.
● Press the clutch pedal and keep your foot
right down.
● Mo
ve the gearbox lever to the required po-
sition.
● Rel
ease the clutch.
Selecting r
everse gear
● Press the clutch pedal and keep your foot
right down.
● W
ith the gearbox lever in neutral, push it
upwar
ds, move it to the left as far as it will go
and then forwards to select reverse ››› Fig. 44
R .
» 37
Page 64 of 248
Safety
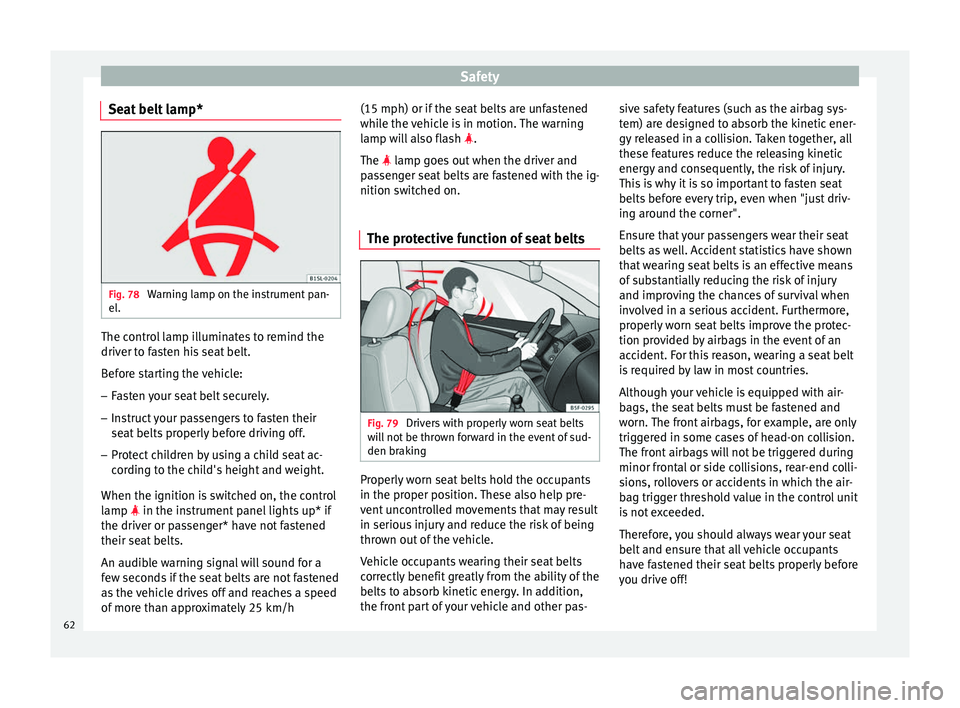
Seat belt lamp* Fig. 78
Warning lamp on the instrument pan-
el . The control lamp illuminates to remind the
driv
er t
o f
asten his seat belt.
Before starting the vehicle: – Fasten your seat belt securely.
– Instruct your passengers to fasten their
seat belts
properly before driving off.
– Protect children by using a child seat ac-
cordin
g to the child's height and weight.
When the ignition is switched on, the control
lamp in the instrument panel lights up* if
the driver or passenger* have not fastened
their seat belts.
An audible warning signal will sound for a
few seconds if the seat belts are not fastened
as the vehicle drives off and reaches a speed
of more than approximately 25 km/h (15 mph) or if the seat belts are unfastened
while the
vehicle is in motion. The warning
lamp will also flash .
The lamp goes out when the driver and
passenger seat belts are fastened with the ig-
nition switched on.
The protective function of seat belts Fig. 79
Drivers with properly worn seat belts
w i
l
l not be thrown forward in the event of sud-
den braking Properly worn seat belts hold the occupants
in the pr
oper po
s
ition. These also help pre-
vent uncontrolled movements that may result
in serious injury and reduce the risk of being
thrown out of the vehicle.
Vehicle occupants wearing their seat belts
correctly benefit greatly from the ability of the
belts to absorb kinetic energy. In addition,
the front part of your vehicle and other pas- sive safety features (such as the airbag sys-
tem) are de
signed to absorb the kinetic ener-
gy released in a collision. Taken together, all
these features reduce the releasing kinetic
energy and consequently, the risk of injury.
This is why it is so important to fasten seat
belts before every trip, even when "just driv-
ing around the corner".
Ensure that your passengers wear their seat
belts as well. Accident statistics have shown
that wearing seat belts is an effective means
of substantially reducing the risk of injury
and improving the chances of survival when
involved in a serious accident. Furthermore,
properly worn seat belts improve the protec-
tion provided by airbags in the event of an
accident. For this reason, wearing a seat belt
is required by law in most countries.
Although your vehicle is equipped with air-
bags, the seat belts must be fastened and
worn. The front airbags, for example, are only
triggered in some cases of head-on collision.
The front airbags will not be triggered during
minor frontal or side collisions, rear-end colli-
sions, rollovers or accidents in which the air-
bag trigger threshold value in the control unit
is not exceeded.
Therefore, you should always wear your seat
belt and ensure that all vehicle occupants
have fastened their seat belts properly before
you drive off!
62
Page 83 of 248

Fuses and bulbs
●
Tak e c
are not to cause short circuits in the
electrical system. WARNING
Using unsuitable fuses, repairing fuses or
bridgin g a curr
ent circuit without fuses can
cause a fire and serious injury.
● Never use a fuse with a higher value. Only
repl
ace fuses with a fuse of the same amper-
age (same colour and markings) and size.
● Never repair a fuse.
● Never replace a fuse by a metal strip, staple
or simil
ar. CAUTION
● To pr ev
ent damage to the vehicle's electric
system, before replacing a fuse always turn
off the ignition, the lights and all electrical
elements and remove the key from the igni-
tion.
● If you replace a fuse with higher-rating
fuse,
you could cause damage to another part
of the electrical system.
● Protect the fuse boxes when open to pre-
vent the entr
y of dust or humidity as they can
damage the electrical system.
● Always carefully remove the fuse box cov-
ers and r
efit them correctly to avoid problems
with your vehicle. Note
● One component m
ay have more than one
fuse.
● Several components may run on a single
fuse.
● In the
vehicle, there are more fuses than
those indicat
ed in this chapter. These should
only be changed by a specialised workshop.
● Positions not containing a fuse do not ap-
pear in the fo
llowing tables.
● Some of the equipment listed in the tables
below pert
ain only to certain versions of the
model or are optional extras.
● Please note that the above lists, while cor-
rect at
the time of printing, are subject to
change. Fuses to the left of the instrument
p
anel Read the additional information carefully
› ›
›
page 44
Only replace fuses with a fuse of the same
amperage (same colour and markings) and
size.
Control box 1
No.Consumer/Amps
1Left lights40
2Central locking40
No.Consumer/Amps
3Power C63 (30 Power)30
4PTC Relay (Engine glow)50
5Left pillar connector A pin 22 (motor
for closing window on driver's side)30
6For closing back left window (motor)30
7Horn20
9Panoramic roof30
10Active suspension7.5
11Headlight washer system relay30
12MIB display5
13(RL-15) SIDO Kl.15 supply (inputs 29
and 55)30
14
Removing ignition key, diagnostics,
headlight lever (flashers), switching
on dipped /side beams (rotating
lights)
7.5
15Air and heat control (supply)7.5Automatic gearbox lever
16Instrument panel5
17Dwa Sensor, Alarm horn7.5
23Dual windscreen cleaner pump7.5
24Engine heater, heating control box
(supply)30
2612V Relay socket20» 81
Technical data
Advice
Operation
Emergencies
Safety
Page 95 of 248

Controls and displays
Operation
C ontr
o
ls and displays
General instrument panel Door release lever
Light sw
it
ch . . . . . . . . . . . . . . . . . . . . . . 117
Headlight range control* . . . . . . . . . .121
Air vents
Lever f
or:
– Turn signals/main beam head-
lights . . . . . . . . . . . . . . . . . . . . . . . . . . 119
– Crui se c
ontrol* . . . . . . . . . . . . . . . . . 180
Instrument panel and warning
lamp s:
– In
struments . . . . . . . . . . . . . . . . . . . . 94
– Warnin g and indic
ation lamps . . .35
Steering wheel with horn and – Driver airb ag . . . . . . . . . . . . . . . . . . . 66
– On-boar d c
omputer controls . . . .25
– Contro
ls for radio, telephone,
navigation and speech dialogue
system ›››
Booklet Radio
– Paddle levers for tiptronic gear-
shift (automatic gearbox) . . . . . . .161
1 2
3
4
5
6
7 Steering and starter lock
. . . . . . . . . .147
Lever for: – Wind
s
creen wipers and washer . .123
– Window w
asher-wiper system* . .123
– Multi-f
unction display control* . .25
Infotainment system:
Depending on the equipment,
glo
ve compartment with: . . . . . . . . .130
– CD pla
yer* and/or SD card*
››› Booklet Radio
Passenger airbag* . . . . . . . . . . . . . . . . 14
Switches for:
– Heating and
ventilation . . . . . . . . . 139
– Air conditionin g* . . . . . . . . . . . . . . . 141
– C
limatr
onic* . . . . . . . . . . . . . . . . . . . . 143
Depending on the equipment, but-
ton s
for:
– SEAT Drive Profile . . . . . . . . . . . . . . . 182
– Park a
ssist system . . . . . . . . . . . . . . 173
– Hazard w
arning lights . . . . . . . . . .121
– Airbag off w
arning lamp* . . . . . . .68, 70
Depending on the equipment:
– USB/AUX -IN inp
ut . . . . . . . . . . . . . . 105
– Cig ar
ette lighter/Power socket . .132
Drink holder/Ashtray . . . . . . . . . . . . .131
8 9
10
11
12
13
14
15
16 Controls in the centre console:
– St ar
t
-Stop operation button . . . . .170
– Tyr
e pressure monitoring* . . . . . . .213
– Heated r
ear window . . . . . . . . . . . . 123
– Heated se
ats* . . . . . . . . . . . . . . . . . . 128
– Central
locking* . . . . . . . . . . . . . . . . 108
Handbrake lever . . . . . . . . . . . . . . . . . . 149
Gear lever – Automatic* . . . . . . . . . . . . . . . . . . . . . 158
– M
anual . . . . . . . . . . . . . . . . . . . . . . . . . 158
Stor
age space
Pedal
s . . . . . . . . . . . . . . . . . . . . . . . . . . . 61
Steering column control lever* . . . .13
Bonnet release lever . . . . . . . . . . . . . .199
Fuse housing . . . . . . . . . . . . . . . . . . . . . 80
Control for adjusting electric exteri-
or mirrors* . . . . . . . . . . . . . . . . . . . . . . . 126
El
ectric window controls* . . . . . . . . .114 Note
Some of the items of equipment listed here
are fitt ed on
ly on certain model versions or
are optional extras. 17
18
19
20
21
22
23
24
25
26
93
Technical data
Advice
Operation
Emergencies
Safety
Page 96 of 248
Operation
Instruments and warning/control lamps
In s
trument
s
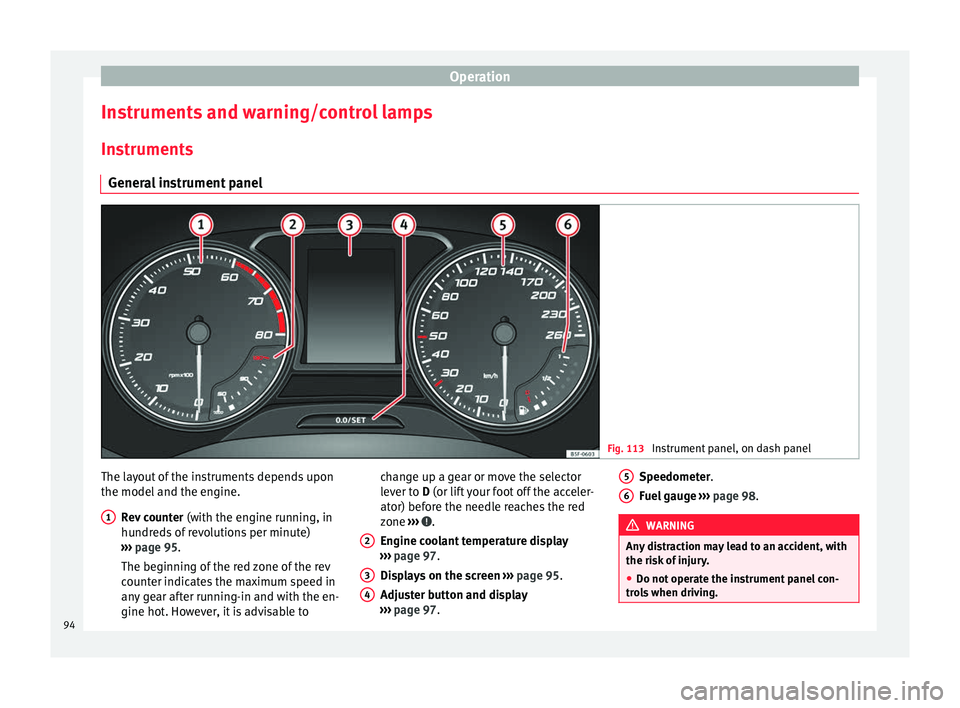
General instrument panel Fig. 113
Instrument panel, on dash panel The layout of the instruments depends upon
the model
and the en
gine.
R
ev counter (with the engine running, in
hundreds of revolutions per minute)
››› page 95.
The beginning of the red zone of the rev
counter indicates the maximum speed in
any gear after running-in and with the en-
gine hot. However, it is advisable to
1 change up a gear or move the selector
l
ev
er t
o D (or lift your foot off the acceler-
ator) before the needle reaches the red
zone ››› .
En gine c
oo
lant temperature display
››› page 97.
Displays on the screen ››› page 95.
Adjuster button and display
››› page 97.
2 3
4 Speedometer.
F
uel
g
auge ››› page 98. WARNING
Any distraction may lead to an accident, with
the risk of
injury.
● Do not operate the instrument panel con-
trol
s when driving. 5
6
94