2016 RENAULT TALISMAN door lock
[x] Cancel search: door lockPage 24 of 328

1.18
AUTOMATIC LOCKING WHEN DRIVING
Operating principleAfter the vehicle is started, the system
automatically locks the doors when you
are driving at approximately 6 mph
(10 km/h) and over.
The door can be unlocked:
– by pressing central door unlocking
switch 2.
– at a standstill, by opening a front
door from inside the vehicle.
Note: if a door is opened or closed, it
will automatically lock again when the
vehicle reaches a speed of 6 mph
(10 km/h).
Activating/deactivating the
function
To switch it on: with the vehicle at a
standstill and the engine running, press
switch 2 until a beep sounds.
To deactivate: with the vehicle at a
standstill and the engine running, press
switch 2 until two beeps sound.
You can also activate/deactivate the
function from the menu on the multi-
function screen 1 (refer to the infor-
mation on the «Vehicle settings custo-
misation menu» section 1, «Auto door
locking while driving» function).
Operating faults
If you experience an operating fault (no
automatic locking, the indicator light in-
corporated in switch 2 does not light up
when trying to lock the doors and boot,
etc.), make sure that locking has not
been deactivated by mistake and check
that the doors and boot are properly
closed. If they are correctly locked and
the fault is still present, contact an au-
thorised dealer.
2
Driver’s responsibility
If you decide to keep the
doors locked when you are
driving, remember that it
may be more difficult for those as-
sisting you to gain access to the
passenger compartment in the
event of an emergency.
1
Page 34 of 328

1.28
SEAT BELTS (2/3)
Locking
Unwind the belt slowly and smoothly
and ensure that buckle 3 locks into
catch 5 (check that it is locked by pull-
ing on buckle 3).
If the belt jams, allow it to return slightly
before attempting to unwind it again.
If your seat belt is completely jammed,
pull slowly, but firmly, so that just over
3 cm unwinds. Allow it to return slightly
before attempting to unwind it again.
If there is still a problem, contact an ap-
proved dealer.
ßDriver’s seat belt reminder
and, depending on the vehi-
cle, front passenger seat belt re-
minder
This lights up on the interior rear-view
mirror when starting the engine then,
if the driver’s or front passenger’s seat
belt (if this seat is occupied) is not fas-
tened and the vehicle has reached
approximately 12 mph (20 km/h), it
flashes and a bleep sounds for around
120 seconds.
Note: an object placed on the passen-
ger seat base may activate the warning
light in some cases.
Rear seat belt reminder (depending
on vehicle)
Warning light
ß lights up on the
instrument panel, accompanied by the
graphic 6 for approximately 30 seconds
each time the vehicle is started, a door
is opened or a rear seat belt is fastened
or unfastened.
1
34
55
Check that the rear passengers are
wearing seat belts and that the number
of seat belts shown as fastened cor-
responds to the number of rear seat
places occupied.
On the graphic 6:
– marker in green: seat belt fastened;
– marker in red: seat belt unfastened.
Unfastening
Press button 4 and the seat belt will be
rewound by the inertia reel. Guide the
belt.
6
Page 44 of 328

1.38
CHILD SAFETY: General information (1/2)
Carrying children
Children, and adults, must be correctly
seated and strapped in for all journeys.
The children being carried in your vehi-
cle are your responsibility.
A child is not a miniature adult. Children
are at risk of specific injuries as their
muscles and bones have not yet fin-
ished growing. The seat belt alone
would not provide suitable protection.
Use an approved child seat and ensure
you use it correctly.
A collision at 50 km/h (30
mph) is the same as fall-
ing a distance of 10 metres.
Transporting a child without
a restraint is the equivalent of allow-
ing him or her to play on a fourth-
floor balcony without railings.
Never travel with a child held in your
arms. In the event of an accident,
you will not be able to keep hold of
the child, even if you yourself are
wearing a seat belt.
If your vehicle has been involved in
a road accident, replace the child
seat and have the seat belts and
ISOFIX anchorage points checked.
To prevent the doors being
opened, use the “Child
safety” device (refer to the
information on “Opening
and closing the doors” in Section 1).
Driver’s responsibility
when parking or stopping
the vehicle
Never leave an animal,
child or adult who is not self-suffi-
cient alone on your vehicle, even for
a short time.
They may pose a risk to themselves
or to others by starting the engine,
activating equipment such as the
electric windows or by locking the
doors.
Also, in hot and/or sunny weather,
please remember that the tempera-
ture inside the passenger compart-
ment increases very quickly.
RISK OF DEATH OR SERIOUS
INJURY.
Page 61 of 328

1.55
DRIVING POSITION (2/2)
The equipment fitted, described below, DEPENDS ON THE VERSION AND COUNTRY.
1 Side air vent.
2 Demister outlet.
3 Stalk for:
– direction indicator lights;
– exterior lights;
– fog lights.
4 Driver Airbag and horn location.
5 Instrument panel.
6 Head-up display.
7 Controls for:
– on-board computer information
read-out and vehicle settings cus-
tomisation menu,
– remote radio and navigation
system.
8 Steering column stalk for winds-
creen and rear screen wash/wiper.
9 Centre air vents.
10 Windscreen demister outlet.
11 Multimedia touchscreen.
12 Multifunction screen controls:
– screen activation/deactivation;
– volume;
– welcome menu;
– driving aids menu;
– settings.
13 Switches for:
– hazard warning lights,
– electric door locking.
14 Heating or air conditioning con-
trols.
15 Passenger Airbag location.
16 Glovebox.
17 Storage compartment.
18 Accessories and multimedia
socket
19 Cup holders
20 Controls for:
– electronic parking brake.
– cruise control/speed limiter.
21 Central multifunction and Multi-
Sense control.
22 Gearstick.
23 Controls for:
– heated front seats,
– ventilated front seats,
– activation/deactivation of ECO
mode,
– activation/deactivation of assisted
parking,
– activation/deactivation of the Stop
and Start function.
24 Engine start/stop button (vehicles
with RENAULT
card).
25 Ignition switch (vehicles with key).
26 Control for adjusting steering
wheel height and reach.
27 Cruise control/speed limiter and
adaptive cruise control controls.
28 Bonnet release control.
29 Controls for:
– electric headlight beam adjust-
ment,
– instrument panel lighting dimmer,
– lane departure warning,
– ESP and traction control system,
– heated steering wheel.
Page 82 of 328

1.76
VEHICLE SETTINGS CUSTOMISATION MENU (1/2)
Adjusting the settings
Select the function to modify:
a) unlocking the driver’s door;
b) automatic locking of the doors while driving;
c) hands-free function;
d) indicator audio volume;
e) internal welcome sound;
f) external welcome;
g) reading lamp in automatic mode;
h) configuration of the driving style indi- cator;
i) Active noise control.
Select “ON” or “OFF” to activate or de-
activate the function.
For the “Light brightness intensity”
function, select the intensity by press-
ing “+” or “-”.
Depending on the vehicle equipment,
this function allows you to activate/
deactivate and adjust some of the vehi-
cle’s functions.
Vehicles fitted with a
navigation system
Accessing the settings menu
With the vehicle at a standstill, using
the multifunction screen
1, select menu
“Vehicle”, “User settings” to access the
various settings.
1
For safety reasons, carry
out any adjustments when
the vehicle is stationary.
Page 83 of 328

1.77
VEHICLE SETTINGS CUSTOMISATION MENU (2/2)
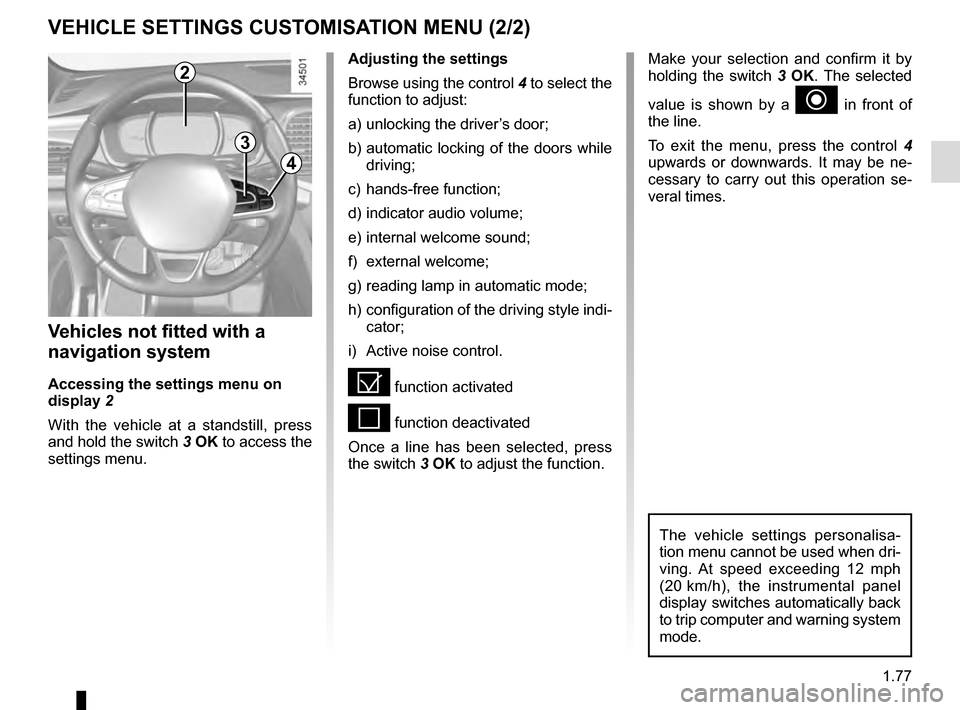
Adjusting the settings
Browse using the control 4 to select the
function to adjust:
a) unlocking the driver’s door;
b) automatic locking of the doors while driving;
c) hands-free function;
d) indicator audio volume;
e) internal welcome sound;
f) external welcome;
g) reading lamp in automatic mode;
h) configuration of the driving style indi- cator;
i) Active noise control.
= function activated
< function deactivated
Once a line has been selected, press
the switch 3 OK to adjust the function.
Vehicles not fitted with a
navigation system
Accessing the settings menu on
display 2
With the vehicle at a standstill, press
and hold the switch 3 OK to access the
settings menu.
2
3
4
Make your selection and confirm it by
holding the switch 3 OK. The selected
value is shown by a
~ in front of
the line.
To exit the menu, press the control 4
upwards or downwards. It may be ne-
cessary to carry out this operation se-
veral times.
The vehicle settings personalisa-
tion menu cannot be used when dri-
ving. At speed exceeding 12 mph
(20 km/h), the instrumental panel
display switches automatically back
to trip computer and warning system
mode.
Page 87 of 328

1.81
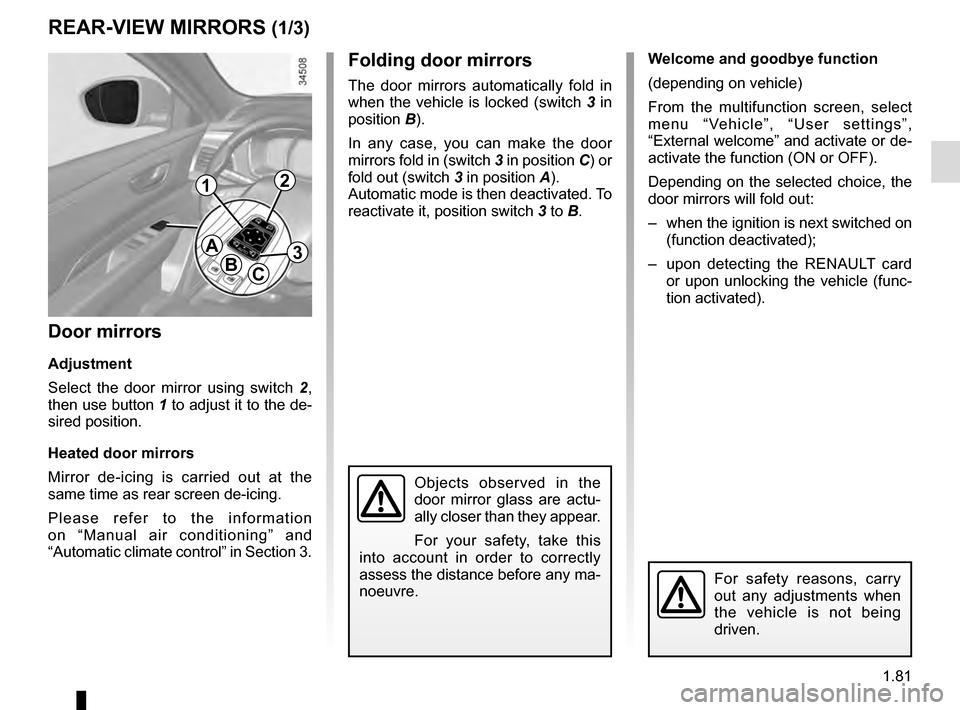
Folding door mirrors
The door mirrors automatically fold in
when the vehicle is locked (switch 3 in
position B).
In any case, you can make the door
mirrors fold in (switch 3 in position C) or
fold out (switch 3 in position A).
Automatic mode is then deactivated. To
reactivate it, position switch 3 to B.
REAR-VIEW MIRRORS (1/3)
Door mirrors
Adjustment
Select the door mirror using switch 2 ,
then use button 1 to adjust it to the de-
sired position.
Heated door mirrors
Mirror de-icing is carried out at the
same time as rear screen de-icing.
Please refer to the information
on “Manual air conditioning” and
“Automatic climate control” in Section 3.
For safety reasons, carry
out any adjustments when
the vehicle is not being
driven.
A
BC
12
3
Objects observed in the
door mirror glass are actu-
ally closer than they appear.
For your safety, take this
into account in order to correctly
assess the distance before any ma-
noeuvre.
Welcome and goodbye function
(depending on vehicle)
From the multifunction screen, select
menu “Vehicle”, “User settings”,
“External welcome” and activate or de-
activate the function (ON or OFF).
Depending on the selected choice, the
door mirrors will fold out:
– when the ignition is next switched on (function deactivated);
– upon detecting the RENAULT card or upon unlocking the vehicle (func-
tion activated).
Page 93 of 328

1.87
Operating faults
When the message “Check auto li-
ghting” appears on the instrument
panel, the system is deactivated.
Consult an approved dealer.
EXTERIOR LIGHTING AND SIGNALS (3/5)
Switching off the lights
There are two possibilities:
– manually, move ring 4 to position 0;
– the lights will go out automatically when the engine is switched off, the
driver’s door is opened or the vehicle
is locked. In this case, the next time
the engine is started the lights will be
switched back on according to the
position of the ring 4.
Lights-on reminder buzzer
A warning beep sounds when the dri-
ver’s door is opened to warn you that
the lights are still on.
Daytime running lights
function
The daytime running lights come on
automatically with no action on stalk 1
when the engine is started, and they go
off once the engine is switched off.
Operating faults
When the message “Check lighting”
with warning light
© is displayed
and warning light
k flashes on the
instrument panel, this indicates that
there is a lighting fault.
Consult an approved dealer.4
3
1