2016 RENAULT SCENIC mirror
[x] Cancel search: mirrorPage 141 of 270

3.1
Section 3: Your comfort
Air Vents . . . . . . . . . . . . . . . . . . . . . . . . . . . . . . . . . . . .\
. . . . . . . . . . . . . . . . . . . . . . . . . . . . . . . . . . 3.2
Manual air conditioning . . . . . . . . . . . . . . . . . . . . . . . . \
. . . . . . . . . . . . . . . . . . . . . . . . . . . . . . . . . . . 3.4
Automatic climate control . . . . . . . . . . . . . . . . . . . . . . . . . . . . . . . . . . . .\
. . . . . . . . . . . . . . . . . . . . . 3.6
Air conditioning: information and advice on use . . . . . . . . . . . . . . . . . . . . . . . . . . . . . . . . . . . .\
. . . . 3.11
Electric windows/Electric panoramic sunroof . . . . . . . . . . . . . . . . . . . . . . . . . . . . . . . . . . . .\
. . . . . . 3.12
Manual window winders/Interior lighting . . . . . . . . . . . . . . . . . . . . . . . . . . . . . . . . . . . .\
. . . . . . . . . . 3.15
Sun visor . . . . . . . . . . . . . . . . . . . . . . . . . . . . . . . \
. . . . . . . . . . . . . . . . . . . . . . . . . . . . . . . . . . . . . . . 3.17
Vanity mirror . . . . . . . . . . . . . . . . . . . . . . . . . . . . . . . . . . . .\
. . . . . . . . . . . . . . . . . . . . . . . . . . . . . . . 3.17
Passenger compartment storage/fittings . . . . . . . . . . . . . . . . . . . . . . . . . . . . . . . . . . . . \
. . . . . . . . . . 3.19
Accessories socket . . . . . . . . . . . . . . . . . . . . . . . . . . . . . . . . . . . .\
. . . . . . . . . . . . . . . . . . . . . . . . . . 3.25
Ashtray . . . . . . . . . . . . . . . . . . . . . . . . . . . . . . . . . . . .\
. . . . . . . . . . . . . . . . . . . . . . . . . . . . . . . . . . . 3.25
Cigarette lighter . . . . . . . . . . . . . . . . . . . . . . . . . . . . . . . . . . . . \
. . . . . . . . . . . . . . . . . . . . . . . . . . . . . 3.25
Adjusting the rear seats . . . . . . . . . . . . . . . . . . . . . . . . . . . . . . . . . . . . \
. . . . . . . . . . . . . . . . . . . . . . . 3.27
Luggage compartment. . . . . . . . . . . . . . . . . . . . . . . . . . .\
. . . . . . . . . . . . . . . . . . . . . . . . . . . . . . . . . 3.32
Rear parcel shelf: normal chassis versions . . . . . . . . . . . . . . . . . . . . . . . . . . . . . . . . . . . . \
. . . . . . . . 3.33
Luggage cover: long chassis versions. . . . . . . . . . . . . . . . . . . . . . . . . . . . . . . . . . . . \
. . . . . . . . . . . . 3.34
Luggage compartment storage space/fittings . . . . . . . . . . . . . . . . . . . . . . . . . . . . . . . . . . . .\
. . . . . . 3.35
Transporting objects: in the boot / towing . . . . . . . . . . . . . . . . . . . . . . . . . . . . . . . . . . . .\
. . . . . . . . . 3.37
Transporting objects: . . . . . . . . . . . . . . . . . . . . . . . . . . . . . . . . . . . . \
. . . . . . . . . . . . . . . . . . . . . . . . . 3.38 equipment . . . . . . . . . . . . . . . . . . . . . . . . . . . . . . . . . . . .\
. . . . . . . . . . . . . . . . . . . . . . . . . . . 3.38
Luggage net. . . . . . . . . . . . . . . . . . . . . . . . . . . . . . .\
. . . . . . . . . . . . . . . . . . . . . . . . . . . . . . . . . . . . . 3.39
Roof bars . . . . . . . . . . . . . . . . . . . . . . . . . . . . . . . . . . . . \
. . . . . . . . . . . . . . . . . . . . . . . . . . . . . . . . . . 3.41
Multimedia equipment . . . . . . . . . . . . . . . . . . . . . . . . . . . . . . . . . . . . \
. . . . . . . . . . . . . . . . . . . . . . . . 3.42
Page 144 of 270

3.4
MANUAL AIR CONDITIONING (1/2)
1234
56
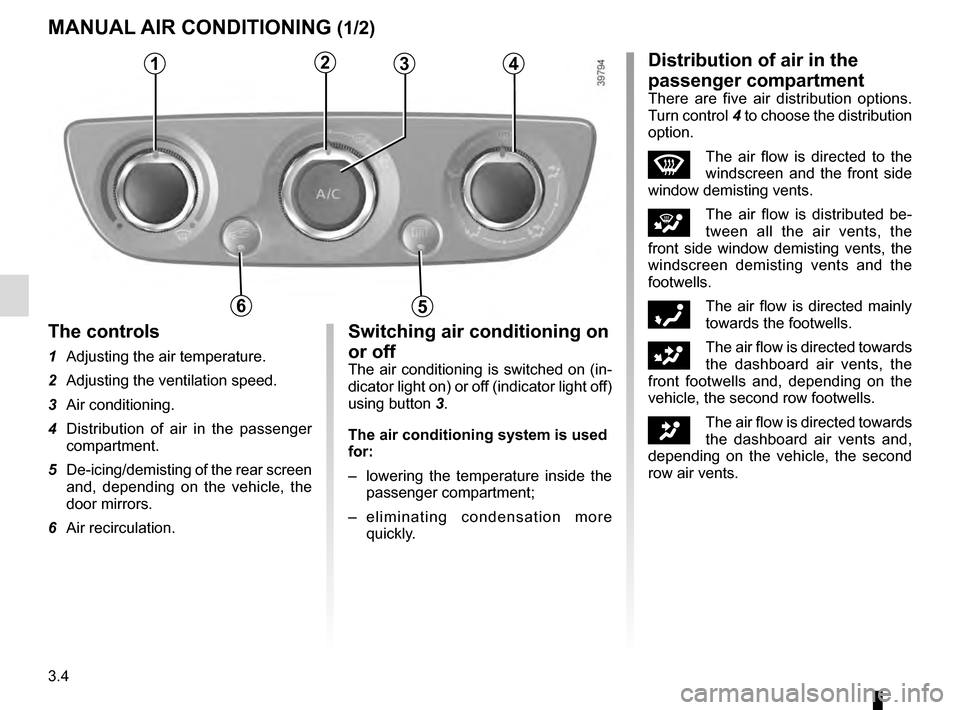
The controls
1 Adjusting the air temperature.
2 Adjusting the ventilation speed.
3 Air conditioning.
4 Distribution of air in the passenger compartment.
5 De-icing/demisting of the rear screen and, depending on the vehicle, the
door mirrors.
6 Air recirculation.
Switching air conditioning on
or off
The air conditioning is switched on (in-
dicator light on) or off (indicator light off)
using button 3.
The air conditioning system is used
for:
– lowering the temperature inside the
passenger compartment;
– eliminating condensation more quickly.
Distribution of air in the
passenger compartment
There are five air distribution options.
Turn control 4 to choose the distribution
option.
WThe air flow is directed to the
windscreen and the front side
window demisting vents.
iThe air flow is distributed be-
tween all the air vents, the
front side window demisting vents, the
windscreen demisting vents and the
footwells.
óThe air flow is directed mainly
towards the footwells.
GThe air flow is directed towards
the dashboard air vents, the
front footwells and, depending on the
vehicle, the second row footwells.
JThe air flow is directed towards
the dashboard air vents and,
depending on the vehicle, the second
row air vents.
Page 146 of 270

3.6
AUTOMATIC CLIMATE CONTROL (1/5)Automatic mode
The automatic climate control system
guarantees comfort in the passen-
ger compartment and good visibility
(except in the event of extreme condi-
tions), whilst optimising consumption.
The system controls the ventilation
speed, air distribution, air recircula-
tion, and starting and stopping the air
conditioning and air temperature. This
mode consists of a choice of three pro-
grammes:
AUTO: allows the selected comfort
level to be best attained, depending on
the exterior conditions. Press button 3.
SOFT: gently brings the temperature to
the desired comfort level. The comfort
level is then maintained gently and si-
lently. Press button 2.
FAST: increases the operation of the
system to reach the desired comfort
level more quickly. Use this programme
when you have passengers in the rear.
Press button 4.
13
4
9 De-icing/demisting of the rear screen
and, depending on the vehicle, the
door mirrors.
10 “Clear View” function.
11 Air recirculation.
12 Display.
13 Fan speed.
6
7891011
32
The controls
1 and 6 Air temperature.
2, 3 and 4 Automatic programmes.
5 Distribution of air in the passenger compartment.
7 Off button.
8 Air conditioning.
12
5
1
Page 147 of 270

3.7
AUTOMATIC CLIMATE CONTROL (2/5)
Varying the ventilation speed
In automatic mode, the system uses
the most suitable amount of air to reach
and maintain the desired comfort level.
You can still adjust the fan speed by
pressing the buttons 13 to increase or
reduce the fan speed.
In this case, the fan speed, which is
no longer controlled automatically, ap-
pears in zone A on the display 12.
Some buttons have an operating
tell-tale which indicates the opera-
ting status.
1
3
Temperature adjustment
Press button 1 or 6 to raise or lower the
left-hand 1 or right-hand 6 temperature.
Pressing button 3 for more than two se-
conds sets the passenger temperature
to the driver’s temperature.
Special note: The highest and lowest
settings allow the system to produce
maximum hot or cold temperature
levels (“LO” and “HI” indicated on the
multimedia display 12).
6
12
Clear View function
Press button 10: the integrated indica-
tor light comes on.
This function quickly demists and de-
ices the windscreen, the rear screen,
the front side windows, and the door
mirrors (depending on the vehicle). The
air conditioning and rear screen de-
icing functions must be activated.
Press button 9 to stop the heated rear
screen operating; the integrated indica-
tor goes out.
You can change the fan speed: press
the button 13.
To exit this function, press:
– the 10 button again;
– one of either button 2, 3 or 4.
109
24
A
13
Page 149 of 270

3.9
AUTOMATIC CLIMATE CONTROL (4/5)
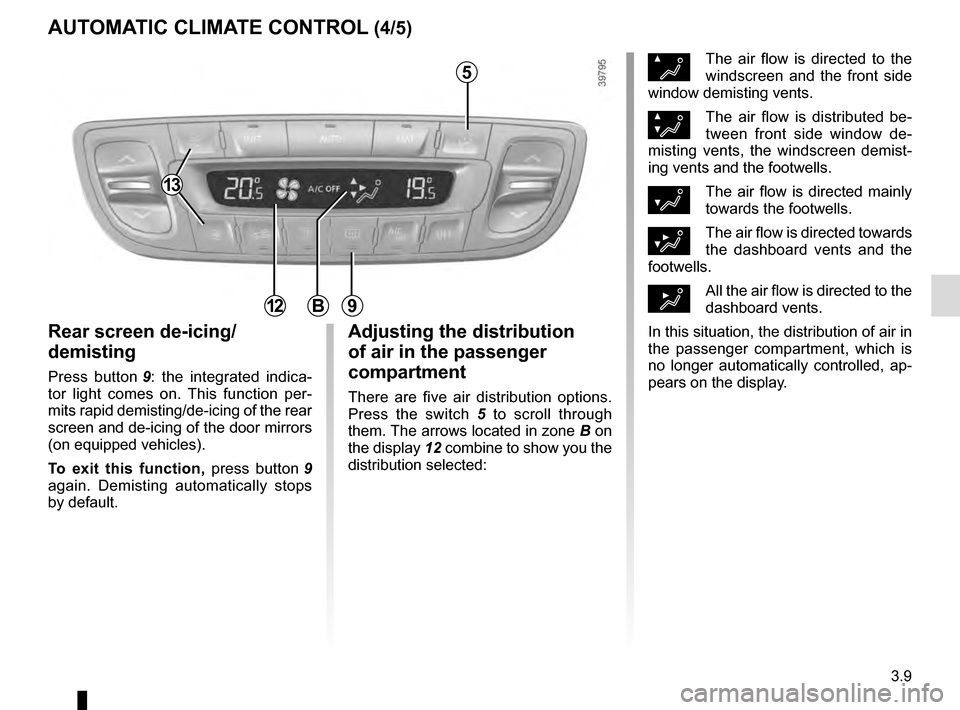
Rear screen de-icing/
demisting
Press button 9: the integrated indica-
tor light comes on. This function per-
mits rapid demisting/de-icing of the rear
screen and de-icing of the door mirrors
(on equipped vehicles).
To exit this function, press button 9
again. Demisting automatically stops
by default.
ØThe air flow is directed to the
windscreen and the front side
window demisting vents.
×The air flow is distributed be-
tween front side window de-
misting vents, the windscreen demist-
ing vents and the footwells.
¿The air flow is directed mainly
towards the footwells.
¾The air flow is directed towards
the dashboard vents and the
footwells.
½All the air flow is directed to the
dashboard vents.
In this situation, the distribution of air in
the passenger compartment, which is
no longer automatically controlled, ap-
pears on the display.9
Adjusting the distribution
of air in the passenger
compartment
There are five air distribution options.
Press the switch 5 to scroll through
them. The arrows located in zone B on
the display 12 combine to show you the
distribution selected:
5
B12
13
Page 157 of 270

3.17
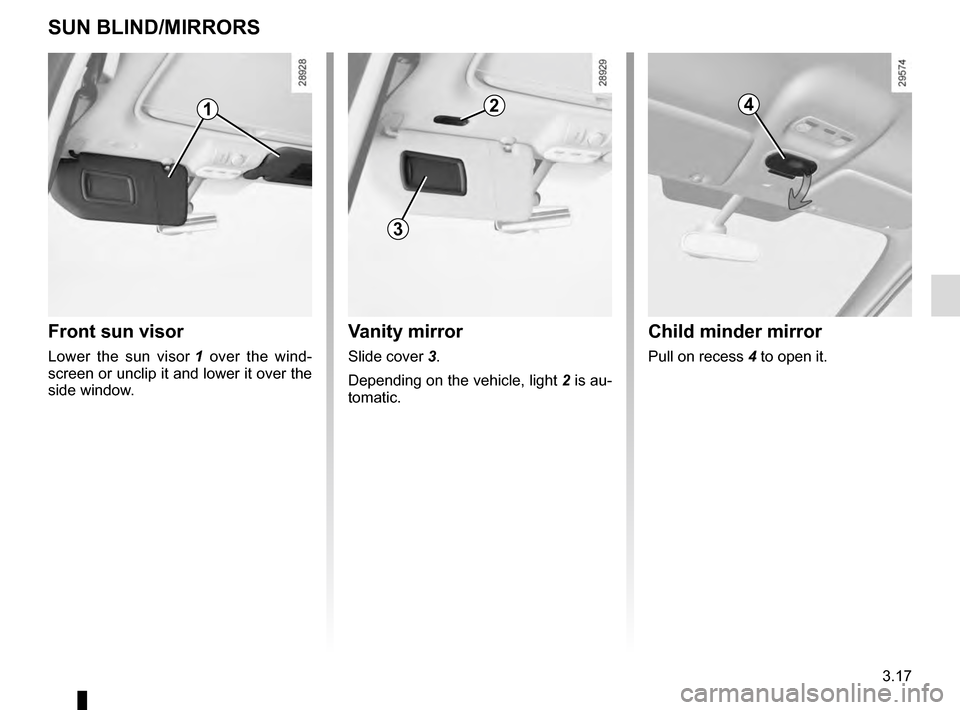
Vanity mirror
Slide cover 3.
Depending on the vehicle, light 2 is au-
tomatic.
SUN BLIND/MIRRORS
Child minder mirror
Pull on recess 4 to open it.
Front sun visor
Lower the sun visor 1 over the wind-
screen or unclip it and lower it over the
side window.
1
3
24
Page 198 of 270

4.16
Respect local regulations about wash-
ing vehicles (e.g. do not wash your ve-
hicle on a public highway).
Observe the vehicle stopping distances
when driving on gravelled surfaces to
prevent paint damage.
Repair, or have repaired quickly, areas
where the paint has been damaged, to
prevent corrosion spreading.
Remember to visit the body shop pe-
riodically in order to maintain your
anti-corrosion warranty. Refer to the
Maintenance Document.
If it is necessary to clean mechani-
cal components, hinges, etc., spray
them with products approved by our
Technical Department to protect them
after they have been cleaned.
BODYWORK MAINTENANCE (2/2)
We have selected special products
to care for your vehicle and you can
obtain these from the manufactur-
er’s accessory outlets.
Using a roller type car wash
Return the windscreen wiper stalk to
the Park position (refer to the informa-
tion on the “Windscreen washer, wiper”
in Section 1). Check the mounting of
external accessories, additional lights
and mirrors, and ensure that the wiper
blades are secured with adhesive tape.
Remove the radio aerial mast if your
vehicle is fitted with this equipment.
Remember to remove the tape and refit
the antenna after washing.
Cleaning the headlights
As the headlights are made of plastic
“glass”, use a soft cloth or cotton wool
to clean them. If this does not clean
them properly, moisten the cloth with
soapy water, then wipe clean with a soft
damp cloth or cotton wool.
Finally, carefully dry off with a soft dry
cloth.
Cleaning products containing alco-
hol must not be used.
Vehicles with a matte paint
finish
This type of paint requires certain pre-
cautions.
Do not do the following
– use wax-based products (polishing);
– rub hard;
– wash the vehicle in a roller-type car
wash;
– wash the vehicle using a high-pres-
sure device;
– attach stickers to the paintwork (risk
of leaving marks).
You should do the following
Wash the vehicle by hand using plenty
of water, using a soft cloth or a gentle
sponge.
Page 226 of 270

5.26
FUSES (2/2)
Some accessories are protected by
fuses located in the engine compart-
ment in fuse box C.
However, because of their reduced ac-
cessibility, we advise you to have your
fuses replaced by an approved Dealer.Allocation of fuses(the presence of certain fuses depends
on the vehicle equipment level)
1 Electronic parking brake;
2 Brake lights;
3 Automatic door locking;
4 Driver’s window winder;
5 Instrument panel;
6 Direction indicator lights;
7 Navigation system;8 Interior rear-view mirror;
9 Rear screen wiper;
10 and 11
Rear electric windows;
12 ABS/ESC ;
13 Passenger electric window;
14 Windscreen washer;
15 Heated door mirrors;
16 Radio;
17 Luggage compartment accessories
socket;
18 Rear seat accessories socket;
19 Cigarette lighter.
1
2
3
4
5
6
7
8
9
10
11
12
13
14
15
16
17
18
19
C